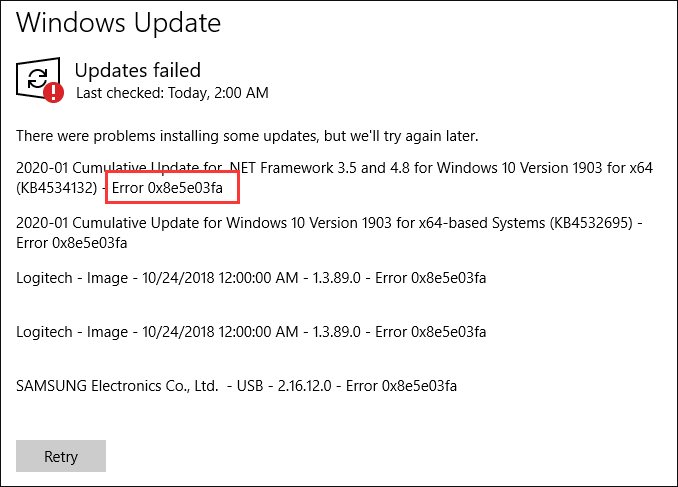
Various problems have been reported with the process of Windows update, and the error 0x8e5e03fa is one of them. To help users effectively fix the Windows update error 0x8e5e03fa, MiniTool Partition Wizard puts together some solutions in this article.
Updating Windows should be a common operation for users. By updating Windows to the latest version, users may get some new features and certain patches for potential bugs and thus make their Windows more user-friendly.
However, sometimes Windows update cannot proceed smoothly and gives various annoying error codes, such as 0xC1900209 and 0xc1900130. Today, you will learn about another Windows update error: the error code 0x8e5e03fa, and get some corresponding solutions.
This error has been reported on Windows 10 and previous versions for Windows and the solutions to the error on different Windows version are almost the same. In the following contents, I will take Windows 10 as an example to show you how to fix the Windows update error 0x8e5e03fa.
Fix 1: Run Windows Update Troubleshooter
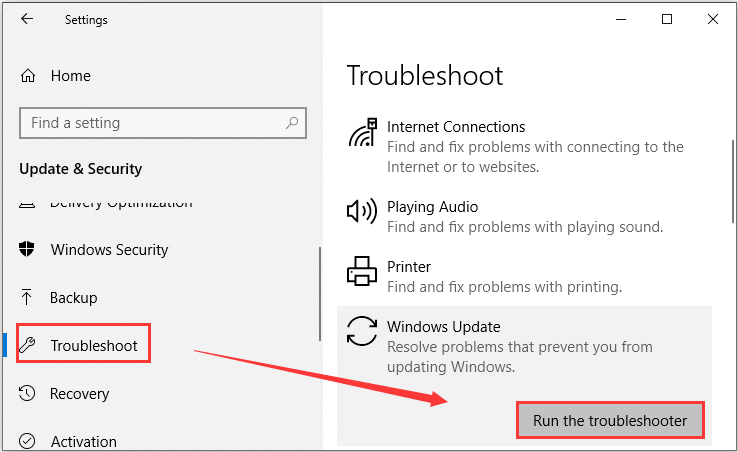
Windows 10 provides troubleshooters to help users deal with different type of problems. As for any problems related to the process of Windows update, you can use the Windows Update troubleshooter. Here’s how to do that:
Step 1: Press Windows + I to open Windows Settings.
Step 2: Choose Update & Security category and then click Troubleshoot section.
Step 3: In the right pane, select Windows Update and hit Run the troubleshooter.
Wait for the process to complete. Then, try updating Windows again to check if the error code 0x8e5e03fa disappears. If the process still fails with the error code, just move on to the next fix.
Fix 2: Reset Windows Update Components
If you encounter certain problems during Windows update, you can try resetting Windows Update components. And the components might be used by the core services related to Windows Update feature, including Windows Update, Cryptographic Services, Background Intelligent Transfer Service, and Windows Installer.
So, you need to stop these services before resetting components. If you don’t know how to do that, just proceed with the following instructions.
Step 1: Press Windows + R, input cmd and press Ctrl + Shift + Enter to open Command Prompt as administrator.
Step 2: Input the following commands and press Enter after each to stop the involved services.
- net stop wuauserv
- net stop cryptSvc
- net stop bits
- net stop msiserver
Step 3: Then, execute the following commands to reset SoftwareDistribution and Cartroot2 folders.
- ren C:WindowsSoftwareDistribution SoftwareDistribution.old
- ren C:WindowsSystem32catroot2 Catroot2.old
Step 4: Finally, restart these services by running the command below:
- net start wuauserv
- net start cryptSvc
- net start bits
- net start msiserver
Fix 3: Run SFC And DISM Scan
The Windows update error 0x8e5e03fa might also appear if certain related system files are missing or corrupted. The good news is that you can use the System File Checker (SFC) to fix the issue.
Just launch Command Prompt as administrator and execute the command sfc /scannow. This tool will scan your system files and automatically replace the problematic ones with a cached copy. The scanning process will take some time and you need to wait patiently until it is completed.
After that, restart your computer and check if the error 0x8e5e03fa is fixed. If the error still exists, you can continue performing a DISM scan. You need to run Command Prompt with administrative privilege and run the command line Dism /Online /Cleanup-Image /RestoreHealth.
Once it’s done, restart the system and check if you can update Windows without the error code 0x8e5e03fa.
Fix 4: Use the Built-in Administrator Account
Some users also recommend updating Windows within the built-in administrator account. This method won’t solve the problem from the root cause, but can help you smoothly complete Windows update. So, it is worth a try. Just follow the steps below:
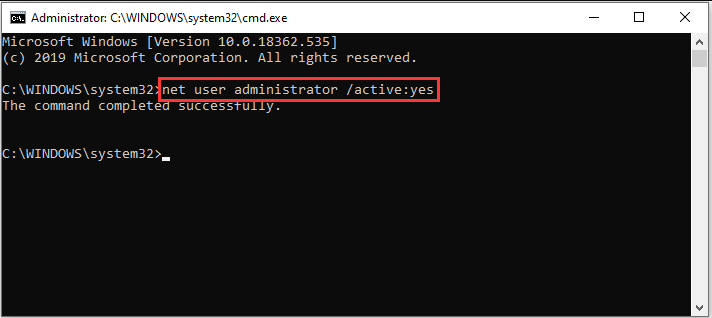
Step 1: Launch Command Prompt as administrator.
Step 2: Type the command net user administrator /active:yes and press Enter to enable the built-in administrator account.
Step 3: Now, log out of Windows and log in with the enabled administrator account.
Step 4: Try update your Windows.

Fix 5: Install Windows Update Manually
If all the above methods fail to resolve the error for you, perhaps you need to install the updates manually. Just visit Microsoft website to search and download the updates you need as per your Windows version. Then, launch the downloaded files and follow the given instructions to installed the updates.
User Comments :