If you find that the WUDFHost.exe is taking up many CPU resources of your system, this article could be helpful for you. Here, MiniTool Partition Wizard lists some methods that you can use to fix the WUDFHost.exe high CPU problem. The detailed instructions are also displayed for you.
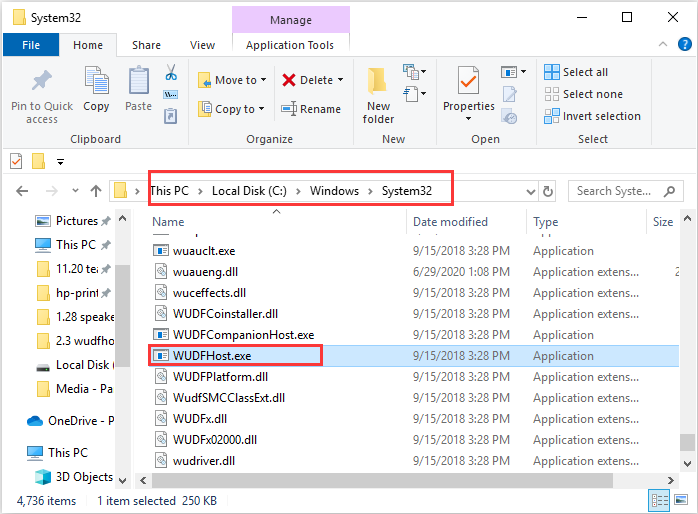
The WUDFHost.exe file is a trustworthy software component of Microsoft Windows. As a critical system process, WUDFHost.exe is associated with the Windows User-Mode Driver Framework Host which is the communication agent for hardware devices on Windows operating system. Commonly, you can find the file in the path of C:WindowsSystem32.
This process can provide stability for your computer and doesn’t cause any harm to your device. However, some users are experiencing the WUDFHost.exe high CPU usage and the system cannot run properly. How to fix the problem? Below are some feasible solutions to WUDFHost.exe high CPU usage Windows 10, and you can try them one by one.
Fix 1: Scan for Virus and Malware
Although the WUDFHost.exe itself is safe and won’t harm your system, some viruses or malware may be disguised as WUDFHost to escape detection and prevent your system work properly. So, if you notice the abnormal CPU usage by WUDFHost.exe, you can use antivirus software to scan for viruses and malware.
If you don’t have any third-party security application, you can make use of the built-in Windows Defender antivirus. Here’s what you need to do:
Step 1: Press Windows + I to open Settings.
Step 2: Navigate to Update & Security > Windows Security and click Virus & threat protection in the right pane.
Step 3: In the pop-up window, click Scan options. Then, choose Full scan and click the Scan now button.
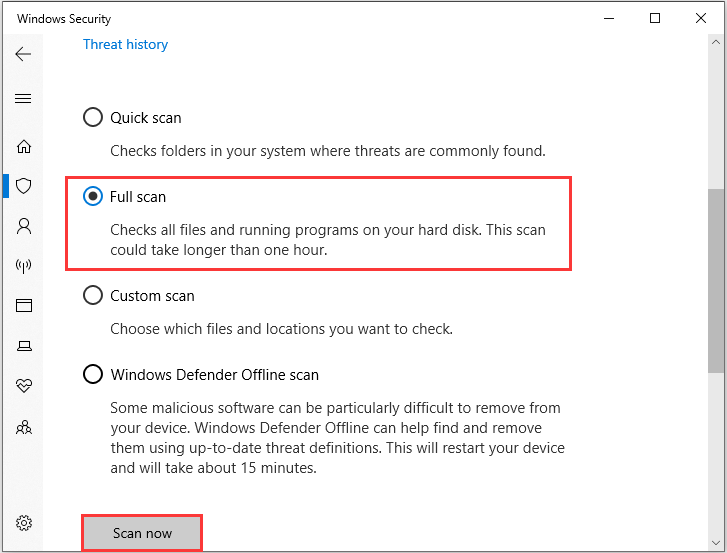
This tool will start checking all files and running programs on your hard disk, and you just need to wait for the process to complete.
Fix 2: Disable Intel Wireless Gigabit 17265 User Mode Driver
According to the reports from some affected users, the Intel Wireless Gigabit User Mode Driver could also lead to the WUDFHost.exe high CPU and they’ve fixed the problem by disabling the driver.
If you are using the driver on your Windows 10 computer, you can disable it by following the steps below.
Step 1: Right-click the Start button and choose Device Manager to open it.
Step 2: Double-click the Intel Wireless Gigabit Drivers category to expand it.
Step 3: Right-click your Intel Wireless Gigabit User Mode Driver and choose Disable device.
Step 4: Click the Yes button in the pop-up dialog to confirm the operation.
After that, you can restart your computer and check if the CPU usage by WUDFHost.exe goes down. If the problem still exists, you can re-enable the driver and move on to the next solution.
Fix 3: Use System File Checker
System File Checker is a Windows built-in utility that helps users to scan protected system files and repair the missing or corrupted ones by replacing them with the cached copy. If you encountered the WUDFHost.exe high CPU, you can also use the utility to solve the problem.
You just need to:
Step 1: Press Windows + R to invoke the Run window.
Step 2: Input cmd and press Ctrl + Shift + Enter to open Command Prompt as an administrator.
Step 3: Type the command sfc /scannow and press Enter to start the system scan.
Wait patiently until the verification is 100% completed. Then, you can restart your computer and open Task Manager to check if the WUDFHost.exe high CPU usage problem is resolved.
Fix 4: Disable NFC
The NFC is another factor that may trigger the WUDFHost.exe high CPU usage. To solve the problem, you can go to disable it on your computer. Just navigate to Windows Settings > Network & Internet > Airplane mode and toggle off the button of NFC in the right pane.
Fix 5: Clean Boot Your Computer
Besides, if there are some potential software conflicts on your computer, you might also encounter the WUDFHost.exe high CPU issue. If the problem appears just after you install a certain application, you can try disabling or uninstalling it. If you cannot find out the problematic software, you can clean boot your computer.
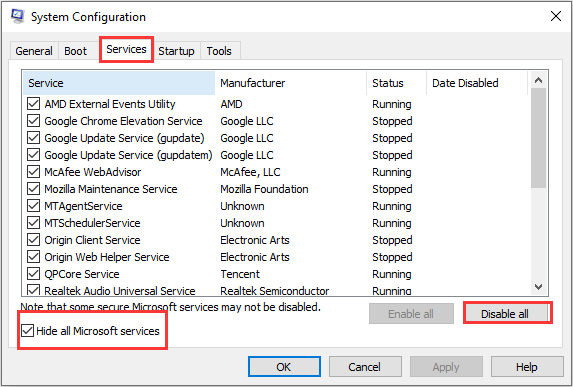
Step 1: Open the Run window, input msconfig, and click OK to open System Configuration.
Step 2: Under the Services tab, click Hide all Microsoft services and click Disable all.
Step 3: Switch to the Startup tab and click Open Task Manager. In the new window, disable all the listed programs.
Step 4: When you go back to the previous window, click Apply and OK to save changes. Then, click the Restart button to apply these changes.
If the WUDFHost.exe high CPU issue is resolved successfully, you can go to enable these disabled services and programs one by one to figure out the problematic one. Then, you can keep the item disabled or remove it from your computer.

User Comments :