
You may need to wipe a BitLocker drive. This post shows you how to do that by using MiniTool Partition Wizard, performing a full format, and running the DiskPart clean all command. To protect data and wipe the drive smoothly, you should learn things to do before wiping.
BitLocker is a Windows built-in full-disk encryption feature used to encrypt both internal hard drives and external storage devices, including USB flash drives and portable hard disks.
It can prevent unauthorized users from accessing files in the encrypted drive without the correct password, PIN, recovery key, or other approved authentication method.
You may need to wipe a BitLocker-encrypted drive in some cases. For example:
- Sell, donate, or recycle your computer or storage device.
- Forgot the BitLocker password or recovery key.
- Fix a corrupted or unreadable BitLocker drive.
- And so on.
Things to Do Before Wiping a BitLocker Drive
To ensure the BitLocker drive wiping proceeds smoothly and without accidental data loss, you need to be aware of the following points before starting the process.
#1. Back Up Important Files
Drive wiping will permanently erase all stored information by overwriting the entire drive with random strings or zeros. As a result, data recovery is usually impossible.
Therefore, if there is important data on the BitLocker drive, please back it up to a safe location first, such as another disk or cloud storage.
#2. Make Sure the Drive Is Not Write-Protected
If the BitLocker-encrypted drive is read-only, the wiping may fail. To check if the disk is read-only, open DiskPart from Windows Search. Then, run the following commands:
- List disk
- Select disk * (* is the disk number of the BitLocker disk)
- Attributes disk
If the Read-only is Yes, the disk is write-protected. To remove write protection, run Attributes disk clear readonly.
#3. Make Sure the Drive Is Not in Use
The wiping operation may also fail when the BitLocker drive is in use. You need to close any programs currently using the drive. If it still shows as in use after doing so, try restarting your computer.
If you need to wipe the BitLocker-encrypted C drive or the system disk, you must prepare a bootable USB drive. Then, use the bootable USB drive to wipe the original C drive or system drive.
How to Wipe a BitLocker Encrypted Drive
Can you wipe a BitLocker drive? The answer is Yes. You can try the following 3 methods to do that.
| Methods | Wiping Object | Suitable for |
| MiniTool Partition Wizard | The BitLocker-encrypted partition or the entire disk | Both internal and external hard drives, USB drives, etc. |
| Full Format | The BitLocker-encrypted partition | Both internal and external hard drives, USB drives, etc. |
| DiskPart Clean All | The entire disk | External hard drives and USB drives |
Method 1. Use MiniTool Partition Wizard
MiniTool Partition Wizard is an all-in-one disk and partition management tool. It allows you to manage BitLocker drives with features such as formatting, deleting, moving/resizing, extending, copying, and wiping.
Here is how to wipe a BitLocker drive using this software.
MiniTool Partition Wizard FreeClick to Download100%Clean & Safe
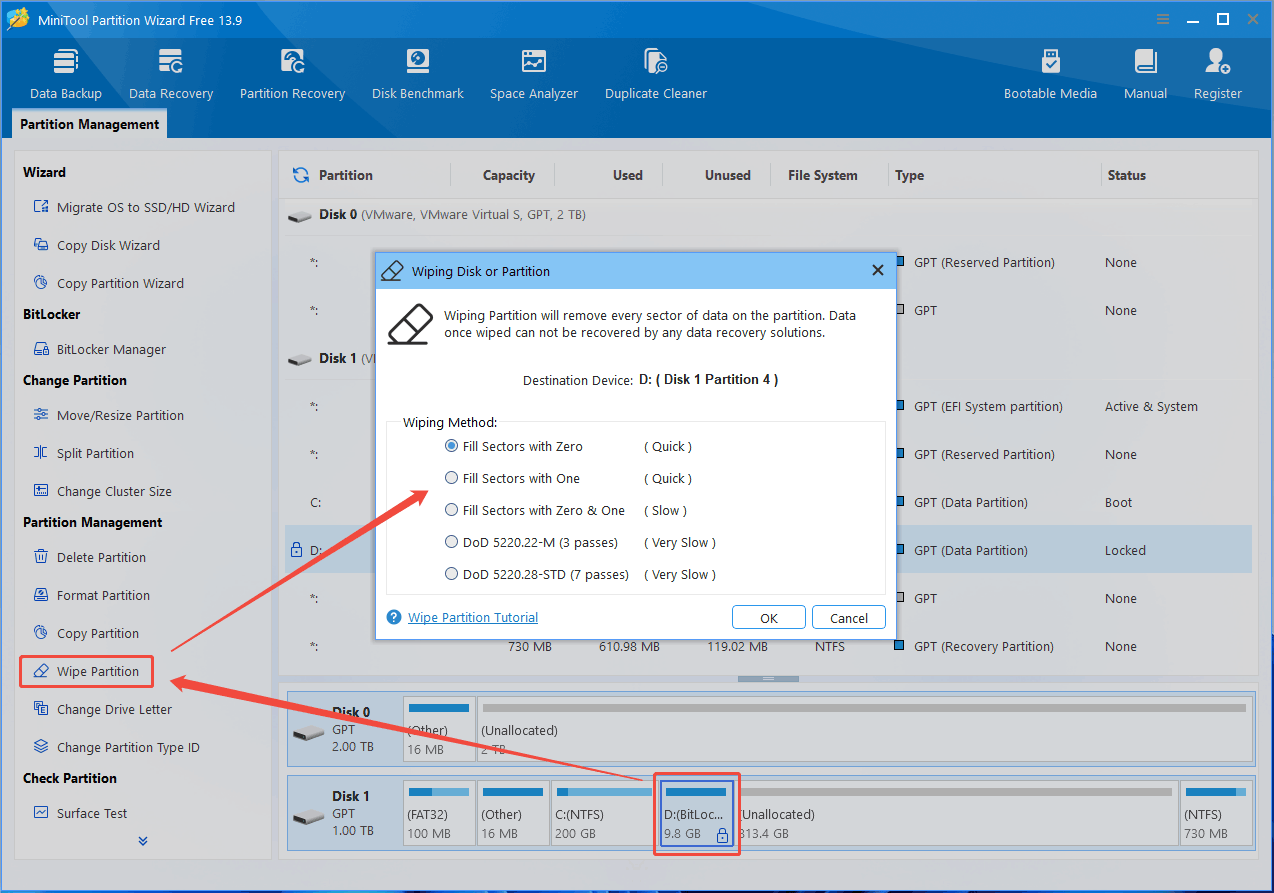
#1. Wipe a BitLocker-encrypted partition in an internal hard drive
- Launch MiniTool Partition Wizard.
- Select the BitLocker-encrypted partition on the internal drive.
- Click Wipe Partition in the action panel.
- Select a wiping method and click OK.
- Click Apply to execute the wiping operation.
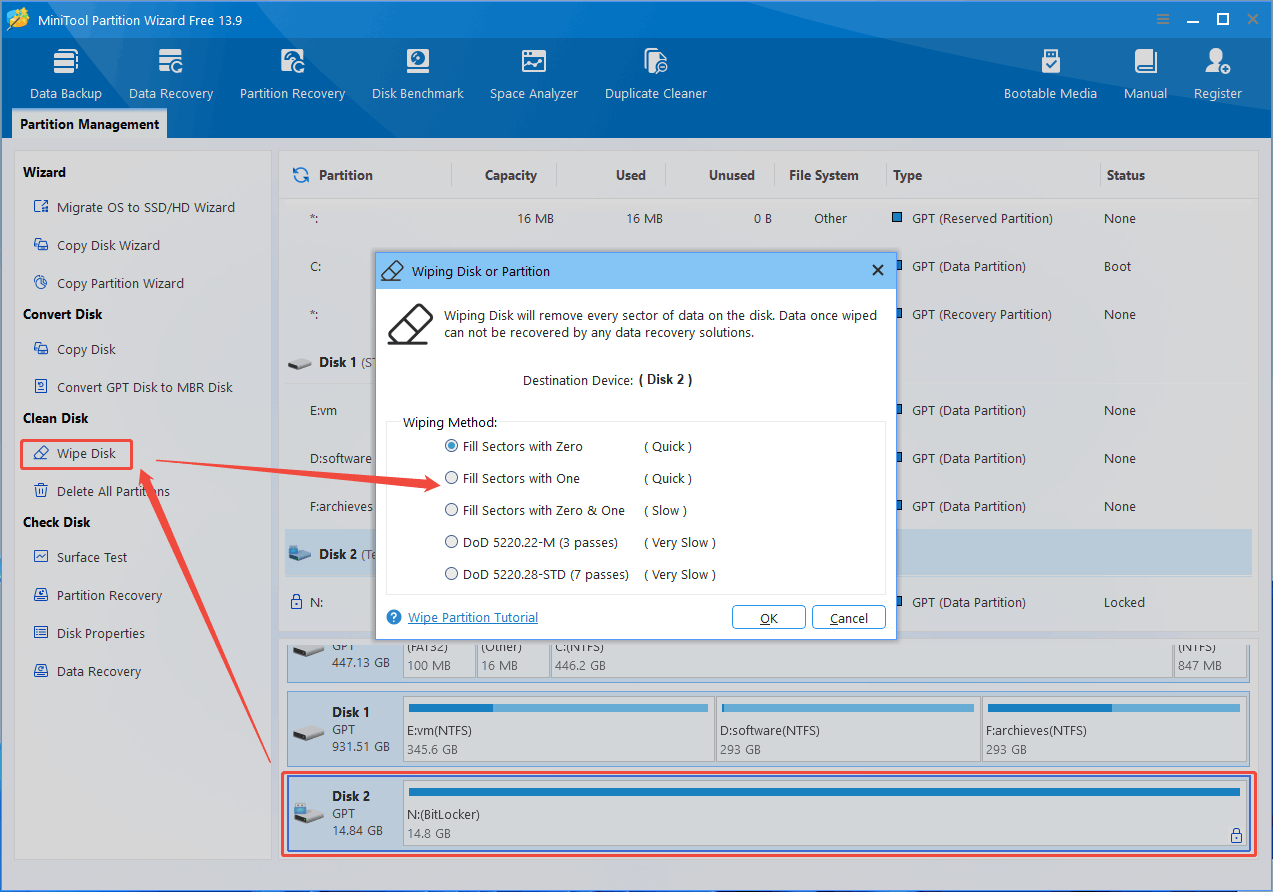
#2. Wipe an entire disk
- In MiniTool Partition Wizard, select the BitLocker-encrypted USB drive or external drive (the entire disk).
- Click Wipe Disk.
- Select a wiping method and click OK.
- Click Apply.
Method 2. Perform Full Format
Unlike quick format, full format will write zeros over every sector to destroy old data. Therefore, it can also wipe the BitLocker drive.
File Explorer, Disk Management, and DiskPart can perform a full format. Here are the guides.
#1. File Explorer
- Press Win + E to open File Explorer.
- Under This PC, right-click the BitLocker drive and choose Format.
- Untick the Quick Format option.
- Click Start and OK.
#2. Disk Management
- Open Disk Management from Windows Search.
- Right-click the BitLocker-Encrypted drive and choose Format.
- Untick the Perform a quick format option.
- Click OK and then OK again.
#3. DiskPart
Open DiskPart from Windows Search. Then, run the following commands one by one.
- list disk
- select disk * (* is the number of the disk where the BitLocker-encrypted partition is located)
- list partition
- select partition # (# is the partition number of the BitLocker-encrypted partition)
- format fs=ntfs (you can also replace ntfs with fat32 or exfat)
Method 3. Use DiskPart Clean All
The DiskPart clean all command will completely erase a disk by overwriting all sectors with zeros, rendering previous data unrecoverable.
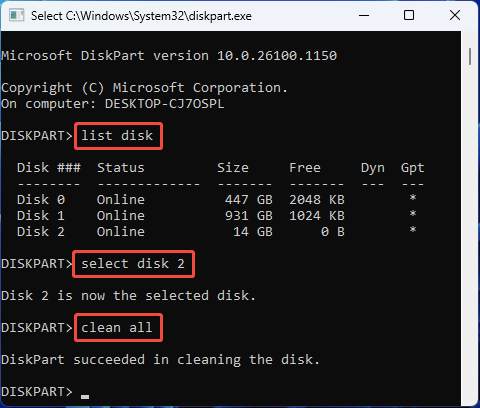
You can open DiskPart from Windows Search. Then, run the following commands to wipe a BitLocker disk.
- List disk
- Select disk * (* is the disk number of the BitLocker disk)
- Clean all
DiskPart can run in WinPE. Therefore, you can also use it to wipe the BitLocker-encrypted C drive and system disk. To do that, you need to:
- Create a Windows installation USB drive.
- Boot the PC from the USB drive.
- Once the Windows Setup wizard opens, press Shift + F10 to open Command Prompt.
- Type “diskpart” and press Enter to call DiskPart. Then, run these commands to wipe the BitLocker drive.
Wipe BitLocker Drive FAQ
Wiping permanently deletes all files, partitions, and encryption information, leaving you with a clean drive. Choose decryption if you want to keep your data, and wiping if you want to erase everything.
Bottom Line
This post offers 3 methods to wipe a BitLocker drive. To ensure the wiping proceeds smoothly, it also explains the preparatory work before the wiping. Among these methods, MiniTool Partition Wizard is recommended for its flexibility and powerful features.
If you encounter issues when using this software, contact our support team via [email protected] for help.
About The Author

Position: Columnist
Linda has been an editor at MiniTool for seven years. She continuously learns about computers and puts her knowledge into practice. Moreover, she is particularly knowledgeable in disk management, data recovery, system installation, and PDF editing. Her articles typically reference multiple examples or are based on her own experience, providing users with the most suitable solutions.
User Comments :