This guide provides a complete walkthrough for upgrading your PC from Windows 10 to Windows 11. It covers checking eligibility, preparing with a full backup, and outlines three distinct upgrade methods. The article also addresses common installation errors and post-upgrade steps, ensuring a smooth transition while protecting your data.
Windows 10 Support to End Soon
Microsoft has officially announced that free support for Windows 10 ended on October 14, 2025. This means your Windows 10 PC no longer receives critical security updates soon, leaving it more vulnerable to viruses and cyberattacks.
Upgrading to Windows 11 isn’t just about new features – it also keeps your device secure, stable, and brings plenty of other benefits.
- Windows 11 features a more modern and streamlined user interface, with a redesigned Start menu and taskbar that provide a fresh user experience.
- The new system is also optimized for better performance, with faster boot process and more efficient multitasking.
- Most importantly, Windows 11 includes enhanced security features to better protect your personal data.
To ensure a smooth upgrade process, you may need some preparation. You might consider using third-party tools like MiniTool products to help with system checks, data backup, and resolving potential compatibility issues, which can make the entire process much smoother.
Check if Your PC Is Eligible for Windows 11
Before you start, check if your PC can run Windows 11. Microsoft has set specific hardware requirements, and if your PC doesn’t meet them, you won’t be able to upgrade.
Key Requirements for Windows 11
- Processor: 1 gigahertz (GHz) or faster with two or more cores on a compatible 64-bit processor or System on a Chip (SoC).
- Memory (RAM): 4 GB or more.
- Storage: 64 GB or more of free space.
- System Firmware: UEFI, Secure Boot capable.
- TPM: Trusted Platform Module (TPM) version 2.0.
- Graphics card: Compatible with DirectX 12 or later with WDDM 2.0 driver.
- Display: High definition (720p) display that is at least 9” diagonally, 8 bits per color channel.
- Internet connection: Internet connection is required to perform updates and to download or use certain features.
Source: Windows 11 requirements | Microsoft Learn
Option 1. Check in Windows Update
Using the Windows Update function is another direct way to check your PC’s eligibility for a Windows 11 upgrade. In fact, this is how most users will be notified that the update is ready.
How to Check with Windows Update?
Step 1. Go to Settings: Click the Start button, then select Settings > Update & Security.
Step 2. Check for updates: On the Windows Update page, click the Check for updates button (or click Resume updates if your Windows 10 updates are paused).
Step 3. If your PC meets all the minimum system requirements, you will see a banner at the top of the page that says, “This PC can run Windows 11.” A Download and install option will then appear.
Step 4. If your PC is not eligible, Windows Update will display a message stating, “This PC doesn’t currently meet the minimum system requirements for Windows 11.”
Option 2. Use the PC Health Check App
Microsoft also provides a free tool for Windows 11 upgarde check, which is PC Health Check. Using the PC Health Check app is the easiest way to see if your PC can run Windows 11. It’s a free, official tool from Microsoft that checks all the system requirements for you.
Here’s how to use it:
Step 1. Download and Install the App
The PC Health Check app is available directly from Microsoft.
- Go to the official Windows 11 website.
- Scroll down to the Check for compatibility section (at the bottom of the page).
- Click the Download PC Health Check App button.
- Once the download is complete, open the file named WindowsPCHealthCheckSetup.msi.
- Follow the on-screen instructions to install the application.
Step 2. Run Windows 11 Compatibility Check
After installing the app, it’s very easy to perform the check.
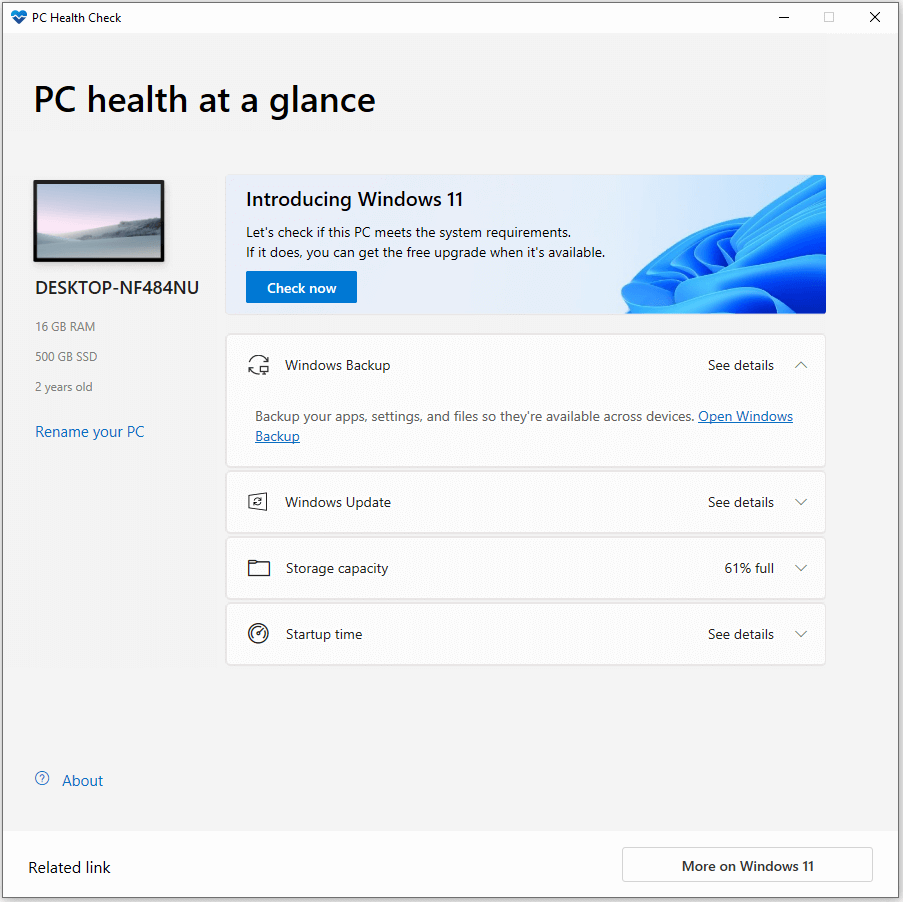
- Open the PC Health Check app.
- On the main screen, find the Introducing Windows 11 section at the top.
- Click the Check now button. The app will quickly analyze your hardware and display the results.
Step 3. Understand the Results
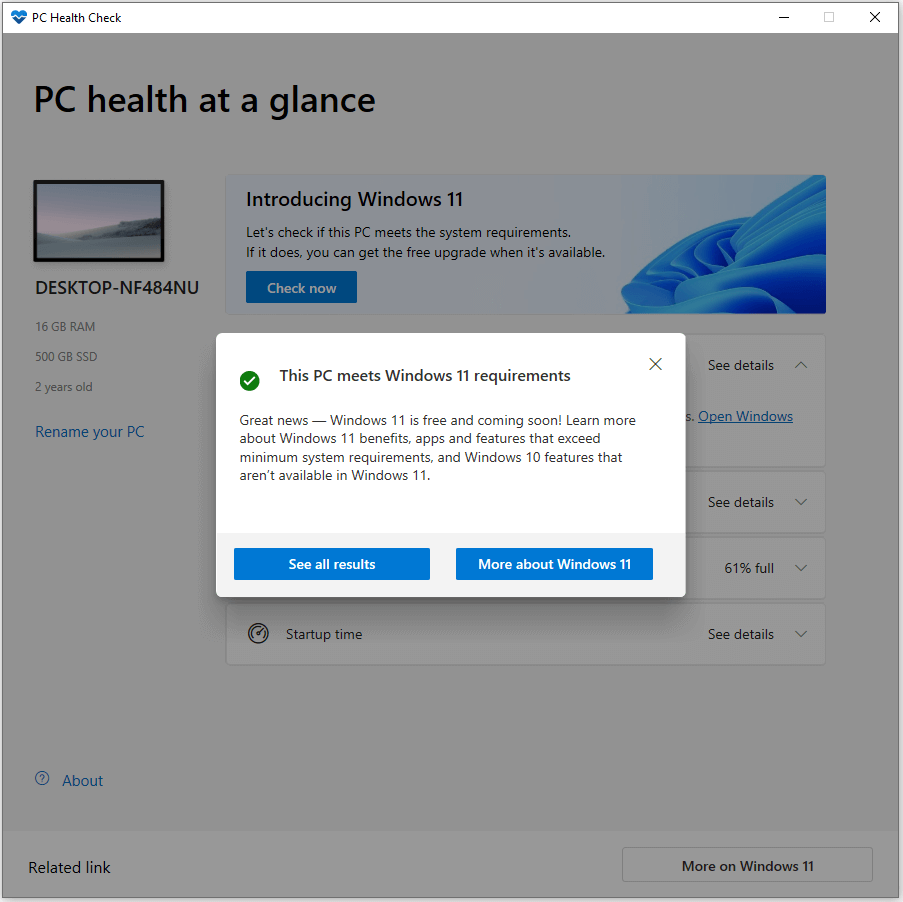
Within seconds, the app will show you either result:
- “This PC meets Windows 11 requirements”: A green checkmark at the top means your computer is ready to upgrade. You’ll be able to install Windows 11 when it’s available for your device.
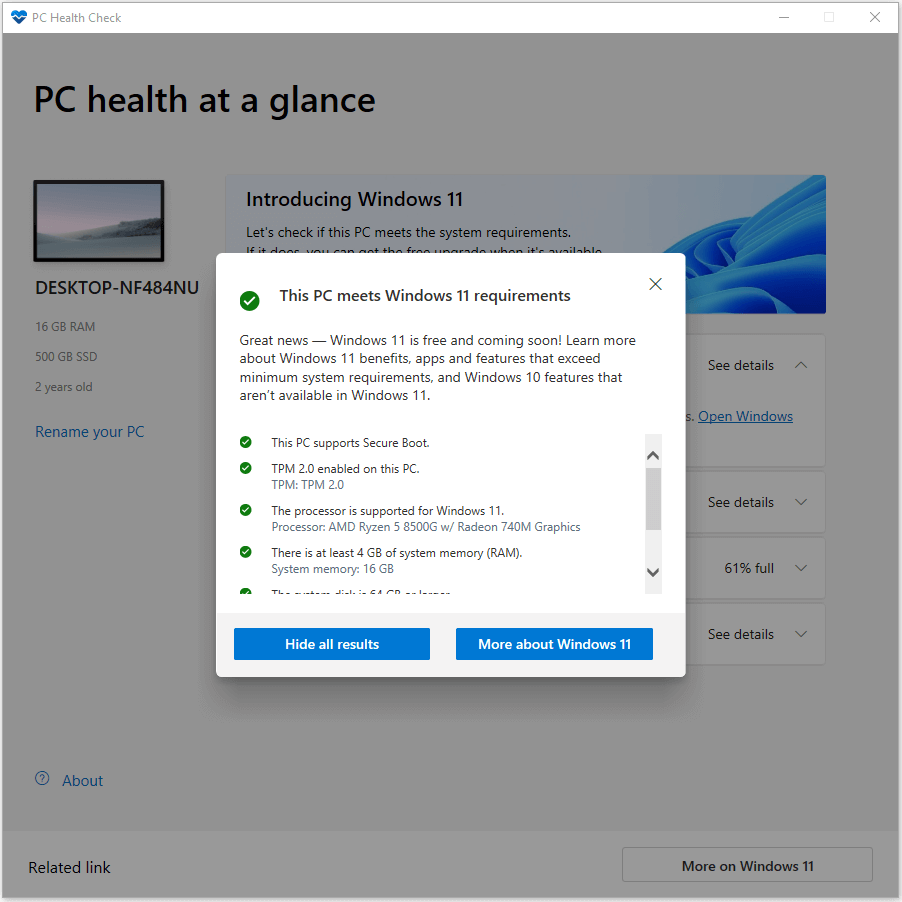
- “This PC doesn’t currently meet Windows 11 system requirements”: A message with a red “X” at the top means your PC isn’t ready. If your PC fails the check, click See all results to get more details on why it is not compatible. Items that do not meet the upgrading requirements will also be listed below, such as the processor, RAM, or TPM.
To get the upgrade immediately, use the official Windows 11 Installation Assistant tool from Microsoft's website. It lets you bypass the waiting period and start the upgrade right away on eligible PCs.
Prepare Before Upgrading to Windows 11
Before you start the upgrade, it’s crucial to prepare your PC. This will help ensure a smooth system transition and prevent any potential data loss.
1. Create a Full System Backup
A failed upgrade can sometimes lead to data loss. The safest way to protect your files and your entire system is to create a full system backup. This backup acts as a time machine – you can take your PC back to how it was before the upgrade if something goes wrong.
You can use free backup tool like MiniTool ShadowMaker to create a backup of your entire system in just a few clicks.
MiniTool ShadowMaker TrialClick to Download100%Clean & Safe
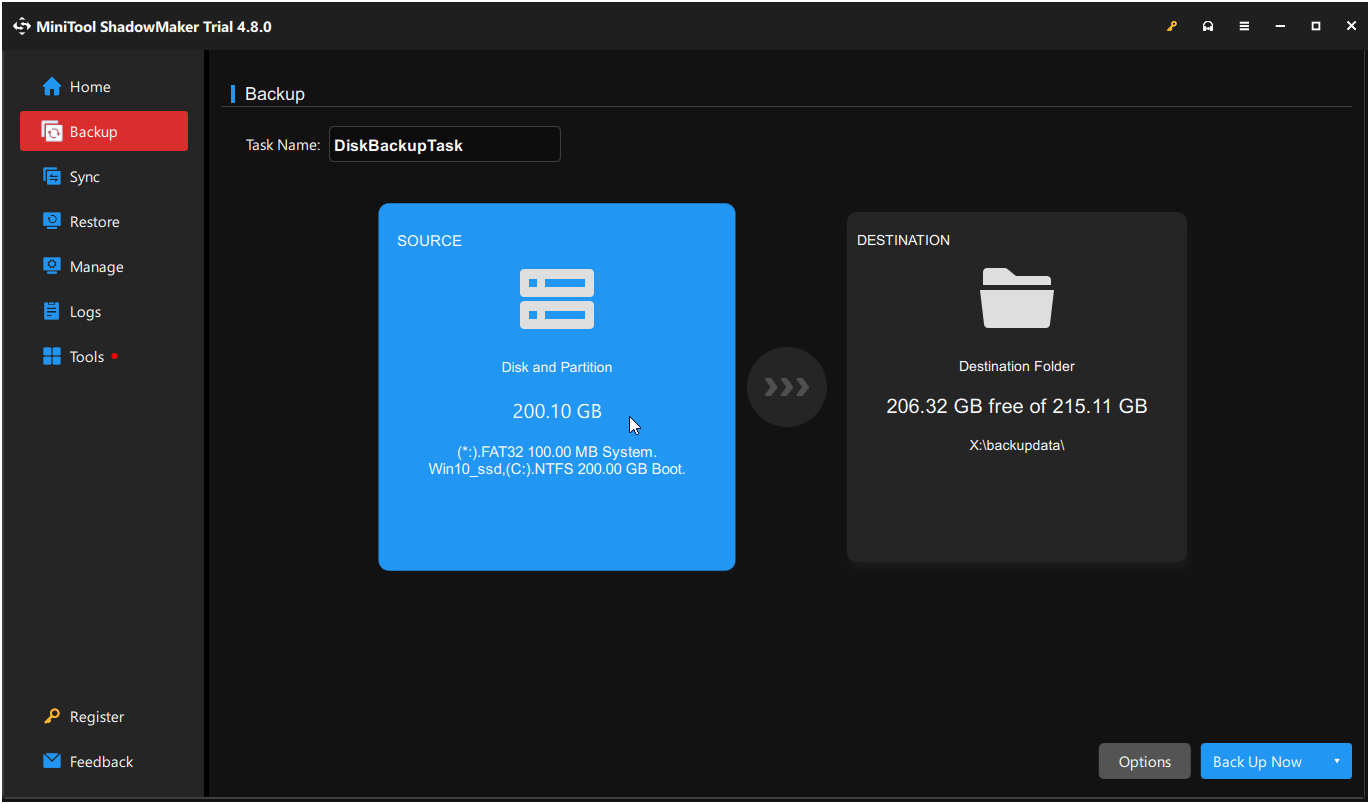
Step 1. Install and launch MiniTool ShadowMaker.
Step 2. In the Backup tab, confirm the system partitions are selected as backup source by default.
Step 3. Choose a destination, such as an external drive.
Step 4. Click Back up Now to start creating your system backup.
2. Check and Manage Disk Space
Windows 11 requires at least 64GB of free space. To avoid error message saying “there’s not enough space”, you’ll need to clear some room on your system drive.
In this case, you can use professional partition manager like MiniTool Partition Wizard to check your disk space, extend your system partition, or remove unnecessary files from the system drive. This ensures you have plenty of room for the upgrade files and the new operating system.
And before that, you are suggested to use MiniTool Partition Wizard full editions to create a bootable media first for system rescue. Then, feel free to do the following operations using MiniTool.
MiniTool Partition Wizard DemoClick to Download100%Clean & Safe
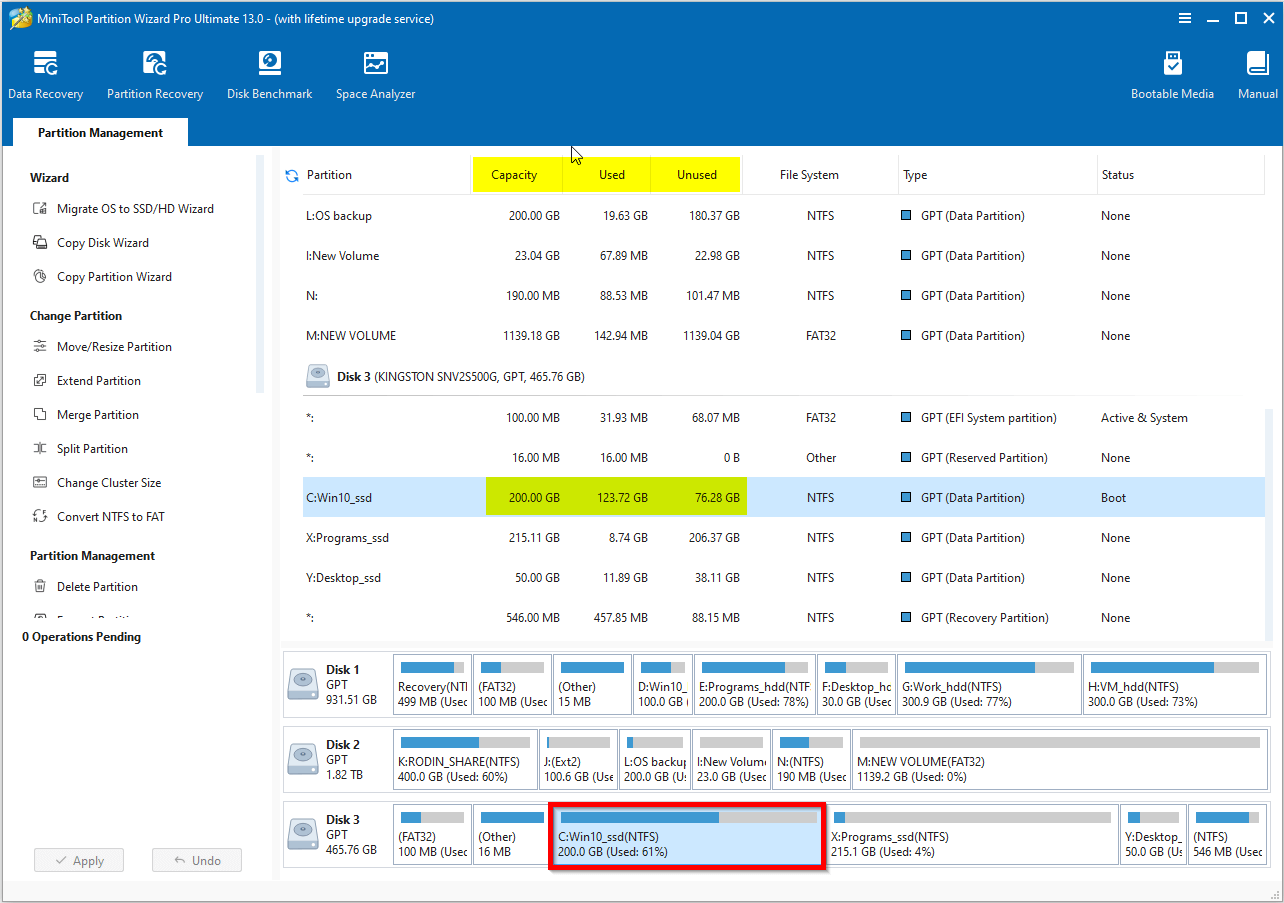
To check free space:
Step 1. In Windows 10, open MiniTool Partition Wizard.
Step 2. Select your system drive (usually with drive letter C:).
Step 3. Review the Capacity, Used, and Unused information above the disk graph. Check if you have 64GB free space on the C drive.
Step 4. Repeat to select the EFI System Partition as well as the WinRE Recovery partition to check if they have enough free space (at least 50MB).
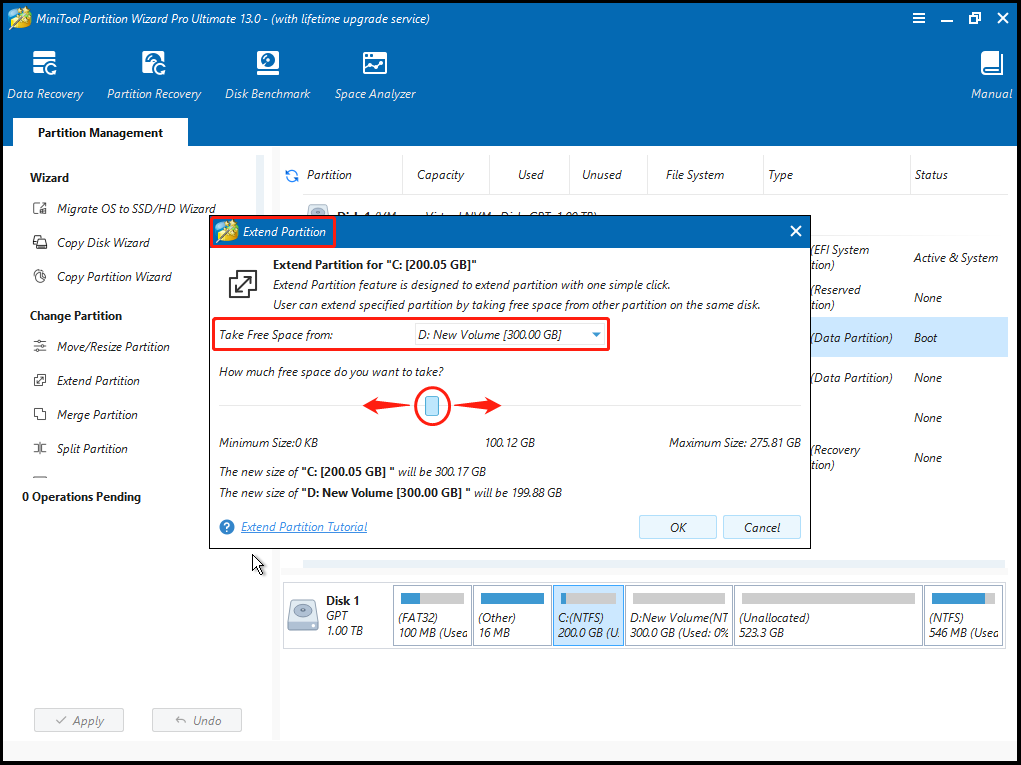
To extend OS related drive:
Step 1. Boot PC from MiniTool bootable media.
Step 2. From the main interface of MiniTool Partition Wizard, right-click the C drive (drive letter might be changed, you can find C drive by checking the “Boot” status) and choose Extend.
Step 3. Click the drop-down box to select another partition or unallocated space to take free space from.
Step 4. Click OK, then Apply to commit the change.
Step 5. Repeat the above steps to extend the EFI System Partition as well as the WinRE Recovery partition.
To delete unnecessary files:
Step 1. In Windows 10, go to MiniTool Partition Wizard, Space Analyzer, and choose the C drive to scan.
Step 2. After the scan, unfold the tree structure to find large or unnecessary files.
Step 3. Select the items you don’t need and delete them safely.

3. Update Your Drivers and BIOS
Outdated drivers can cause compatibility issues during the upgrade. Make sure to update your device drivers (especially for your graphics card, network adapter, and chipset) to the latest versions from your PC manufacturer’s website.
You should also check for any available BIOS/UEFI updates. A current BIOS can improve hardware compatibility and stability with the new operating system.
Update guides you can refer to:
- [PCMag] How to Manually Update Your Drivers in Windows
- [PCMag] How to Update Your Computer’s BIOS/UEFI
4. Convert MBR to GPT
Windows 11 can only be installed on a GPT disk in UEFI mode. If your Windows 10 is installed on MBR, you will have to change the system disk to GPT first.
Also, make sure you have created a MiniTool bootable media for system rescue. Then, feel free to convert MBR to GPT using MiniTool.
MiniTool Partition Wizard DemoClick to Download100%Clean & Safe
Option A. Direct Conversion of Current System Disk
Step 1. On the main interface of MiniTool Partition Wizard, select the existing system disk and choose Convert MBR Disk to GPT Disk, then hit the Apply button.
Step 2. The software will prompt for a restart, allow it to proceed automatically.
Step 3. After conversion, enter your BIOS and change the boot mode to UEFI (usually in the Boot tab).

Option B. Clone to a New GPT Disk
Alternatively, you can clone MBR system disk to another MBR disk in Windows 10, then boot from the new system disk, and finally convert it to GPT disk to generate EFI system partition.
This way, you keep a copy of the original MBR system disk as a backup in case anything goes wrong.
However, if the target disk won’t boot after converting to GPT disk, double-check that Secure Boot and UEFI boot are enabled in BIOS.
If problem persists, use the MiniTool Partition Wizard bootable media to restore boot. Here is how:
Step 1. Find the EFI System Partition (by checking the partition type) and add a drive letter to it.
Step 2. Note the drive letters of the Windows OS partition and the EFI System Partition.
Step 3. Quit MiniTool Partition Wizard, and open Command Console from MiniTool PE Loader.
Step 4. Run this command: bcdboot E:\windows /s K: /f UEFI. Replace E with your own Windows OS partition letter; and replace K with your EFI system partition letter. This command copies the boot files from the Windows installation on E: into the system partition K: and sets up the system to boot in UEFI mode. Make sure you identify the correct drive letters to avoid errors.
Step 5. Exit MiniTool bootable media and reboot your Windows 10.
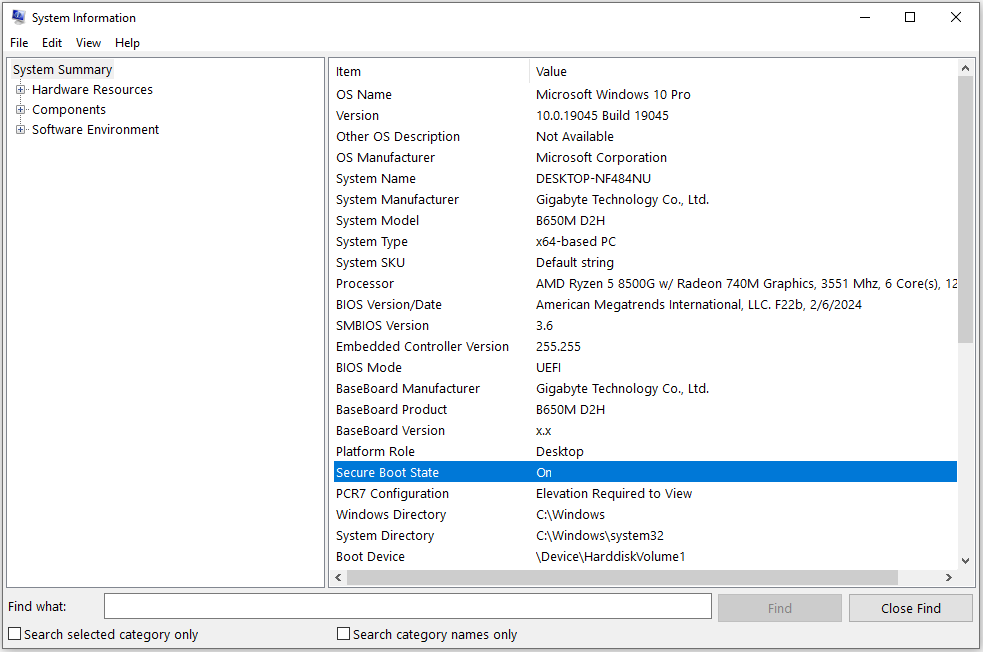
5. Secure Boot & TPM
Upgrading to Windows 11 requires that Secure Boot is enabled.
Here is how to do that.
Step 1. Restart your PC and press the correct key (usually F2, Del, Esc, or F10) to enter BIOS/UEFI.
Step 2. Go to the Boot or Security tab and look for the Secure Boot option.
Step 3. Make sure the system is set to UEFI mode (not Legacy/CSM) and then enable Secure Boot.
Step 4. Save the changes and restart Windows.
Step 5. Check the Secure Boot status in msinfo32. Just run msinfo32 to get the System Information window. Then look for Secure Boot State on the right side. Make sure the status is showing “On”.
If your motherboard supports TPM but doesn’t include the chip, consider purchasing a TPM2.0 module.
How to Upgrade to Windows 11
Once you’ve confirmed your PC is ready and you’ve backed up your data, you can start the upgrade process. Official methods to install Windows 11 are listed here:
| Method | Pros | Cons |
| Windows Update Feature | (1) Easiest and most hands-off method. (2) Preserves all files, apps, and settings. | (1) Can be a very slow process. (2) Not always available immediately due to phased rollout. |
| Windows Installation Assistant | (1) A quick and straightforward process. (2) Bypasses the waiting period for the update. (3) In-place upgrade which preserves files. | (1) Less reliable than a clean install. (2) Can sometimes have compatibility issues. |
| Windows Installation Media | (1) The cleanest, most stable installation which gives you a fresh start. (2) Resolves potential system issues from the old OS. | (1) Deletes all data on your drive. (2) Requires more technical knowledge to perform. |
Keep reading to get the details.
Option 1: Windows Update Feature
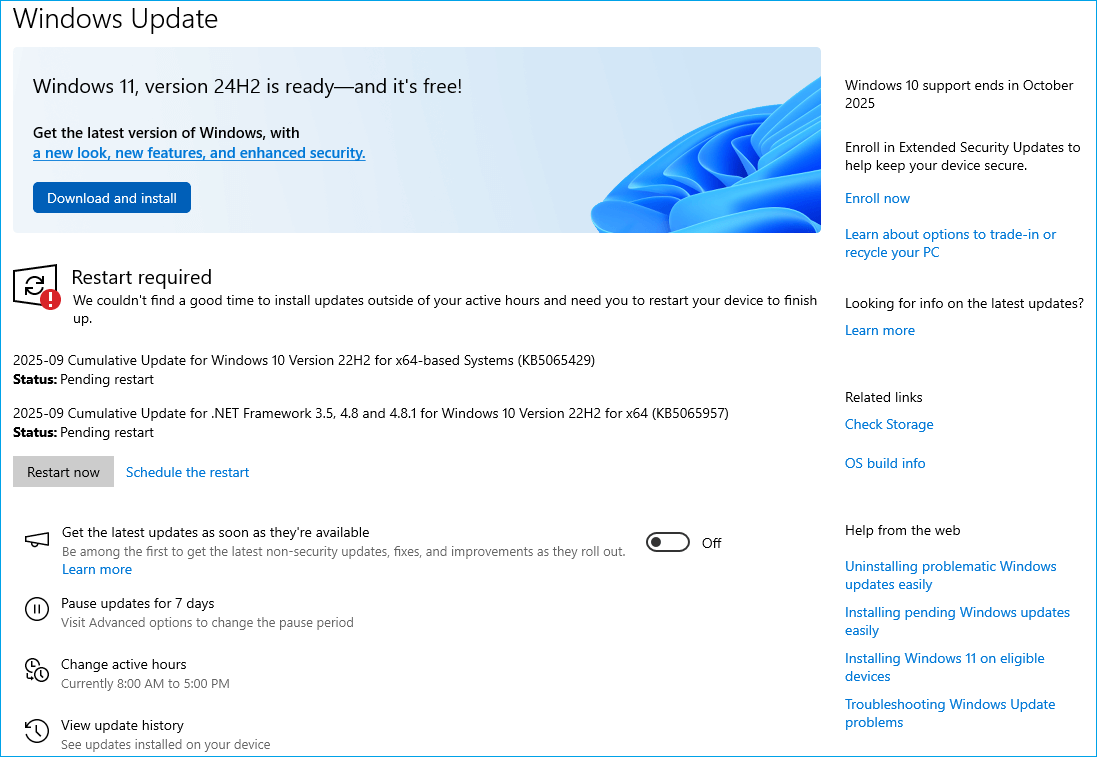
This is the simplest way to upgrade. If your PC is eligible and the update has been released for your device, it will appear as an option directly in your Windows 10 settings.
Step 1. Click the Start button, then go to Settings > Update & Security > Windows Update.
Step 2. Click the Check for updates (or Resume updates) button located in the upper part of the right panel.
Step 3. If your PC is ready, you’ll see a banner at the top of the page that says, “Upgrade to Windows 11 is ready” or “Windows 11 version X is ready”.
Step 4. Click the Download and install button and follow the on-screen instructions.
This method performs an in-place upgrade, which means your files, apps, and settings should all be preserved.
Option 2: Windows 11 Installation Assistant
If your PC is eligible but you haven’t received the update through Windows Update yet, you can use the Installation Assistant to start the process immediately. Go to the official Download Windows 11 page.
Step 1. Under the Windows 11 Installation Assistant section, click Download Now.
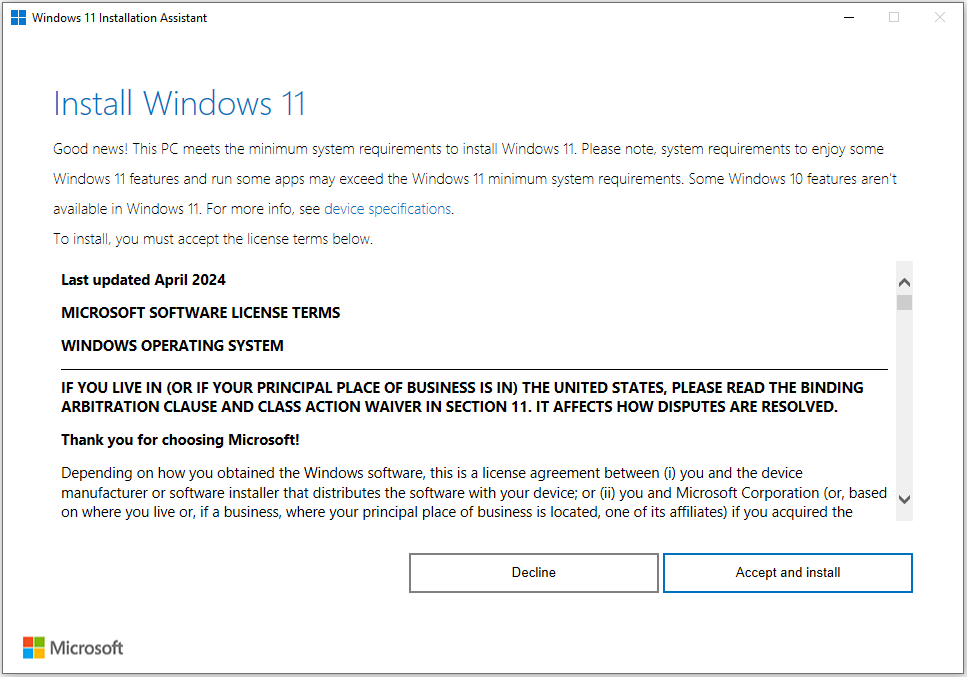
Step 2. Run the downloaded tool and click Accept and install.
Step 3. The tool will automatically start the download and installation process for Windows 11. And your PC will restart a few times to finish the installation.
This method is also an in-place upgrade, keeping your existing files and applications intact.
Option 3: Create Windows Installation Media (Clean Install)
This is the most advanced method, as it involves a fresh installation of Windows 11. A clean install is ideal for getting rid of old files and resolving system issues, but it will erase everything on your hard drive.
Step 1. Also go to the official Download Windows 11 page.
Step 2. Under the Create Windows 11 Installation Media section, click Download Now.
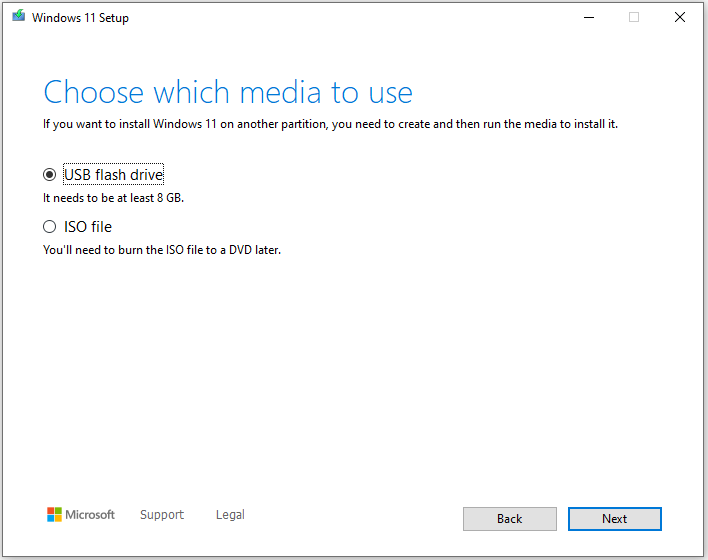
Step 3. Run the Media Creation Tool and choose to create a bootable USB drive.
Step 4. Once the installation media is ready, restart your PC and boot from the USB drive. You may need to change your boot order in the BIOS/UEFI settings.
Step 5. Follow the Windows 11 setup wizard to perform a clean installation.
See Also: Windows 11 Clean Installation Process (Official)
Common Upgrade Errors & Solutions
Even with preparation, you might run into issues. Here are the most common errors and how to fix them.
Error 1: Not Meeting Hardware Requirements
This is the most frequent reason for an upgrade failure. If you get a message saying your PC isn’t eligible, it means one or more of your components don’t meet Microsoft’s strict requirements.
Solution: Check the PC Health Check app again. It will tell you exactly which component failed (e.g., your processor, RAM, or storage). In many cases, you can’t fix this without upgrading your hardware, such as installing more RAM or getting a new computer.
Error 2: TPM or Secure Boot Errors
These are specific security features required by Windows 11. Your PC’s hardware likely supports them, but they might be turned off in your system’s BIOS/UEFI settings.
Solution: You need to enter your PC’s BIOS/UEFI setup. Restart your computer and press the required key to enter the setup screen (often F2, F10, F12, or Del). Navigate to the security or boot settings and enable TPM and Secure Boot. Save your changes and exit, then try the upgrade again.
Error 3: Installation Stuck or Rolling Back
Sometimes, the installation process will get stuck on a certain percentage or fail and roll back to Windows 10. This can be caused by outdated drivers, software conflicts, or corrupted system files.
Solution: The first step is to check for and install all available Windows 10 updates. If the problem persists, try a different upgrade method, like using the Windows 11 Installation Assistant or performing a clean install with installation media. A clean install is often the best way to bypass these issues entirely.
For all other issues, Microsoft provides extensive support. You can visit the Windows 11 support page for troubleshooting guides and solutions.
Is MiniTool Software Useful During the Process
Yes, using MiniTool’s free software can be very useful. These tools help you prepare your system and protect your data, making the entire Windows 11 upgrade much smoother and safer.
MiniTool ShadowMaker
Why it’s useful: The most important step before any major system change is to back up your data. MiniTool ShadowMaker is a free, reliable tool that creates a full system image. This means it saves a complete copy of your Windows 10 OS, applications, and files. If the Windows 11 upgrade fails or you encounter an issue after installation, you can easily restore your PC to its previous state.
Main Function: System backup and restore.
Benefit: Provides a safety net, protecting you from data loss and system failure.
MiniTool ShadowMaker TrialClick to Download100%Clean & Safe
MiniTool Partition Wizard
Why it’s useful: Windows 11 requires a minimum of 64GB of free space. If your primary drive is running out of room, the upgrade will fail. MiniTool Partition Wizard can help you manage your disk space by extending your system partition or removing data to free up the necessary space. Besides, it’s an essential tool for troubleshooting MBR to GPT conversions.
Main Function: Disk and partition management.
Benefit: Helps you prepare your hard drive to meet Windows 11’s storage requirements.
MiniTool Partition Wizard DemoClick to Download100%Clean & Safe
MiniTool Power Data Recovery
Why it’s useful: Despite your best efforts, sometimes things go wrong, and you might lose important files during or after the upgrade. If this happens, your best option is to use file recovery software.
MiniTool Power Data Recovery is a powerful and easy-to-use tool designed to recover lost or deleted files. If you find that important documents, photos, or videos have disappeared after the upgrade, this software can help you get them back.
Always remember to save the recovered files to a different location to avoid overwriting the original data.
Main Function: File recovery.
Benefit: A last resort for retrieving lost files if something unexpected happens.
MiniTool Power Data Recovery FreeClick to Download100%Clean & Safe
After the Upgrade
Congratulations! You have successfully upgraded to Windows 11. Now, it’s time to perform a few final steps to ensure your new system is running at its best.
1. Check System Performance and Re-enable Security
After the first boot into Windows 11, take a few minutes to check that your hardware is working correctly. Make sure your network connection is stable, your sound is working, and all your peripherals are recognized. If you temporarily disabled your antivirus or firewall software before the upgrade, be sure to re-enable them immediately to protect your PC.
2. Install Pending Windows 11 Updates
Windows 11 is constantly being updated with new features and security patches. After the initial upgrade, there may already be a new cumulative update waiting for you.
Step 1. Go to Settings > Windows Update.
Step 2. Click Check for updates to download and install any pending updates.
This ensures you have the latest security protections and bug fixes for your new operating system.
3. Clean up Old Files and Free Up Space
The upgrade process creates a Windows.old folder that contains your previous Windows 10 installation files. This folder can take up a lot of space. Windows will automatically delete it after 10 days, but you can remove it manually to free up disk space immediately.
Step 1. Go to Settings > System > Storage.
Step 2. Click Temporary files.
Step 3. Select Previous Windows installation(s) and click Remove files.
To get a more complete view of your storage and manage your new system drive, you can use MiniTool Partition Wizard to clean up leftover files and optimize your new system’s disk space.
4. Restore Files from Backup if Needed
If any files seem to be missing after the upgrade, don’t panic. You can restore your files from the backup you created before the upgrade.
Alternatively, you can run a scan with MiniTool Power Data Recovery to check for any recoverable data on your drive. This can often retrieve files that were lost during the upgrade process.
5. Back up Your New Windows 11 System
You have just performed a major upgrade, and now your system is clean and stable. This is the perfect time to create a new system backup.
Use a tool like MiniTool ShadowMaker to create a fresh backup of your Windows 11 installation. Having a new recovery point will save you from future headaches if a crash or hardware failure occurs.
Windows 11 Upgrade FAQs
About The Author

Position: Columnist
Rodin is an enthusiastic IT writer focusing on Windows trends, disk partition management and data recovery. She loves to write and share her idea about the useful tips and tricks on personal computers' maintenance. If you are looking for methods to improve your computer performance, manage hard drives and recover data from different devices, Rodin can provide reliable solutions for data management.
User Comments :