What Is WD Quick Formatter and How to Use It
WD Quick Formatter is short for Western Digital quick formatter, a format tool developed by Western Digital Technologies, Inc. It is also known as WD advanced format utility. WD quick formatter tool allows you to reformat WD external hard drive to NTFS, FAT32, etc. in Windows 10/8/7 or other Windows versions.
WD Quick Formatter tool download is available on Western Digital official website. It is usually used to repair a corrupted external hard disk. For example, the external hard drive is unrecognized or inaccessible, showing “You need to format the disk in drive before you can use it“. In this case, the most effortless way is to format the external hard drive if you want to get access to the drive.
But don’t forget to backup important files before formatting. MiniTool Shadow Maker is a professional backup software, which can help Windows users to make file backup, system backup and disk/partition backup in a simple way.
After you have backed up important files on the external hard drive that needs to be formatted, I will introduce you how to use the WD Quick Formatter utility to format external hard drive.
Step 1. Connect the external hard drive to your PC.
Step 2. Download WD Quick Formatter for Windows 10. After you downloaded it to your computer, you need to unzip it before installing.
Step 3. After a successful installation, launch WD Quick Formatter and read the warning. Then click Continue.
Step 4. Accept the “End User License Agreement” to continue.
Step 5. The format tool will automatically scan for external drives to be formatted. Select the drive you want to format from the drop-down list after scanning completed.
Step 6. Wait for the formatting process to be completed and click “Exit” to leave the window.
Please keep in mind that using WD Quick Formatter to format external hard drive is an irreversible process. Once the process begins, it cannot be undone and all the data on the drive will be lost. So if you have important files and data stored on the external hard drive, please make backups beforehand.
If you do forget backing up important file and data on the formatting drive, there is one way you could try to recover data immediately. By using MiniTool Power Data Recovery, you may recover formatted hard drive in just a few clicks.
Three WD Quick Formatter Alternatives
In most cases, WD Quick Formatter is very helpful for users to deal with external hard drive formatting issues. However, WD Quick Formatter is not always effective. Sometimes, WD Quick Formatter might fail to format WD external hard drive when it encounters some errors. There are users complained WD Quick Formatter format external drive failed or WD Quick Formatter not working now and then.
Therefore, you need to learn some other format utilities in case of the occurrence of WD Quick Formatter not working.
For this reason, I will introduce you three WD Quick Formatter alternatives to help you format external hard drive smoothly.
WD Quick Formatter Alternative 1: MiniTool Partition Wizard
MiniTool Partition Wizard is a free and reliable format tool. And it is also a reputable all-in-one disk partition manager, which can help you not only format partitions but also assist you in creating, deleting, merging and splitting partitions. You may also use this software to copy disk, convert dynamic disk to basic or migrate Windows OS to an SSD. No need to spend hours reinstalling your old disk’s operating system and applications!
Its Format Partition function allows you to format WD, Seagate or other external drives to NTFS, FAT32, FAT, EXT2, or EXT3 with just a few clicks. After formatting, you may use this tool to repartition external drive as well, which is more convenient and more powerful than Quick Formatter indeed. With a user-friendly interface, the software is suitable for both computer newcomers and experts. Now read the following contents to see the simple steps.
You may download this free format tool by clicking the following button firstly.
MiniTool Partition Wizard FreeClick to Download100%Clean & Safe
Step 1. Connect the external drive to your computer.
Step 2. Install and launch it to get its main interface.
Step 3. Right-click the external drive and select Format Partition.
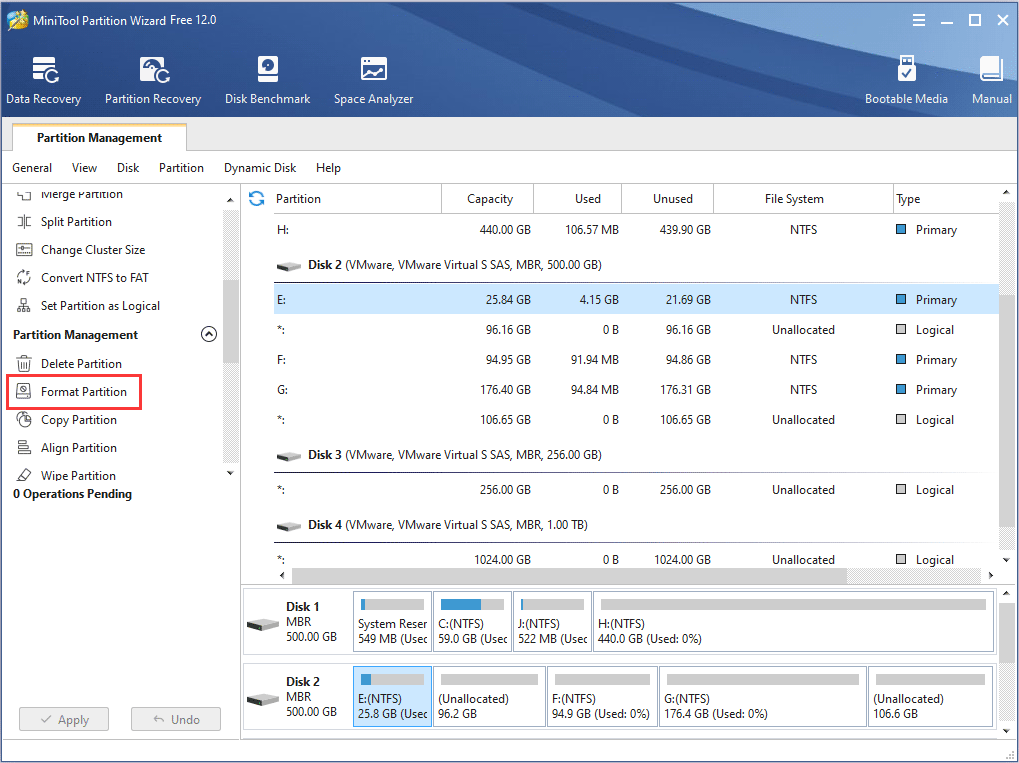
Step 4. At this window, you are allowed to specify partition label, file system as well as cluster size. Then click OK.
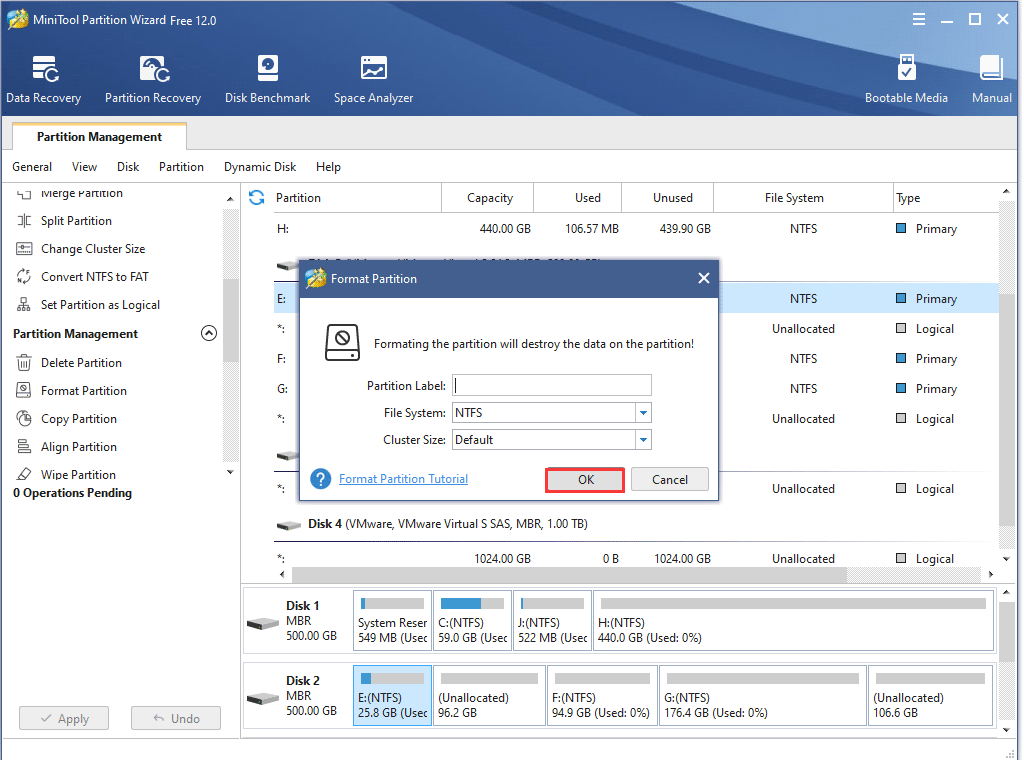
Step 5. Click Apply in the tool bar to execute the pending operation.
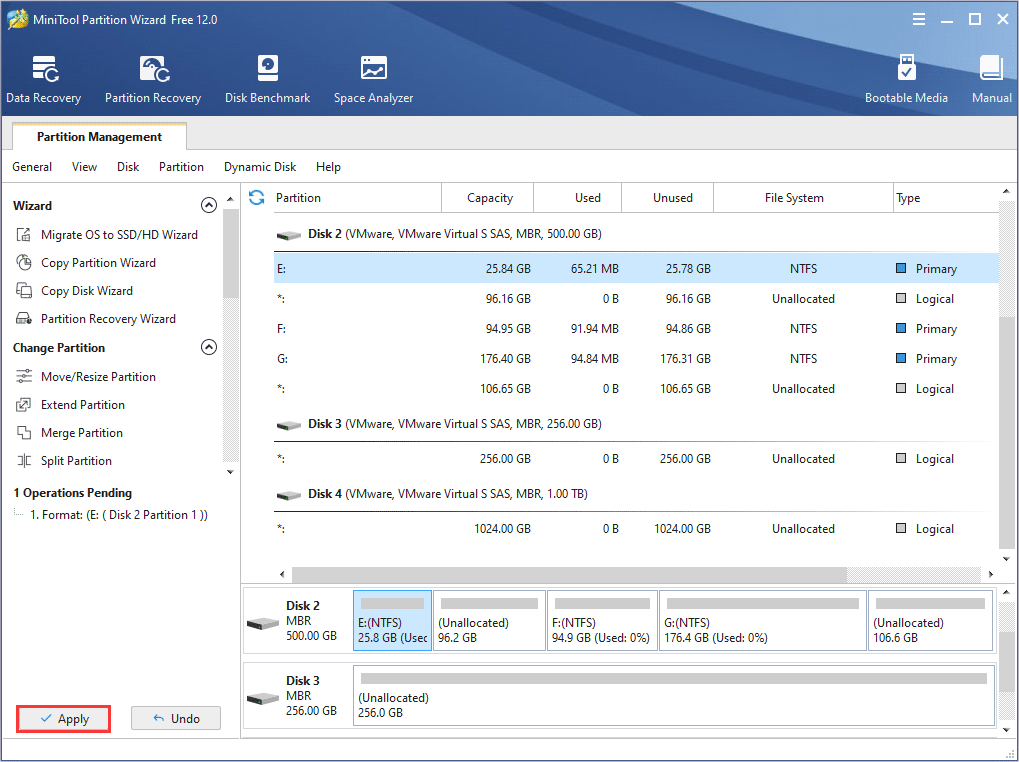
You see! With just a few steps, you can finish the formatting easily. As a professional partition management software, MiniTool Partition Wizard could not only help you format external hard drive, but also can help you manage your disks in a better way. You may try its other features by yourself and you will find how powerful it is!
But if you don’t want to resort to a third-party software, you may also use the windows built-in partition tool – Disk Management.
WD Quick Formatter Alternative 2: Disk Management
Disk Management is a Microsoft Windows utility first introduced in Windows XP. It enables users to view and manage the disk drives (internal and external) installed on their computer. With Disk Management, users could create, delete and format volumes by themselves.
Using Disk Management format tool to format external hard drive is a great choice for those who don’t want to install a third-party software. Now I will show you how to get into Disk Management and format volumes with it.
Formatting a volume will destroy any data on the partition. Make sure you have backed up any data you want to save before you begin.
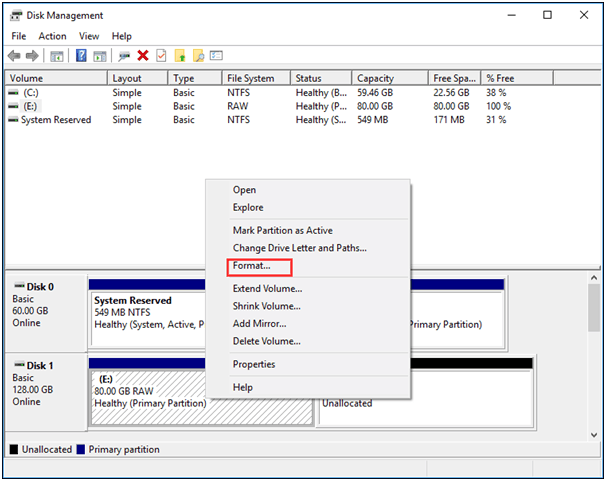
Step 1. Right-click the Windows Start menu and select Disk Management. Then you will get the following interface.
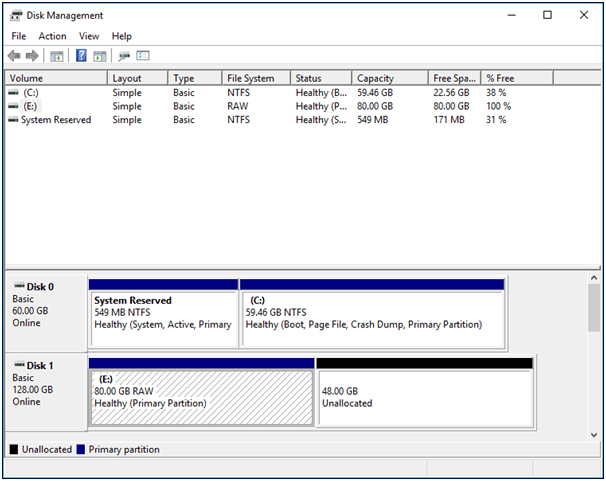
Step 2. After successfully opening the Disk Management, choose the volume on the external drive that you want to format, and then right-click it to select Format.
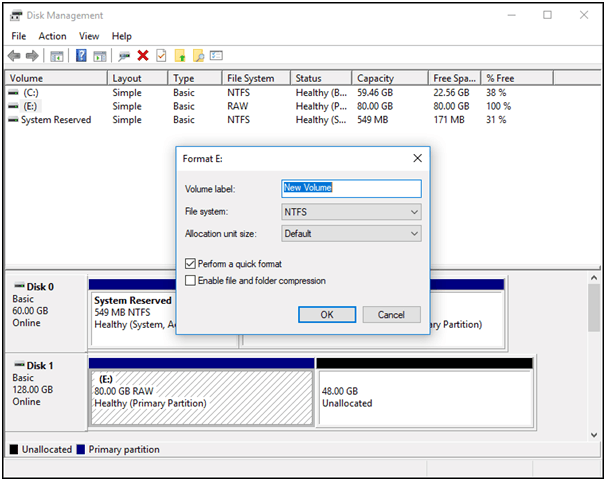
Step 3. The volume label, file system and allocation unit size are set by default. To format the volume with the default settings, in the Format dialog box, select OK, and then select OK again. You may also specify the volume label, file system and allocation unit size by yourself.
Attention:
- Disk Management can only format an external hard drive to limited file systems, including FAT, FAT32, NTFS and exFAT.
- Formatting an external drive or partition that is currently in use or partition that contains Windows is not allowed.
- The Perform a quick format option will create a new file table, but will not fully overwrite or erase the volume. If you don’t check the Perform a quick format option, it would be much slower to format a volume and the data on the volume will be fully erased.
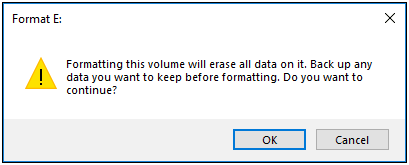
Step 4. Read the warning and click OK to continue.
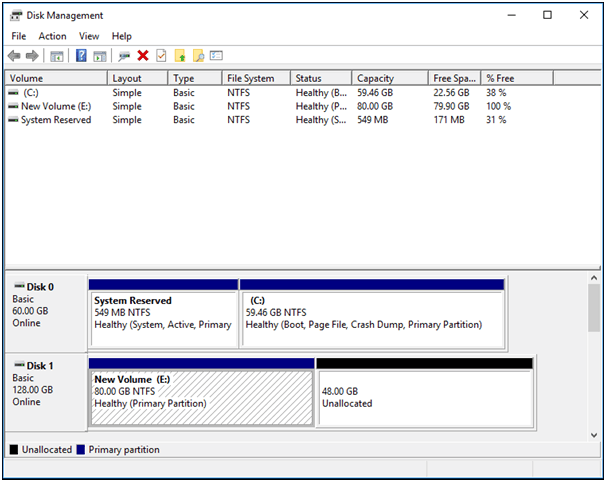
Step 5. At this time, the external drive was already formatted. And for inaccessible external drives, they can be used as a normal one again.
Although Disk Management does not provide so many functions to manage disks as MiniTool Partition Wizard, it also could be a big help for users who just want to format external hard drive or other simple operations like creating or deleting volumes.
However, when you open Disk Management, you might met common issues like Disk Management taking a long time to load, being stuck on loading disk configuration or the format did not complete successfully. In this case, I will offer you another method to format external hard drive – CMD.
WD Quick Formatter Alternative 3: CMD
CMD is also known as cmd.exe or Command Prompt. Command Prompt interacts with the user through a command-line interface. In Windows, it is used to execute entered commands and solve all kinds of Windows issues. You may also format external hard drive by typing a few commands in the Command Prompt window.
Before you do the following operations, you should make sure that you have backuped all available data so as to prevent data loss. Now, follow the below steps to format a drive:
Step 1. Right-click the Windows Start menu, then choose Run and input cmd to open Command Prompt window. You may also input cmd in the search box and click the best match to open it.
Step 2. When the command line is opened, input diskpart and press Enter. You may see a pop-up window like as below. Click Yes to open the Diskpart window.

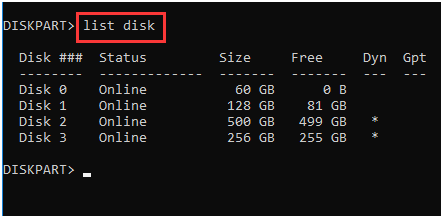
Step 3. Then input list disk and press Enter. It will list all the available drives.
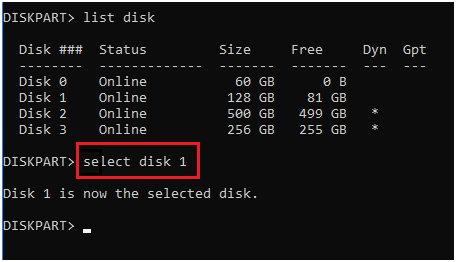
Step 4. Input select disk (disk number) as shown below and press Enter. Specify the drive number which needs to be formatted.
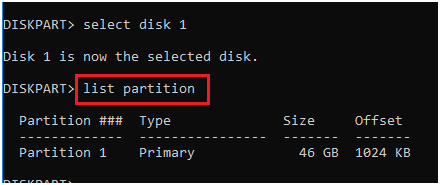
Step 5. Input list partition and press Enter.
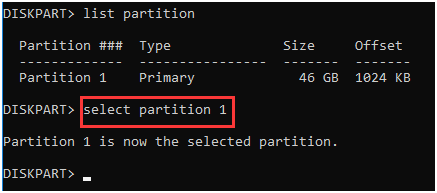
Step 6. Input select partition (partition number) and press Enter. (The number should be the partition you want to format.)
Step 7. Now format the partition with FAT or NTFS file system. Input format fs=ntfs and press Enter.

Here we formatted the partition to NTFS file system. However, when you are trying to format a partition to FAT32 using diskpart, you may receive an error message like: “The volume size is too big.” In this case, you are unable to format the partition directly in CMD. No need to worry. You may find solutions to resolve this issue by clicking here.
Step 8. After DiskPart successfully formatted the partition, then you may type exit to close the Diskpart window.
At this time, you have completed formatting. As you can see, All of them are helpful to you to format external hard drive when WD Quick Formatter not working. But obviously, The latter two are not as convenient as MiniTool Partition Wizard. So MiniTool Partition Wizard will be your best choice after learning the above methods.
MiniTool Partition Wizard FreeClick to Download100%Clean & Safe
Bottom Line
In this post, I have introduced you how to use WD Quick Formatter to format external hard drive. Apart from that, I have shown you another three methods as WD Quick Formatter alternatives – MiniTool Partition Wizard, Disk Management, and CMD. You may choose a suitable format tool according to your needs.
If you have any question about the use of WD quick formatter tool described in this post or you have other good solutions on formatting external hard drive, you can leave a message on the following comment zone and we will response as soon as possible. If you need any help when using MiniTool software, you can contact us via [email protected].
User Comments :