Many users reported the VirtualBox no 64 bit guest operating systems. Why VirtualBox only allows 32 bit? How to fix it? Now, let’s explore these questions together with MiniTool.
What Causes VirtualBox No 64 Bit
VirtualBox is one of the most popular solutions used to manage and run virtual machines. It can run a guest operating system in a virtualized environment and some people like to try a new OS in it. However, many people reported that VirtualBox only shows 32 bit operating system even when they fulfill all the requirements.
What causes VirtualBox no 64 bit? According to a survey, the issue is often related to improper Hyper-V configuration. Some other factors like System Debuggers, VM platforms, Device Guard, Core isolation, and CPU with virtualization enabled. How to fix VirtualBox not showing 64 bit Windows 10? Let’s keep reading.
How to Fix VirtualBox No 64 Bit
Before you fix the VirtualBox only 32 bit issue, make sure that you log in to your administrator account. Besides, you should have a valid guest OS file that will be used to load the guest operating system. If the .iso file is invalid or a different kind, you may encounter the “VirtualBox not giving 64 bit option” problem.
Now, let’s start fixing the issue!
Method 1. Check If You Have an x64 CPU
The first thing you should do is to check if your computer has an x64 bit CPU. If you are using a 2 bit CPU, you will encounter the VirtualBox not showing 64 bit issue.
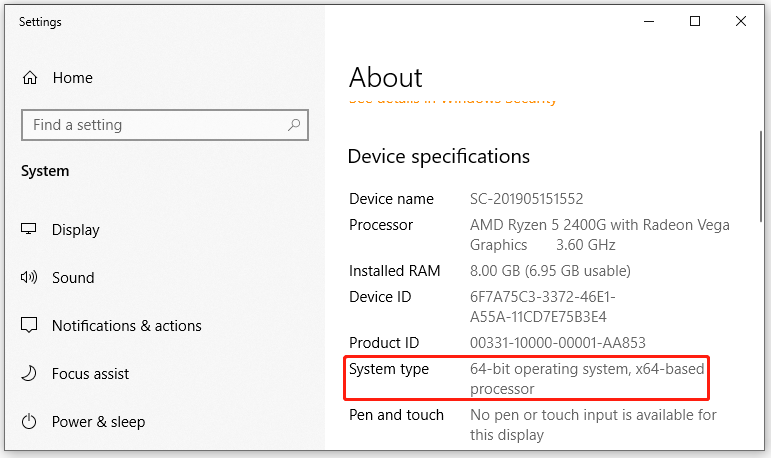
Step 1. Press Win + E keys to open the File Explorer, and then right-click This PC and select Properties.
Step 2. In the pop-up window, navigate to the Device specifications section and check the System type. If your operating system and processor are 64 bit, you can proceed with the following solutions.
Method 2. Disable Hyper-V
Microsoft Hyper-V is a piece of virtualization program that enables users to create one or more virtual machines. It performs almost the same tasks as VirtualBox. Some users noticed that the Hyper-V can interfere with the running of VirtualBox. To remove the conflict, you can try disabling Hyper-V.
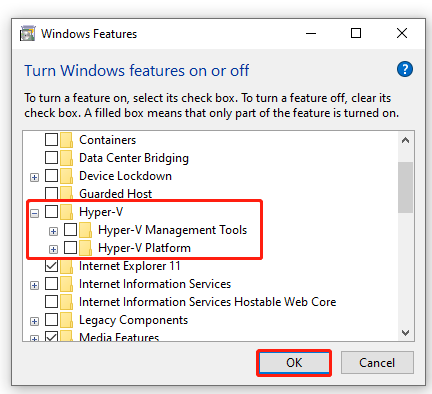
Step 1. Press Win + R keys to open the Run dialog box, and then type OptionalFeatures.exe in it and hit Enter.
Step 2. In the Windows Features window, scroll down the list to find the Hyper-V option. If it is checked, untick the checkbox of Hyper-V, including its sub-options.
Step 3. Click on OK to save changes.
Now, you can restart your computer and see if the VirtualBox only allows 32 bit.
Method 3. Enable Intel Virtualization Technology
Virtual Technology is an architecture that allows users to run multiple and isolated operating systems on a single server. If the configuration is disabled, you might encounter the VirtualBox not showing 64 bit Windows 10 issue. Here you can follow the steps below to enable it:
Step 1. Restart your computer and press the Delete or F2 key when the startup screen appears to enter BIOS.
Step 2. Navigate to the Advanced tab, and then select the Intel Virtualization Technology option and change it to Enabled using the arrow keys.
Step 3. Press the F10 key to save changes and exit the BIOS. Then your computer will restart.
Once restart, you can reinstall the application and see if the VirtualBox not giving 64 bit option issue is solved.
Method 4. Disable Core Isolation
Core isolation is a technology in Windows to create a secure area of system memory. It can help run the virtual machines on Windows. Sometimes, however, this module can trigger conflicts with VirtualBox.
Some users have confirmed that disabling Core isolation can resolve the VirtualBox no 64 bit issue. Let’s have a try.
Step 1: Press Win + I to open Windows Settings and select Update & Security.
Step 2: Select Windows Security from the left pane and click on Open Windows Security from the right side.
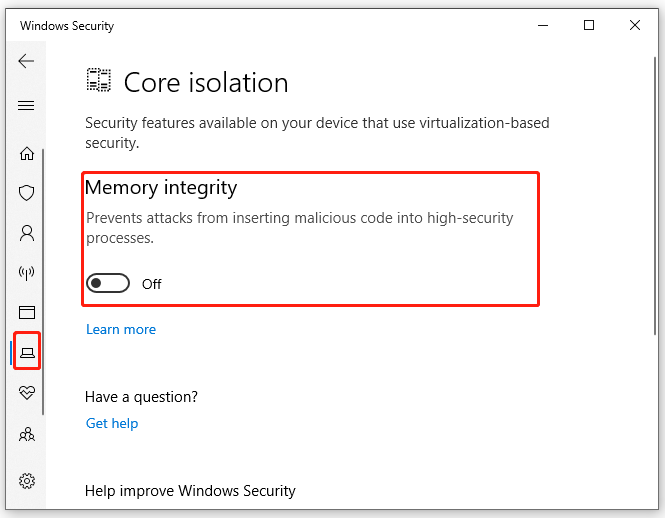
Step 3: In the pop-up window, select Device Security from the left side and click the Core isolation details hyperlink.
Step 4. Then toggle off the Memory integrity button under Core isolation.
After that, restart your computer and check if the VirtualBox only 32 bit problem is solved.
Method 5. Disable Device Guard
Device Guard is a piece of enterprise-related hardware and software security features that’s enabled by default in Dell computers. If you are using a Windows 10 Enterprise edition, you need to disable it for VirtualBox to show 64 bit. Here’s how:
Step 1. Open the Run dialog box by pressing Win + R keys, and then type gpedit.msc in the box and hit Enter.
Step 2. In the Local Group Policy Editor window, locate the following path via the left navigation bar:
Computer Configuration > Administrative Templates > System > Device Guard
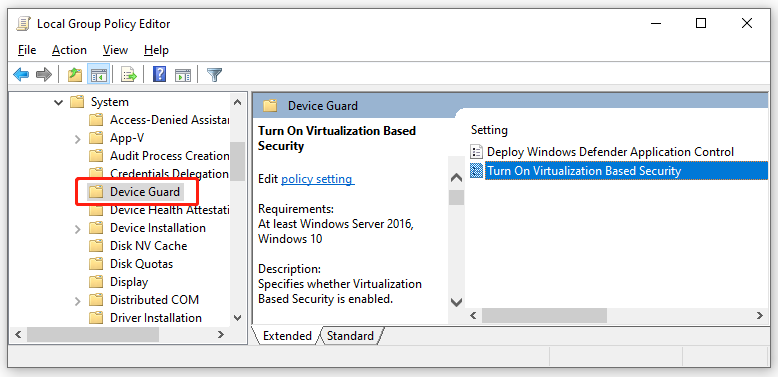
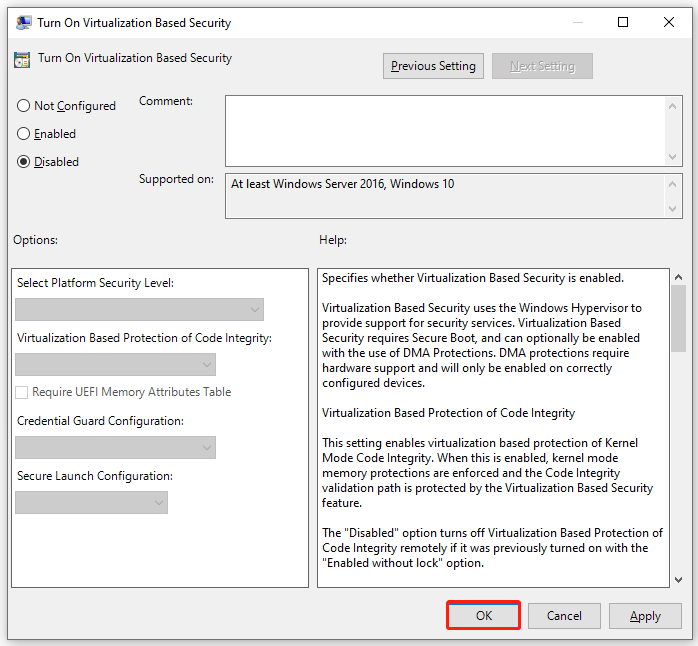
Step 3. Double click the Turn on Virtualization Based Security option and set it as Disabled.
Step 4. Click on OK to save changes and reboot your computer. After that, you can relaunch the program and see if the VirtualBox no 64 bit issue persists.
Method 6. Uninstall System Debuggers and Other VM Programs
If installed other VM programs on your computer or system debugger, the VirtualBox only allows 32 bit guest operating system. This is because it might cause conflict with the functionalities of the program. In this case, you can uninstall the system debugger or VM program.
Step 1. Open the Run box again and then type appwiz.cpl in the box and hit Enter.
Step 2. Scroll down the list of installed programs to find other VM programs or System Debuggers, and then right-click it and select Uninstall. Then follow the on-screen prompts to complete the uninstallation.
Step 3. Once installed, restart your computer and check if the issue is fixed.
User Comments :