Dynamic disk allows users to create various types of volumes, such as mirrored volume, striped volume, etc. Unfortunately, some users reported that they were unable to convert basic to dynamic disk with Windows tools such as Disk Management. In this post from MiniTool Partition Wizard, you can find some solutions to this problem.
Basic Disk vs. Dynamic Disk: Which Is Better?
Basic and dynamic disks are two types of disks. Which is better? They have different features and the answers could vary from person to person.
Generally, a basic disk manages data with partitions. And there are two styles of partitions that a basic disk can use: MBR and GPT.
If the basic disk is of MBR style, you can create up to four primary partitions or three primary partitions plus an extended partition that can contain a huge number of logical partitions. On a GPT disk, you can create up to 128 primary partitions to manage your files.
Differently, a dynamic disk manages data with dynamic volumes, including simple volume, mirrored volume, spanned volume, stripped, and RAID 5 volume. The last four types of volumes require more than two disks to create.
Dynamic disks provide more features and enable you to manage data more efficiently. For example, a mirrored volume includes data backup but will take up more space. A striped volume can speed up the data reading and writing but without backup.
As you can see, basic disk and dynamic disk have their own advantages and disadvantages. In a word, if you have only one disk, you can choose to use it as a basic disk. If you have multiple disks, using them as dynamic disks might improve efficiency.
Unable to Convert Basic Disk to Dynamic
If you want to use your disks as dynamic disks, you can use Windows built-in tools such as Command Prompt and Disk Management to convert them to dynamic free.
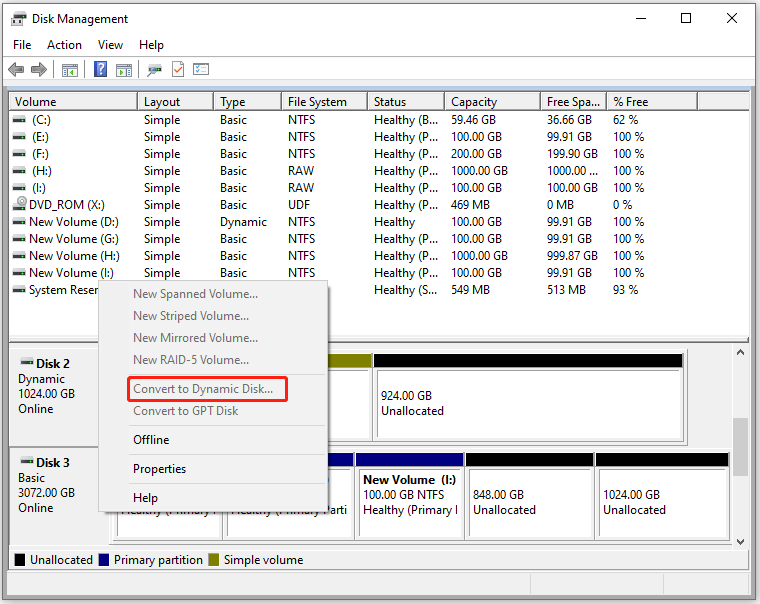
How to convert basic disk to dynamic disk? In Disk Management, you just need to right-click the disk and select Convert to Dynamic Disk. In the pop-up window, check the target disks and click OK. For more details, you can refer to Two Ways to Convert Basic Disk to Dynamic Disk.
However, sometimes you might be unable to convert basic disk to dynamic. Here are the cases and error messages you might encounter while trying to convert basic disk to dynamic:
- The “Convert to Dynamic Disk” option in Disk Management greyed out.
- Error message: Only the first 2TB are usable on large MBR disks. Cannot create partitions beyond the 2TB mark, nor convert the disk to dynamic.
- The disk could not be converted to dynamic because security is enabled on one or more partitions.
- There is not enough space available on the disk(s) to complete this operation.
- The operation is not supported by the object.
- The pack name is invalid.
If you are bothered by the problem “unable to convert basic to dynamic disk”, keep reading to get solutions.
How to Fix “Unable to Convert Basic to Dynamic Disk”
According to the different cases, there are different methods to solve the problem.
Solution 1: Convert MBR to GPT
When your disk is initialized to MBR and larger than 2TB, the Convert to dynamic disk option in Disk Management will grey out.
If you try to convert the disk to dynamic with Command Prompt, you will receive the error message “Only the first 2TB are usable on large MBR disks. Cannot create partitions beyond the 2TB mark, nor convert the disk to dynamic”.
It happens because only the first 2TB space is available on an MBR disk. If you plan to convert it to dynamic, you should convert it to GPT at first.
If the involved disk contains no data, you can convert it to GPT via Disk Management and Command Prompt. If it contains data, please use MiniTool Partition Wizard instead, which is displayed in the last part of Solution 1.
In Disk Management, you can:
- Right-click a partition on the disk and select Delete Volume. Repeat the operation to delete all the partitions on this disk.
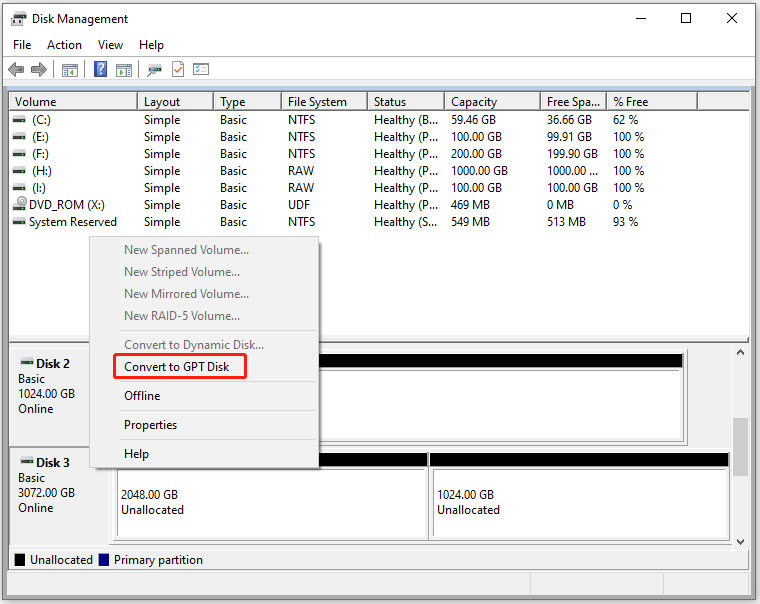
- Right-click the disk and select Convert to GPT disk.
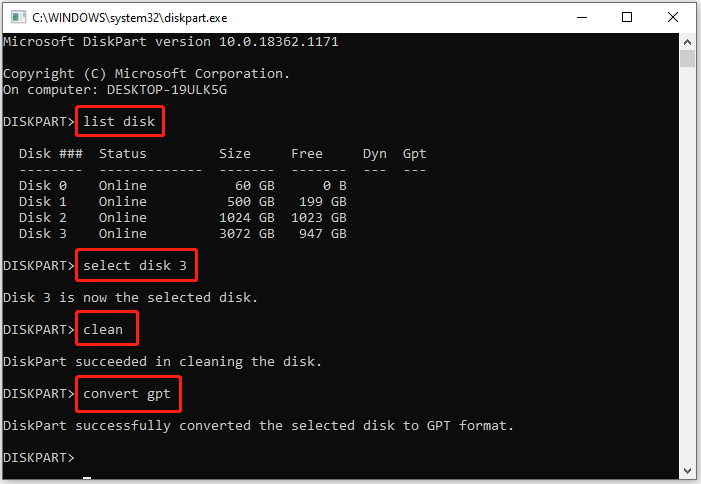
In Command Prompt, you just need to access diskpart. Then input the following commands one by one and press Enter after each:
- List disk
- Select disk 3 (replace 3 with the disk you want to convert to dynamic)
- Clean
- Convert gpt
If you have stored files on this disk and you don’t want to lose them, you can convert it to GPT with MiniTool Partition Wizard. MiniTool Partition Wizard is a powerful and reliable disk manager. It can help you manage your disks and partitions within a few clicks.
With this tool, you can convert your MBR disk to GPT without losing data. Now, let’s see how to do it.
Step 1: Download MiniTool Partition Wizard by clicking the following button. Then install and launch it on your computer.
MiniTool Partition Wizard FreeClick to Download100%Clean & Safe
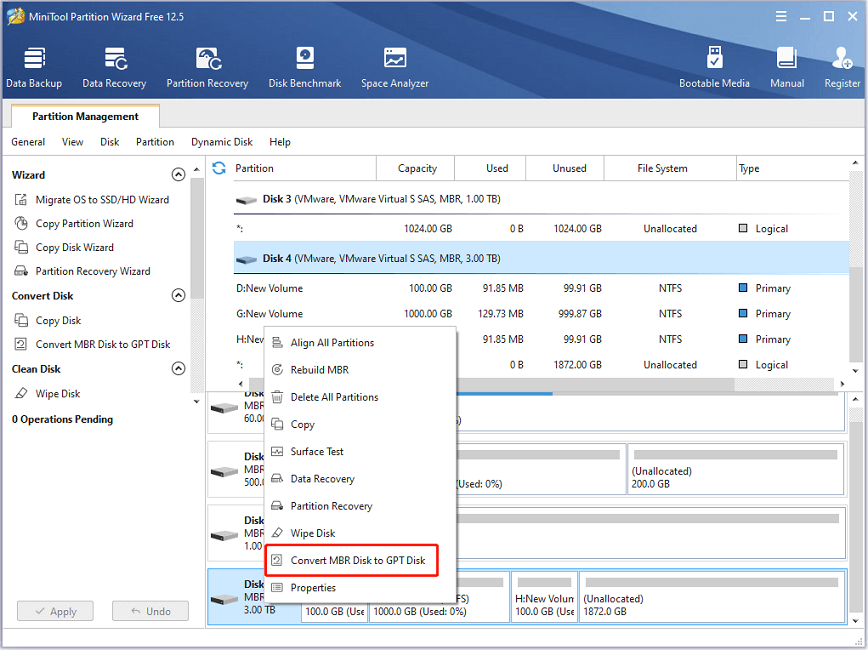
Step 2: When you get the main interface of MiniTool Partition Wizard, right-click the target disk and select Convert MBR Disk to GPT Disk. Alternatively, you can select the disk and choose the Convert MBR Disk to GPT Disk feature from the left action panel.
Step 3: Click the Apply button. In the pop-up window, click Yes to start the converting process.
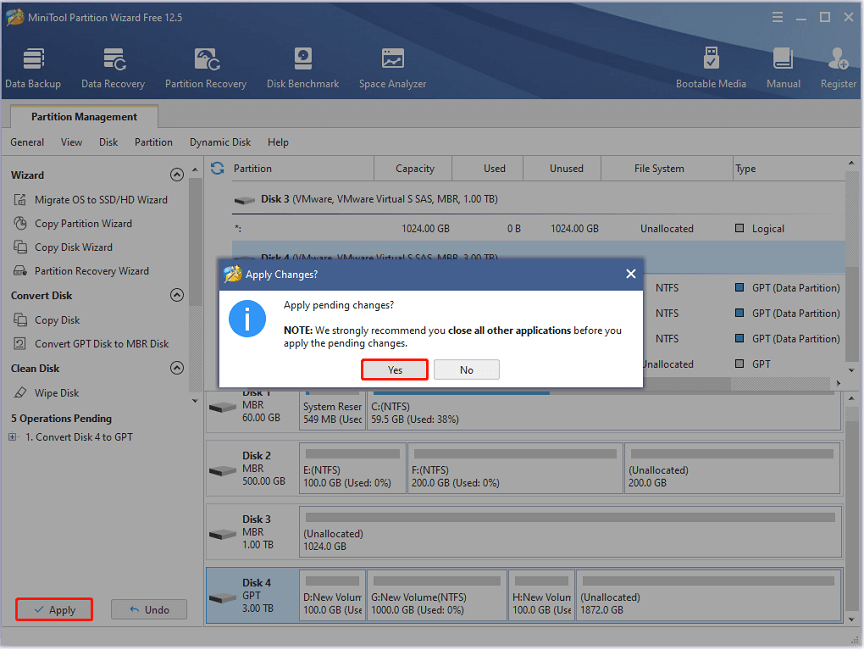
Then you just need to wait until the process is finished. Please do not shut down your computer during the process to make sure everything goes well.
After converting the MBR disk to GPT disk, you can go to Disk Management, right-click the disk, and select Convert to dynamic disk. The “Convert to dynamic disk greyed out” issue should be solved.
Solution 2: Change the Name of Your Computer
If you can’t convert to dynamic disk because of the error message “the pack name is invalid”, you can try changing the name of your computer to solve it. And here are the detailed steps.
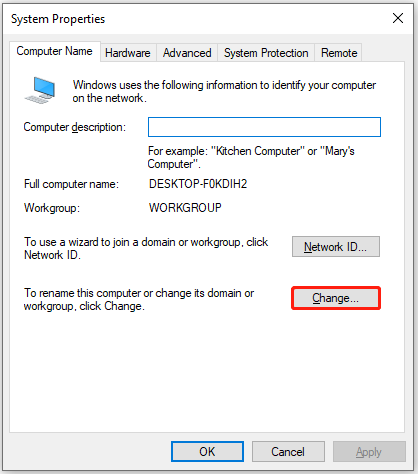
Step 1: Press Win + R to invoke the Run window. Then input sysdm.cpl and click OK to open the System Properties window.
Step 2: Click the Change button from the pop-up window.
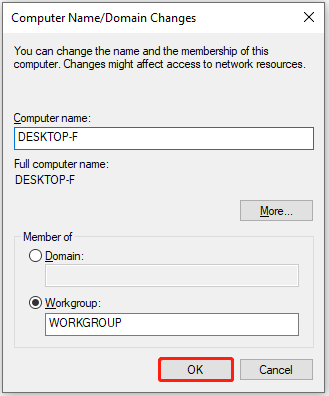
Step 3: On the next page, input the new name of your computer. Please make sure the name includes no double-byte characters. Then click OK to save the changed name.
Restart your computer and then you can try to convert your basic to dynamic disk again.
Solution 3: Create Storage Pools
If you are unable to convert basic to dynamic disk without losing data because security is enabled, you can try to create mirrored storage space with Storage Pools. In this way, you can use your storage space like mirrored volume without converting your basic disk to dynamic.
Here is how to create Storage Pools.
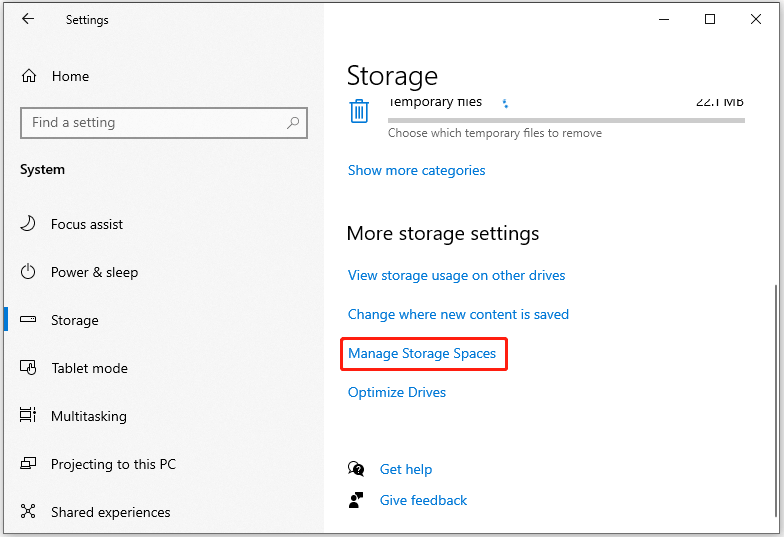
Step 1: Press Win + I to open Windows Settings. Then go to System > Storage.
Step 2: In the right pane, select Manage Storage Spaces under the More storage settings section.
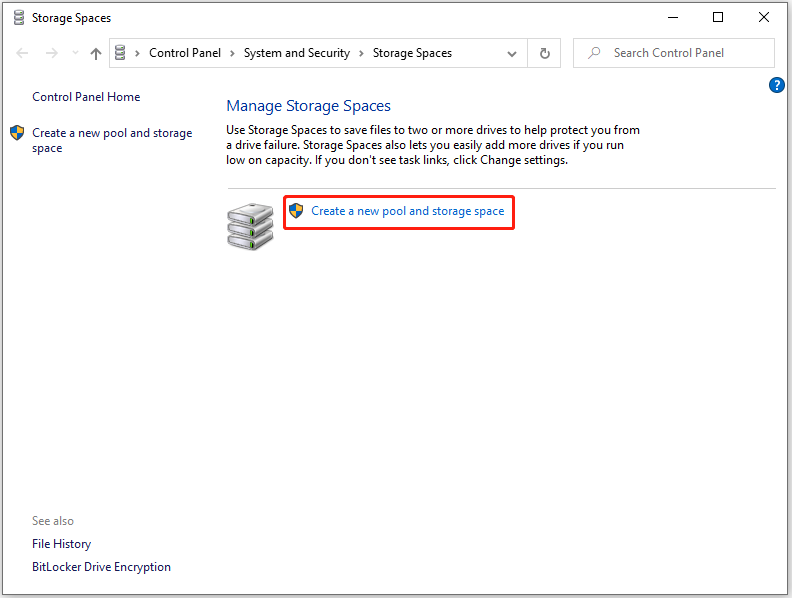
Step 3: In the pop-up window, click Create a new pool and storage space.
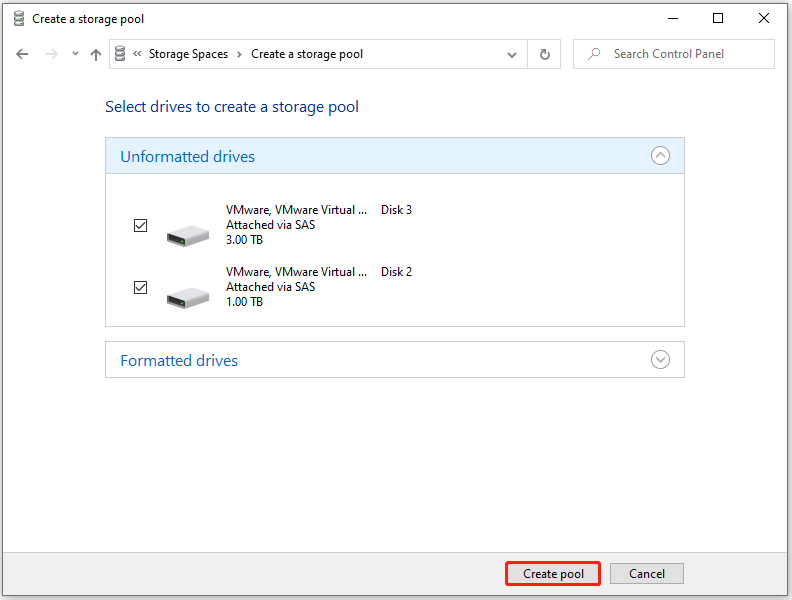
Step 4: On the next page, check the drives you want to use and click the Create pool button to create a storage pool.
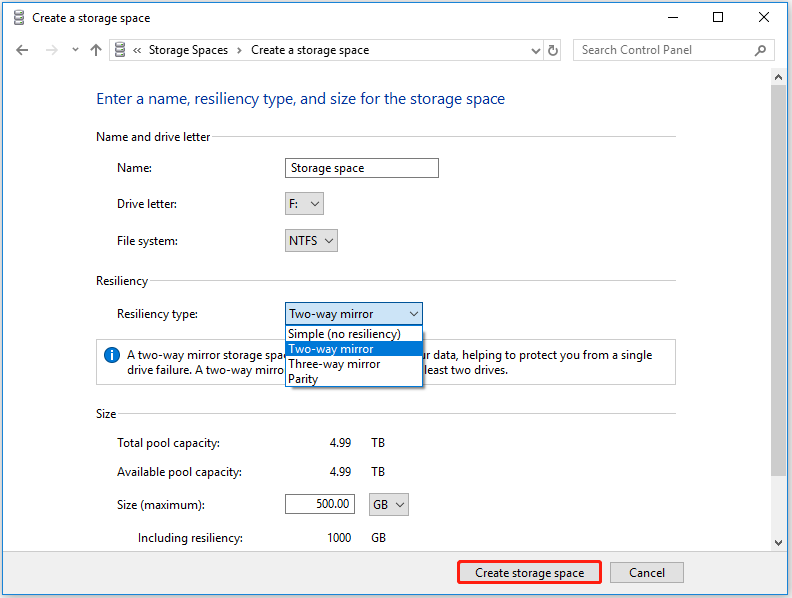
Step 5: Configure your new storage space. On the following page, you can set the name, drive letter, file system, resiliency type, and size of the storage space. There are four types of resiliency:
- Simple (no resiliency): it writes one copy of data and requires at least one drive. Please note that this wouldn’t protect your data from drive failures.
- Two-way mirror: it can write two copies of your data with at least two drives. This resiliency can help protect data from a single drive failure.
- Three-way mirror: it writes three copies of data, which requires at least five drives. This can protect data from simultaneous drive failures.
- Parity: parity storage space writes data with parity information, which requires at least three drives. It can help protect data from a single drive failure.
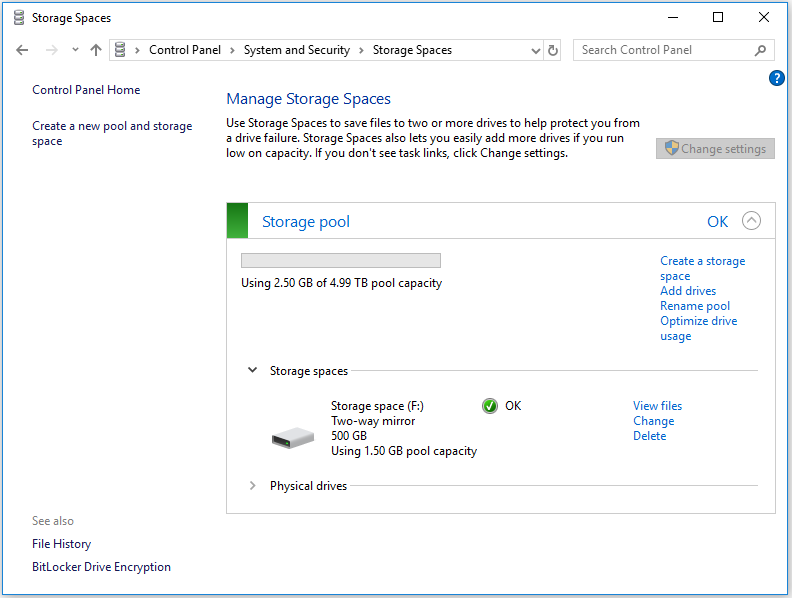
The process might take a few minutes and please wait patiently. Once the storage space is created, you can start to use it.
Please notice that you cannot manage Storage Pools in Disk Management. If you want to create more storage space, or change or delete the created storage space, you have to go to Control Panel > System and Security > Storage Spaces. Of course, MiniTool Partition Wizard also works.
Hope the above solutions can help you use your disks more efficiently.
Bottom Line
Are you unable to convert basic to dynamic disk? Reasons for this problem could be various, but you don’t need to worry. Try the above solutions according to your situation.
You can share your ideas and experiences with us in the following comment zone. For any problems with MiniTool Partition Wizard, you can contact our support team via [email protected].
User Comments :