
BitLocker is Windows' built-in drive encryption feature that helps protect your data from unauthorized access. This post shows detailed steps to turn on or off BitLocker using MiniTool Partition Wizard, Control Panel, and Command Prompt.
What Is BitLocker?
BitLocker is a built-in Windows security feature that protects your data by encrypting entire hard drives.
It scrambles your files so they remain unreadable without a decryption key. And it protects your data from offline attacks or unauthorized access if your laptop or drive is lost or stolen.
BitLocker can encrypt a wide variety of drives in Windows, focusing on both internal and external storage to prevent unauthorized access.
Benefits of BitLocker
- Protects sensitive files
- Prevents unauthorized access after device theft
- Encrypts the entire drive automatically
- Works with TPM (Trusted Platform Module) for enhanced security
- Supports recovery keys in case you forget your password
BitLocker is available on Windows Pro, Enterprise, or Education editions. For the Windows Home edition, it is not available.
Now, try the methods below to enable BitLocker or disable BitLocker.
Method 1. Turn on/off BitLocker Using MiniTool Partition Wizard
MiniTool Partition Wizard features a BitLocker Manager designed to easily manage BitLocker encryption on your drives, including turning BitLocker on or off and locking or unlocking the drive.
It also allows you to manage BitLocker-protected drives alongside partition and disk operations, making encrypted drive management more convenient and flexible.
MiniTool Partition Wizard FreeClick to Download100%Clean & Safe
Now, let’s look at how to turn on/off BitLocker to protect your hard drive.
How to Turn on BitLocker
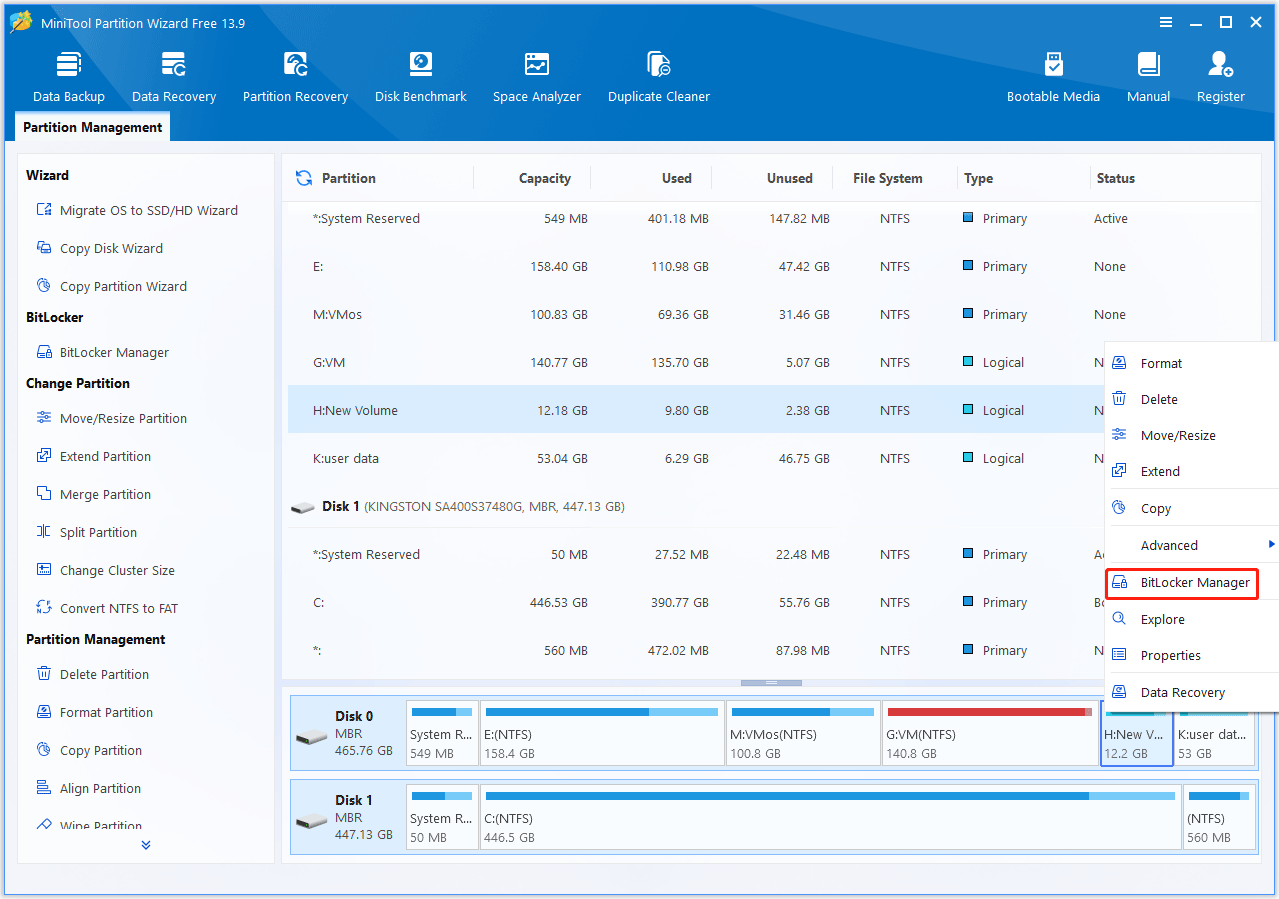
Step 1. Launch MiniTool Partition Wizard. Right-click the target drive and click BitLocker Manager.
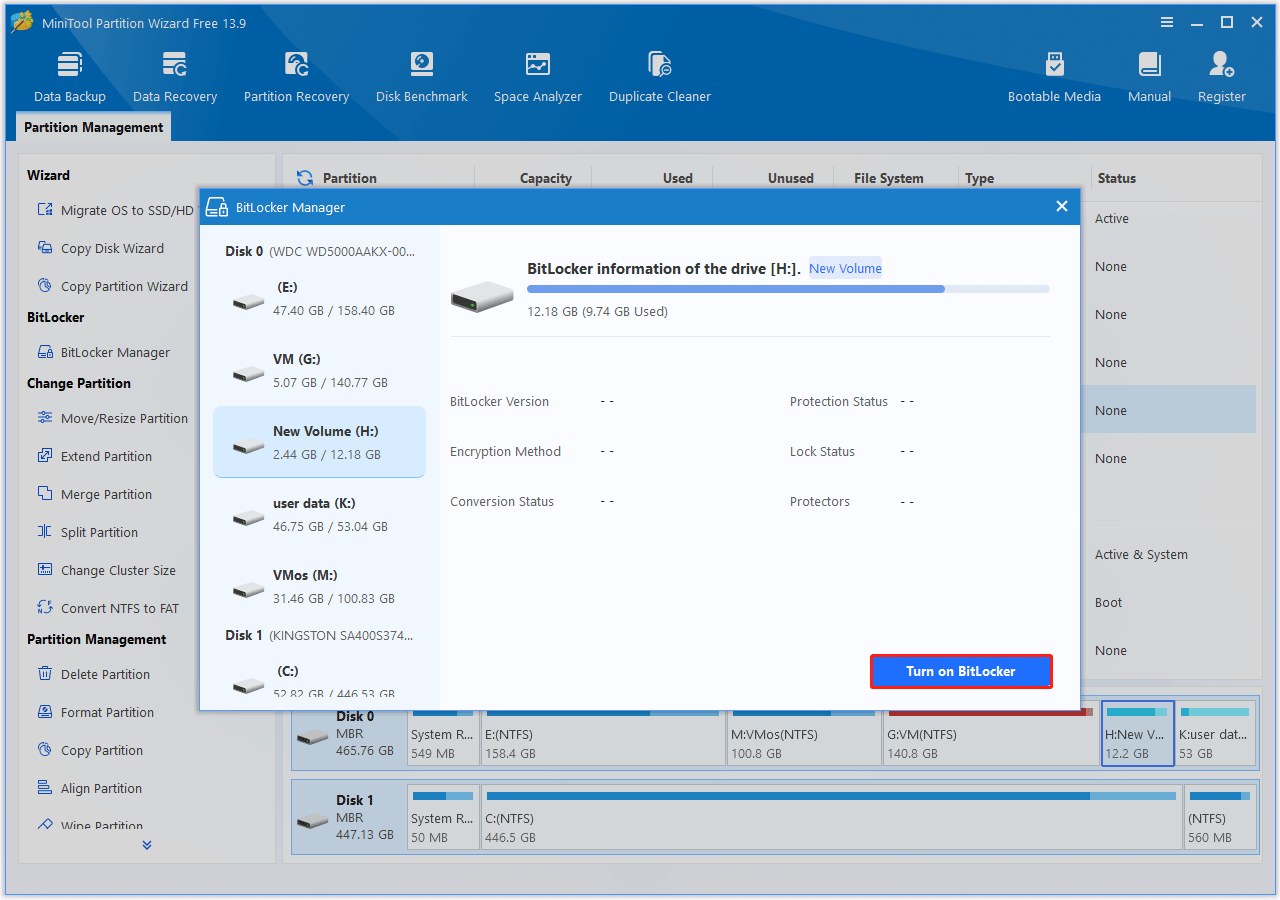
Step 2. Click the Turn on BitLocker button in the pop-up window.
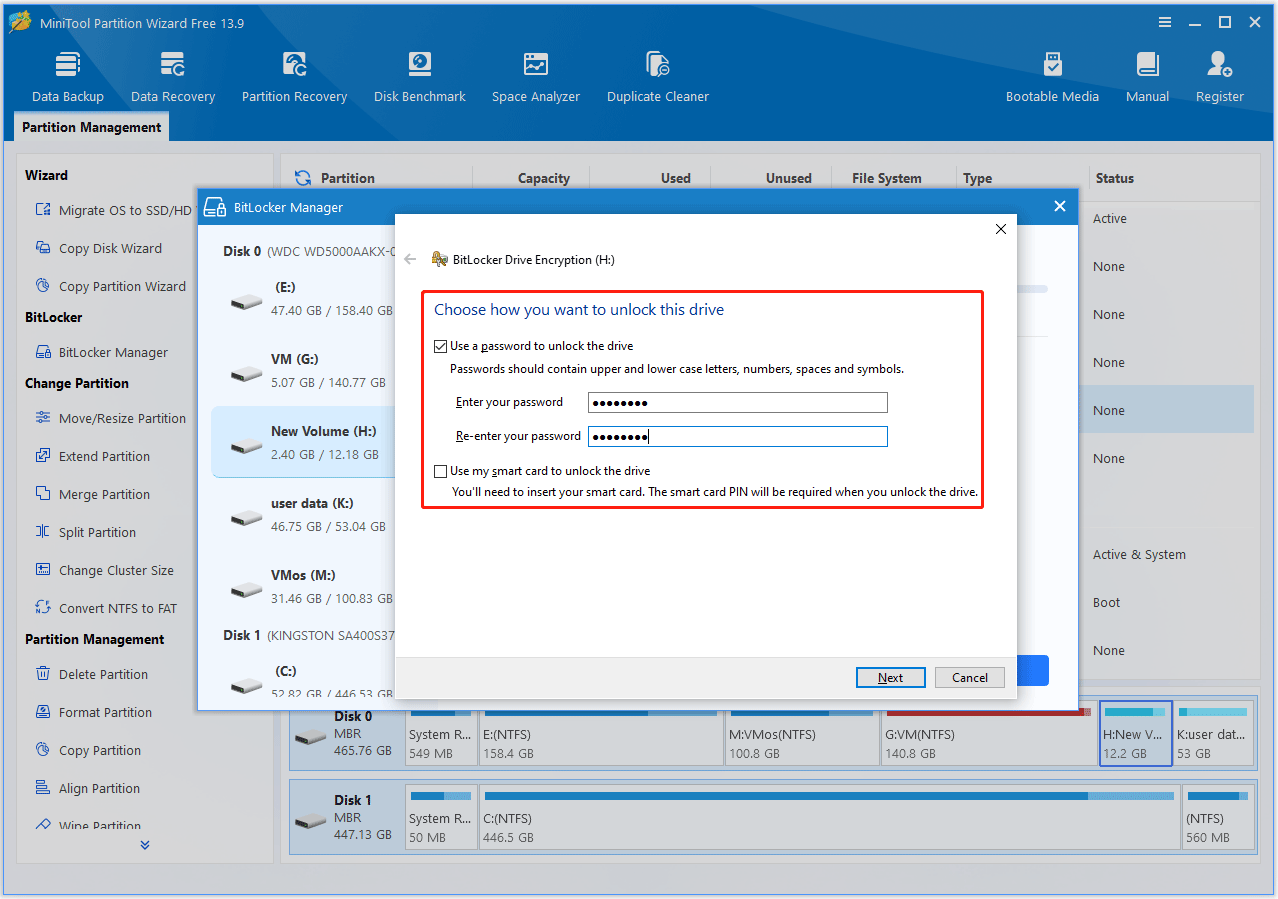
Step 3. In a new pop-up window, choose a method to unlock the drive. After selecting, enter the required password or insert a smart card, then click Next.
- Use a password to unlock the drive
- Use my smart card to unlock the drive
Step 4. Choose where to save the recovery key. Here, we take Save to a file for example.
- Save to your Microsoft account: Saves the recovery key to your Microsoft account for online recovery.
- Save to a USB flash drive: Saves the recovery key to a USB drive for offline storage.
- Save to a file: Saves the recovery key as a .TXT file on another drive or network loction.
- Print the recovery key: Prints the recovery key as a papaer copy.
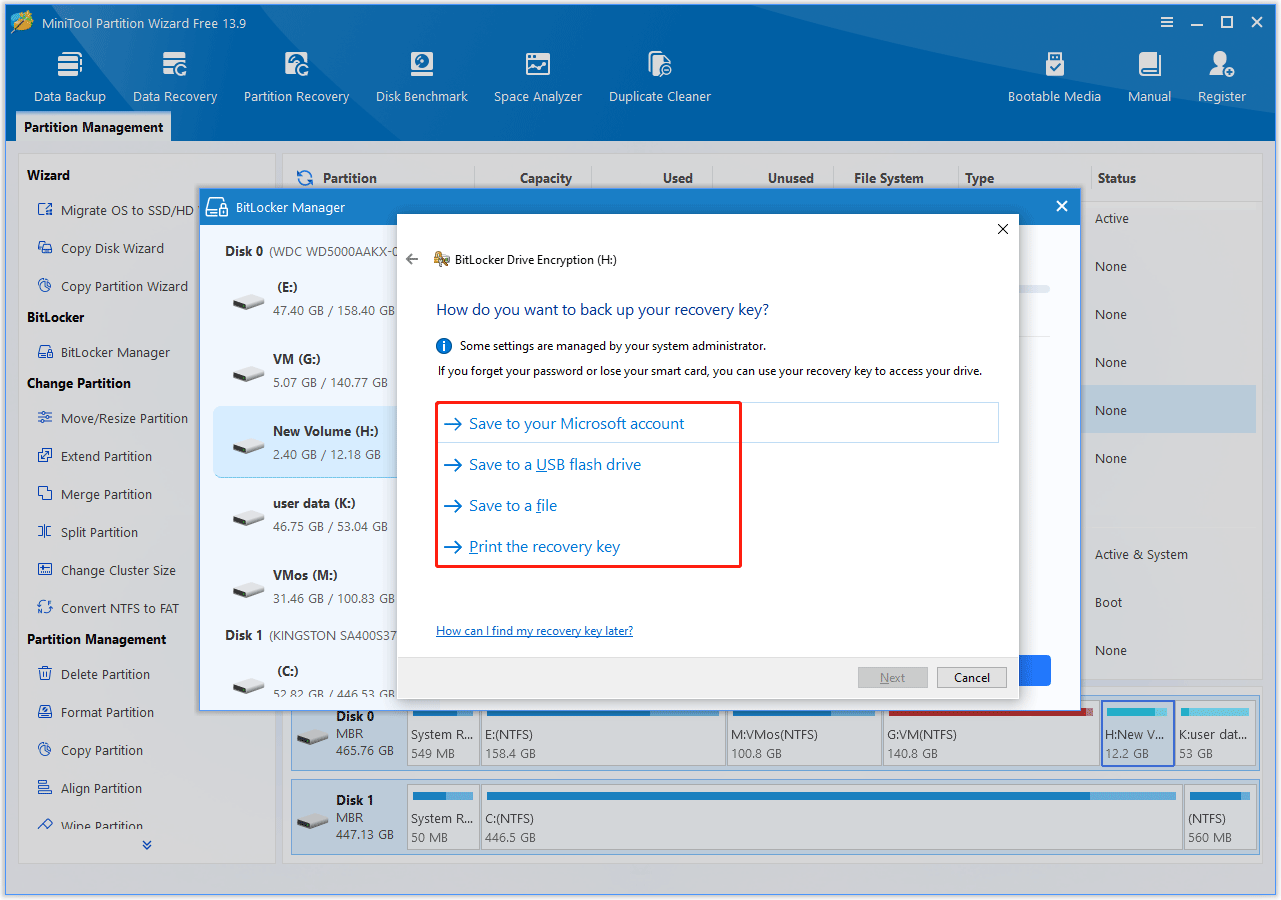
Step 5. Select a location to save the recovery key and click Save. Then click Next.
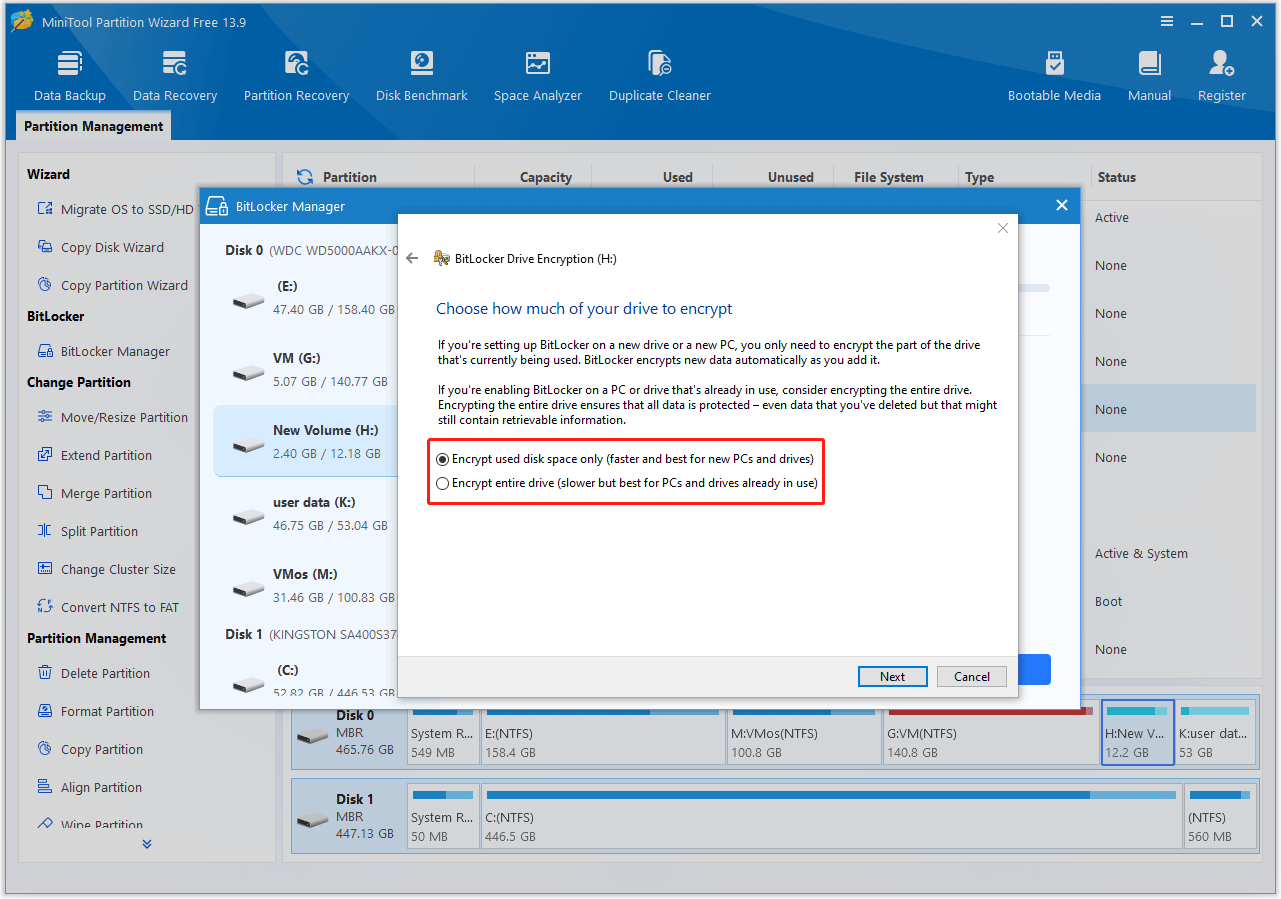
Step 6. Choose how much of your drive to encrypt. Then click Next.
- Encrypt used disk space only (faster and best for new PCs and drives)
- Encrypt entire drive (slower but best for PCs and drives already in use)
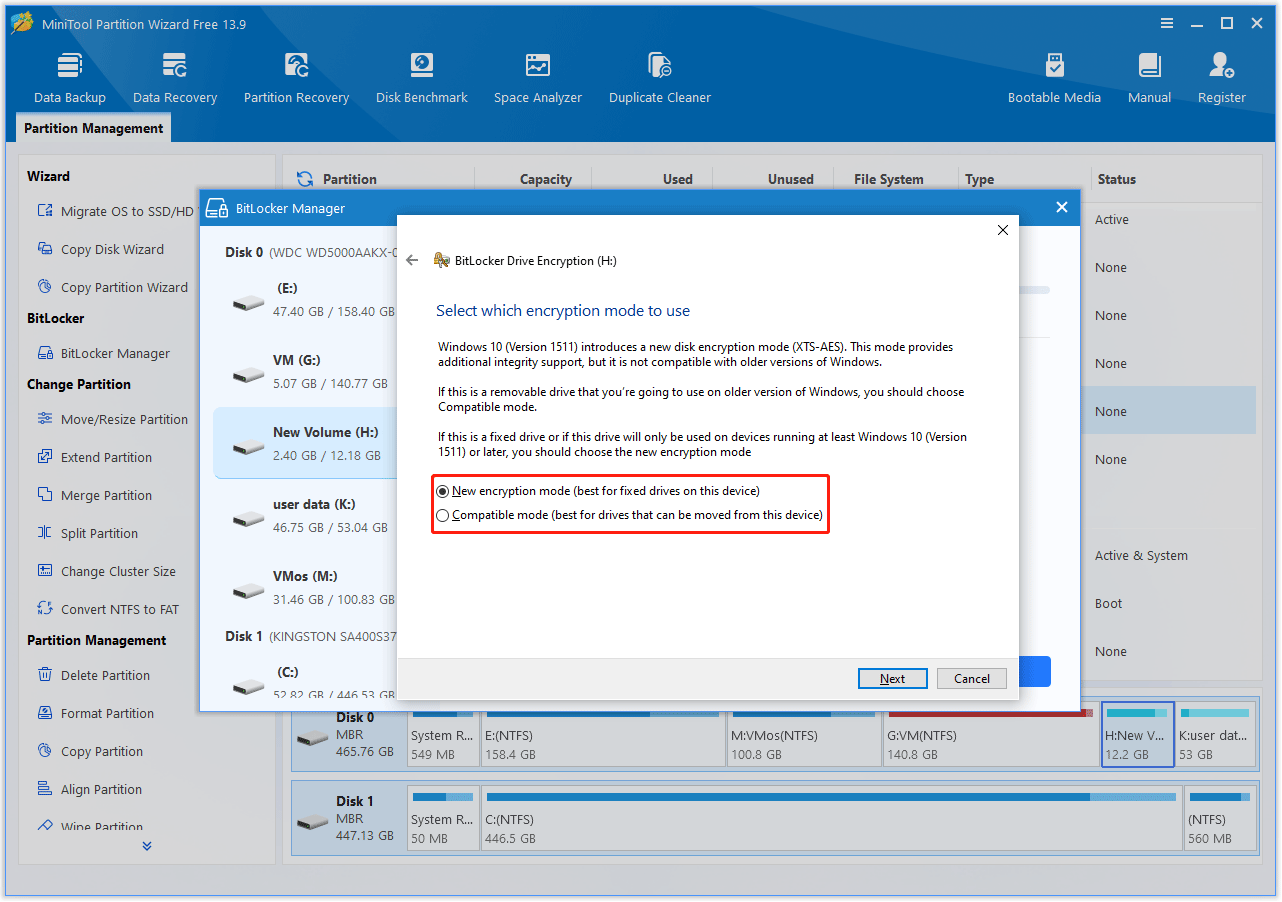
Step 7. Select the encryption mode and click Next.
- New encryption mode (best for fixed drives on this device)
- Compatible mode (best for drives that can be moved from this device)
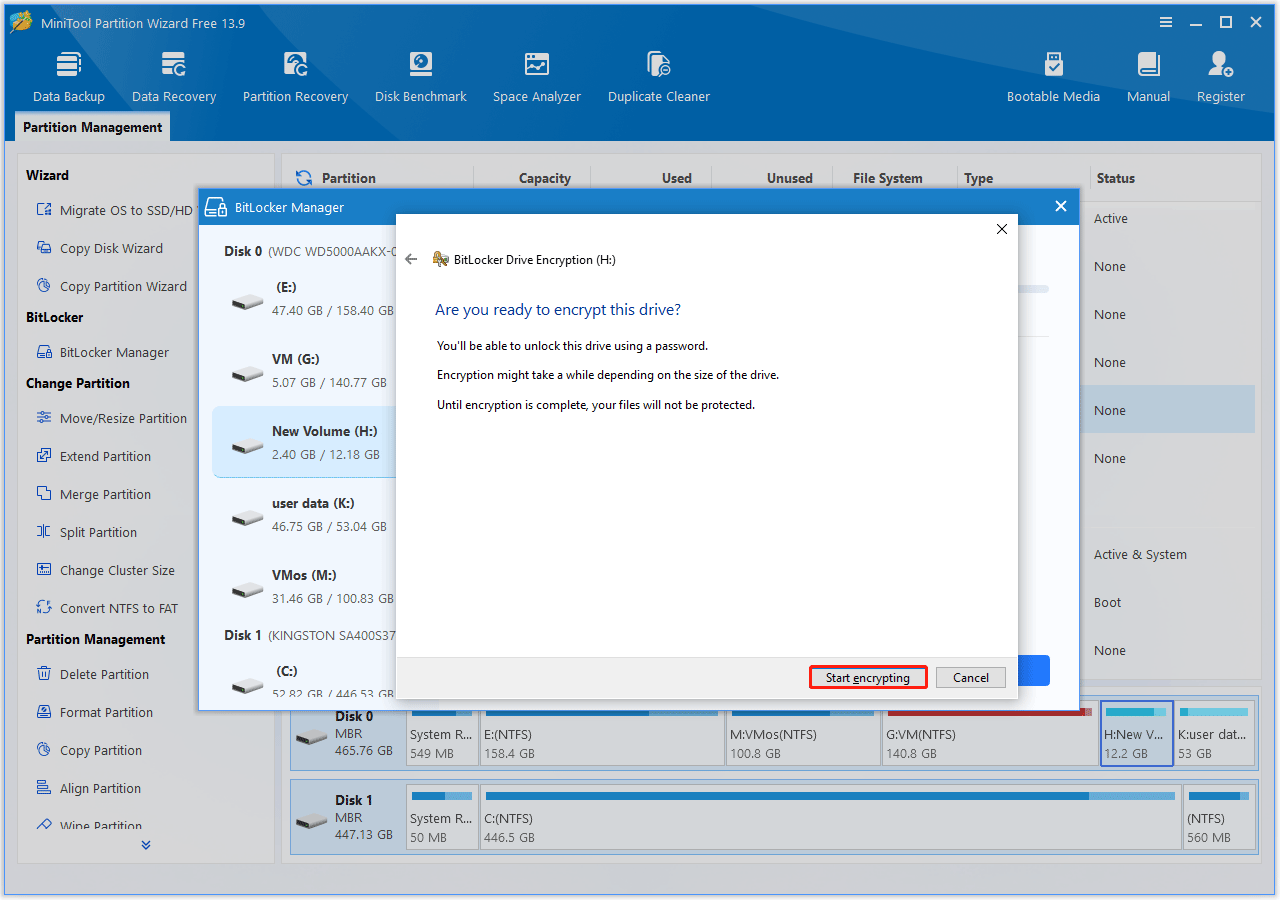
Step 8. Click Start encrypting to begin the encryption process.
Step 9. Once done, click Close to return to the software main interface. Now, the target drive will display a lock icon in an unlocked state, indicating that BitLocker has been enabled successfully.
To lock the BitLocker drive, in the BitLocker Manager window, click Lock. After that, press the refresh button, and the target drive will display in a locked state.
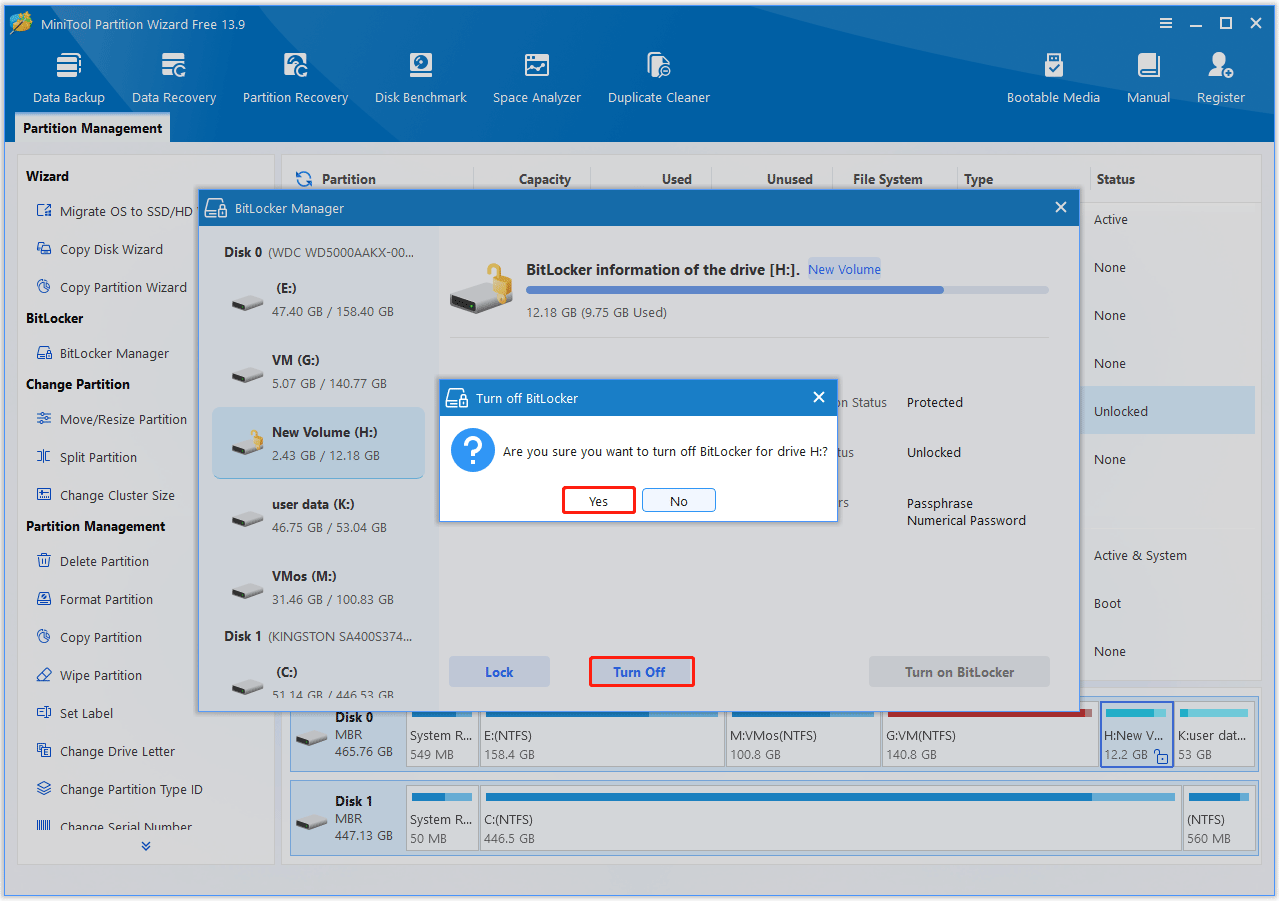
How to Turn off BitLocker
- Right-click the target drive and select BitLocker Manager.
- In the pop-up window, click Turn Off.
- Click Yes to confirm the operation.
Method 2. Turn on/off BitLocker Using Control Panel
Managing BitLocker Drive Encryption via Control Panel is straightforward. To turn on/off BitLocker using this tool, here are the steps:
How to Turn on BitLocker
- Type Control Panel in the Search bar, and open the Control Panel.
- In Control Panel, set View by: to Large icons in the top right.
- Click BitLocker Drive Encryption.
- Under the drive you want to protect, click Turn BitLocker on.
- Follow the prompts to choose how to unlock the drive, choose where to save the recovery key, and select the encryption mode.
- Click Start encrypting. The encryption process may take from several minutes to several hours depending on drive size.
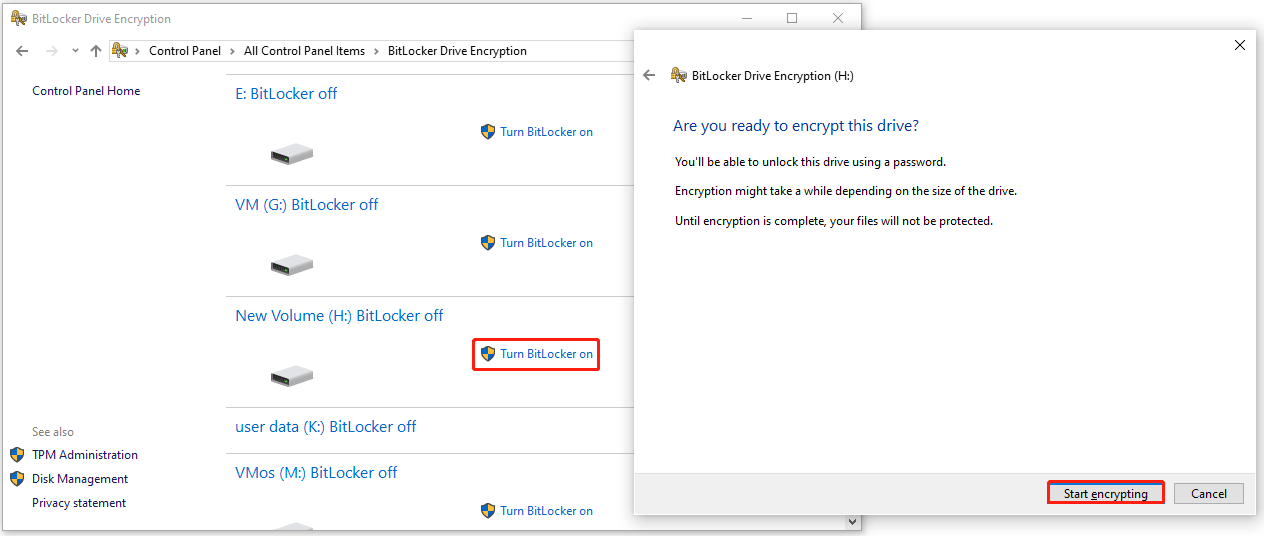
After the encryption is completed, your drive is encrypted but currently unlocked. Restart your computer or reconnect the removable drive to lock the drive.
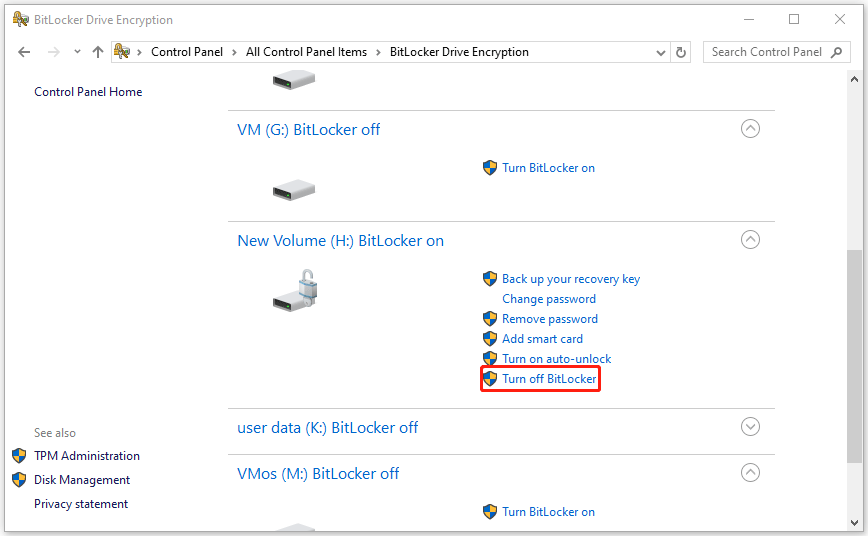
How to Turn off BitLocker
- In BitLocker Drive Encryption of Control Panel, expand the drive that is currently encrypted and click Turn off BitLocker.
- Confirm the prompt by clicking Turn off BitLocker.
- Wait for the decryption to finish.
Method 3. Turn on/off BitLocker Using Command Prompt
BitLocker can be turned on or off via the Command Prompt using the manage-bde command. Administrative privileges are required for these operations.
Step 1. Open Start, type cmd, right-click Command Prompt, and select Run as administrator.
Step 2. To turn on BitLocker for a drive (e.g., H: drive), execute the command.
- Type manage-bde -on H: -Password and press Enter.
- When prompted to set a password for the volume, type your chosen password and press Enter. The password will not be displayed in the command line window as you type.
- Re‑enter the password to confirm, then press Enter again. The Command Prompt will begin encrypting your drive.
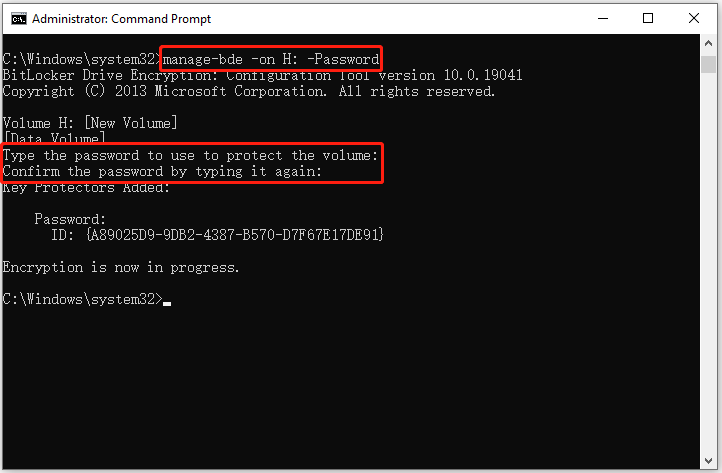
Step 3. To turn off BitLocker, use this command: manage-bde -off H:
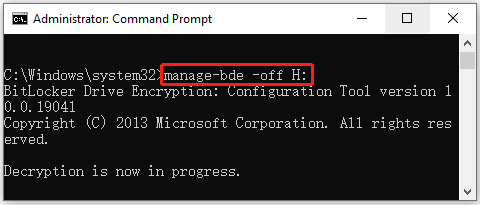
After that, restart your computer or reconnect the removable drive to apply the encryption.
How to Turn On/Off BitLocker FAQ
Bottom Line
BitLocker is one of the most effective ways to protect data on Windows 10/11. This post offers 3 different methods to turn on/off BitLocker. Among them, MiniTool Partition Wizard is the better choice, offering more features.
For any questions or suggestions about MiniTool Partition Wizard, contact us via [email protected]. We’ll reply as soon as possible.
About The Author

Position: Columnist
Vega enjoys helping people with computer problems, including disk management, data recovery, data backup, and more. She is constantly expanding her knowledge in related fields. And she will continue to bring more easy-to-understand professional articles to help people solve various problems on the PC.
User Comments :