Many users are reporting the TeamViewer connection failed no route issue and seeking for solutions on the forum. If you are one of them, you are at the right place. In this article, MiniTool Partition Wizard summaries some possible solutions that have effectively resolved the issue for some users.
TeamViewer is one of the most popular remote assistance software that helps users access and control computers remotely via Internet. But sometimes, TeamViewer might stop working or run into certain problems such as “TeamViewer connection failed not route”.
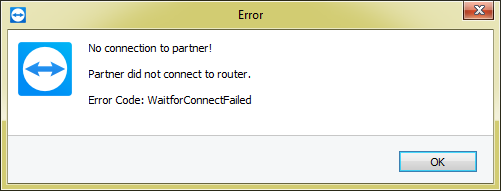
Commonly, this error occurs when users are trying to connect from a remote client to the server or computer, and they will receive an error window in TeamViewer, reading:
No connection to partner!
Partner did not connect to router.
Error Code: WaitforConnectFailed
The root cause of the TeamViewer no connection to partner error may differ in different cases, but you are able to fix it by using one of the following solutions. Just work your way down the list.
Solution 1: Restart the Network Connection
As the error message shows, your partner did not connect to router. So, it is possible that this issue has something to do with the router and the network connection of both computers. Before trying any technical solutions, you can simply restart the router to re-establish the network connection on your computer and your partner.
After restarting the network, you can try connecting to your partner again. If you still receive the “Partner did not connect to router” error message, you can move on to the next solution.
Solution 2: Allow Full Access Control
Besides, to make sure that the TeamViewer client has the privilege to create connections between the involved computers, you need to allow the Full Access Control on both devices. Here’s what you should do:
Step 1: Open the TeamViewer client and click Extras from the upper tool bar. Then, choose Options from the drop-down menu.
Step 2: In the TeamViewer options window, click Advanced tab in the left pane and click Show advanced options in the right pane to show the hidden settings.
Step 3: Under the Advanced settings from connections to this computer section, expand the list of Access Control and choose Full Access. Click OK button to save the changes you’ve made.
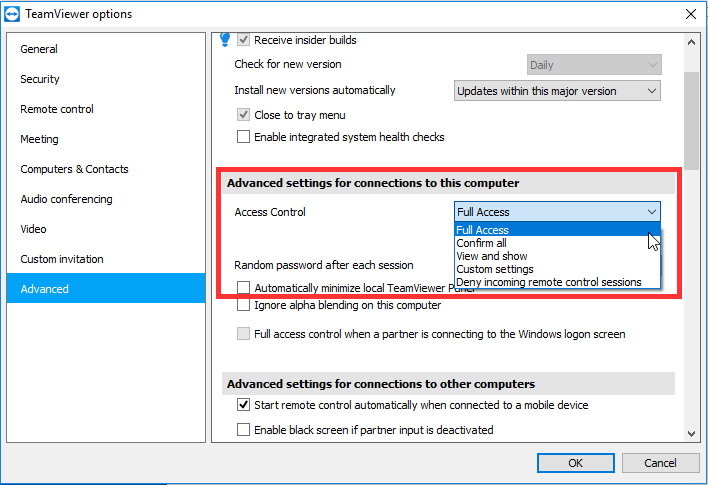
Don’t forget to enable Full Access on your partner PC. After that, restart TeamViewer on both computers and check if the no connection to partner error has been resolved.
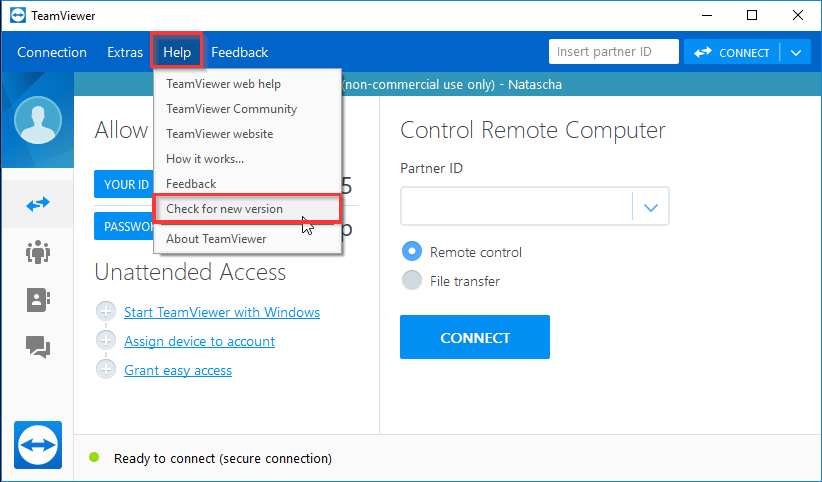
Solution 3: Update or Downgrade TeamViewer
If either you or your partner is using an outdated version of TeamViewer, you might encounter TeamViewer connection failed no route error. In this case, you should make sure the client is up-to-data on both computers. Just open TeamViewer, choose Help > Check for new version, and install the available new version.
If there is no new version and your version of TeamViewer is already up-to date, perhaps you can try downgrading the TeamViewer to a previous version that is more stable. But you should make sure the clients are of the same version on both computers. To do that, just uninstall TeamViewer, download a previous version from the official website, and install it properly.
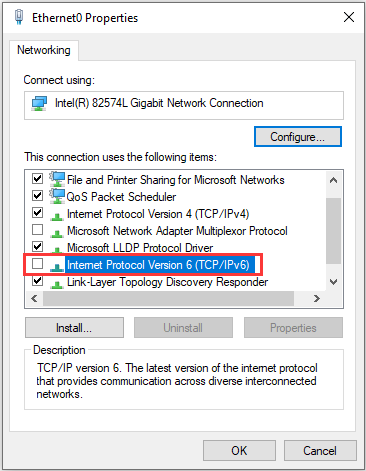
Solution 4: Disable IPv6 on Both Computer
Some users have resolved TeamViewer connection failed no route error by disabling IPv6, and you can also have a try. You can refer to the instructions below and make sure to repeat the operation on the client’s computer.
Step 1: Press Windows + S, input control, and click Control Panel to open it.
Step 2: Navigate to Network and Internet > Network and Sharing Center and click Change adapter settings from the left pane.
Step 3: Right-click the network you are currently using and choose Properties.
Step 4: Uncheck Internet Protocol Version 6 (TCP/IPv6) option and click OK button to save changes.
Solution 5: Flush DNS
Corrupted DNS entries could also lead to the “partner did not connect to router” error in TeamViewer. In this case, flushing DNS cache could be helpful to fix the connection issue. You just need to:
Step 1: Press Windows + R to invoke Run window.
Step 2: Input cmd and press Ctrl + Shift + Enter to run Command Prompt as administrator.
Step 3: Type the following command lines one by one and press Enter after each:
- ipconfig/release
- ipconfig/renew
- ipconfig/flushdns
Once it’s done, exit the utility and check if you can connect with your client’s computer without problems.

User Comments :