A lot of users are searching for how to turn off Steam auto update on google. Is there a complete guide for Steam turn off auto updates? Yes, it is. This post of MiniTool will walk you through detailed steps to disable Steam auto update.
When starting up Steam, there is always an update for either games or the client. Steam auto updates games in the background only if there is a network connection, so you may experience a slow internet connection while running intense operations.
To speed up the gaming process, a great many users want to disable Steam auto update. How to turn off Steam auto update? There is no option to fully turn off Steam auto update. However, you can change the auto update schedule, or disable auto update for a specific game. Please keep reading the following part to learn detailed steps.
Method 1. Change Steam Auto Updates Schedule
To avoid some update failures like Steam update queued, you can change the Steam auto update schedule. It is an indirect method for Steam turn off auto updates. Let’s see how to turn off auto update Steam for the future.
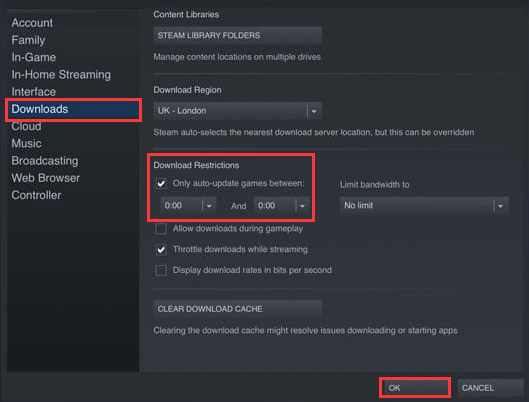
Step 1. Launch your Steam client, and then select Steam > Settings from the upper left corner.
Step 2. Navigate to the Downloads from the left pane, and tick the checkbox for Only auto-update games between under the Download Restrictions section.
Step 3. You can select a time frame from the drop-down menu that you want to Steam updates itself and click OK to save changes.
–image from gamingscan.com
Method 2. Turn off Steam Auto Update for a Single Game
This method is suitable for Steam turn off auto updates on a single game. By doing so, it will stop all auto updates of this game. Here’s how to do that:
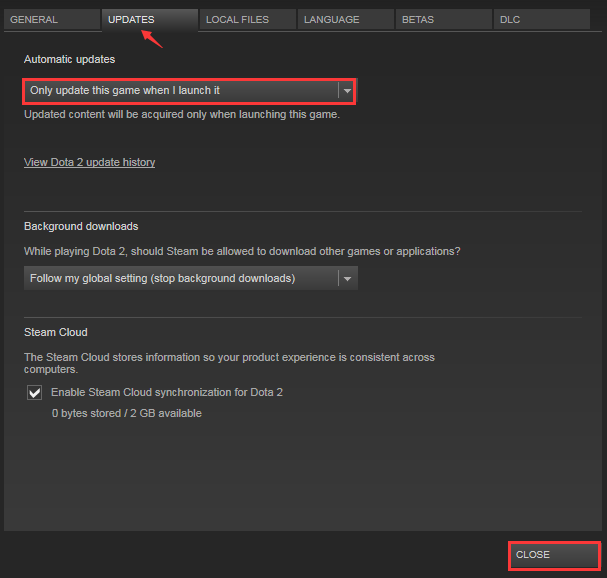
Step 1. Launch the Steam client and navigate to the Library tab.
Step 2. Right-click the game that you want to disable Steam auto update and select Properties.
Step 3. Go to the Updates tab in the Properties window, and then select the Only update this game when I launch it option from the drop-down menu of Automatic updates. After that, click on Close to save the change.
Method 3. Disable Steam Starting on Startup
As mentioned above, Steam updates will start in the background when the computer starts up. For Steam turn off auto updates, you can disable the Steam startup process.
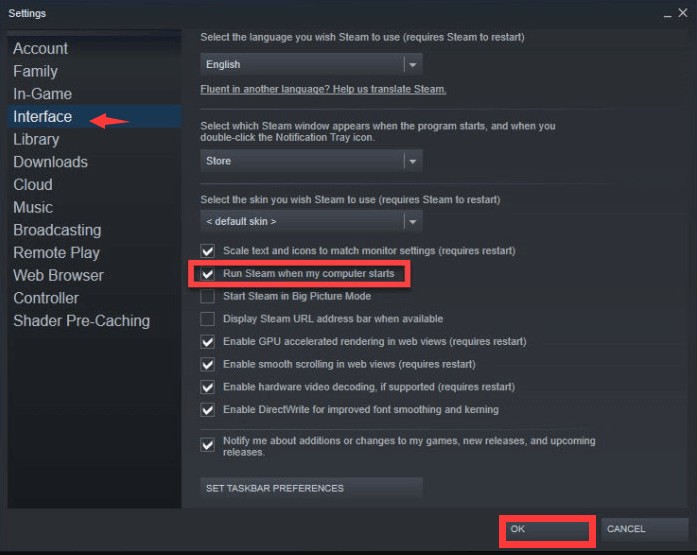
Step 1. Launch your Steam client, and then select Steam > Settings.
Step 2. Navigate to the Interface section from the left sidebar, and then untick the checkbox for Run Steam when my computer starts and click on OK.
Method 4. Disable Auto Updates for Steam Client
Another simple method for Steam turn off auto updates is to add start attributes to the client shortcut. By doing so, it will disable Steam auto update for the client itself. For that:
Step 1. Right-click the Steam shortcut on your desktop and select Properties.
Step 2. Navigate to the Shortcut tab, and then and add the following startup text line to the Target field.
-noverifyfiles -nobootstrapupdate -skipinitialbootstrap -norepairfiles –overridepackageurl
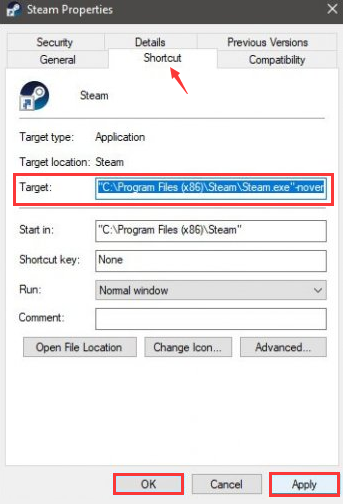
Step 3. Click on OK and Apply to save the change.
Steam how to turn off auto updates? The top 4 methods for Steam turn off auto updates has been told to you. Now, it’s your turn to make a choice.
![How to Fix Discord Game Detection Not Working [5 Proven Ways]](https://images.minitool.com/partitionwizard.com/images/uploads/2021/03/discord-game-detection-not-working-thumbnail.jpg)
User Comments :