If you are a Word user, you may have encountered the spell check not working issue. What causes the error? How to fix it? Here, MiniTool will illustrate the possible causes and offer you some solutions.
Microsoft Word is widely used across the world, which brings much convenience to us. It enables you to change formats, and can check spelling, grammar as well as sentence errors automatically. However, Microsoft Word spell check not working issue sometimes may take place.
There are plenty of factors that can cause the spell check not working in Word error. For instance, if you add more than one language to the system, the error will happen to you. No matter what causes, you can utilize the following methods to fix Word spell check not working issue.
Solution 1: Uncheck Detecting Language Automatically
After you encounter the Word spell check not working in Word issue, you can try unchecking Detecting Language automatically to fix it. Here’s how to do.
Step 1: Open the Word document. Press Ctrl plus A keys to choose all the content, and then right click the Review tab on the top of the main page.
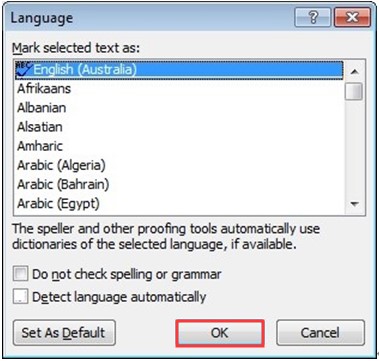
Step 2: Click on Language, and then select Set Proofing Language from its sub-menu.
Step 3: Uncheck the Do not check spelling or grammar and Detect language automatically options. After that, click OK to save changes.
Step 4: At last, check if you can use the spell check utility successfully. If still fails, you can try again or try other solutions.
Solution 2: Change Exceptions
The Microsoft Word editor includes exceptions from all proofing and spelling checks, which is very useful for people who don’t want their work to be checked. If you set the language as custom by mistake, you should reset the language settings to fix the issue.
Step 1: After choosing all the content, click on the Review tab.
Step 2: Choose Language and pick Language Preferences.
Step 3: Then, click on Proofing and go to the end of the options. Uncheck both the Hide spelling errors in this document only and Hide grammar errors in this document only checkboxes.
Step 4: Finally, click on OK to save changes and exit the operation. If you are asked, please restart the application for changes to take effect and check if the issue is fixed or not.

Solution 3: Disable Do Not Check Spelling or Grammar
Another feature of Microsoft Word is to stop checking the spelling or grammar for several words. It enables specific spelling errors not to be detected by the editor. This is very useful for people who always want to ignore these words. However, if you configured unproperly, you may ignore all the spelling check. Under this circumstance, you can try restoring the option to solve the issue.
Step 1: After opening the document, choose the specific word that is not being shown in the spell check and press Shift plus F1.
Step 2: Click on Language, and then uncheck the Do not check spelling or grammar checkbox in the pop-up dialog window.
Step 3: Press OK to save changes.

Solution 4: Enter Safe Mode of Microsoft Word
The add-in in Word can affect the spelling and grammar checking tool, causing it cannot work normally or not working at all. You can check this n safe mode. That is because Word will load without any add-in under the safe mode.
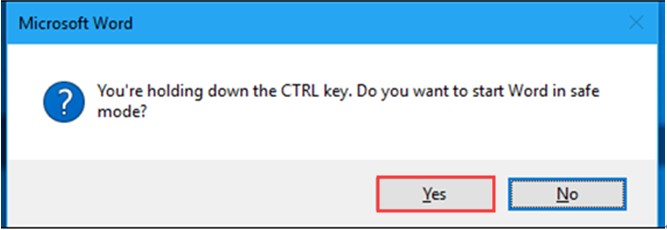
Step 1: Press the Ctrl key and choose the Word icon on your desktop or in your program files.
Step 2: In the elevated window, select Yes.
Step 3: Open an existing document and press F7 to perform spell check. If it works, exit Word and continue working.
Step 4: Open the document again, and then choose File > Options > Add-ins.
Step 5: Chooser the add-in type in the Manage list, and then select Go.
Step 6: Clear the checkbox that is next to the add-in that you would like to disable, and then click on OK to execute the change.
That’s all solutions that MiniTool would like to share with you. Pick one now!
User Comments :