How do I reset Windows Update components? Do you have such doubt? If so, this post will be suitable for you as it provides you some methods to do that. Now, check the detailed information from MiniTool.
About Windows Update Reset
As you know, Windows Update plays an important role in Windows 10 system. It is capable of downloading and installing the latest updates with bug fixes, security patches, as well as drivers. However, you may encounter various Windows Update issues like Windows Update not working, Windows 10 Update error 80072ee2, Windows Update cannot currently check for updates, etc.
At this time, performing a Windows Update reset is useful. How do I reset Windows Update components? You may be confused about it like many other users. In the following content of this post, several methods to reset Windows Update Windows 10 will be introduced to you.
Method 1: Reset Windows Update via Troubleshooter Tool
The reset Windows Update tool from Microsoft helps you perform that operation with ease. To reset Windows 10 Update via Microsoft Troubleshooter, please refer to the steps below.
Step 1: Click here to download the Windows Update Troubleshooter from Microsoft.
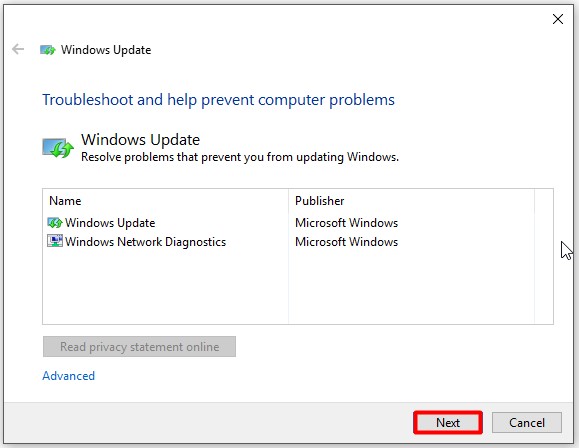
Step 2: You can receive the following window by double clicking the downloaded file. Click the Next button in the prompted window.
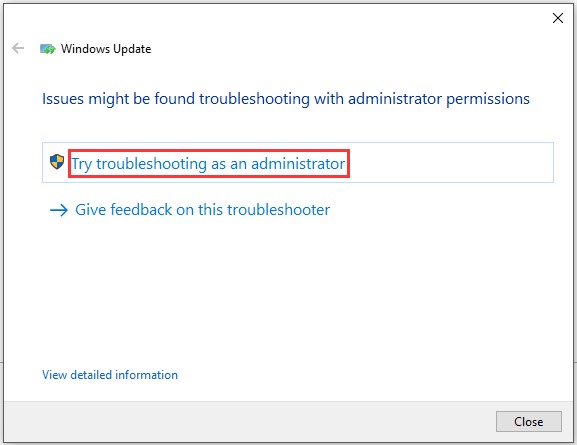
Step 3: Then the Troubleshooter utility will detect your Windows Update for errors. If you get the following window, click Try troubleshooting as an administrator.
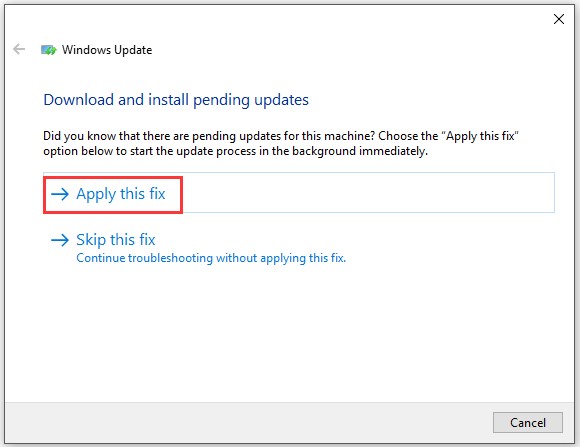
Step 4: Follow the pop-up instruction to start the operation. If it finds any solutions, you will be elevated with the window below. Click Apply this fix to execute the solution, and then close the utility.
Step 5: Open the utility again. Then choose Windows Networking Diagnostics and continue the operation with pop-up instruction to ensure that there is no network associated issue with Windows Update.
Method 2: Reset Windows Update via Command Prompt
The Windows built-in utility – Command Prompt, can also reset Windows Update. The whole process can be divided into several phases. You can carry out them one by one.
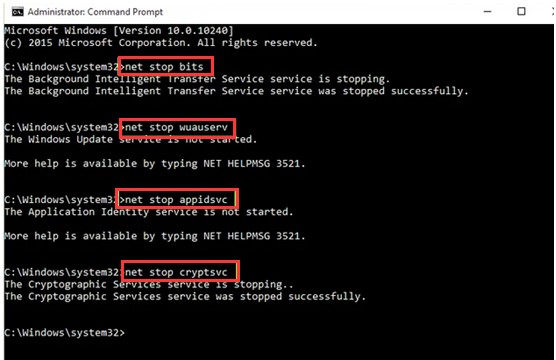
Phase 1: Stop Windows Updates Services
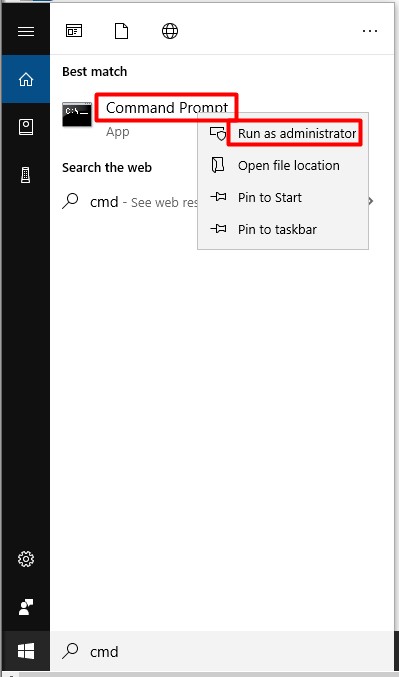
Step 1: Type cmd in the search box, and then right click Command Prompt from the search results and click on Run as administrator.
Step 2: In the pop-up window, type the following commands and then hit Enter after each to stop Background Intelligent Transfer Service (BITS), Windows Update service, as well as Cryptographic service.
- net stop bits
- net stop wuauserv
- net stop appidsvc
- net stop cryptsvc
Phase 2: Delete qmgr*.dat Files
Now, you need to type and execute the following commands to delete qmgr*.dat files that are created by BITS.
- Del “%ALLUSERSPROFILE%Application
- DataMicrosoftNetworkDownloader*.*”
Then type Y to confirm the operation.
Phase 3: Remove Windows Update Cache
After deleting qmgr*.dat files, you should remove Windows Update cache to allow Windows 10 re-download the updates as the already downloaded files on your computer might be damaged. To delete Windows Update cache, you just need to execute the following commands.
- rmdir %systemroot%SoftwareDistribution /S /Q
- rmdir %systemroot%system32catroot2 /S /Q
Phase 4: Reset BITS and Windows Update Services
Now, it’s time to reset the BITS service and Windows Update services to their default security descriptor. Type the following commands and then click Enter after each line.
- sc.exe sdset bits D:(A;;CCLCSWRPWPDTLOCRRC;;;SY)(A;;CCDCLCSWRPWPDTLOCRSDRCWDWO;;;BA)(A;;CCLCSWLOCRRC;;;AU)(A;;CCLCSWRPWPDTLOCRRC;;;PU)
- sc.exe sdset wuauserv D:(A;;CCLCSWRPWPDTLOCRRC;;;SY)(A;;CCDCLCSWRPWPDTLOCRSDRCWDWO;;;BA)(A;;CCLCSWLOCRRC;;;AU)(A;;CCLCSWRPWPDTLOCRRC;;;PU)
Then you need to type cd /d %windir%system32 and click Enter to move to the System32 folder.
Phase 5: Register BITS and DLL Files to Registry
Carry out the following commands to register all the BITS and Windows Update DLL files on the Registry.
- regsvr32.exe /s atl.dll
- regsvr32.exe /s urlmon.dll
- regsvr32.exe /s mshtml.dll
- regsvr32.exe /s shdocvw.dll
- regsvr32.exe /s browseui.dll
- regsvr32.exe /s jscript.dll
- regsvr32.exe /s vbscript.dll
- regsvr32.exe /s scrrun.dll
- regsvr32.exe /s msxml.dll
- regsvr32.exe /s msxml3.dll
- regsvr32.exe /s msxml6.dll
- regsvr32.exe /s actxprxy.dll
- regsvr32.exe /s softpub.dll
- regsvr32.exe /s wintrust.dll
- regsvr32.exe /s dssenh.dll
- regsvr32.exe /s rsaenh.dll
- regsvr32.exe /s gpkcsp.dll
- regsvr32.exe /s sccbase.dll
- regsvr32.exe /s slbcsp.dll
- regsvr32.exe /s cryptdlg.dll
- regsvr32.exe /s oleaut32.dll
- regsvr32.exe /s ole32.dll
- regsvr32.exe /s shell32.dll
- regsvr32.exe /s initpki.dll
- regsvr32.exe /s wuapi.dll
- regsvr32.exe /s wuaueng.dll
- regsvr32.exe /s wuaueng1.dll
- regsvr32.exe /s wucltui.dll
- regsvr32.exe /s wups.dll
- regsvr32.exe /s wups2.dll
- regsvr32.exe /s wuweb.dll
- regsvr32.exe /s qmgr.dll
- regsvr32.exe /s qmgrprxy.dll
- regsvr32.exe /s wucltux.dll
- regsvr32.exe /s muweb.dll
- regsvr32.exe /s wuwebv.dll
Phase 6: Reset Network Configurations
Execute the following commands to reset network configurations.
- netsh winsock reset
- netsh winsock reset proxy
Finally, type the commands below and then hit Enter to restart BITS, Windows Update, and Cryptographic services.
- net start bits
- net start wuauserv
- net start appidsvc
- net start cryptsvc
After executing the above commands, restart your computer. Now, the Windows Update reset operation takes into effect.
User Comments :