Have you ever encountered a black screen with the message “personalized settings not responding”? You may be unable to see your Desktop when your Windows has the problem. MiniTool Solution offers you 4 ways to remove it. You can try them one by one.
Some users have reported that when they reboot the system after a Windows update, it shows a white or black screen afterwards with the message “personalized settings not responding” at the top.
There are two reasons for this issue:
- File Explorer is unable to start after Windows Update.
- There is a bug after Windows update, which makes Windows fails to start your peripheral drivers.
If you encounter personalized settings not responding in Windows 10, you can fix it with the following solutions.
Solution 1: Delete the Registry Key for Windows Update
If the error “personalized settings not responding” appears after you perform Windows update, you can use Registry Editor to solve it.
Step 1: Press Win + R to open Run window. Then input regedit in the dialog box and click OK to access Registry Editor.
Step 2: Navigate to the following location:
ComputerHKEY_LOCAL_MACHINESOFTWAREMicrosoftActive SetupInstalled Components{89820200-ECBD-11cf-8B85-00AA005B4340}
Step 3: Right-click {89820200-ECBD-11cf-8B85-00AA005B4340} from the left pane and choose Delete.
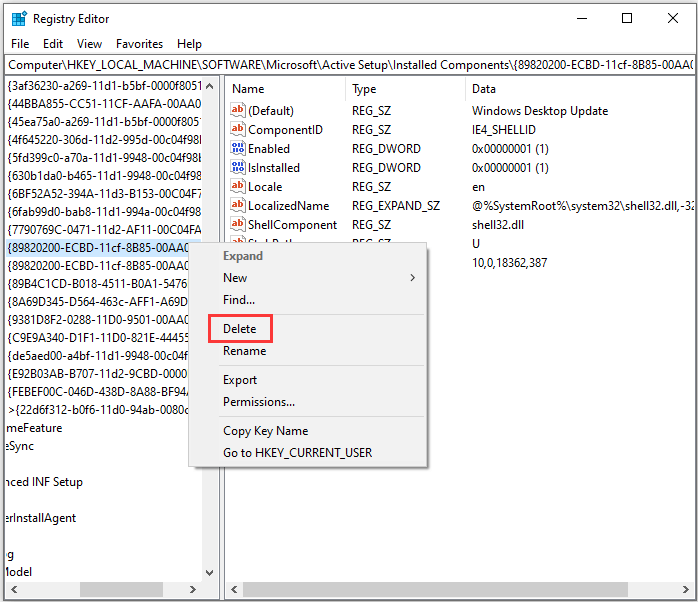
Step 4: Follow the pop-up instructions to finish the rest steps.
Solution 2: Relaunch Windows Explorer
You can also try relaunching Windows Explorer when personalized settings not responding happens.
Step 1: Press Ctrl + Alt + Del and then select Task Manager.
Step 2: Right-click Windows Explorer and choose End task.
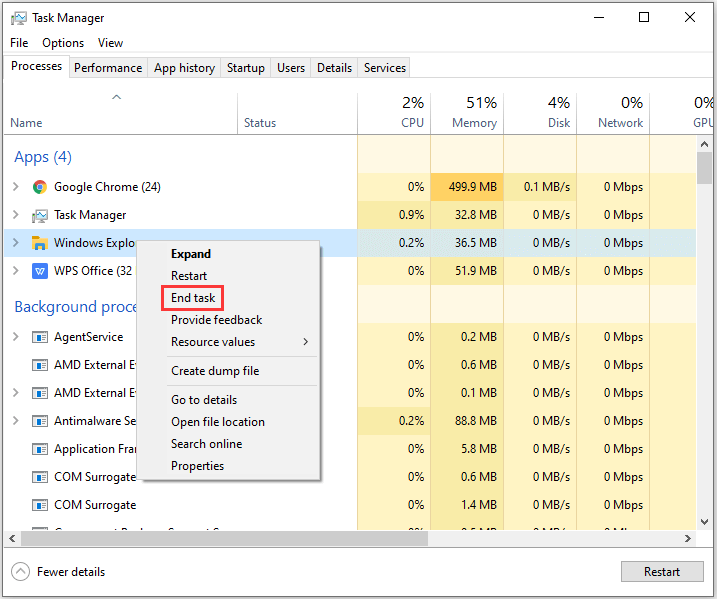
Step 3: Click File from the upper-left corner and choose Run new task.
Step 4: Type explorer in the new window and check Create this task with administrative privileges option. Then click OK.
Step 5: Restart your PC and check whether “personalized settings not responding” has been fixed.

Solution 3: Run SFC Scan
Corrupted system files could also cause this issue. You can run the Windows built-in utility System File Checker (SFC) to scan and restore corrupted system files. Follow the steps below.
Step 1: Run Command Prompt as administrator.
Step 2: Input the command sfc /scannow and press Enter to run the command.

Step 3: Restart your computer and see if the solution works.
If you still see “personalized setting not responding” message, you need to try the next way.
Solution 4: Disconnect Your Devices
As I mentioned, the Windows update may have a bug that stops Windows from loading the device drivers and leads to “personalized settings not responding”.
So, once the update is installed, you need to disconnect all the devices (including keyboard, mouse and so on) before you restart the computer.
Then reboot your PC and plug in your peripheral devices. Sign in to your account and the issue should be removed.
User Comments :