What causes NVIDIA audio not working? According to a survey, the issue often occurs after the default audio output device was changed accidentally. Moreover, faulty or outdated audio drivers and the disabled Onboard sound device are responsible for the NVIDIA sound not working problem. Don’t worry. Here are several effective methods to fix it.
![How to Fix High Definition Audio Controller Code 10 [6 Ways]](https://images.minitool.com/partitionwizard.com/images/uploads/2021/08/high-definition-audio-controller-code-10-thumbnail.jpg)
Fix 1. Set the Default Audio Output Device
Many users have proven that setting the default audio output device can fix the NVIDIA High Definition audio no sound problem. Let’s have a try.
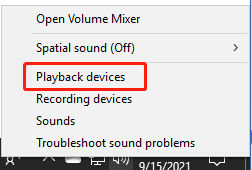
Step 1. Right-click the Volume/Sound icon from the notification area and select Playback devices.
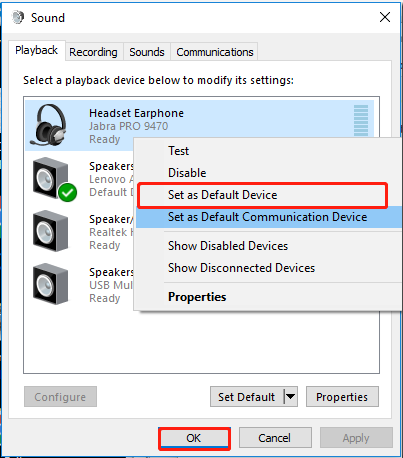
Step 2. Stay in the Playback tab, and then right-click the desired audio device and select Set as Default Device.
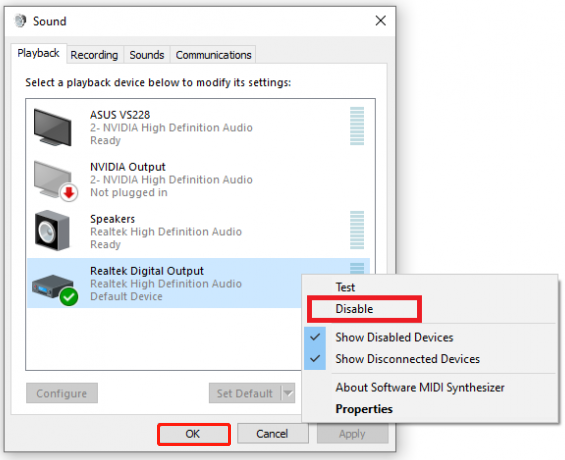
Step 3. Right-click the Digital Audio/Monitor/HDMI Output device and select Disable from the appeared menu.
Step 4. Click on OK to save changes.
Now, you can check if the NVIDIA HDMI audio not working issue gets resolved.
Fix 2. Roll Back or Update or Reinstall the Audio Driver
The NVIDIA High Definition audio not working Windows 10 issue can be caused by corrupt or outdated audio device drivers. To fix it, you can try rolling back, or updating, or reinstalling the audio driver.
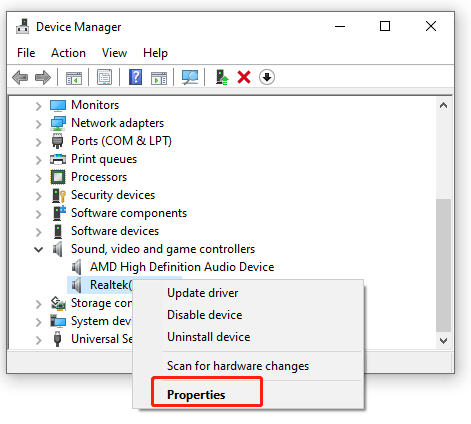
Step 1. Right-click the Start button and select Device Manager from the context menu.
Step 2. Expand the Sound, video and game controllers category, and then right-click Realtek HD Audio driver and select Properties.
Step 3. Go to the Driver tab, and then click on Roll Back Driver and follow the on-screen prompts to complete the operation.
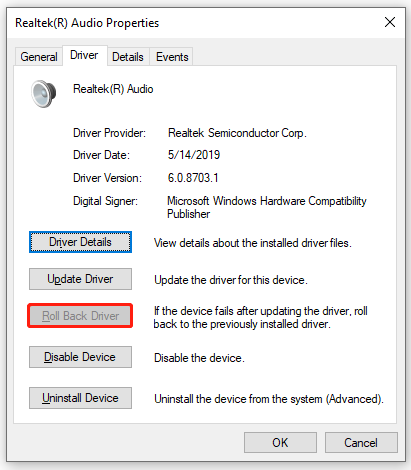
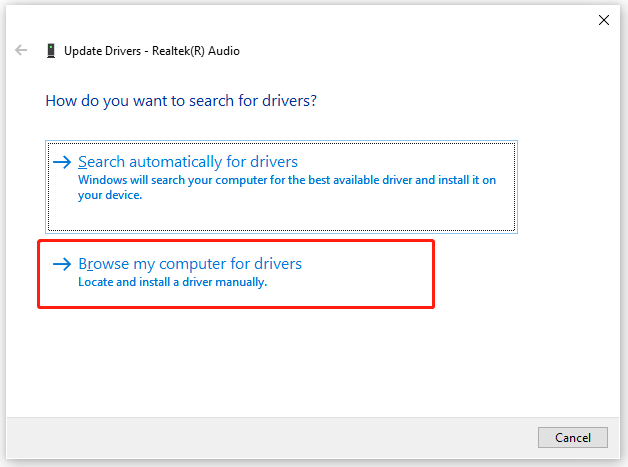
Step 4. If the NVIDIA audio not working problem still occurs, you can click on Update Driver and select Browse my computer for driver software. Then click on Let me pick from a list of available drivers on my computer in the pop-up window.
Step 5. After a while, tick the checkbox for Show compatible hardware and select a correct driver version from the list and click on Next. Then wait for the update to complete.

Step 6. Once done, restart your computer and check if the problem is solved. If not, you can try reinstalling the audio driver by selecting Uninstall Device in Step 3 and follow the on-screen prompts to complete it. Then Windows will install a default audio driver automatically next startup.
Fix 3. Reinstall NVIDIA GPU Driver
In addition to the audio driver, the outdated or corrupt GPU driver can trigger the NVIDIA sound not working issue. Here you can try reinstalling the NVIDIA GPU driver.
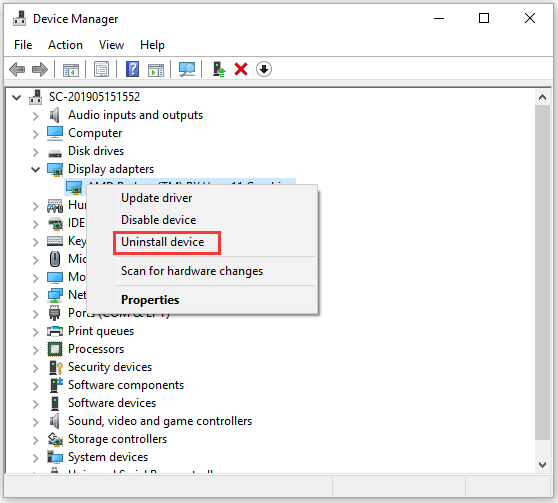
Step 1. Open the Device Manager window again and expand the Display adapters category.
Step 2. Right-click the graphics card driver and select Uninstall device. Then follow the on-screen prompt to complete this uninstallation.
Step 3. Restart your computer and then Windows will automatically install a default graphics card driver for you.
Once done, you can see if the NVIDIA HDMI audio not working issue is fixed.
Fix 4. Enable the Onboard Sound Device in BIOS
According to some user reported, the onboard sound device gets disabled automatically when an external sound device is connected or a new graphics card driver is installed. In this case, you can follow the steps below to enable the onboard sound device in BIOS:
Step 1. Restart your computer and press the Delete or F2 key when the startup screen appears to enter BIOS. This may vary from different configurations and it depends on your motherboard. So, make sure you press the correct BIOS key.
Step 2. Go to the Advanced > Onboard Sound Device tab and change its status to ON.
Step 3. Press F10 or Enter to save the change and exit BIOS.
![[Fixed] Windows Hello for Business Provisioning Won’t Be Launched](https://images.minitool.com/partitionwizard.com/images/uploads/2021/09/windows-hello-for-business-provisioning-will-not-be-launched-thumbnail.jpg)
Fix 5. Disable NVIDIA HDMI Sound Adapter in BIOS
If you encounter the NVIDIA High Definition audio no sound issue after installing NVIDIA HDMI sound adapter, then the issue could be related to your BISO and its settings. In this case, you can try disabling the NVIDIA HDMI sound adapter in BIOS.
Step 1. Enter BIOS by following Step 1 in the above fix.
Step 2 Navigate to the Advanced tab and then select Onboard Devices.
Step 3. Change the status of the NVIDIA HDMI Sound Adapter to Disabled, and then press F10 to save the change.
After that, exit BIOS and see if the “NVIDIA High Definition Audio driver Windows 10 no sound” problem is gone.
Fix 6. Perform a Clean Installation of NVIDIA Driver
If the NVIDIA High Definition audio no sound problem persists after trying all the above fixes, you may consider performing a clean installation of the NVIDIA driver. Here’s how:
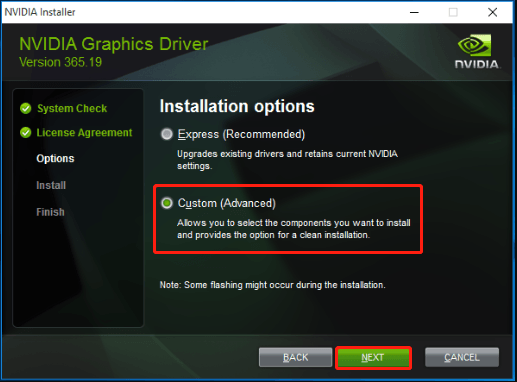
Step 1. Open the installation of the NVIDIA installer and double-click the setup file to run it.
Step 2. Go to the Installation options menu, and then select the Custom (Advanced) option and click on Next.
Step 3. Select the checkbox for Perform a clean installation and click on Next. Then follow the on-screen instructions to complete the process.
User Comments :