A lot of users encounter the “The New Storage Pool Wizard did not successfully complete” issue when users try to create a storage pool for Storage Spaces on Windows 10. How to fix this problem? This article from MiniTool Partition Wizard will help you fix the error.
Storage Spaces is a technology built into Windows and Windows Server that helps you protect data from drive failure and increase the storage space for your data. It usually stores extra copies of your data, so if one of your drives fails, you still have a full copy of your data. If capacity is insufficient, simply add more drives to the storage pool.
Sometimes, however, you may encounter the following error message when you attempt to create a storage pool for Storage Spaces.
The New Storage Pool Wizard did not successfully complete. Could not create storage pool. One of the physical disks specified is not supported by this operation.
When you encounter this problem, it may describe why the operation did not complete successfully. This description may vary, however, it’s all the same error. It is one of the storage pool errors. The solutions provided in this article apply to all situations.
How to Fix The New Storage Pool Wizard Did Not Successfully Complete
If you are faced with the “The New Storage Pool Wizard did not successfully complete” issue, you can try the two methods below to resolve the issue.
# 1. Verify that the Attached Disks Meet Storage Pool Requirements
According to Microsoft documentation, you can use commodity drives connected via Serial Attached SCSI (SAS), Serial ATA (SATA), PCI-Express, M.2, U.2, or USB. Storage tiers that abstract physical disks are not compatible with Storage Spaces. This includes VHDs and pass-through disks in virtual machines, as well as storage subsystems that layer RAID implementations on top of physical disks. Storage Spaces does not support iSCSI and Fiber Channel controllers.
The RAID adapter (if used) must be in non-RAID mode with all RAID functions disabled. Such adapters must not abstract physical disks, cache data, or hide any attached devices, including enclosure services provided by the bundle of attached disks (JBOD) devices. Storage Spaces is only compatible with RAID adapters that support disabling all RAID functions completely.
# 2. Initialize Disk
This solution requires you to initialize the attached disk for which the storage pool will be created.
Before initializing the disk, you should recover data from the uninitialized disk.
Now you can initialize the disk to MBR or GPT without data loss. How to do that? There are 3 accessible ways that you can choose.
Option 1: Initialize Disk via Disk Management
You can use the Windows built-in tool Disk Management to initialize the disk. But you should make sure that the disk is listed as Unallocated in the Disk Management tool. With a brand-new hard drive, it’s no surprise to find it unallocated.
Step 1: Press the Win + R key to open the Run dialog. Then type diskmgmt.msc in the box and press Enter to open the Disk Management window.
Step 2: Right-click the Unknown disk and select Initialize Disk.
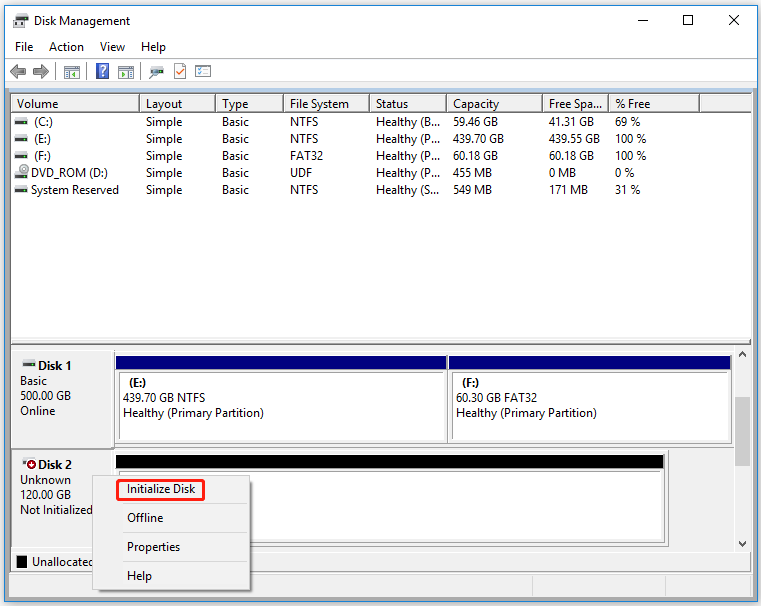
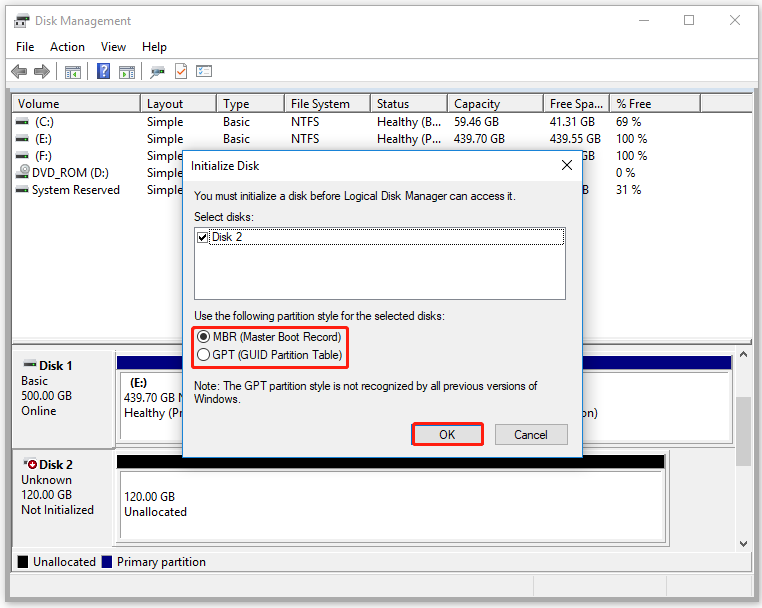
Step 3: In the pop-up window, select the partition style for the disk and click on OK. If you are not sure to select MBR or GPT, you can refer to this article.
However, with an old hard drive that is already partitioned and has data stored on it, right-clicking it in Disk Management reveals that there is no “Initialize Disk” option. In this case, you have to initialize the disk with Diskpart.
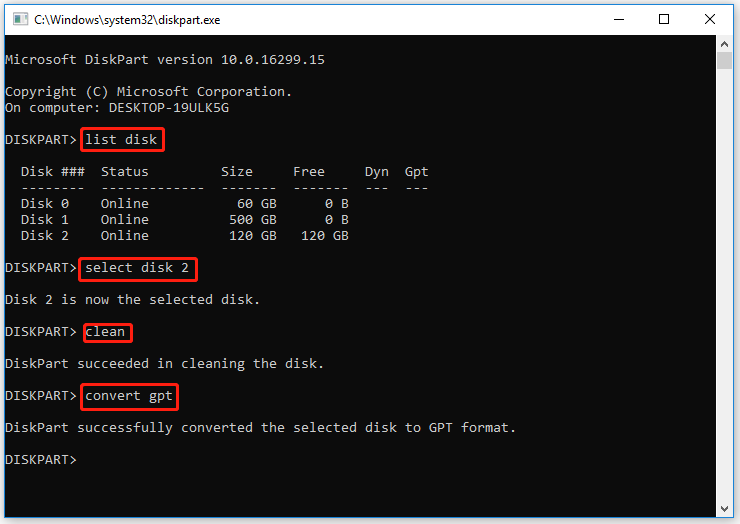
Option 2: Initialize Disk via Diskpart
Diskpart is also a Windows built-in tool that can initialize disks. However, this tool needs you to delete all partitions on the disk before initializing the disk.
Step 1: Open the Run dialog box again, and then type diskpart in it and press Enter.
Step 2: In the Diskpart window, type the following commands in order and press Enter after typing each command.
- list disk
- select disk * (* represents the number of the disk that you want to initialize)
- clean
- convert gpt (or convert mbr if you are converting a GPT disk)
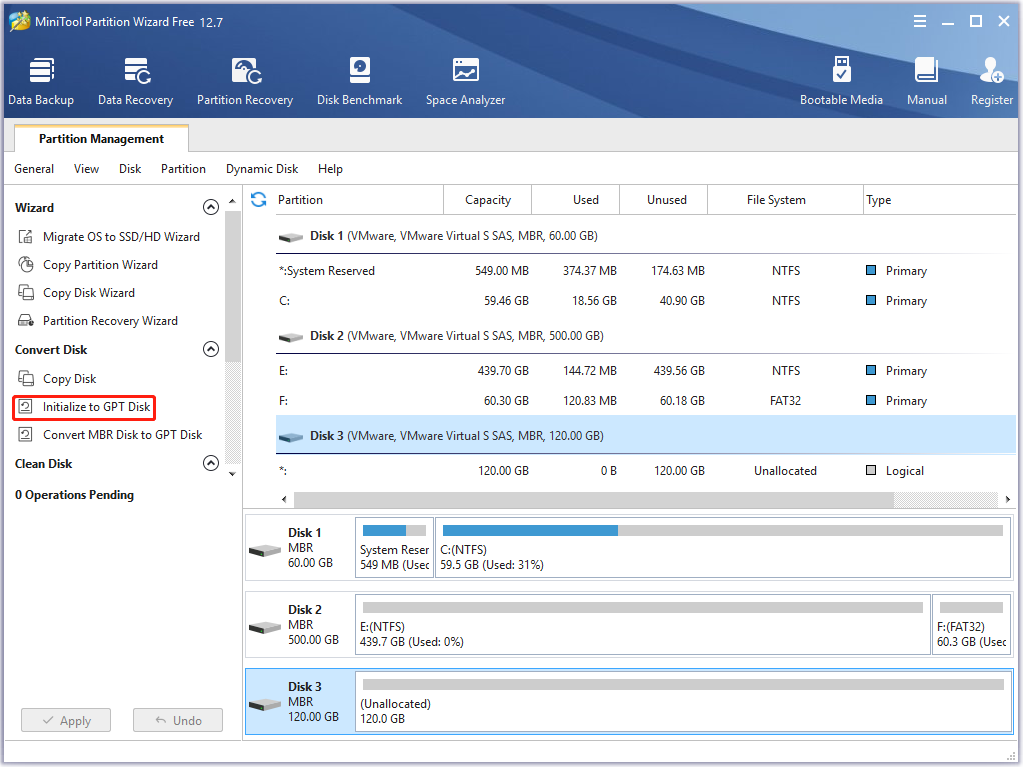
Option 3: Initialize Disk via MiniTool Partition Wizard
Both of the above methods can help you initialize the disk, but they both have limitations. Therefore, a better alternative to Disk Management/Diskpart to initialize a disk is to use a professional third-party disk manager application. MiniTool Partition Wizard is a tool that can initialize GPT/MBR disks and convert disks to GPT/MBT without data loss.
Moreover, MiniTool Partition Wizard can be used to extend/resize/move/wipe partitions, rebuild MBR, repair file system errors, migrate OS, and more. Here’s how to initialize the disk using MiniTool Partition Wizard.
MiniTool Partition Wizard FreeClick to Download100%Clean & Safe
Step 1: Run MiniTool Partition Wizard to open its main interface and select the disk that you want to initialize from the disk map.
Step 2: Select Initialize to MBR disk/GPT disk from the left action panel and click on Apply to execute the pending change.
If you want to change the partition style without data loss, you can directly select the Convert MBR Disk to GPT Disk or Convert GPT Disk to MBR Disk option.
Now your hard disk should be initialized to MBR or GPT successfully. And you can attempt to create the storage pool again, and the process should be completed without any errors.
Bottom Line
How to fix the “The New Storage Pool Wizard did not successfully complete” issue? This post has introduced two effective ways to you. If you have any other fixes to the problem, please leave them in the following comment zone. You can also send us an email at [email protected] if you have any questions about the MiniTool software, and we will reply to you as soon as possible.
About The Author

Position: Columnist
Vega enjoys helping people with computer problems, including disk management, data recovery, data backup, and more. She is constantly expanding her knowledge in related fields. And she will continue to bring more easy-to-understand professional articles to help people solve various problems on the PC.
User Comments :