When you are trying to log into other computer via remote desktop connections, you might receive an error message that the Local Security Authority cannot be contacted. How to fix it? In this post from MiniTool Partition Wizard, you will learn about several solutions.
It is convenient for users to access another computer via the remote desktop connection. However, they might be stopped from connecting the remote computer by the error message the Local Security Authority cannot be contacted.
This error message comes up with a Remote Desktop Connection windows, prompting that an authentication error has occurred. Why does this issue occur? The reasons could be various, including improper DNS address, Remote Desktop connections disabled, and conflictions between IP and DNS address.
If you come across the same problem, just keep on your reading to get some feasible solutions to it. Let’s check them out one by one.
Fix 1: Keep Remote Connections Enabled
If the remote desktop connections feature is disabled, you will be definitely unable to log into the remote computer. So, if you are prompting that an authentication error has occurred during the process, you should make sure the remote connections feature is enabled on both the host and the client PC.
Here are 2 methods to enable remote connections on a computer, and you can choose either one to have a try.
Enable Remote Connections in System Properties
Step 1: Right-click This PC and choose Properties.
Step 2: Click Change settings in the right pane to open System Properties.
Step 3: Switch to Remote tab, check Allow remote connections to this computer under Remote Desktop section. Uncheck Allow connections only from computers running Remote Desktop with Network Level Authentication option.
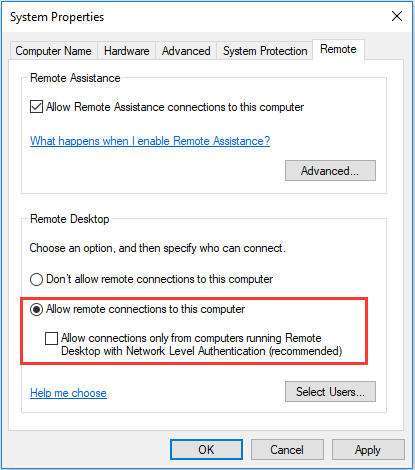
Step 4: Click Apply and OK to save the changes.
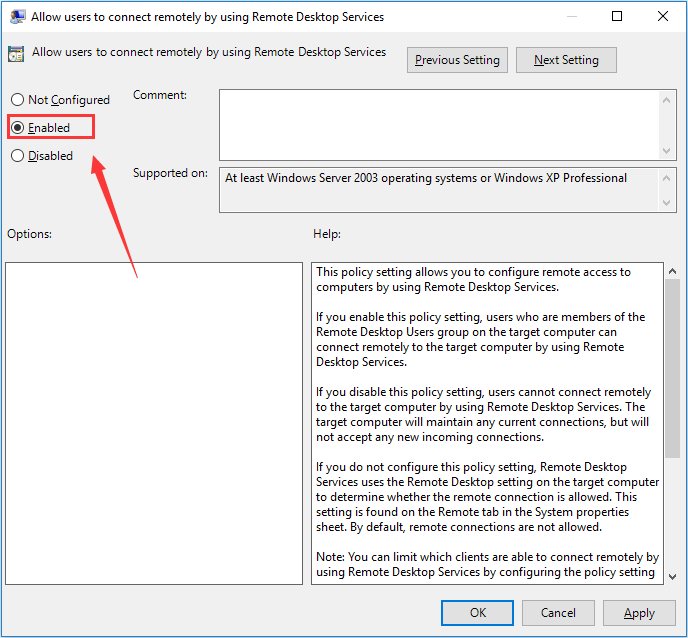
Enable Remote Connections in Group Policy Editor
The Group Policy Editor is only provided in the Pro and Enterprise editions of Windows 10. If this tool is available in your Windows, you can also use this method to enable remote connections.
Step 1: Press Windows + R, input gpedit.msc and click OK button to open Group Policy Editor.
Step 2: Now, go to Computer Configuration > Administrative Templates > Windows Components > Remote Desktop Services > Remote Desktop Session Host > Connections.
Step 3: Select Connections folder and double-click Allow users to connect remotely by using Remote Desktop Services policy in the right pane.
Step 4: In the new window, choose Enabled and click Apply and OK to save changes.
After that, restart your computer and check if you are able to connect to the remote PC.

Fix 1: Change DNS Address
If your DNS address is wrongly configured, it might not be accepted by the host or the client computer. As a result, you will receive the remote desktop connection error and fail to log into the remote computer.
In this case, you can try changing your DNS address. If you don’t know how to do that, just follow the steps below.
Step 1: Press Windows + R, input ncpa.cpl and click OK to open Network Connections interface in Control Panel.
Step 2: Right-click the network adapter you are using and choose Properties.
Step 3: Under Networking tab, select Internet Protocol Version 4 (TCP/IPv4) and click Properties.
Step 4: In General tab, choose Use the following DNS server addresses and input the following value:
- Preferred DNS server: 8.8.8.8
- Alternate DNS server: 8.8.4.4
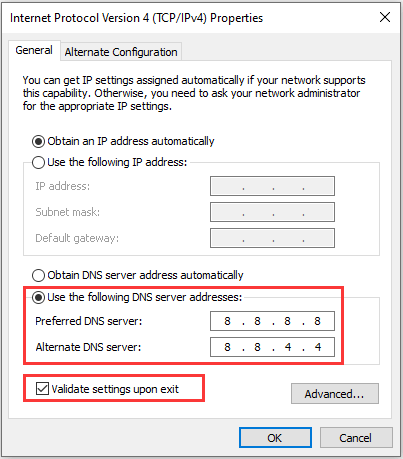
Step 5: Check Validate stings upon exit option and click OK to apply the changes. Then, check if the issue is fixed.
Fix 3: Flush DNS Cache
If the DNS cache gets corrupted or broken, you might also encounter “the Local Security Authority cannot be contacted” error. In this case, you just need to flush DNS cache with a simple command. Here’s how to do it.
Step 1: Press Windows + R, input cmd and press Enter to open Command Prompt.
Step 2: Type the command ipconfig/flushdns and press Enter to execute it.
Step 3: After the operation completed successfully, reset the connection and check if the issue has been resolved.

User Comments :