Google Chrome is a frequently-used browser for computer users. Sometimes, the images of website are not displayed or are shown as broken image icon in Google Chrome. To fix this problem, 7 methods are provided in this post. In addition, MiniTool Partition Wizard is recommended here to help you resolve problems related to your partition and hard disk.
Images not showing, which is a common problem in browsers, can be caused by various reasons and show in different forms. Keep reading to learn about the image problem in depth and the ways to fix it.
Reasons for Images Are Not Showing in Google Chrome
When comes to images not showing in Google Chrome, you may have encountered several forms before. For example, images are not loading on a certain website and even in Chrome, or there are just broken images or broken image icons.
The possible reasons that preventing pictures showing in Google Chrome are various. Some common factors are displayed below:
- System or network configuration
- Settings of Google Chrome itself
- The third-party antivirus on your computer
- The extensions added in Chrome
After learning about the reasons for this issue, I will introduce 7 methods to fix it in detail in the next parts.
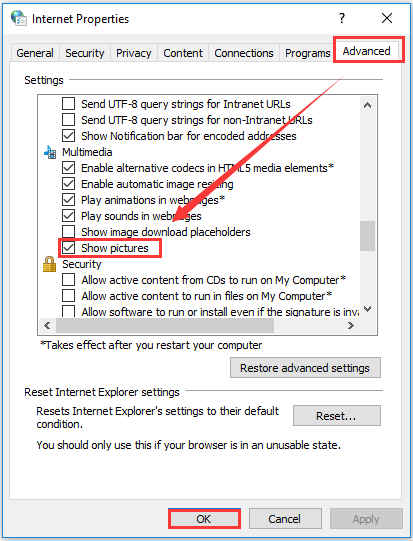
Method 1: Make Sure the Show Pictures Option is Checked
It’s probably that your network configuration is set to not show pictures. Just do as the following steps to check the configuration.
Step 1: Open the Control Panel, and click Network and Internet from the main interface.
Step 2: Choose Internet Options.
Step 3: In the pop-up window of Internet Properties, choose Advanced tab. Then, find Show pictures in Multimedia settings and make sure it’s checked. If not, check it and click OK.
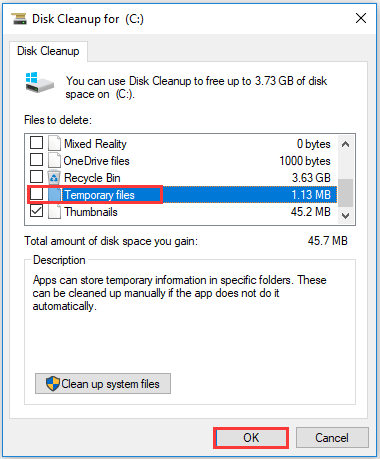
Method 2: Delete Temporary Files
The temporary internet files also may lead to this issue. To solve the problem, just delete these files. If you want to restore the deleted files to computer, you can try Data Recovery feature of MiniTool Partition Wizard.
Step 1: Search Disk Cleanup and open it.
Step 2: Select the system drive to clean up. Here (C:) is selected by default, so just click OK to start scanning.
Step 3: After the scan finishes, select Temporary files and click OK to delete. Some other files including Temporary internet files are checked by default, just leave them as they are.
You might be interested in this post: 10 Ways to Free up Disk Space in Windows 10 – 2018 Update
Method 3: Disable Your Antivirus Temporarily
The antivirus will detect whether it is safe to visit a website, which may cause the images of certain website to become missing. You can disable the antivirus temporarily to check whether the issue can be fixed. If the problem is solved after disabling it, then you can remove this antivirus.
No need to worry about the security of your computer because Windows will activate Windows Defender instead.
Method 4: Browse in Incognito Mode in Google Chrome
It is another feasible way to browse in Incognito mode in Chrome. Just click the Three dots icon on the top right corner of Google Chrome. Then select New incognito window from the drop-down menu.
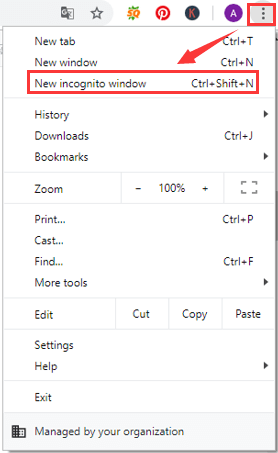
In this mode, load the images again to see if the problem is solved.
Method 5: Make Some Changes for Google Chrome Setting
The settings of browser itself should take responsibility for this issue in many scenarios. Let’s see how to remove this issue by making some changes for Google Chrome setting.
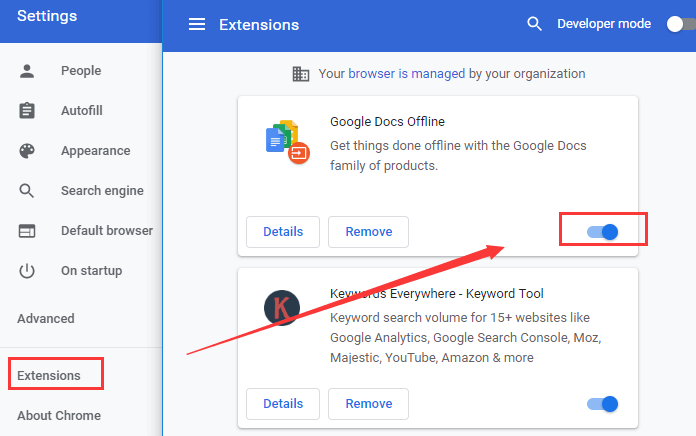
1. Disable Extensions
If the same webpage doesn’t have any broken images in the Incognito mode, you should disable your extensions of Chrome. Just open Settings and select Extensions. In the new page, click the button beside the extensions to disable them, showing in the following picture.
2. Turn on Show All Images
In the Chrome setting panel, navigate to Advanced –> Privacy and security –> Site Settings –> Images. Make sure that Show all option has been turned on.

3. Clear Cache and Cookies
Open Settings, and go ahead to Advanced –> Privacy and security –> Clear browsing data. In the pop-up window, set the Time range as All time, check the data you want to clear and then click Clear data.

4. Turn on JavaScript
Turning off JavaScript will remove some images from pages. You can go ahead to Site setting as mentioned above and choose JavaScript. Then switch on JavaScript in the new page.
5. Reset Chrome Setting to The Original Defaults
In Advanced setting, choose Reset and clean up and then click Reset settings. There will be a pop-up window showing messages on resetting, and you just need to click Reset settings button to confirm. In this way, you can restore the original browser setting.
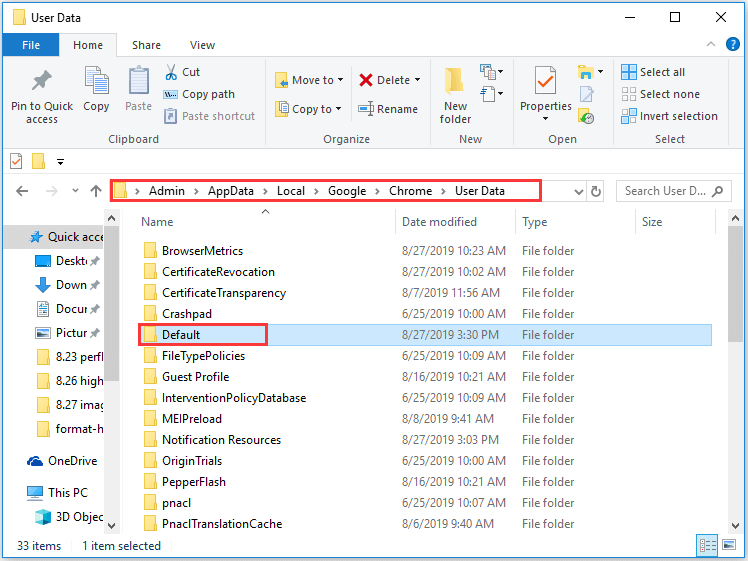
Method 6: Rename the Date Folder of Google Chrome
Images not showing in Chrome might be related to Chrome’s data folder as well. Renaming the folder is a way to fix it.
Step 1: You need to close Google Chrome first.
Step 2: Press Windows + R to open Run window.
Step 3: Type in %localappdata% and click OK.
Step 4: Navigate to Google > Chrome > User Date, then locate Default and rename it.
Method 7: Try Other Browsers
If the images not showing in Google Chrome is not fixed using the methods above, or the issue appears from time to time, you can choose to try other browsers. If the same problem raised in other browsers as well, then pay attention to your system.
The above is all the suggested methods for you to fix images not showing in Google Chrome. Hope these methods are helpful for you if the issue happens to your computer.
User Comments :