HP Recovery Manager is a Windows software program designed for HP consumers. It provides a recovery environment so that we can restore damaged or normal HP computers to the desired previous state. Here MiniTool tells how to use these recovery options.
What Exactly Is HP Recovery Manager
Simply put, HP Recovery Manager is a Windows software program. Obviously, only HP computer users can install and use it.
To get into HP Recovery Manager, turn on HP computer and continuously press F11 key once every second until it says Windows is loading files. Then the Recovery Manager opens.
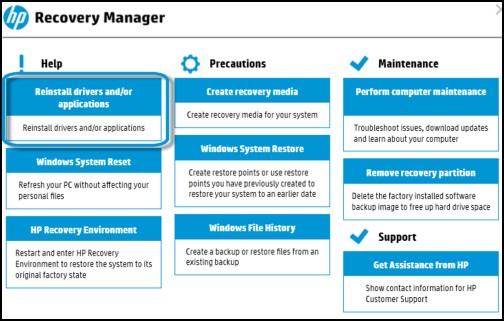
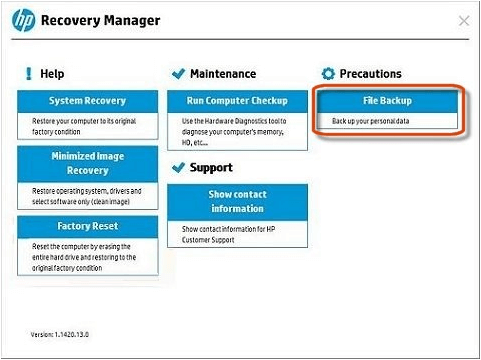
From the official introduction, we can see that HP Recovery Manager provides 9 useful features, which are categories into 4 sections: Help, Precautions, Maintenance, and Support.
Key Features of HP Recovery Manager
#1 Reinstall drivers and/or applications
It helps us reinstall the software and hardware drivers that were originally installed on the computer. For commercial computers, the recovery option may no longer be feasible.
If there is not enough disk space on the computer to reinstall the program, choose a method from the 10 ways to free up disk space in Windows 10.
#2 Windows System Reset
We can use this feature when we need to reset our computer. It repairs the computer by reinstalling the operating system. And we can choose to keep our files or remove everything during the operation.
How to factory reset HP laptop? Follow these steps to reset HP laptop:
Step 1. Restart the computer and enter “Choose an option”.
Step 2. Click “Troubleshoot” and click “Reset you PC” in the next page.
Step 3. Make a choice.
- Keep my files: delete all preinstalled HP apps, apps and drivers install by ourselves; save our personal files intact and reset the system to factory.
- Remove everything: delete all preinstalled HP apps, apps and drivers we install include our personal files and then reset the system to factory.
Step 4. Choose to delete the files only in system drive or in all drives.
Step 5. Choose to “Just remove my files” or “Fully clean the drive”. Then click “Reset” and wait for it to complete.
If we no longer use this computer, and we need to completely erase the data on the computer. We recommend to Wipe Disk with MiniTool Partition Wizard Free. It will definitely protect our privacy.
MiniTool Partition Wizard FreeClick to Download100%Clean & Safe
#3 HP Recovery Environment
In addition to factory reset HP laptop, HP Recovery Environment allows us to perform File Backup, System Recovery, Minimized Image Recovery (restore OS, drives and select software only) and show contact information.
The following are the specific steps to enter the recovery environment (The steps are for HP Omen 15 laptop users only):
Step 1. Type “HP Recovery Manager” in Start screen, and press “Enter” to search.
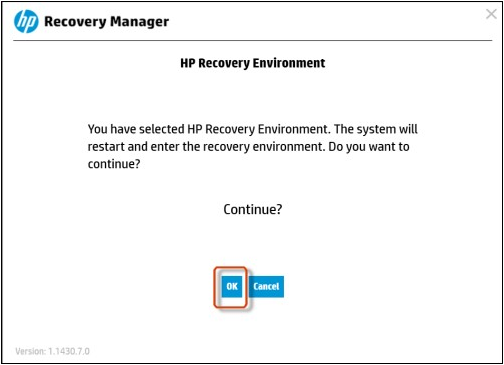
Step 2. Click “HP Recovery Manager” in the window and then choose “Windows Recovery Environment”.
Step 3. Click “OK” in the pop-up window to continue, and wait for the computer to restart.
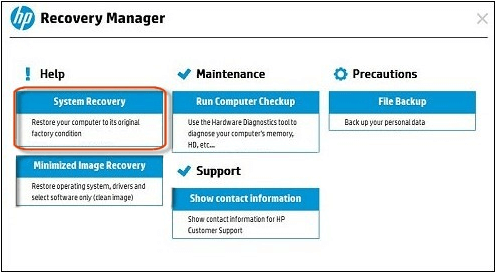
Step 4. When we are in the recovery environment, we can choose the features we need by following the instructions on the screen.
- System Recovery: restore our computer to its original factory condition.
- File Backup: back up our data on the computer.
- Minimized Image Recovery: reinstall all hardware-related drivers and software and the OS, but not including other software applications.
- Show contact information: show the information we contact with the HP Customer Support.
- Run Computer Checkup: use the hardware diagnostics toll to diagnose our computer’s memory, HD, etc…
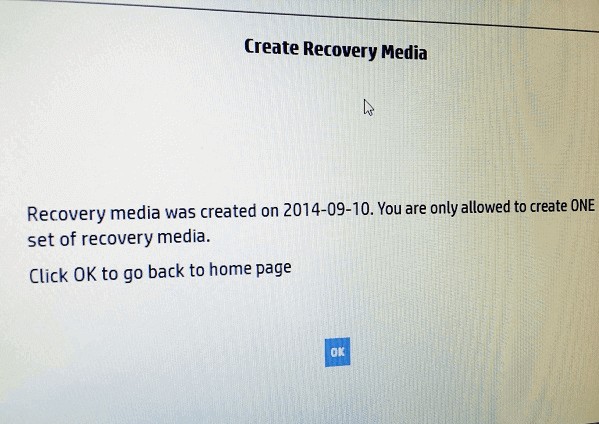
#4 Create recovery media
This helps us save the computer’s software image on a Disc or USB flash drive. If a serious software/hardware failure occurs, the recovery disk can fully restore the computer.
How to save the recovery image on the media (USB hard drives/discs) by HP Recovery Media Creation, so that we can use it to restore the computer to its original state in the event of a serious problem happen to the computer?
Here are the steps for to HP notebook computer (scan desktop computer) and Compaq computers that came with Windows 8 to create recovery media on USB drive:
We need to pay attention to it before we start:
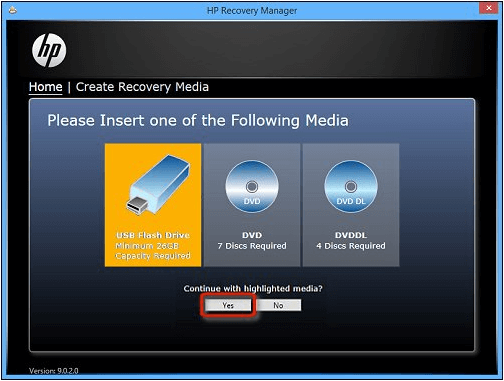
- The size of the USB flash drive must be less than 32 GB.
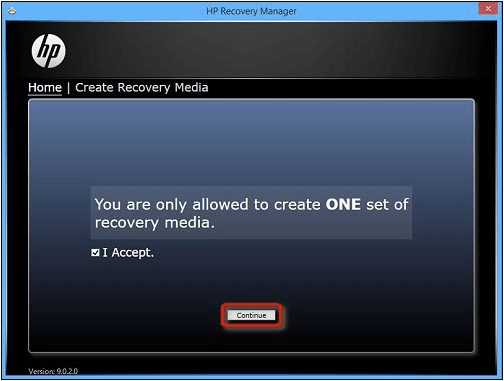
- We are allowed to create only one recovery image. If we had created a recovery image on other media previously, we cannot create a recovery image on the USB drive.
- The creation process takes about half an hour. If we are performing an operation that requires reboot of the computer, we may not be able to successfully create a recovery media. We need to arrange our time properly.
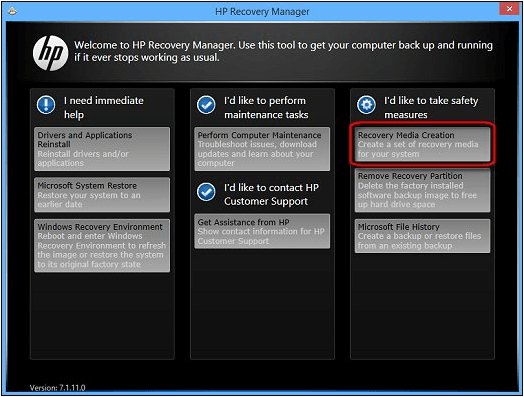
Step 1. Search “HP Recovery Manager” in Start screen and then press “Enter. Click “Recovery Media Creation” in the main menu.
Step 2. Check “I Accept” and then click Continue.
Step 3. If the system prompts us to enter an administrator password or make a confirmation, just do as required. When the “User Account Control” window asks if we want the program to change the computer, click “Yes“.
Step 4. Connect the USB flash drive to the computer and choose “USB Flash Drive” from the three options.
Step 5. Follow the instructions on the screen to save the recovery media to the USB flash drive and then click “Finish”. Pull off the USB flash drive and keep it safe.
#5 Windows System Restore
If we use HP Recovery Manager to back up files on our computer, then we can restore these files by using the same program
Tip: The recovery process may take 20 to 40 minutes to start. Do not close the restore window during restoring.
Step 1. Open the location where the backup file is stored. Insert the USB flash drive if we save the backup in it.
Step 2. Open the backup folder and double-click to open the executable that was created during the backup process. Then click “Yes” in the pop-up window to continue.
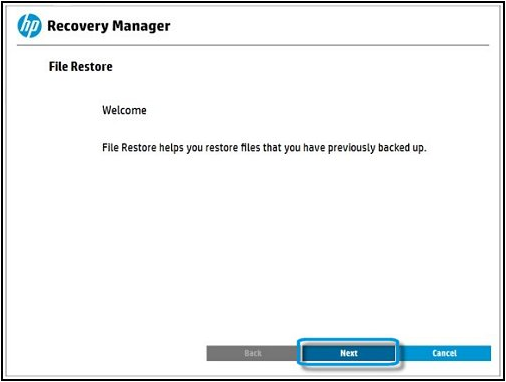
Step 3. Click “Next” in the welcome window.
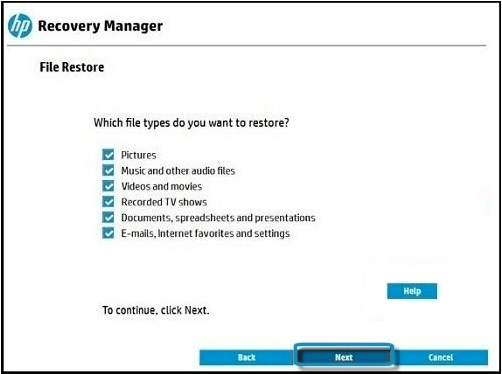
Step 4. Check the file types which we want to restore. Then click “Next”.
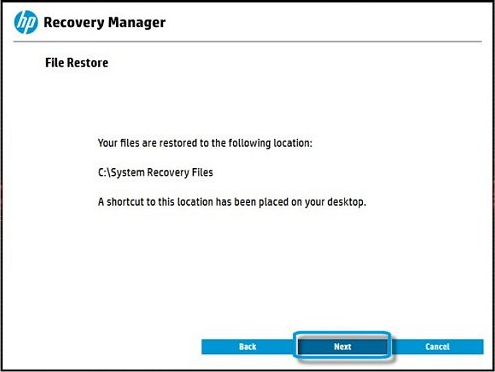
Step 5. The window will show our files will restore to which location. Click “Next”.
Step 6. Wait for the restore progress to complete. Click “Finish” when HP Recovery Manager restores successfully.
#6 Windows File History
We can back up in the File History so that files can be restored in time when the original files are lost. At the same time, it also provides the function of restore.
Windows File History helps us create a backup or restore files from an existing backup. Read the detailed steps (for HP and Compaq desktop computer and laptop that came with Windows 10 or Windows 8):
Step 1. Restart the computer and press “F11” button enter “Choose an option”.
Step 2. Click “Troubleshoot” and click “Recovery Manager” in the next page. Then select “File Backup”.
Step 3. Choose the backup method.
- Auto Selection: back up a certain type of file, for instance: pictures, videos, music, movie, emails, etc.
- User Selection: select individual files by ourselves. Then click “Next”.
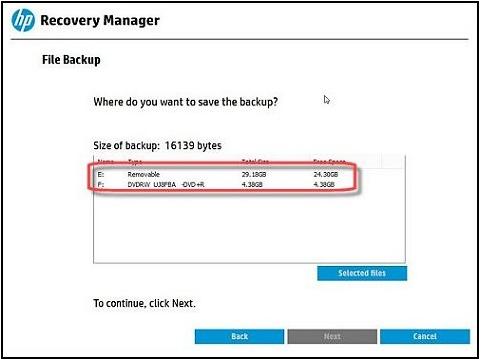
Step 4. Choose a location to save the backup files and click “Next”.
Step 5. Make sure the location and click “Next” to continue.
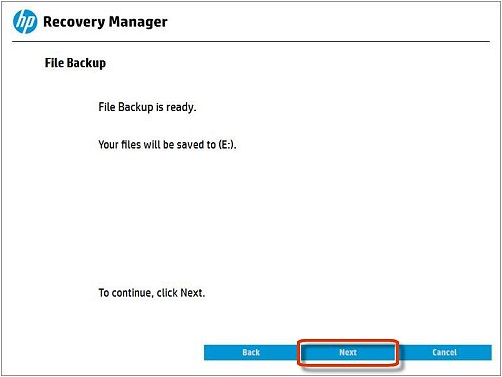
Step 6. Wait for HP Recovery Manager to create the backup. Click “Next” when it successfully created the backup.
MiniTool ShadowMaker is also a powerful Windows image backup software and it also has the function of automatic file backup. Download Trial edition to have a try!
MiniTool ShadowMaker TrialClick to Download100%Clean & Safe
#7 Perform computer maintenance
This feature helps troubleshoot HP computer issues, computer updates, and gets us learn more about our own computers.
#8 Remove recovery partition
delete the factory installed software backup image to free up available hard drive space.
When facing the problem of hard drive is full, we can no longer save more new files to it. At this point, we need to clean up or extend partition to create some available space. We can also free up disk space by removing recovery partition.
The HP computer is previously installed with some software backup images on the recovery partition of a hard drive. So we can remove the recovery partition to free up hard drive space.
Step 1. Open “HP Recovery Manager” and then click “Remove recovery partition”.
Step 2. Delete the specific partition according to its instructions.
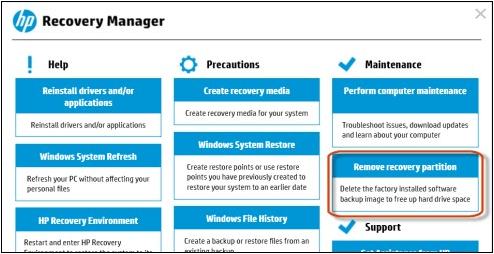
#9 Get Assistance from HP
We can contact the HP customer support to help us solve the problem that we can’t fix.
How to use HP Recovery Manager? View this article, you’ll get solutions. Click to Tweet
Bottom Line
As you can see, HP Recovery Manager is a practical system backup and restore software to HP users in the aspect of factory reset HP laptop, restore HP laptop to previous state, backup files, etc. For non-HP users, we recommend using MiniTool software to manage hard drive space and keep data safe.
About The Author

Position: Columnist
Rodin is an enthusiastic IT writer focusing on Windows trends, disk partition management and data recovery. She loves to write and share her idea about the useful tips and tricks on personal computers' maintenance. If you are looking for methods to improve your computer performance, manage hard drives and recover data from different devices, Rodin can provide reliable solutions for data management.
User Comments :