During a meeting, you might need to share screens with others. Zoom provides a built-in feature for screen sharing and you can have a try. If you don’t know how to share screen on Zoom, you can refer to this tutorial provided by MiniTool Partition Wizard.
About Zoom Cloud Meetings
Zoom Cloud Meetings, or simply Zoom, is a cloud-based peer-to-peer program that provides online chat and video telephony services. It was launched in 2003. Nowadays, it is mainly used for teleconferencing, telecommuting, distance education, and social relations.
To host or join a meeting with Zoom, you need to download and install the meeting client. It is available on various platforms, including Microsoft Windows (Windows 7 and later versions), macOS (macOS X with macOS 10.9 or later), Linux, iOS, Android, and Blackberry. For more information about the Zoom system requirements, you can visit its official website.
How to Share Screen on Zoom Windows 10
Similar to other communication tools, you can also use Zoom Cloud Meetings for video, voice, content sharing, and chat across various platforms. During a video meeting, you can share the following contents if you use the Zoom screen sharing feature:
- Entire desktop, phone screen, or iPhone/iPad screen.
- At least one specific application.
- A portion of your screen.
- Whiteboard.
- A locally saved video.
- Content from a second camera.
Now, let’s see how to screen share on Zoom on Windows 10.
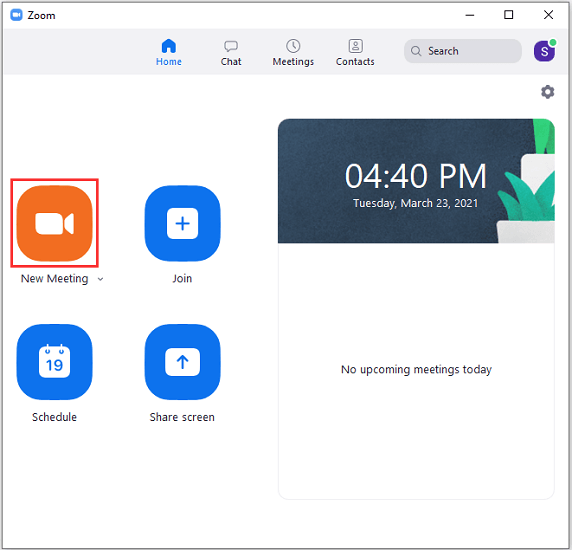
Step 1: Launch the Zoom client and sign in with your account to get the homepage of Zoom.
Step 2: If you want to host a meeting, click the New Meeting button. If you have a meeting ID or personal link name, click the Join button.
Step 3: In the pop-up window, click Join with Computer Audio to start the meeting. You can check Automatically join audio by computer when joining a meeting so that you don’t need to spend time on this step the next time you join a meeting on Zoom.
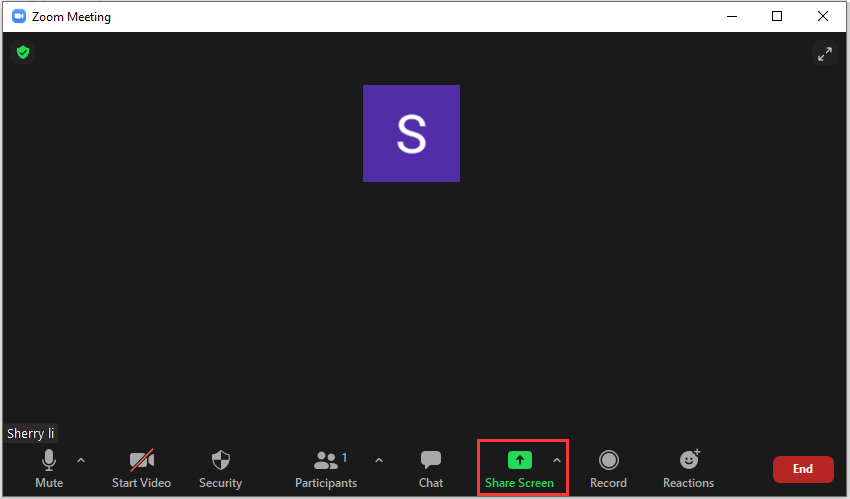
Step 4: When you participate in the meeting, click the Share Screen button located at the bottom of the window.
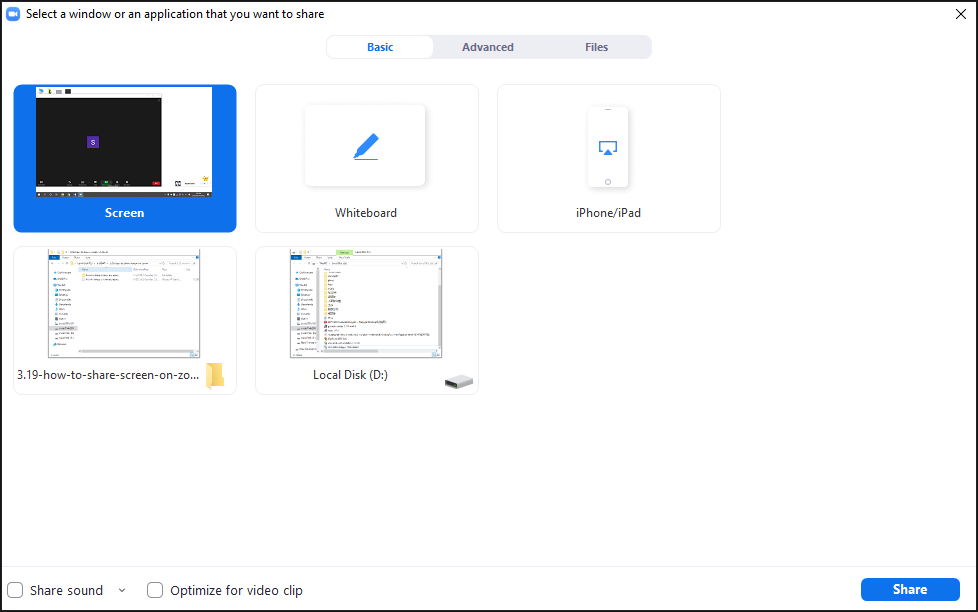
Step 5: Select a Zoom screen sharing option from the following options:
- Basic: Desktop Screen, Whiteboard, iPhone/iPad;
- Advanced: PowerPoint as Virtual Background, Portion of Screen, Computer Audio, Video;
- Files: Dropbox, Microsoft OneDrive, Google Drive, Box, Microsoft SharePoint.
Step 6: Click the Share button and the Zoom screen sharing will be started. During the process, you will receive a message showing you are screen sharing.
To stop the Zoom screen sharing, you just need to click the Stop Share button next to the notification banner.

How to share screen on Zoom? Now, it’s your turn to have a try.
![Zoom Share Screen Not Working [5 Solutions]](https://images.minitool.com/partitionwizard.com/images/uploads/2021/01/zoom-share-screen-not-working-thumbnail.png)
User Comments :