Have you upgraded your Windows 10 to Windows 11? Are you wondering how to install Japanese keyboard on Windows 11 or Windows 10? Don’t worry if you have no idea. You can find a detailed guide in this post from the MiniTool Partition Wizard.
Windows 11 is a new operating system provided by Microsoft. As the successor of Windows 10, Windows 11 comes with many new features and a fresh outlook. The good news is that Windows 11 is free to upgrade.
Whether you are using Windows 10 or Windows 11, if you want to use Japanese keyboard, this post can help.
How to Install Japanese Keyboard on Windows 11
Windows 11 supports a huge number of languages. If you need to type with a second language, you just need to go to Windows Settings to install it. Now, let’s see how to install Japanese keyboard on Windows 11.
Step 1: Press Win + I to open Windows Settings quickly.
Step 2: In the left pane, select Time & language.
Step 3: In the right pane, choose Language & region.
Step 4: Click the Add a language button for the Preferred languages setting.
Step 5: In the pop-up window, search for Japanese and select it. Then click Next. On the next page, configure the optional language features and click Install.
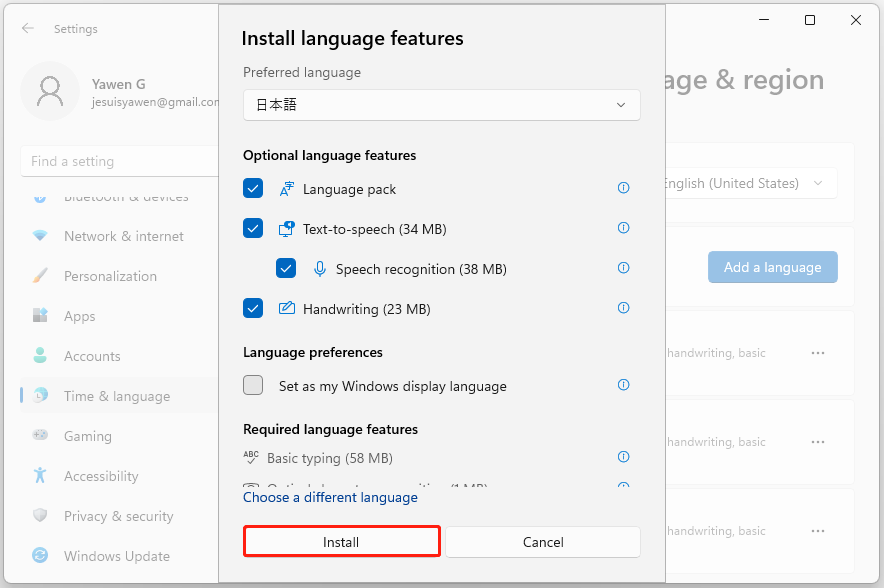
The installation might take a few minutes. Please wait patiently. Once it the Japanese is installed, you can use the Japanese keyboard.

How to Get Japanese Keyboard on Windows 10
As for how to install Japanese keyboard on Windows 10, you can follow the steps below.
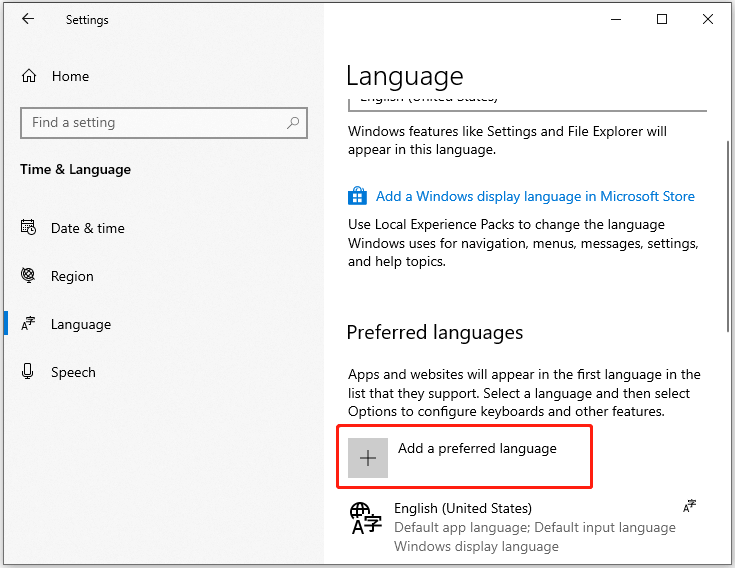
Step 1: Go to Settings > Time & Language > Language.
Step 2: Click the Add a preferred language.
Step 3: Select Japanese and click Next, then configure the optional language features and click Install.
When Japanese is installed successfully, you can move to the next part to see how to use Japanese keyboard.
How to Use Japanese Keyboard
On Windows 10 and 11, you can switch the installed keyboard languages by pressing Win + Space. Just press the keyboard shortcut and select Japanese. Then you can start to use it.
Alternatively, you can click the language icon on the taskbar to change the keyboard language to Japanese.
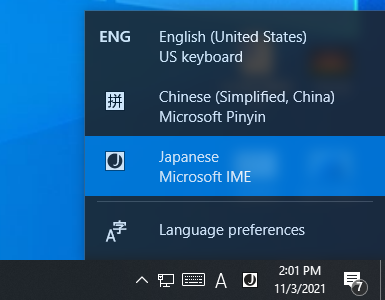
Now, you might see the alphabet A next to the Japanese input icon, which indicates you are still typing in English. Click the A icon and it will change to Japanese.
If you want to change the Japanese keyboard to different variants, you can right-click the A icon and choose the one you prefer. To use the Japanese keyboard, you can choose the Hiragana option.
Now, you can type Japanese with the English keyboard.
Further Tip: Use a Physical Japanese Keyboard
In addition to installing Japanese keyboard on Windows 10/11, you can also use a physical Japanese keyboard to meet your demands. Just connect the keyboard to your computer and go to Settings > Time & Language. Then select Japanese and click Options > Change hardware keyboard layout to add your keyboard.

User Comments :