Microsoft Excel is a multifunctional spreadsheet program that helps you visualize and analyze data. Blank rows in Excel may make the spreadsheet untidy. If you want to know how to delete blank rows in Excel, this MiniTool post is exactly what you need.
Many people are eager to find a simple way to remove blank rows in Excel spreadsheets. The reason is that too many blank rows not only make the table look untidy but also will cause the entire file to be too large, even if there is little data. Don’t worry, this post shows you how to delete blank rows in Excel using four simple methods.
Method 1: Delete Blank Rows Manually
This method is the easiest one if you only need to delete a few blank rows.
If you only need to delete a blank row, you can directly select a row by clicking the row number on the left side of the spreadsheet. Then, right-click and select Delete.
If you want to delete several blank rows at the same time, you just need to select a row, hold down the Ctrl key and then select multiple blank rows using the mouse. Then, right-click and select Delete to delete all the selected blank rows.
Method 2: Use Go To Special to Delete Blank Rows
If you have multiple non-consecutive blank rows, deleting them manually wastes too much time. The Go To Special function in Excel is more applicable for this situation.
Step 1: First, open your spreadsheet in Excel. Click on “Find & Select” on the toolbar of the Home page and then select “Go To Special…” from the drop-down menu.
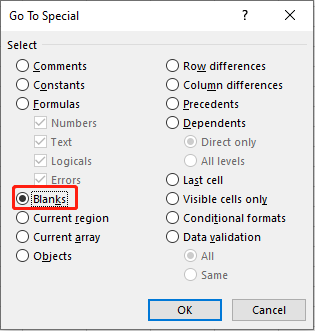
Step 2: In the pop-up window, select “Blanks” and click on “OK” to choose all the blank cells from the selected columns.
Step 3: On the Home page, click on the “Delete” function and choose “Delete Sheet Rows” to delete entire blank rows.
Method 3: Use Find Function to Delete Blank Rows
Excel has a Find function, which can also help you find blank rows easily.
Step 1: Open the spreadsheet with Excel. On the Home page, click on “Find & Select” in the upper right corner and then choose the “Find” option.
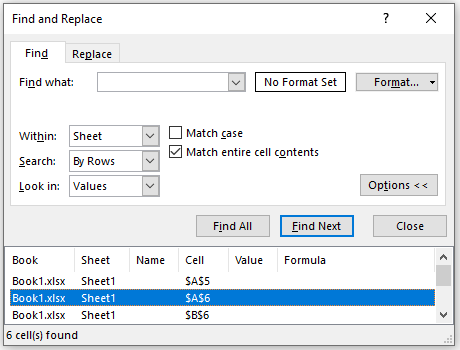
Step 2: On the pop-up Find and Replace menu, click “Options” to expand it.
Step 3: Check the “Match entire cell contents” option. In addition, click the drop-down arrow behind “Look in” and switch to “Values”. At last, press the “Find All” button to confirm.

Step 4: All rows containing blank cells will be listed. Select a row from it at will, and then press “Ctrl + A” to select all listed rows.
Step 5: After closing this window, click on the “Delete” function on the Home Page and choose “Delete Sheet Rows” to delete the selected blank rows.
Method 4: Delete Blank Rows with Filters
The Filters function is also a good choice for deleting blank rows. Here are the detailed steps below.
- First, select all columns including all the blank rows.
- Navigate to the Data page and click on the Filter button on the toolbar. After completing this operation, you will find that each of the columns has been added a filter arrow.
- Click any arrow in a column that contains a blank cell, uncheck “Select All” first, and then check “Blanks”. After completing the filtering, remove blank rows by clicking “Delete” on the Home Page and then choose “Delete Sheet Rows”.
- Repeat the operations of filtering and deleting for the other columns that contain blank cells in turn, until all the blank rows are deleted.
The above are four methods on how to delete blank rows. What’s more, if you, unfortunately, encounter an Excel crash while using Excel, you will need the help of the following post.
User Comments :