A lot of users complain about the Hamachi not working Windows 10. Have you come across the Hamachi Tunnel problem? Now, you come to the right place. This post of MiniTool summarizes several tested troubleshooting methods.
Hamachi is a virtual private network application that can be used to build direct links between many distant computers. This application can be available as a production version for Microsoft Windows. Sometimes, however, you may encounter Hamachi Tunnel problem on Windows 10 like many users.
According to a survey, the Hamachi not working issue can be caused by an outdated network adapter driver. Besides, the LogMeIn Hamachi Tunneling Engine service and multiplexor protocol are responsible for the problem.
If it is the first time you encounter the Hamachi tunnel problem yellow triangle, you can try restarting your PC or Hamachi. If the issue can’t be resolved, you can try the following fixes.
![How to Set up Steam Link & Fix Steam Link Lag [Full Guide]](https://images.minitool.com/partitionwizard.com/images/uploads/2021/05/steam-link-lag-thumbnail.jpg)
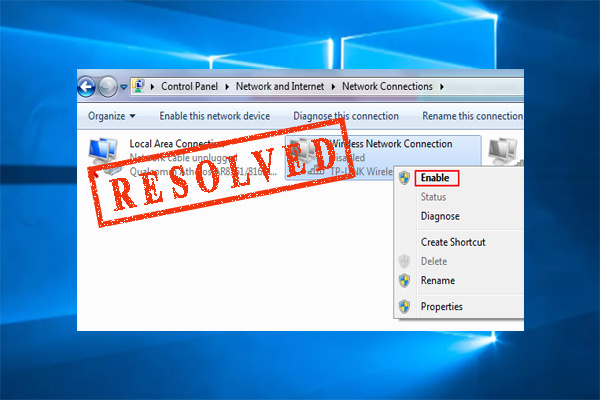
Fix 1. Re-enable the Hamachi Network Connection
The easiest troubleshooting method for the Hamachi Tunnel problem is to re-enable your network connection. To do so, you can follow the given steps below:
Step 1. Press Win + R keys to open the Run dialog box, and then type ncpa.cpl in the box and hit Enter.
Step 2. When the Network Connections window opens, right-click the Hamachi network connect and select Disable.
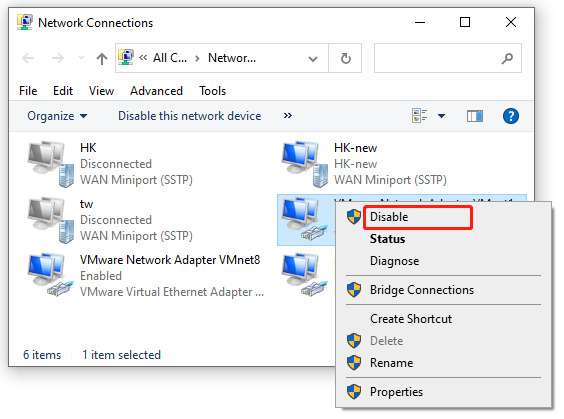
Step 3. Wait for a few minutes, and then right-click the same network connection again and select Enable.
Now, you can relaunch the app and see if the Hamachi Tunnel problem Windows 10 issue is fixed.
Fix 2. Enable the LogMeIn Hamachi Tunneling Engine Service
Sometimes, the Hamachi not working Windows 10 problem can occur if the LogMeIn Hamachi Tunneling Engine service is not running or disabled. Here you can follow the guide below to restart this service on your computer.
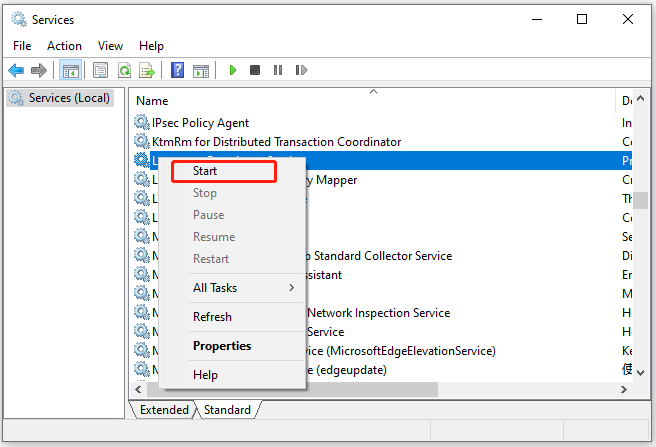
Step 1. Open the Run dialog box again, and then input services.msc in the box and hit Enter.
Step 2. Navigate to the LogMeIn Hamachi Tunneling Engine service from the list, and then right-click it and select Start. If the service status is running, you can right-click it and select Stop and then restart it.
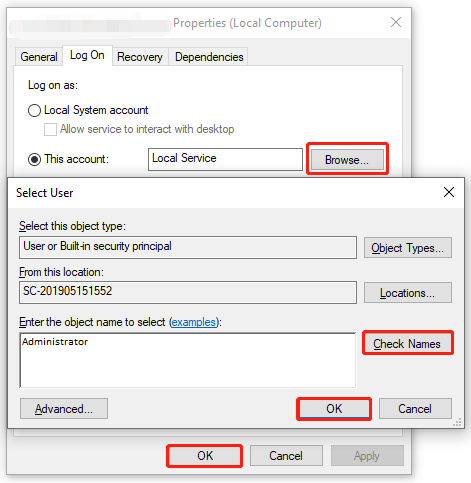
Step 3. Double click this service to open its Properties window, and then change its Startup type to Automatic and click on Start. Now, click on OK and Apply to execute the change.
Now, you can restart the computer and check if the Hamachi no connection problem is fixed.
Fix 3. Run Hamachi as an Administrator
Some users reported that the Hamachi Tunnel problem Windows 10 issue can be resolved by running the program as an administrator. Let’s have a try.
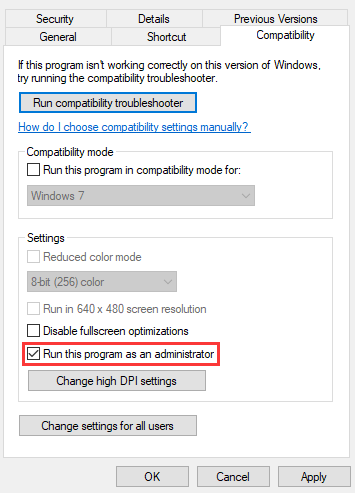
Step 1. Right-click the Hamachi shortcut on your desktop and select Properties.
Step 2. In the Properties window, navigate to the Compatibility tab and tick the checkbox next to Run this program as an administrator. Then click on OK to save the change.
After that, you can relaunch the program and see if the Hamachi not working Windows 10 problem is gone.
Fix 4. Disable the Microsoft Network Adapter Multiplexor Protocol
According to user reports, Microsoft Network Adapter Multiplexor Protocol can interfere with Hamachi. To avoid the Hamachi network adapter error, you can disable this protocol via the following steps.
Step 1. Press Win + R keys to open the Run dialog box, and then type ncpa.cpl in the box and hit Enter.
Step 2. In the Network Connections window, right-click your local area connection and select Properties.
Step 3. Untick the checkbox for Microsoft Network Adapter Multiplexor Protocol and click on OK to save the change.
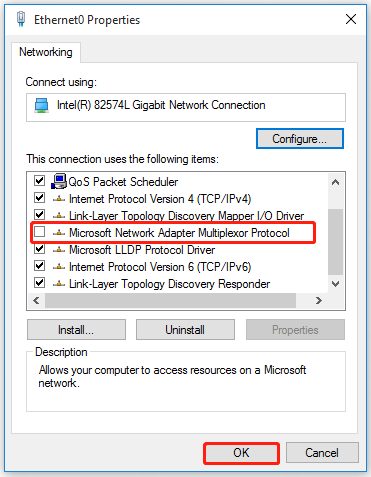
Then you can restart computer and check if the Hamachi not showing up in network connections issue is resolved.
Fix 5. Update the Hamachi Network Adapter Driver
As mentioned above, the Hamachi not working Windows 10 problem can be caused by an outdated or corrupted network adapter driver. To fix it, you can try updating your Hamachi adapter driver to the latest version.
Step 1. Press Win + R keys to open the Run dialog box, and then type devmgmt.msc in the box and hit Enter.
Step 2. Expand the Network adapters section, right-click the wireless network adapter driver and select the Update Driver option.
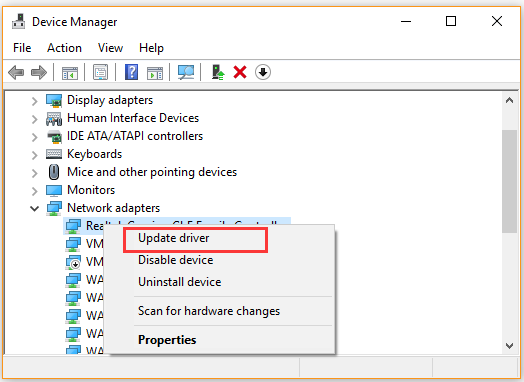
Step 3. In the pop-up window, you can select an update the network adapter driver automatically or manually based on your demands. After selecting the way to update the driver, follow the on-screen prompts to complete the update.
Once done, you can restart the computer and check if the Hamachi network adapter error is solved. If you still encounter the Hamachi Tunnel problem, you may have to consider reinstalling this application.
User Comments :