Some users asked on the forum: how do I get rid of the volume bar on my screen? If you are bothered by the same question, you are at the right place. Here in this post, MiniTool Partition Wizard will show you how to fix volume control stuck on the screen issue.
When you are trying to adjusting the volume on your computer, a volume control bar will appear on the top left corner of the screen. Normally, the volume bar will disappear automatically a few seconds after you complete the adjustment. But some users report the volume bar stuck on the screen issue which commonly appears in Windows 8.1.
This is not a critical issue for your Windows, but it is quite annoying for users as it will obstruct the screen visibility. In some cases, users are even unable to open other applications until the volume bar disappear, and the issue might still appear even after they restart the computer.
The reasons for the volume control stuck on the screen issue are not clear, but it may have something to do with your sound driver. You may ask: How do I get rid of the volume bar on my screen? Here are some solutions that may help disable on-screen volume control display.
You can try them one by one until you fix the issue successfully.
Method 1: Update or Reinstall Your Sound Driver
As mentioned before, the volume control stuck on the screen issue might be caused by the conflict with the sound driver. In this case, update your sound driver to the latest version might be helpful. Here’s how to do that:
Step 1: Right-click the Start button and choose Device Manager.
Step 2: Double-click the Sound, video and game controllers category to expand it.
Step 3: Right-click your sound driver and choose Update driver.
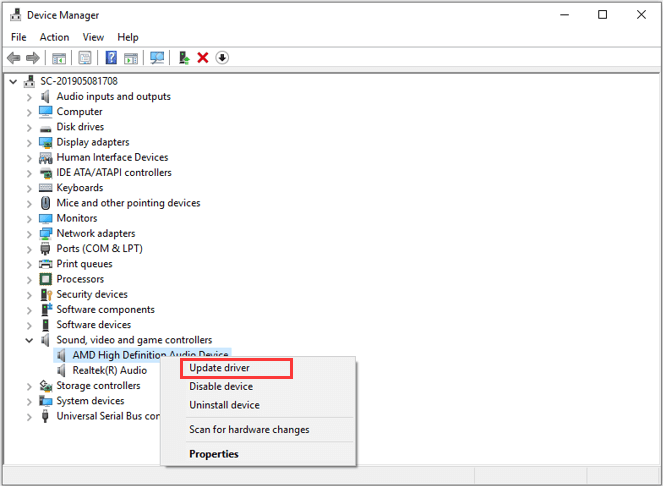
Step 4: In the pop-up window, choose Search automatically for updated driver software to continue and follow the onscreen instructions to complete the process.
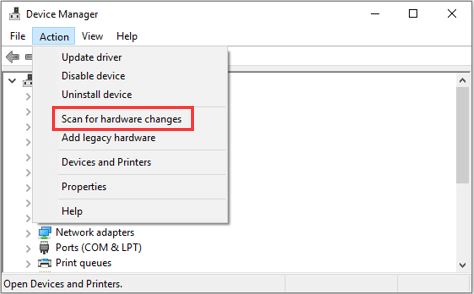
Alternatively, you can also reinstall your sound driver. Just right-click the driver and choose Uninstall device. Then, click Action > Scan for hardware changes, and your Windows will reinstall the default drive for your device automatically.
Once it’s done, restart your computer and check if volume bar stuck on the screen issue is fixed.
See also: 10 Ways to Open Device Manager Windows 10
Method 2: Run Windows Troubleshooter
Some users report that running Windows troubleshooter can effectively disable on-screen volume control display. You can also have a try.
Step 1: Press Windows + S, input control panel and click the best match result to open it.
Step 2: Choose Small icons from the drop-down menu of View by.
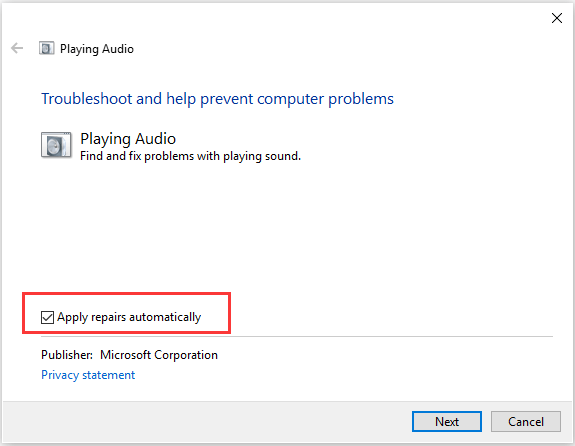
Step 3: Select Troubleshooting > Hardware and Sound > Playing Audio.
Step 4: In the new page, click Advanced and then check the Apply repairs automatically option. Hit Next button to start troubleshooting.
Method 3: Change the Notification Time
To disable on-screen volume control display, you can try making the notifications appear for just a small amount of them. This is a useful trick and you can follow the steps below.
Step 1: Go to Settings and choose Ease of Access category.
Step 2: Choose Other options in the left pane.
Step 3: In the right pane, open the list of Show notifications for and choose the minimum amount of time – 5 seconds.
Method 4: Clean Boot Your Computer
It is possible that the problem is caused by the interference from a certain third-party program on your computer. If you have installed new applications recently, try uninstalling it. If you haven’t modified your programs for a period of time, you can clean boot your computer to diagnose the issue.
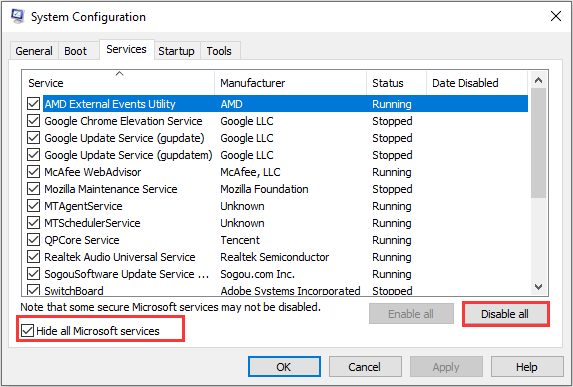
Step 1: Press Windows + R, input msconfig and click OK to open System Configuration window.
Step 2: Switch to the Services tab, check Hide all Microsoft services and click Disable all button.
Step 3: Go to the Startup tab and click Open Task Manager to disable all the startup items listed in Task Manager.
Step 4: When you go back to the original window, click Apply and OK to save changes.
After that, restart your computer for the changes to take effect. If the issue is resolved, re-enable these disabled items one by one to find the problematic one. Then, you can choose to keep it disabled or remove it from your computer.
See also: How to Disable Windows 10 Volume Popup [2020 Update]
User Comments :