While performing an in-place upgrade to Windows 10 using SCCM (System Center Configuration Manager), it’s possible for you to experience the error 0x4005(16389). This error may occur due to multiple reasons. In order to solve it effectively, we list a couple of common reasons below.
- There is not enough disk space for upgrading Windows
- The Windows edition you are trying to upgrade to is different from your current one
- Third-party antivirus software installed on your PC interferes with the upgrading process
- You are attempting to set a local computer description during the task sequence and the command doesn’t work
- …
Based on the above reasons, we summarize some feasible solutions to the error: 0x4005(16389) Windows 10. Just keep reading to fix it.
Solution 1: Restart Your Computer
When you are suffering from the error 0x4005(16389), you can try performing a restart for your PC to see if it works. Usually, a simple restart can remove plenty of issues that are caused by minor bugs and glitches. To restart your computer, you can right-click the Start icon and then go to Shut down or sign out > Shut down.
You can learn more ways to restart your PC by reading this post: How to Reboot Windows 10 Properly? (3 Available Ways)
After you restart your computer, try the upgrading process again. If the error is still here, then you ought to try some other advanced solutions.
Solution 2: Free Up Disk Space
We can learn from Microsoft that at least 20GB of disk space is needed to upgrade to Windows 64-bit. If there is no sufficient disk space on your system, you will fail to complete the upgrading process and see the error: 0x4005(16389) Windows 10. Therefore, to get rid of this error, it’s recommended that you free up some disk space. The following are some effective ways for you.
Way 1: Empty Recycle Bin
Files that are not deleted permanently will eventually appear in Recycle Bin and take up much disk space. Therefore, we need to empty Recycle Bin to remove these files completely and get free space. To execute this operation, just right-click the Recycle Bin icon on your desktop and select Empty Recycle Bin.
Way 2: Run Disk Cleanup
You can also erase unnecessary files with the Windows 10 built-in tool – Disk Cleanup.
Step 1: Open the Run dialog by pressing Windows + R keys.
Step 2: Type Cleanmgr.exe in the text box and then click OK.
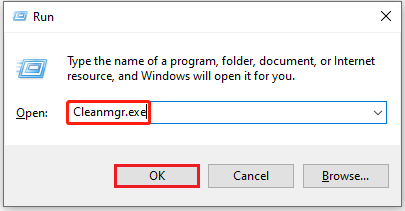
Step 3: In the prompted window, choose the target disk and click OK.
Step 4: Wait for a while until the next window appears. Check the files you want to delete and then click OK.
Step 5: Click Delete Files to confirm the operation.
Way 3: Defragment Your Hard Drive
Defragmenting your hard disk can give you more available space. Additionally, it can optimize your PC’s performance.
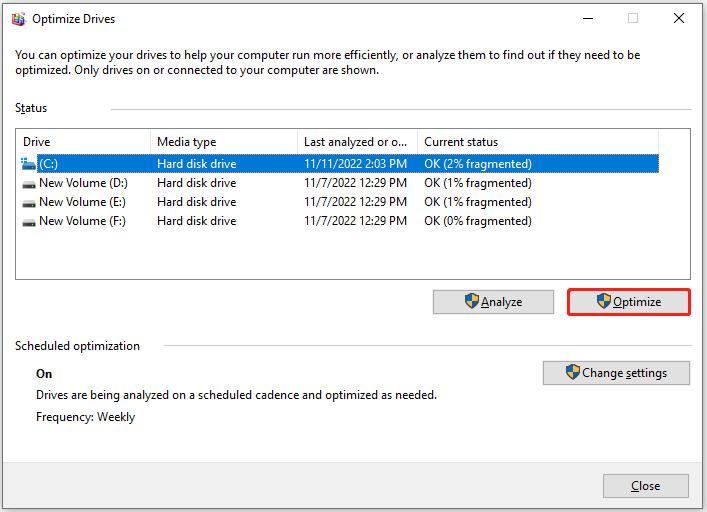
Step 1: Type defrag in the search bar and then open the Defragment and Optimize Drives app in the Best match section.
Step 2: Select the specific hard disk you want to defragment and click Optimize.
Way 4: Extend Your Partition
Another way you can try to get more free space is to extend the specific partition. It’s easy to extend partitions through Disk Management and Command Prompt. But sometimes, the process in the two utilities fails to complete and shows you some issues, such as Extend Volume greyed out, Command Prompt not working, and so on.
For higher security, we recommend you extend the partition with MiniTool Partition Wizard. It’s a professional third-party partition manager that enables you to create/ format/extend/move/resize partitions, copy/wipe disks, migrate OS to SSD/HD, etc.
The way to extend your partition using MiniTool Partition Wizard can be different in terms of the condition of your partition. To find out the best way for you, we explore detailed information for two cases.
Case One: There is no unallocated space next to the target partition
Step 1: Download and install MiniTool Partition Wizard on your computer. Then launch it to enter the main interface.
MiniTool Partition Wizard FreeClick to Download100%Clean & Safe
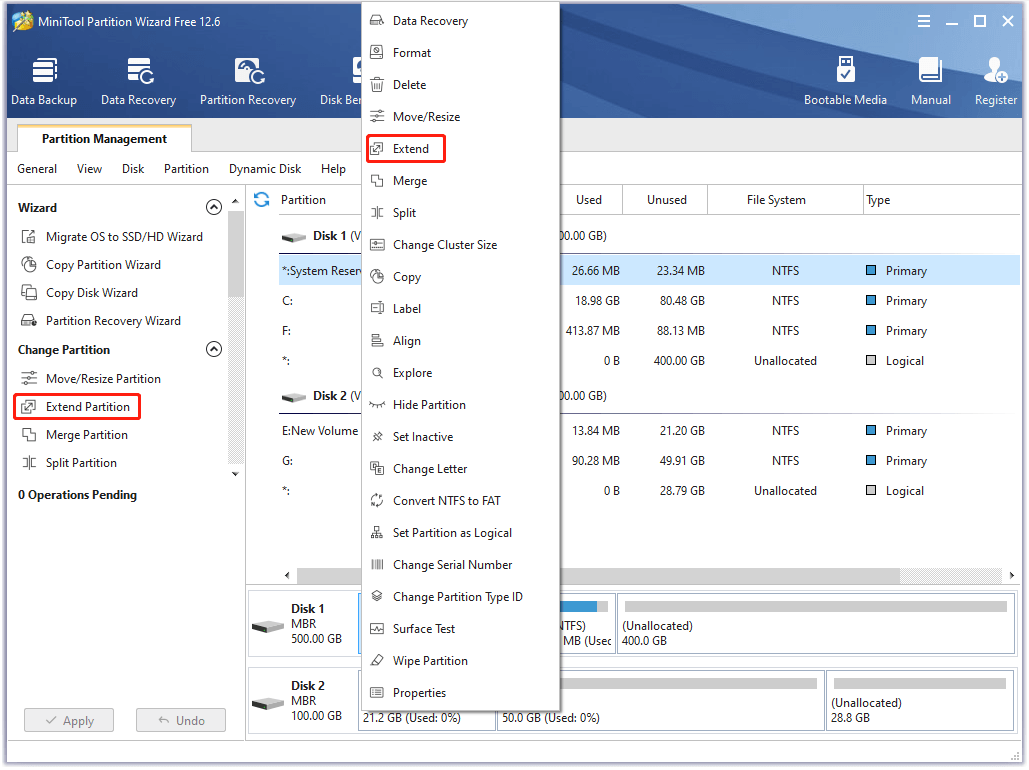
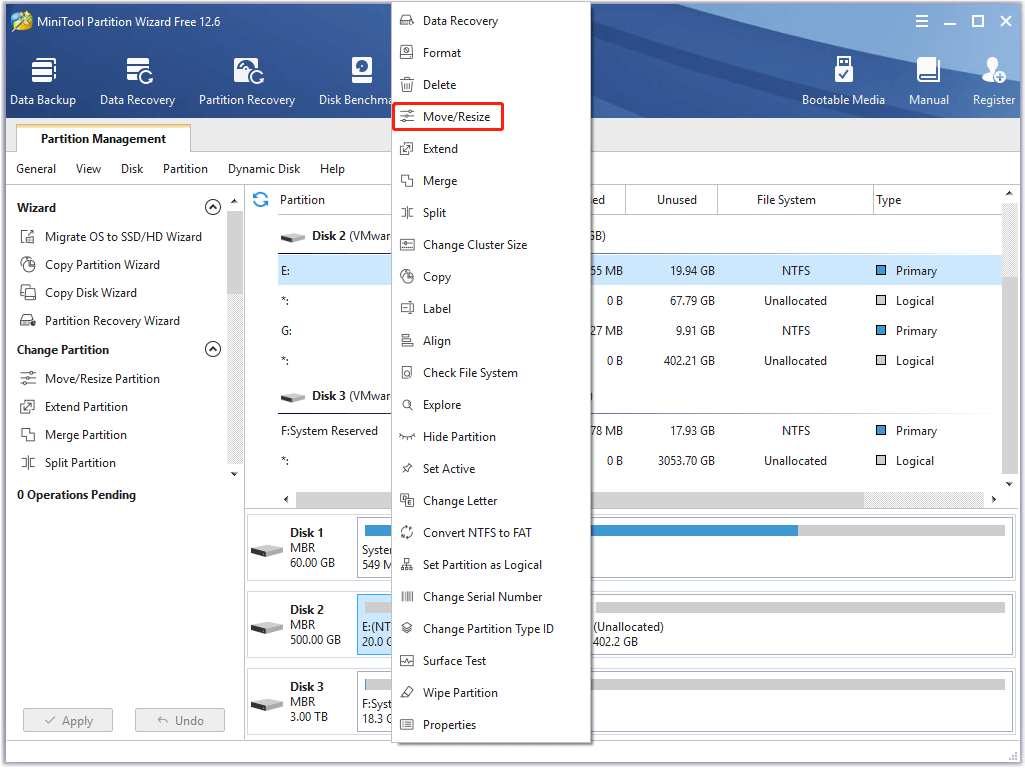
Step 2: Right-click the partition you want to extend and select Extend. Alternatively, you can highlight the target partition and select Extend Partition from the left action pane.
Step 3: Choose the partition or unallocated space where you want to take space and drag the slider to decide the amount of space you want. Then click OK to save the changes.

Step 4: Finally, don’t forget to click Apply to begin the process.
Case Two: There is adjacent unallocated space for the target partition
Step 1: Launch MiniTool Partition to get into its main interface.
Step 2: Right-click the specific partition and then select Move/Resize.
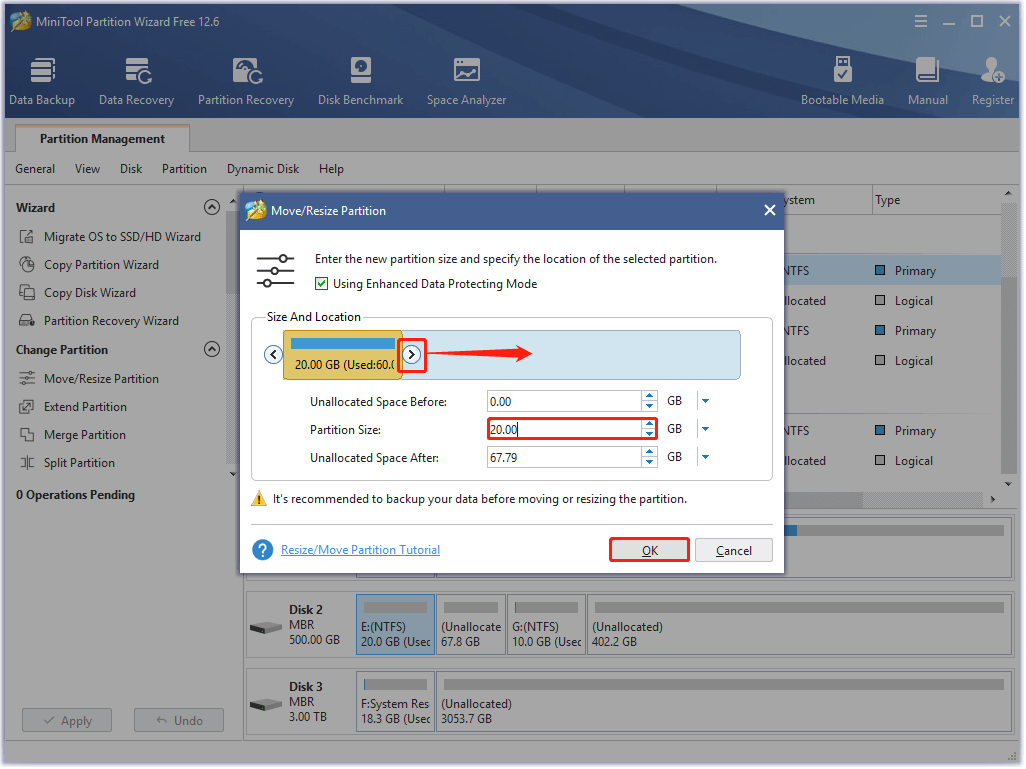
Step 3: In the pop-up window, lengthen the handle until you take up enough unallocated space. You can do this by dragging the triangles or typing the exact size in the Partition size section. After that, click OK.
In this section, you can also drag the whole partition handle to change its location.
Step 4: Finally, click Apply to execute the operation.
Way 5: Upgrade to a Larger Hard Drive
If the hard drive you are currently using is old and runs slowly. It’s better to upgrade to a larger new hard disk for more storage space. If you don’t know how to do this, just follow this guide: How to Upgrade to Larger Hard Drive Without Data Loss?
In addition to the above ways, you can also try to get more disk space by:
- Deleting files that are unnecessary and space-consuming
- Uninstalling the apps you don’t use anymore
- Turning on Storage Sense
Once there is enough disk space available, try the upgrading process again to see if the error is solved.
Solution 3: Use the Same Windows Edition
As you can know from above, the 0x4005(16389) error will come out if you’re using a different Windows edition than the one currently installed on your computer. For instance, if you are using Windows Enterprise, you can only upgrade your system with Windows Enterprise media. Or you will get stuck in this annoying error.
In this case, to resolve the error 0x4005(16389), make sure you upgrade to the same Windows edition as your current one. If the error persists when you use the same Windows edition, you should continue with other solutions.
Solution 4: Temporarily Disable Antivirus Software
If you install certain third-party antivirus programs on your computer, they may recognize the upgrading process as a threat and disrupt it, leading to the Microsoft error 0x4005(16389). To avoid this error, you need to temporarily disable the antivirus on your PC.
It’s a simple way and you just need to right-click the program icon at the right of your Windows taskbar and then select Exit or Disable. Keep in mind that viruses and malware may attack your system after the antivirus is disabled. Therefore, you’d better turn on it as soon as you finish upgrading your Windows.
You might be interested in: How to disable Windows Defender Firewall in Windows?
Solution 5: Change Local Computer Description Command
If you are using a custom command or script to set up the local computer description during the task sequence of upgrading and the command/script fails, then you are likely to be prompted with the Microsoft error 0x4005(16389).
In this case, you can try to solve the error by changing the command that is used to set the local computer description. To do this, you can use the NET CONFIG command. Here’re the detailed steps.
Step 1: In the System Center Configuration Manager console, go to Software Library > Operating Systems > Task Sequences.
Step 2: Select the task sequence you fail to complete from the list and then select Edit.
Step 3: After that, navigate to Add > General > Run Command Line.
Step 4: Type the following command in the Command line section and click OK to execute it.
cmd /c net config Server /SRVCOMMENT: “%OSDComputerDescription%”
This command will change the computer description to the OSDComputerDescreitpion variable’s value. You can replace OSDComputerDescription with whatever you want.
Solution 6: Remove the 32-Bit Program from 64-Bit Computers
The Windows 10 0x4005(16389) error may show up as well when you are trying to deploy a .NET framework across machines. It’s may because you have a program running as a 32-bit process on a 64-bit computer system. On this occasion, you can simply uninstall the specific program to fix the error. To do this, follow the steps below.
Step 1: Open the Installer (or Deployment) Properties for the .NET version you are about to deploy.
Step 2: In the pop-up window, go to the Programs tab. Tick the checkbox next to the Run installation and uninstall program as 32-bit process on 64-bit clients option.
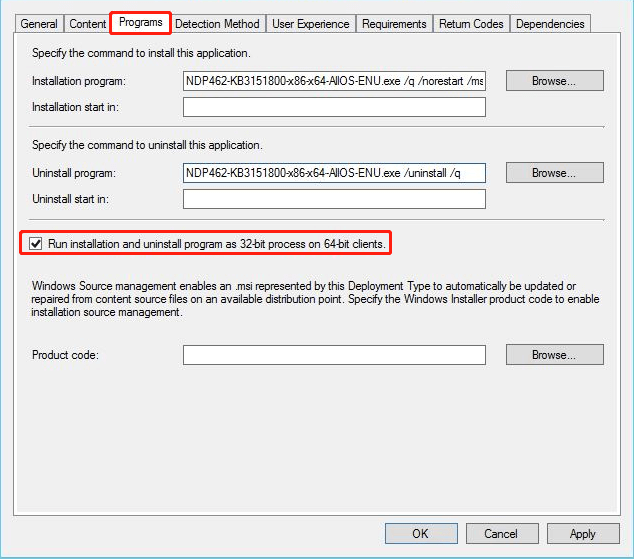
Step 3: Finally, click Apply and OK to save the change.
Bottom Line
This post reveals some common reasons for the error 0x4005(16389) and offers possible solutions. If you are suffering from this error, you can try these solutions one by one until you fix it. If you have any problems with this error, you can leave a message in the comment zone below.
If you meet something wrong while using MiniTool Partition Wizard, you can contact us via [email protected]. We will get back to you once we receive the email.
User Comments :