Do you want to access files on network devices? Sometimes you may have to enable SMB1 Windows 10. How to enable SMB1 Windows 10? If you are also searching for this guide, this post of MiniTool is what you have been looking for.
Why You Need to Enable SMB1 Windows 10
As you might know, SMB (Server Message Block) is a client-server communication protocol. It can be used to share access to files, printers, and serial ports on a network. To read and write files, you can use SMB to connect to some network devices such as a router and NAS or another computer.
Since SMB Version 1 (SMB1) is an old and insecure networking protocol, Windows 10 no longer installs it by default. However, some users encountered the error messages like “You can’t connect to the file share because it’s not secure” and “The specified network name is no longer available” when attempting to access files.
At this time, you have to temporarily enable SMB1 Windows 10 in order to fix these errors. Here are the top 3 methods for Windows 10 enable SMB1.
Method 1. Enable SMB1 Windows 10 Using Control Panel
For those who don’t have direct access to the network devices running the SMB protocol, you can follow the steps below to enable SMB1 Windows 10 temporarily.
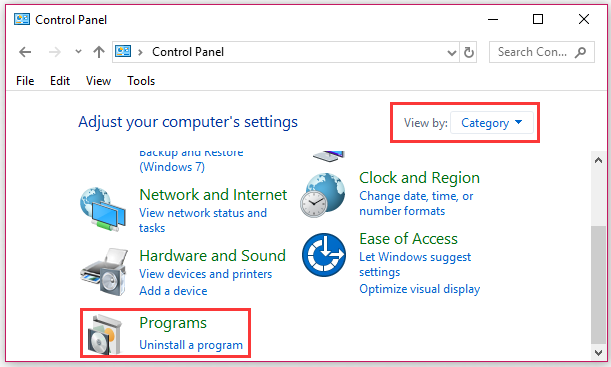
Step 1. Type control in the search box and select Control Panel from the best match.
Step 2. Change the View by to Category, and then click on the Programs section.
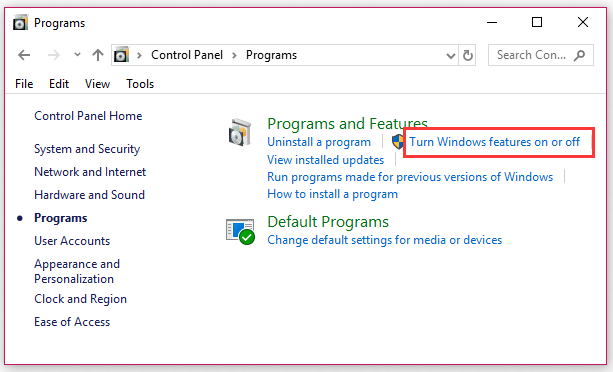
Step 3. Click on the Turn Windows features on or off link.
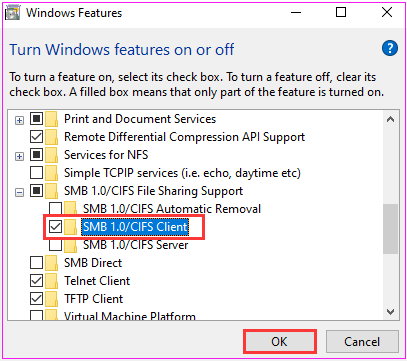
Step 4. Then expand the SMB 1.0/CIFS File Sharing Support section and select the checkbox for the SMB 1.0/CIFS Client.
Step 5. Click on the OK button to save this change and restart your computer.
Now you can check if this Windows 10 SMB1 enable operation to fix the network errors.
Method 2. Enable SMB1 Windows 10 Using PowerShell
Windows PowerShell can help you enable SMB1 Windows 10 as well. You can follow the detailed steps below:
Step 1. Type PowerShell in the search box, and then right-click the Windows PowerShell and select Run as administrator.
Step 2. Type the following command and hit Enter to check if the SMB1 is enabled.
Get-SmbServerConfiguration | Select EnableSMB1Protocol
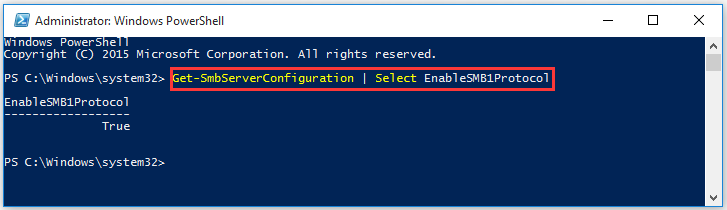
Step 3. If the output is True, which indicates that the SMB1 is enabled. If the output is False, you can type the following commands and hit Enter to enable it.
Set-SmbServerConfiguration –EnableSMB1Protocol $true
If this method fails to Windows 10 enable SMB1, you can move on to the final method.
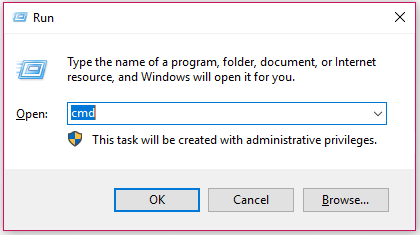
Method 3. Enable SMB1 Windows 10 Using Command Prompt
Apart from Windows PowerShell, you can use a similar utility – Command Prompt. It can also help you enable SMB1 on Windows 10. Here’s how to do that:
Step 1. Press Win + R keys to open the Run dialog box, and then type cmd in it and press Ctrl + Shift + Enter keys to open the elevated command prompt.
Step 2. Type the DISM /Online /Enable-Feature /All /FeatureName:SMB1Protocol command and hit Enter. After that, restart your computer.
Now, you can check if the Windows 10 SMB1 is enabled.
User Comments :