Are you the only person who uses your computer? If you are not the only one, you might need to enable disk quotas. Why? Keep reading to get the reason.
What Are Disk Quotas?
Wikipedia’s explanation: A disk quota is a limit set by a system administrator that restricts certain aspects of file system usage on modern operating systems. The function of using disk quotas is to allocate limited disk space in a reasonable way.
MiniTool’s explanation: Disk quotas help Windows administrators control and limit disk space that others use. In other words, with disk quotas enabled, you can limit the amount of storage space that every user can use, and nobody can trespass this limit. That means your storage space will never be filled up by others’ accounts.
There are two basic types of disk quotas: NTFS disk quotas and FSRM quotas (also known as File Server Resources Manager quotas). What are the differences between NTFS disk quotas and FSRM quotas?
NTFS quotas allow you to control the amount of data that other people on an NTFS formatted volume. FSRM quotas allow you to limit the space that is used for a volume or folder, and the limit can be automatically applied to new folders that are created on a volume. Moreover, they also allow you to define quota templates for new volumes or folders.
FSRM quotas are more flexible and convenient, but in some cases, NTFS quotas can be more efficiently used. Therefore, the following is going to mainly talk about the first type of disk quotas: NTFS disk quotas.
NTFS disk quotas have the following features:
- It only works on NTFS partitions.
- It needs administrator permission to setup.
- It only applies to physical storage and partitions.
- It calculates the original file size even if NTFS compression is enabled.
The following walks you through the process of enabling this type on Windows 10.
How to Enable NTFS Disk Quotas Windows 10?
First, you need to make sure that the partition is formatted to the NTFS file system, and then use Disk Properties, Registry, Group Policy Editor, or Command Prompt to enable NTFS disk quotas.
Make Sure It’s an NTFS Partition
Open File Explorer with the Windows + E key combination. Afterwards, right-click the partition to which you want to apply NTFS disk quotas and choose the Properties option. After that, you can see if this partition is formatted to NTFS.
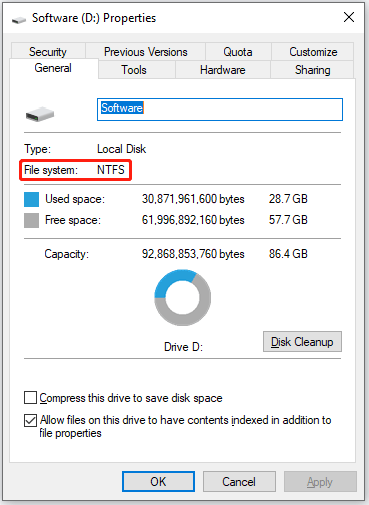
If the partition is using NTFS, then you can start to apply NTFS disk quotas to the partition. If not, you need to perform a reformat. In Windows 10, you can reformat a partition in many different ways — use the Format function provided by File Explorer, Disk Management, or MiniTool Partition Wizard, or run the Diskpart Format command.
Editor’s choice: Use MiniTool Partition Wizard
MiniTool Partition Wizard is a free and reliable disk format tool for Windows that allows you to format a partition to various file systems such as NTFS, FAT32, exFAT, and ext2/3/4.
MiniTool Partition Wizard FreeClick to Download100%Clean & Safe
Here are the tutorials on how to format a partition to NTFS using the above utilities.
Use File Explorer
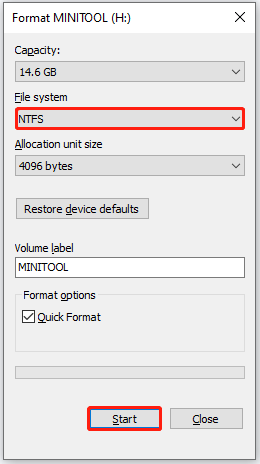
- Open File Explorer.
- Find and right-click the partition and choose the Format option.
- Choose the NTFS option from the File system menu and then click the Start button.
- Click the OK button to confirm this reformat.
- Wait for the process to end.
Use Disk Management
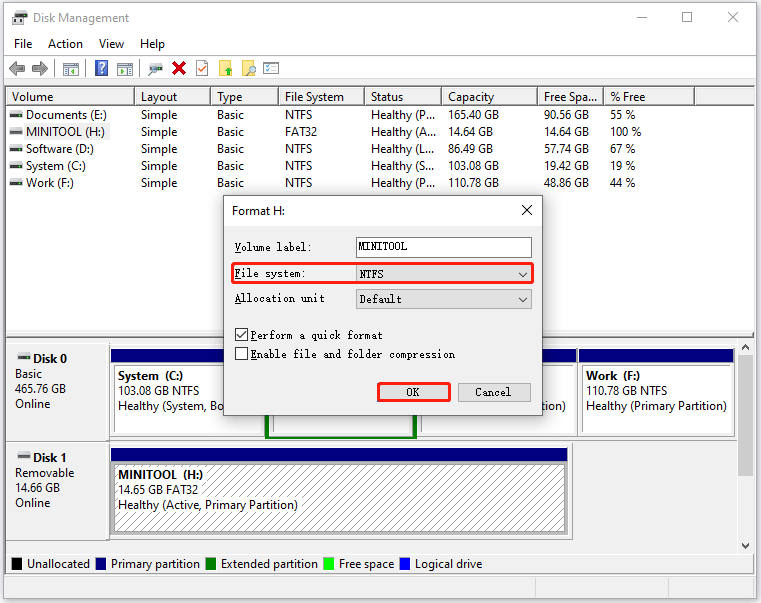
- Right-click the Windows icon on the taskbar and then choose the Disk Management option.
- Once inside the Disk Management window, locate the partition and right-click it to choose the Format option, and click the OK button.
- Click the OK button again to confirm this operation.
Use MiniTool Partition Wizard
MiniTool Partition Wizard FreeClick to Download100%Clean & Safe
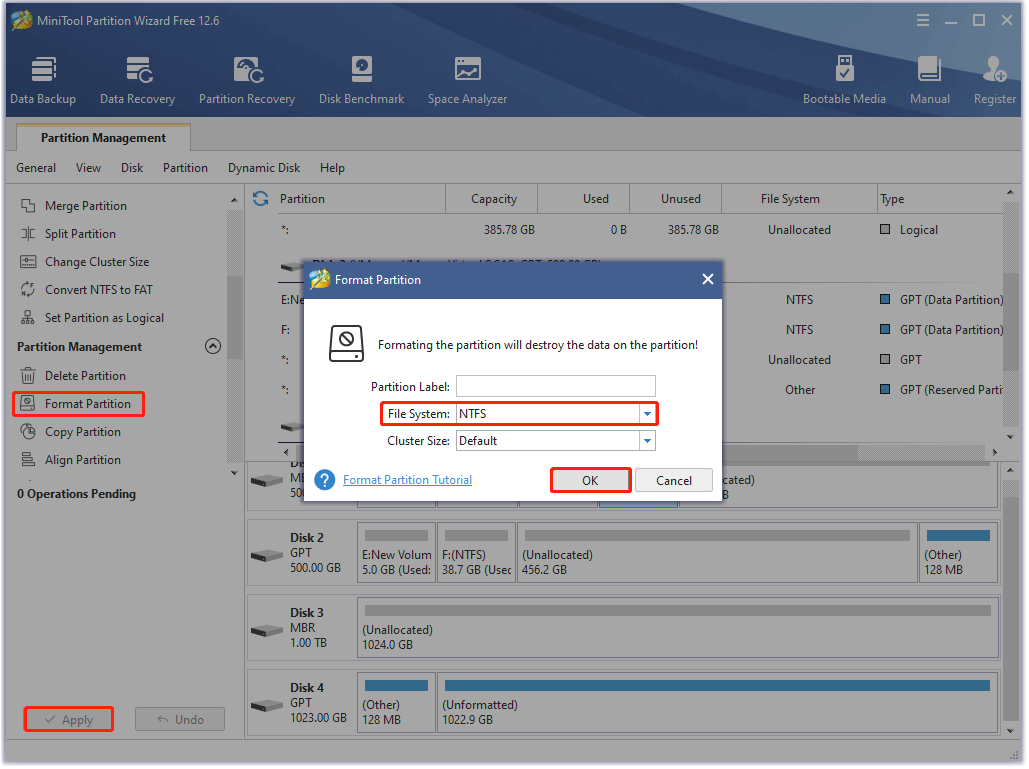
- Launch MiniTool Partition Wizard to access its main interface.
- Locate the partition and then choose the Format Partition feature from the left side.
- On the Format partition window, choose the NTFS option from the File System menu and click the OK button.
- Click the Apply button on the main interface to start the formatting.
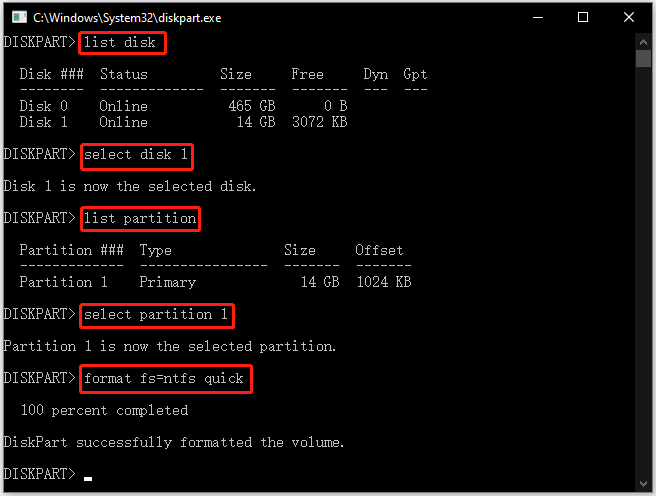
Use Diskpart
First, open the diskpart window by typing diskpart into the search bar and then hitting the Enter key. Then, type the following commands one by one and hit the Enter key after each typing. Finally, wait for the message to appear, saying DiskPart successfully formatted the volume.
list disk
select disk 1 (replace the number “1” with the actual one)
list partition
select partition 1 (replace the number “1” with the actual one)
format fs=ntfs quick
Enable NTFS Disk Quotas
As mentioned above, there are four ways to enable NTFS disk quotas in Windows 10:
- Use Disk Properties;
- Use Registry Editor;
- Use Group Policy Editor;
- Use Command Prompt.
The details are displayed below. Check them now.
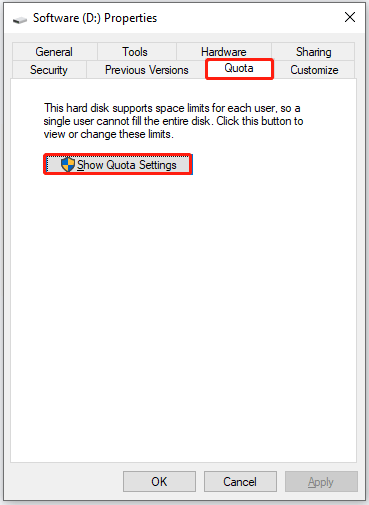
Use Disk Properties
To start, right-click the NTFS partition on the File Explorer window and choose the Properties option. On the drive’s properties window, head over to the Quota tab and then click the Show Quota Settings button.
Then, you can get a window that looks like this:
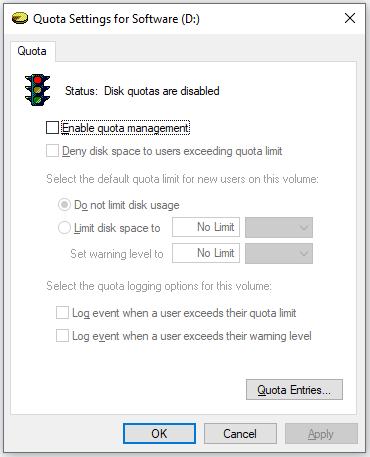
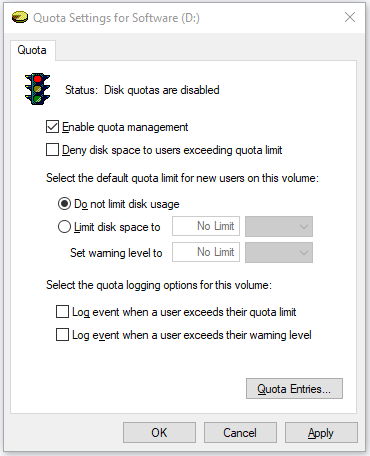
In this window, you need to tick the checkbox for the Enable quota management option. After that, the options on this window that were greyed out now become selectable to set quota limits.
These options are as follows:
- Deny disk space to users exceeding quota limit: it prevents users who have exceeded the quota limit from saving data to the partition.
- Limit disk space to: it sets a limit on the total size of files for one user.
- Log event when a user exceeds their quota limit: it logs an event in Event Viewer if a user exceeds the quota limit.
- Log event when a user exceeds their warning level: it logs an event in Event Viewer if the quota threshold is reached.
Added information: Event Viewer is a Windows built-in tool that allows you to check the information of the event that happens on your computer. For example, if someone exceeds the quota limit you allocate, open Event Viewer on which you can see the information saying “A user hit their quota limit on volume D”.
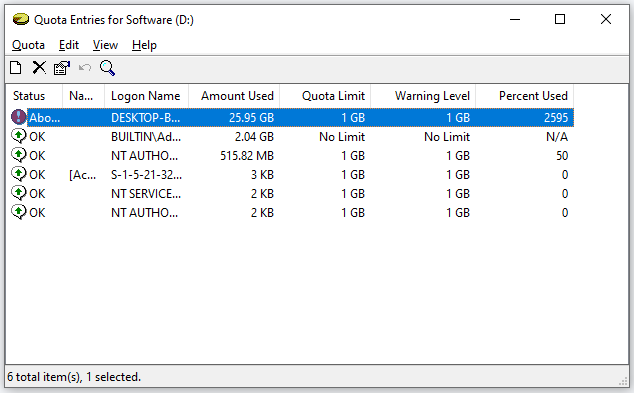
There is a button called Quota Entries. This button is designed for system administrators to set some advanced quota settings, like setting specific disk quotas for specific users, managing files owned by users, and so forth.
Once finishing setting these quota limits, click the Apply button on the Quota Settings for Software window, and you can get the Disk Quota window on which a message says “You should enable the quota system only if you intend to use quotas on this disk volume …”.
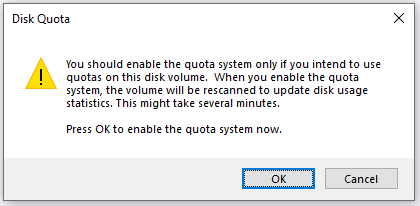
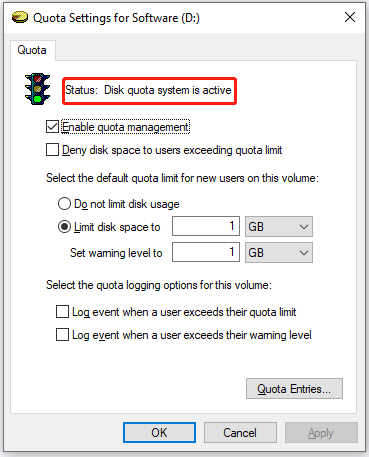
Click the OK button on the Disk Quota window to let Windows scan the partition to update the usage statistics. This will bring you back to the Quota Settings for System window on which now you can see the information following Status saying “Disk quota system is active”. This means that NTFS disk quotas are enabled on the computer.
Finally, click the OK button on the Quota Settings for Software window to close the current window.
Use Registry Editor
Or you can enable NTFS disk quotas via Registry Editor, and the steps are as follows:
First, open Registry Editor as administrator. To do so, type regedit into the Windows search bar and right-click the search result to choose the Run as administrator option.
Then, inside the Registry Editor window, navigate to the following path and see if there is a key or folder called DiskQuota. If it is not available, create it. To do so, right-click the Windows NT key and choose the options: New > Key; then name the key DiskQuota.
HKEY_LOCAL_MACHINESOFTWAREPoliciesMicrosoftWindows NT
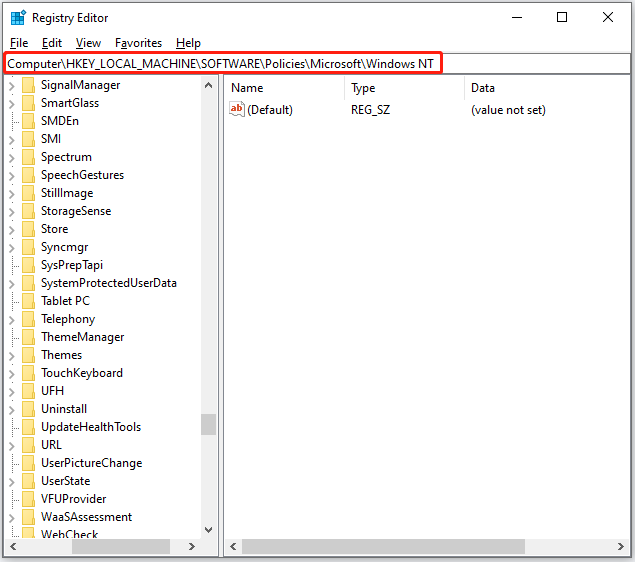
Next, under the DiskQuota key, right-click the blank area on the right side and choose the options: New > DWORD (32-bit) Value; then name the DWORD Enable; finally, double-click it to set its value data to 1 and click the OK button to save this change.
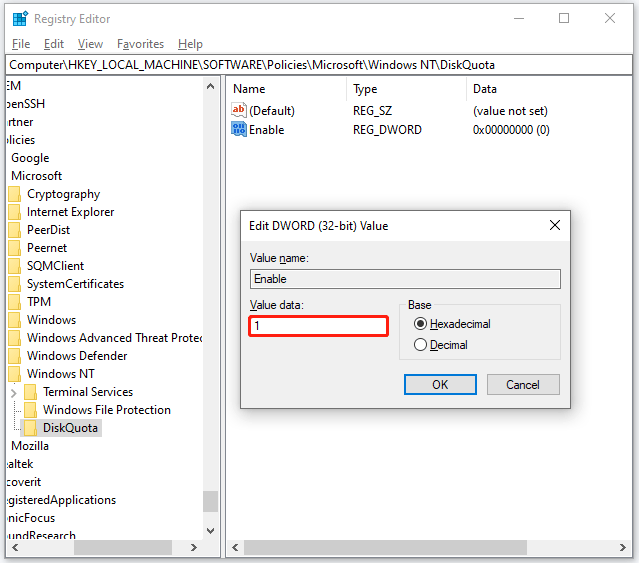
Finally, close the Registry Editor window and restart your computer to apply these changes.
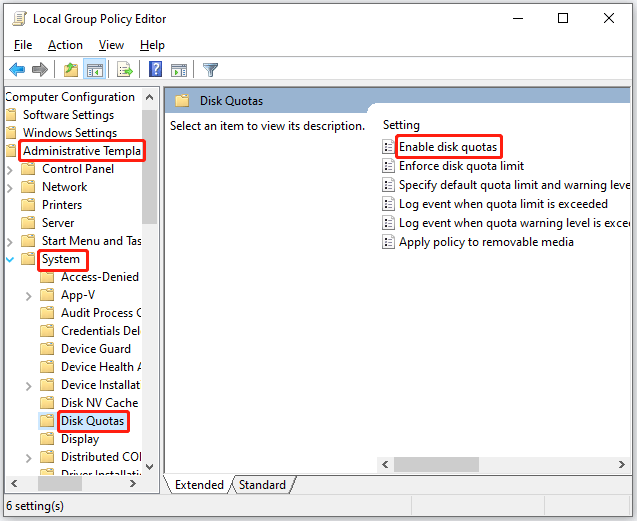
Use Group Policy Editor
You can also enable NTFS disk quotas using Group Policy Editor. But this Windows utility is not available on Windows 10 Home edition. See Windows 10 Home vs Windows 10 Pro.
First, open Group Policy Editor. For that, press Windows + R to launch the Run dialog box, then type gpedit.msc into the box, and click the OK button.
Then, go to the path: Computer ConfigurationAdministrative TemplatesSystemDisk Quotas. After that, look at the right side of the window and double-click the Enable disk quotas setting.
Next, choose the Enabled option and click the buttons: Apply > OK.
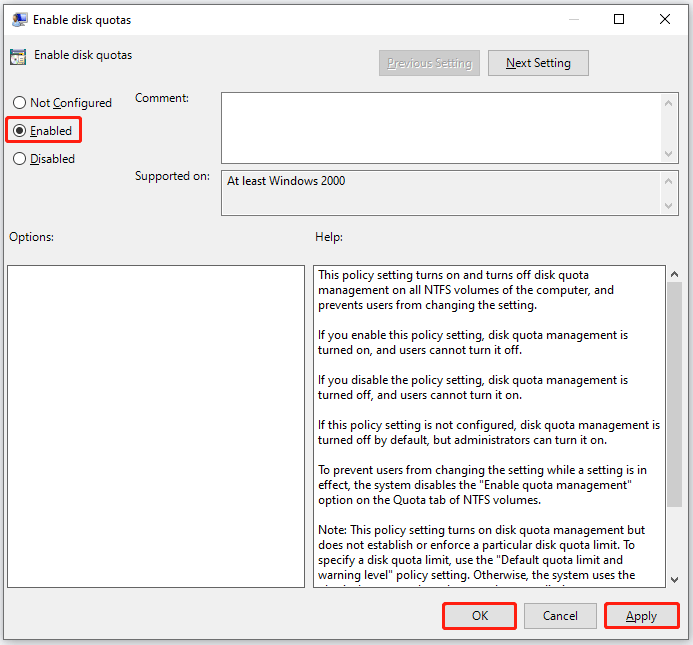
Finally, close the Windows utility and restart your computer.
If you want to disable disk quotas, just repeat the above steps but choose the Disabled option this time.
Use Command Prompt
First, type cmd into the Windows search bar, right-click the search result and choose the Run as administrator option.
Then, In the Command Prompt window, type the command: fsutil quota track D: (replace the drive letter “D” with the actual drive letter) and hit the Enter key.
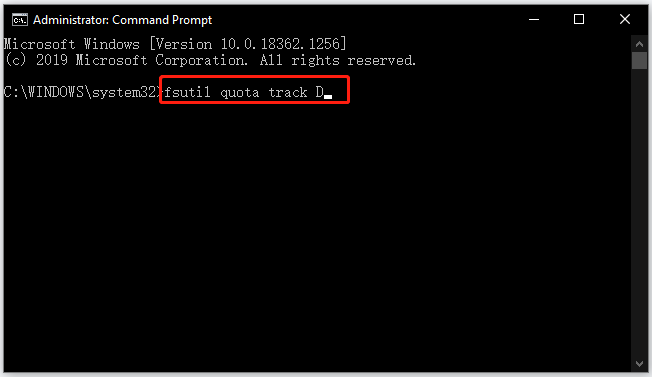
Finally, when the above command finishes, close Command Prompt and restart your computer.
Well, to disable disk quotas using Command Prompt, run the command: fsutil quota disable D: (replace the drive letter “D” with the actual drive letter).
Conclusion
Disk Quotas allow you to set a space limit for others who can save files on your computer. So, if you want to control and limit the amount of disk space that users use, disk quotas come to help you.
This post shows you how to enable NTFS disk quotas, one type of disk quotas in different ways. If you have any questions about these ways, please let us know, and we will get back to you as soon as possible.
If you have any suggestions on our software — MiniTool Partition Wizard, please contact us via [email protected]. Thanks in advance.
User Comments :