To resolve the Critical Process Died stop code, you can disconnect all devices, scan for malware, update drivers, clone the system partition with MiniTool Partition Wizard, perform a system restore, check RAM, etc.
When Windows detects a critical, unrecoverable error, the system crashes with a Blue Screen of Death (BSOD), also known as a stop error. It then shuts down or restarts to prevent further damage.
The “Critical Process Died” error is a manifestation of a Blue Screen of Death, meaning that a vital system process has crashed, preventing Windows from continuing to function normally.
The following section will explain the cause of this error and how to fix Critical_Process_Died Windows 10.
Causes of Critical Process Died Windows 10/11
The stop code Critical Process Died can be caused by a variety of issues. Here are some common causes:
- Peripheral device malfunction: Connecting a faulty external device (such as a USB drive, external hard drive, or mouse) can sometimes cause the Critical Process Died blue screen error.
- Corrupted system files: Damage or loss of certain important files in the operating system can prevent critical processes from running properly, triggering this error.
- Memory problems: If the computer’s RAM has a problem, such as a damaged memory module or poor contact in the slot, it can also cause Critical Process Died Windows 11.
- Driver conflicts or outdated drivers: Incompatible or outdated drivers may conflict with system processes, leading to a blue screen Critical Process Died error.
- Software conflicts or virus infection: Certain malware, viruses, or incompatible software can interfere with system processes, causing Windows stop code Critical Process Died error.
- Hard drive problems: If the hard drive has bad sectors or other hardware failures, it may also prevent data from being read correctly, leading to system crashes and BSOD Critical Process Died.
Next, the following content will introduce several methods to resolve the “BSOD Critical Process Died” problem. First, perform some basic checks, then gradually delve deeper to troubleshoot and fix hardware issues.
Solution 1: Perform Quick Fixes
When you encounter the Windows stop code Critical Process Died, you should try the following immediate actions:
- Restart PC: A simple reboot can clear temporary system errors by closing all running programs and processes. This action reloads the operating system and may resolve Critical Process Died blue screen problems caused by issues such as cache, temporary files, or program errors.
- Disconnect all peripheral devices: Disconnect all non-essential peripheral devices (such as USB, external drives, scanners, speakers, etc.) to see if a faulty peripheral device is causing the Critical Process Died blue screen problem.
- Remove the RAM: Some forum users have reported that removing one RAM stick can resolve the stop code Critical Process Died issue when your computer has multiple RAM modules. You can try this method.
If this does not solve your problem, please try the following solutions.
Solution 2: Try Startup Repair
Startup Repair is a more advanced troubleshooting tool built into Windows. It is specifically designed to fix startup problems and issues that prevent Windows from loading normally.
Step 1: Hold the Shift key down, click the Power icon, and then select Restart.
Step 2: When your device restarts to the Choose an option section, select Troubleshoot > Advanced options > Startup Repair.
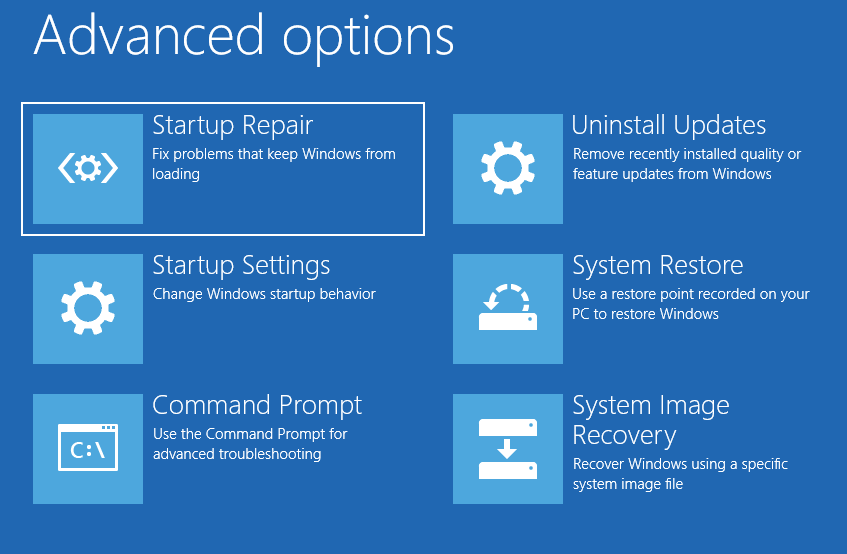
Step 3: After that, you might need to select an account and enter your password or BitLocker recovery key.
Windows will scan your computer for issues and try to resolve them automatically before restarting.
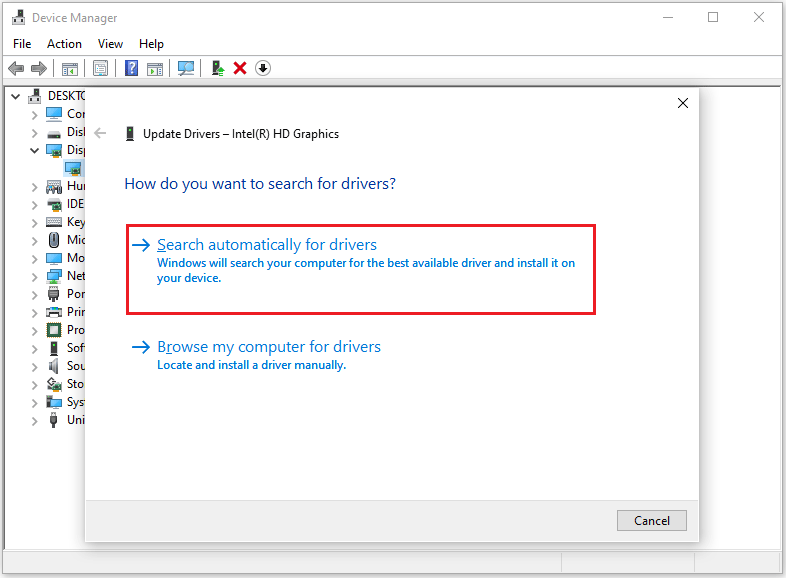
Solution 3: Update/Rollback Drivers
Outdated drivers (especially graphics and network drivers) are one of the causes of the Critical Process Died error on computers. Therefore, you should update or roll back your drivers.
Here is the guide:
- Press Win + X, and then select Device Manager.
- Expand the Display adapters category, right-click the graphics card, and select Update driver.
- Choose Search automatically for drivers and follow the on-screen instructions.
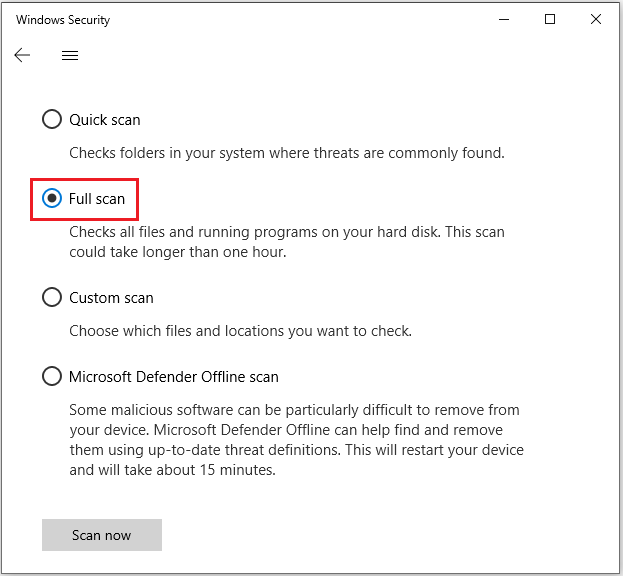
Solution 4: Check for Malware
By checking for and removing malware, system failures caused by viruses or malware can be repaired, ensuring that system files and the operating environment return to normal, thereby resolving the “blue screen Critical Process Died” error.
Here are the steps:
- Open Settings > Update & Security > Windows Security > Virus & threat protection.
- Click Scan options and select Full scan.
- Click Scan now and follow prompts to remove detected threats.
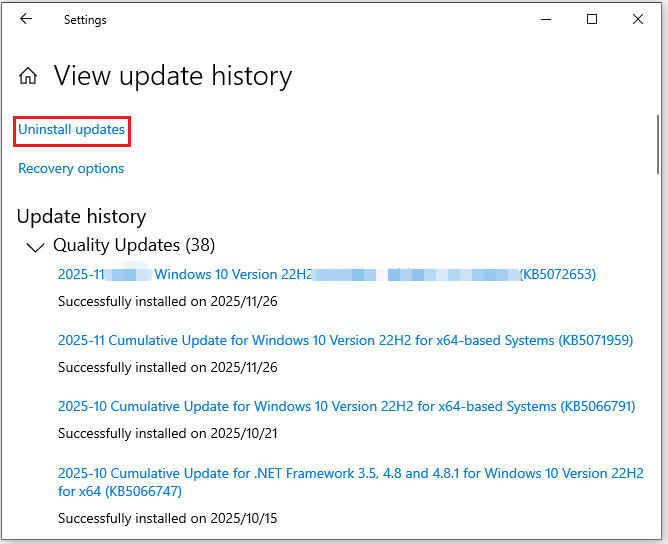
Solution 5: Uninstall Recent Updates
Sometimes, Windows updates may introduce new drivers, system files, or patches that are incompatible with existing hardware or software, causing blue screen errors.
If your Critical Process Died blue screen problem occurred after a recent update, uninstalling those updates is usually an effective solution.
Tip: If your computer fails to boot, you need to enter WinRE to uninstall and update Windows. The method is as follows: in WinRE, select Troubleshoot > Advanced options > Uninstall Updates > Uninstall quality update. Finally, click Uninstall quality update.
Here are the steps to uninstall recent Windows updates in Settings.
Step 1: Go to Settings > Update & Security > Windows Update > View update history.
Step 2: Click the Uninstall updates link and follow the on-screen prompts.
Solution 6: Perform a Clean Boot
A clean boot loads only the core files and drivers required by Windows, which helps identify which software caused the blue screen error, such as Critical Process Died.
Solution 7: Run SFC & DISM Scans
Corrupted system files can cause a “BSOD Critical Process Died” error. To resolve this issue, you can run DISM and SFC scans, which are designed to repair corrupted or missing system files, repair the Windows image, and restore the stability of the operating system.
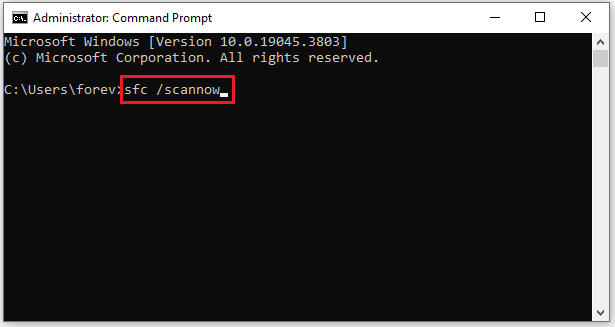
Step 1: In the search bar, type cmd and then select Run as administrator from the right side.
Step 2: Type DISM /Online /Cleanup-Image /RestoreHealth and press Enter. This command will scan and repair corrupted files, components, or update files in the Windows system image.
Step 3: After DISM finishes running, type sfc /scannow and press Enter. This command will scan protected system files in Windows and repair corrupted or missing files.
Solution 8: Perform System Restore
Performing a system restore can revert your computer to a previous stable state to resolve system problems such as blue screens, program crashes, or driver conflicts.
System restore will not affect personal files, but it will restore system settings, installed programs, and system files to the state they were in at the restore point you selected.
Step 1: Type Create a restore point in the Search box and choose Open on the right side.
Step 2: Under the System Protection tab, click the System Restore button.
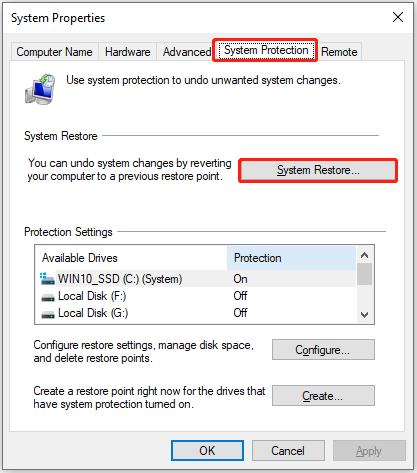
Step 3: Click Next. Then, choose a system restore point and tap Next.
Step 4: Click Finish to confirm.
Restart your computer to check if the “Windows stop code Critical Process Died” issue is resolved.
Solution 9: Test RAM
The blue screen Critical Process Died Windows 11 can sometimes be caused by memory problems, so you can run the Windows Memory Diagnostic tool to test the RAM.
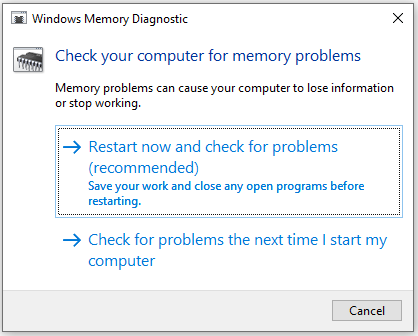
Step 1: Press Win + R to open the Run window.
Step 2: Type mdsched.exe in it and click OK.
Step 3: In the pop-up window, click Restart now and check for problems (recommended).
Step 4: After the memory test is complete, your computer will automatically restart. To view the test results, press the Win + X keys and select Event Viewer.
Step 5: Go to Windows Logs > System, right-click System, search for MemoryDiagnostic in the box, and then click Find Next to see the results.
Solution 10: Check Disk
Disk errors or bad sectors can cause a “Critical Process Died” blue screen error. The CHKDSK command checks the health of the disk and repairs errors that could cause system crashes.
Here are the steps:
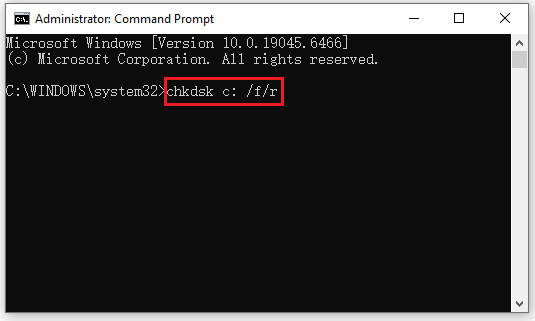
Step 1: Type Command Prompt in the search box and choose Run as administrator.
Step 2: In the Command Prompt window, type chkdsk *: /f /r and press Enter. Replace “*” with the letter of your drive.
- /f: It fixes any errors it detected.
- /r: Locate bad sectors on the drive and try to recover any readable information from them.
Clone the Disk to Another One
When you suspect a disk problem, it is recommended to use MiniTool Partition Wizard to clone the entire disk (including data and system) to another one to prevent potential data loss. Then, use the new disk to boot up the computer.
How to use this software to clone a disk to another one? Please refer to the following guide:
MiniTool Partition Wizard DemoClick to Download100%Clean & Safe
Step 1: Connect the new disk to your computer. If your computer has only one hard drive bay, an NVMe/SATA to USB adapter is needed.
Step 2: Launch MiniTool Partition Wizard to its main interface.
Step 3: Right-click the system disk and choose Copy.
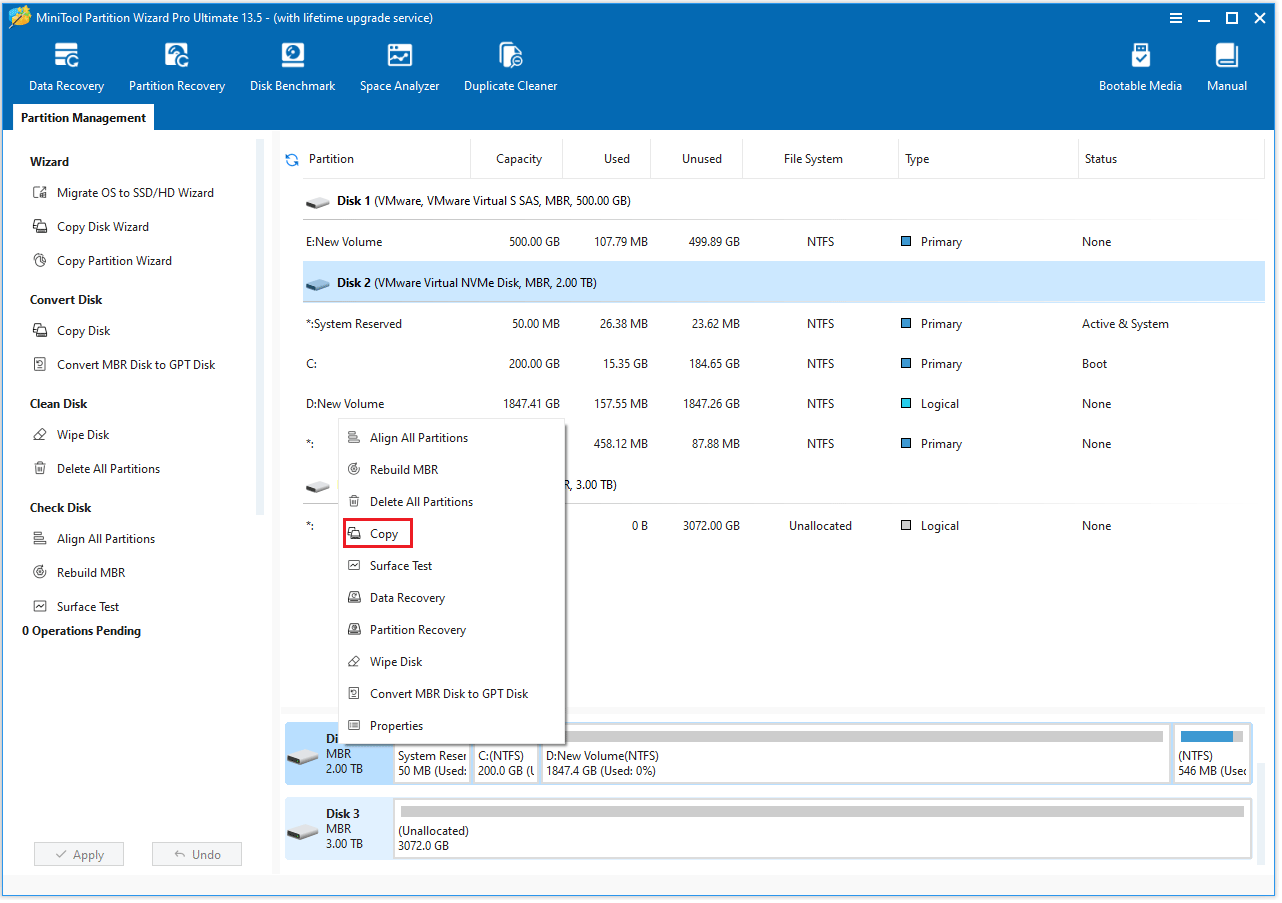
Step 4: Select the new disk as the target disk and then click Next > Yes.
Step 5: Check the copy options and disk layout, and click Next. You can adjust the size and location of the partitions by dragging the sliders.
- The Align partitions to 1MB option is usually checked by default, which is recommended for optimal performance.
- The Use GUID Partition Table for the target disk option is recommended to select if the new hard drive is larger than 2TB and your computer supports UEFI boot.
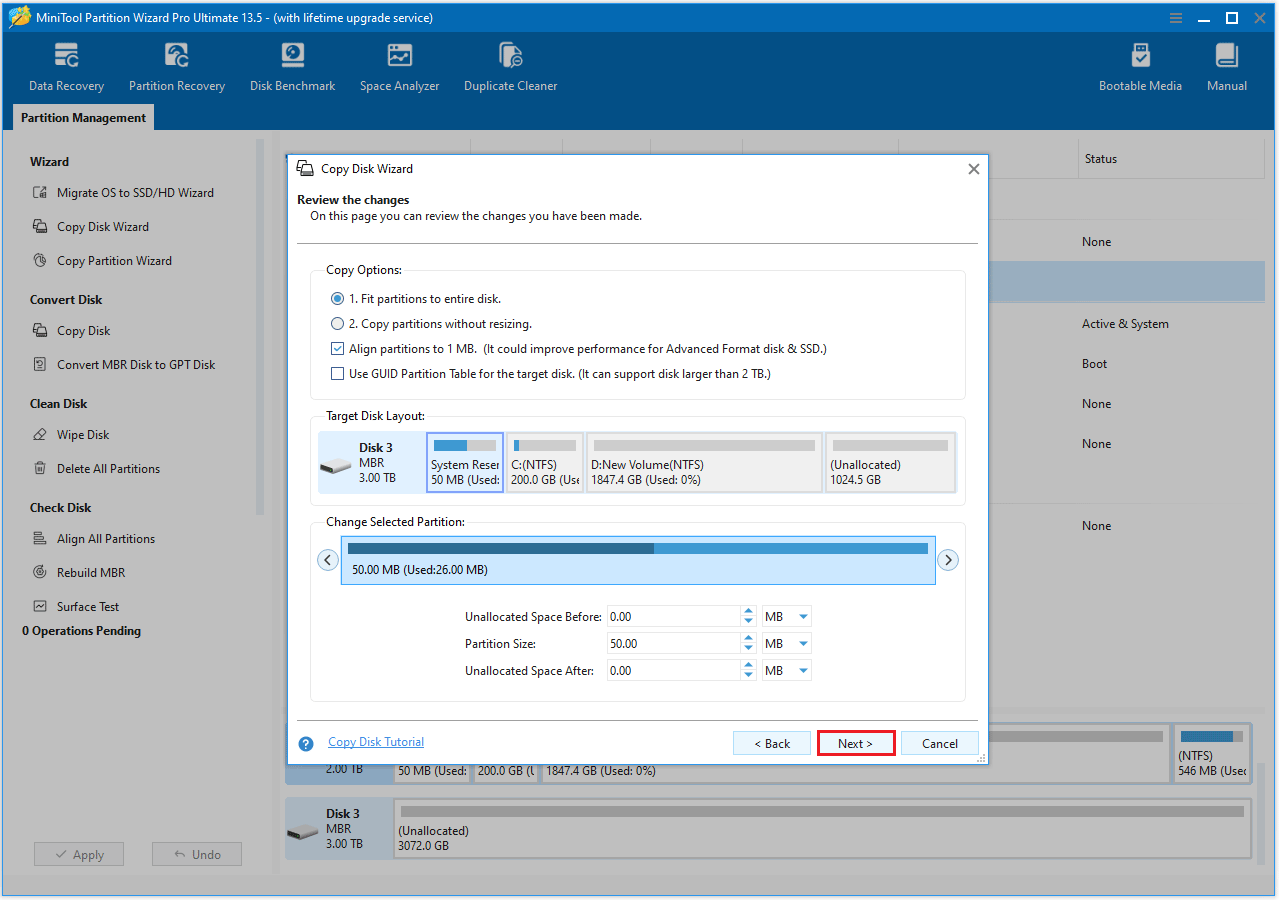
Step 6: Read the NOTE information and click Finish.
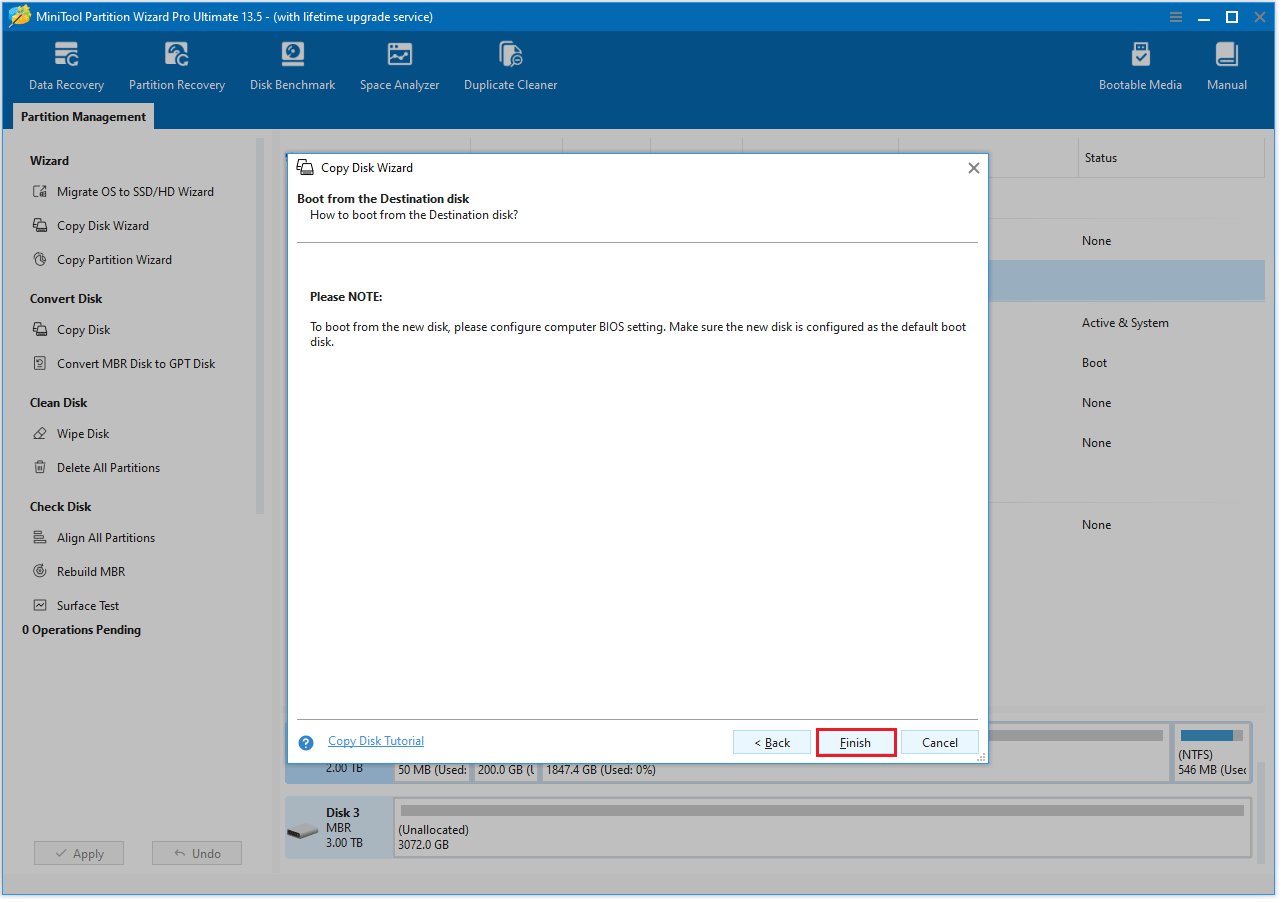
Step 7: Click Apply to start the migration process.
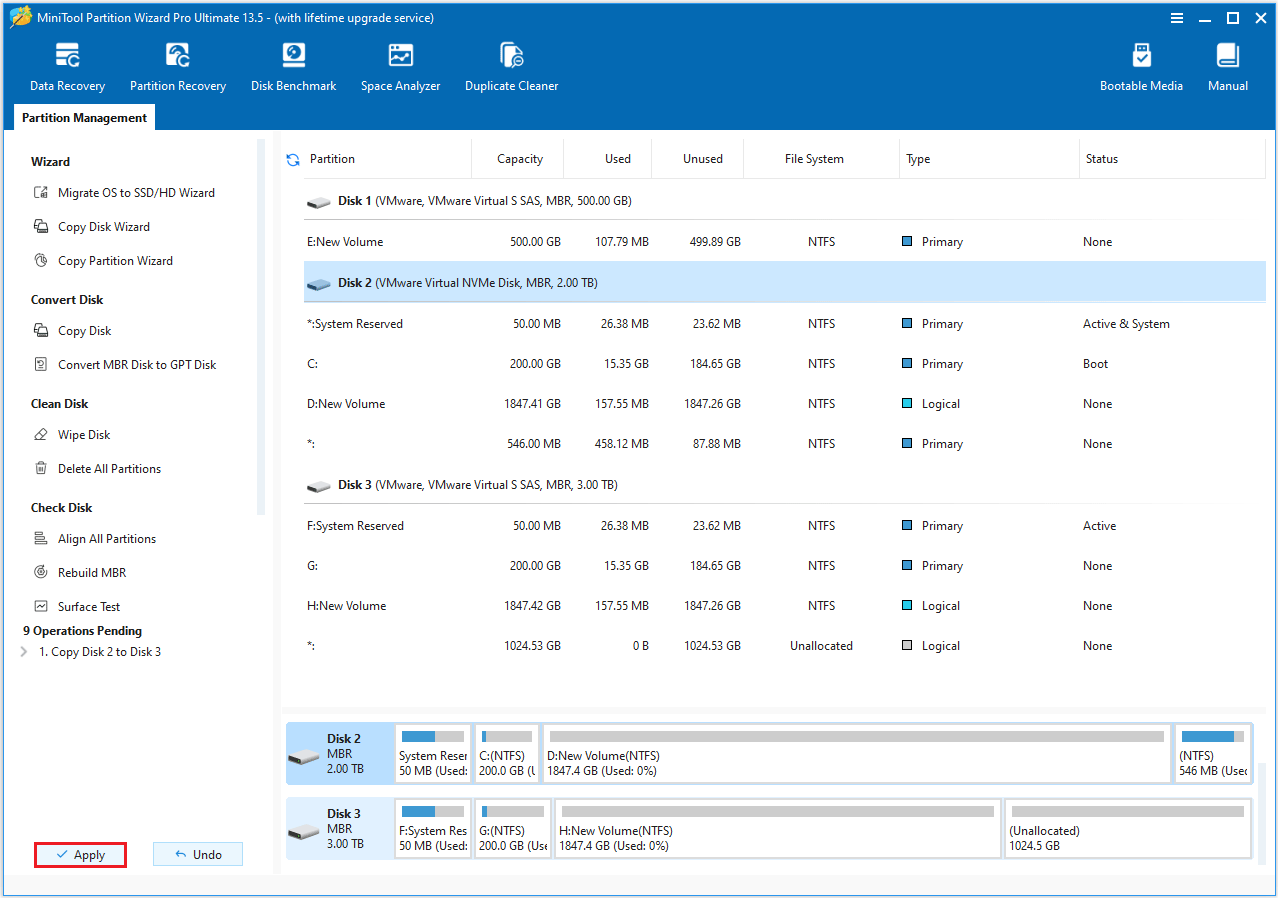
After the migration is complete, shut down the computer and install the new disk. Then, start the computer and press the BIOS key to enter the BIOS/UEFI settings, and set the new disk as the preferred boot device.
Note: If you find that you have lost data after a blue screen, you can use the data recovery function of MiniTool Partition Wizard. It can recover data lost due to disk failure, file system errors, or virus attacks.
Bottom Line
This article covered the common causes of the Windows stop code Critical Process Died and shared some effective troubleshooting solutions.
If methods such as updating drivers, performing a clean boot, or running SFC & DISM Scans don’t resolve the issue, professional repair may be required.
Additionally, using MiniTool Partition Wizard is suggested, as it is a powerful tool to clone data to another drive.
If you have any questions or suggestions while using MiniTool Partition Wizard, you can contact us via [email protected] for further assistance.
About The Author

Position: Columnist
Cecilia is a new member of MiniTool. She works as an English editor on the MiniTool team. She likes to learn articles about computers and is passionate about partition management and Windows operating systems. She is committed to allowing readers to use simple, efficient, and fast methods to solve the computer problems they encounter. To provide more professional solutions, she will continue to learn and master computer knowledge.
User Comments :