Does Adobe Reader not work after you upgrade your system to Windows 10? If you face “Adobe Reader not working Windows 10”, this post is worth reading. The post from MiniTool Partition Wizard will guide you to fix the issue step by step.
Adobe Reader Not Working Windows 10
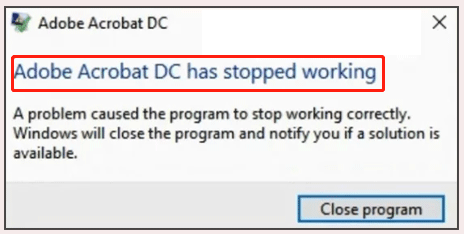
Windows 10 is worth trying, but many people who upgraded to Windows 10 found Adobe Reader not working in Windows 10 when they load a PDF.
Adobe Reader not working in Windows 10 upgrade: Since upgrading to Windows 10, Adobe Reader is not working. How can I fix it?answers.microsoft.com
Reasons for “Adobe Reader Not Working”
Why does the issue appear in Windows 10? The possible reasons include Windows Update (the main culprit), the administrative privileges, the protected mode in Adobe Reader, and the corrupted installation of Adobe Reader.
How to Fix “Adobe Raeder Not Working”
How to solve “Adobe Reader not working Windows 10”? The following solutions could be helpful.
- Run Adobe Reader in compatibility mode and as administrator
- Disable the protected mode
- Repair and install the latest patch
- Reinstall Adobe Reader
- Uninstall updates
Fix 1: Run Adobe Reader in Compatibility Mode and as Administrator
As mentioned above, the first and second reasons for “Adobe Reader not working Windows 10” are Windows Update and the administrative privileges. In this case, the issue can be fixed by running Adobe Reader in compatibility mode and as administrator.
Step 1: Open File Explorer by pressing Windows + E and then navigate to the following path.
C:Program Files (x86)AdobeAcrobat Reader DCReader
Step 2: Right-click the Adobe executable file and choose the Properties option.
Step 3: Switch to the Compatibility tab on the Properties window. Then, tick the checkbox for Run this program in compatibility mode and choose Windows 7 or Windows XP from the following drop-down menu. Finally, tick the checkbox for Run this program as administrator.
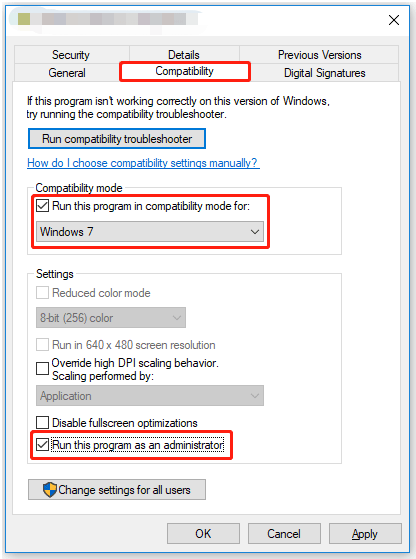
Step 4: Click the Apply button to save the changes. Then, reboot your computer and see if Adobe Reader can work in Windows 10.
Fix 2: Disable the Protected Mode
If Adobe Reader still doesn’t work after applying the first solution, now try disabling the protected mode in Adobe Reader.
Step 1: Open Adobe Reader and click the Edit option on the menu.
Step 2: Once inside the Preference window, select Security (enhanced) from the Categories list.
Step 3: Look at the right side of the window, on which you need to untick the checkbox for Protected Mode at startup under Sandbox Protection. Then, tick the checkbox for Enable Enhanced Security and then close the window.
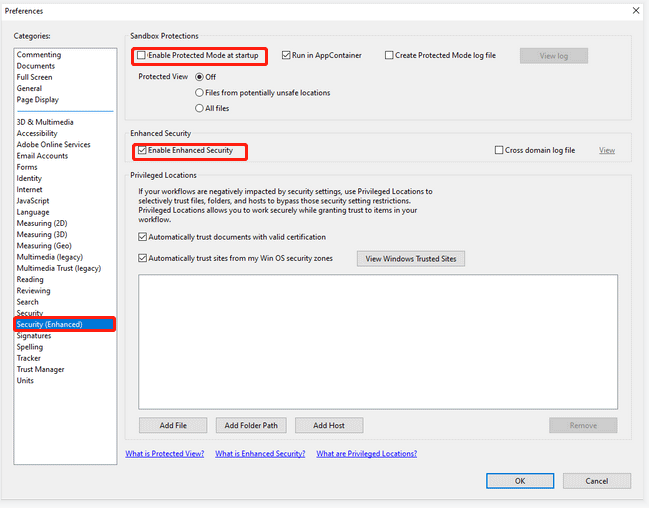
Now the protected mode has been disabled, and you can try relaunching Adobe Reader and see if the program works as expected.

Fix 3: Repair and Install the Latest Parch
If the above two fixes cannot help you fix “Adobe Reader not working Windows 10”, the real culprit could be the corrupted installation of Adobe Reader.
To remove the corrupted installation, you can choose to reinstall the program, but here it is recommended that you repair or update the program to the latest patch that comes with new features and fixes some bugs.
Here is how to repair or update Adobe Reader to the latest patch:
Step 1: Open Adobe Reader, click the Help tab, and click Repair Installation.
Step 2: Click the Yes button on the prompt window and then follow the on-screen instructions.
Step 3: Select the Check for Updates option. After that, Adobe Reader starts scanning for any available patches to download and install.
Step 4: Install the latest patch and restart your computer.
Fix 4: Reinstall Adobe Reader
Try reinstalling Adobe Reader if it still doesn’t work in Windows 10.
Here are three stages to reinstall Adobe Reader in Windows 10.
Stage 1: uninstall Adobe Reader
Step 1: Open Control Panel, then choose Programs and click Programs and Features.
Step 2: On the Programs and Features window, click Adobe Reader and click Uninstall on the top bar.
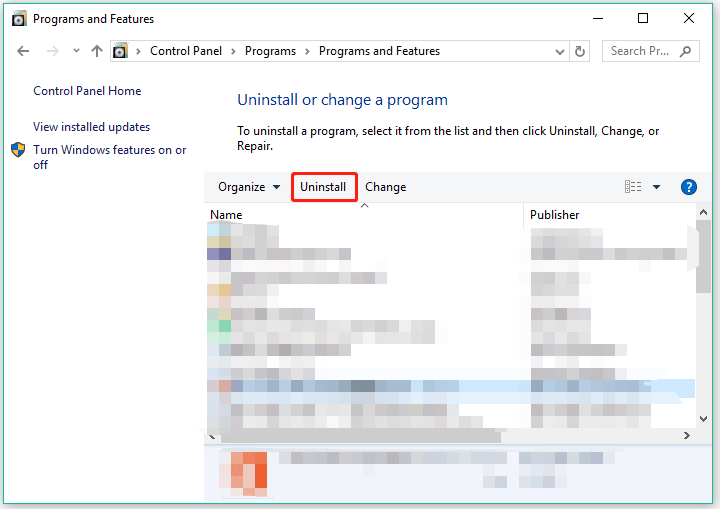
Step 3: Restart your computer.
Stage 2: delete all files Adobe Reader related folders
Step 1: Make sure you logged in as an administrator.
Step 2: Open File Explorer by pressing Windows + E and navigate to the following paths one by one and delete all Adobe Reader-related folders.
C:Users{username}AppDataLocalAdobeAcrobat
C:Program Files (x86)AdobeAcrobat Reader DC
Step 3: Restart your computer.
Stage 3: download and install Adobe Reader
Step 1: Go to the official Adobe download website and download Adobe Reader.
Step 2: Right-click the installation file and choose Run as administrator.
Step 3: Follow the on-screen instructions to install Adobe Reader on Windows 10.
Fix 5: Uninstall Updates
If Adobe Reader still refuses to work in Windows 10, the last fix to the issue is to remove the latest installed update.
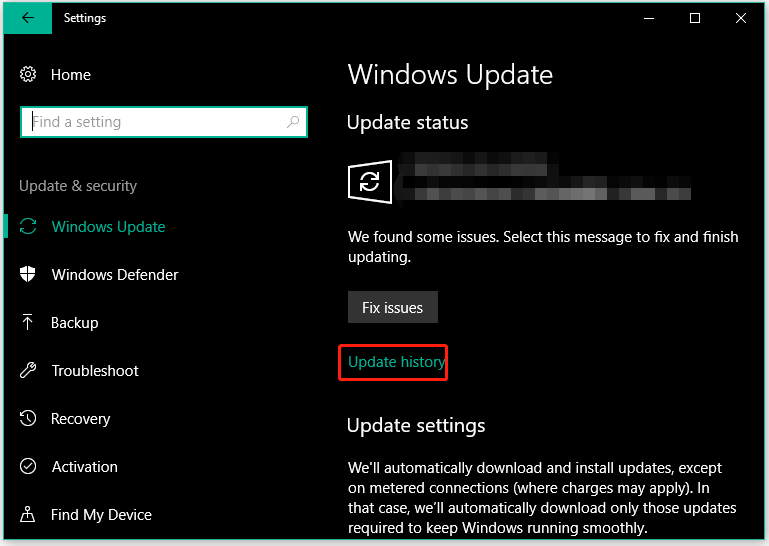
Step 1: Press Windows + X and then choose the Settings option.
Step 2: Once inside the Settings window, choose the Update & security setting.
Step 3: Click the Update history option on the right side.
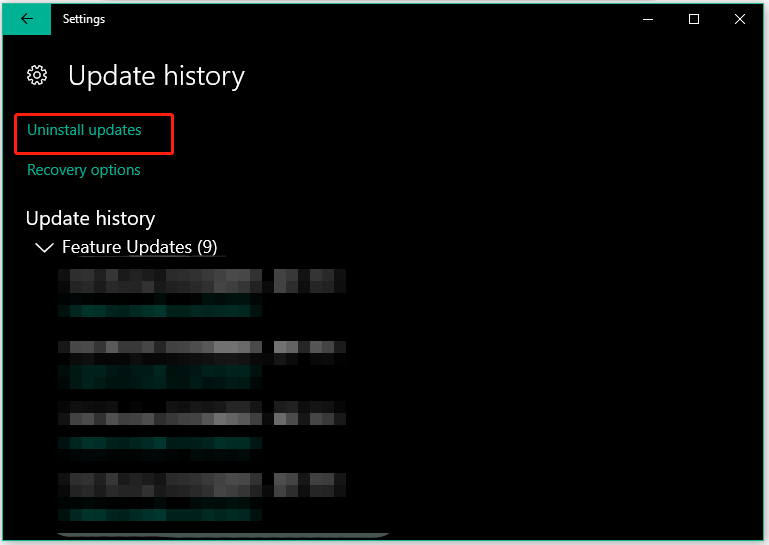
Step 4: Click the Uninstall updates present at the top of the screen.
Step 5: Now you should see a window called installed Updates where all the updates are listed. Then, right-click the update which you think causes the issue and click the Uninstall option.
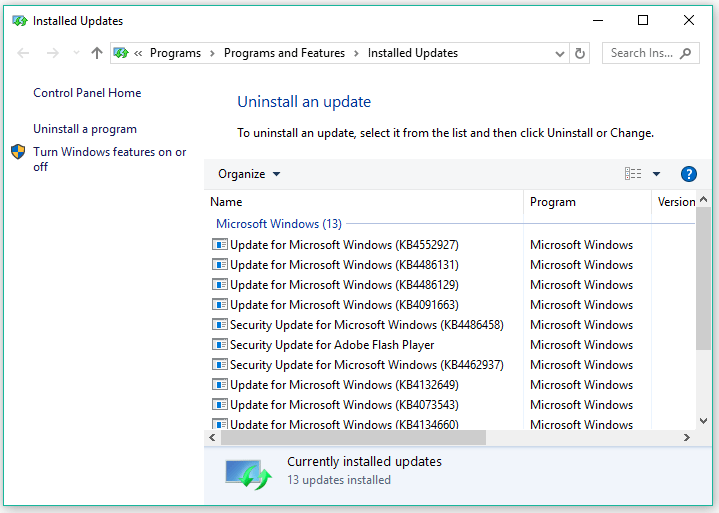
Step 6: Wait for your system to uninstall the update. Then, restart your computer.
That’s all about how to fix “Adobe Reader not working Windows 10”. Hope the shared five solutions can help you fix the issue.
User Comments :