Some users complained that they encountered the “KB4103727 won't install” issue and got error messages such as 0x800706be or 0x80070bc. Are you bothered by this update issue? Fortunately, this post from MiniTool Partition Wizard shows you some methods to fix this problem.
What causes the “Windows update KB4103727 fails to install” issue? There are several possible reasons why this update may not install properly, such as corrupted system files, outdated drivers, or incompatible software.
Method 1. Run the Windows Update Troubleshooter
If Windows update KB4103727 fails to install on your PC, you can try fixing it by running the Windows Update troubleshooter, which is a built-in tool that can diagnose and fix common problems with Windows Update. Follow these steps below:
Step 1. Press Win + I to open Settings. Then go to Update & Security > Troubleshoot > Additional troubleshooters.
Step 2. In the next window, click Windows Update and select Run the troubleshooter.
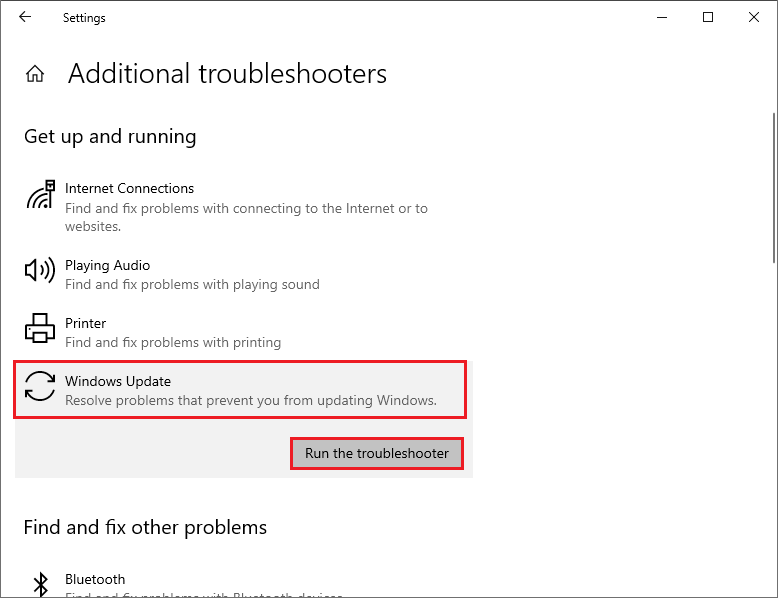
Step 3. Then follow the on-screen instructions and let the troubleshooter scan and fix any issues it finds.
Step 4. Once done, restart your device and check if the issue is fixed.
Method 2. Clear the Windows Update Cache
Another possible fix is to clear the Windows Update cache, which is a folder that stores temporary files related to Windows Update. Sometimes, these files may get corrupted and cause issues with installing updates. To clear the Windows Update cache, follow these steps:
Step 1. Press Win + R to open the Run dialog box. Then type cmd and press Ctrl + Shift + Enter to run Command Prompt as administrator.
Step 2. In the Command Prompt window, copy and paste the following commands one by one and press Enter after each one.
net stop cryptsvc
net stop bits
net stop msiserver
net stop wuauserv
ren C:WindowsSoftwareDistribution SoftwareDistribution.old
ren C:WindowsSystem32catroot2 Catroot2.old
net stop cryptsvc
net start bits
net stop msiserver
net start wuauserv
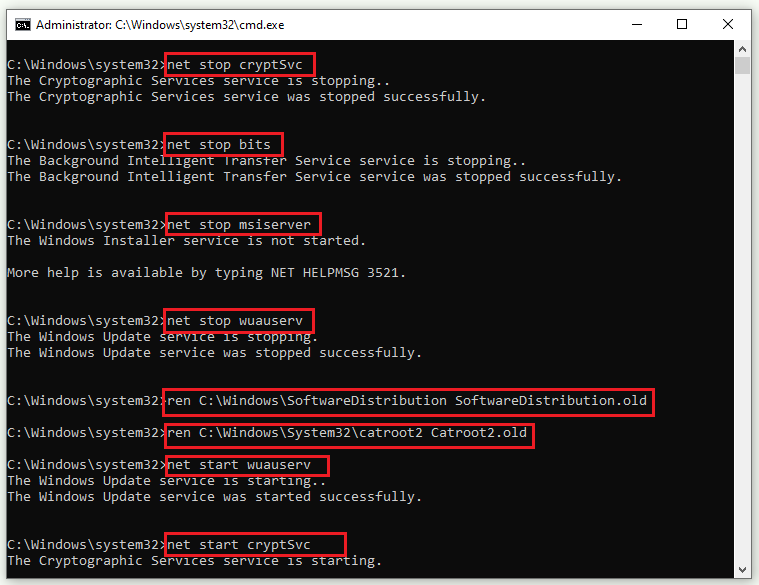
Step 3. Once done, reboot your PC and try to install the update again.
In addition, to fix the “KB4103727 won’t install” issue, you can run commands or use MiniTool Partition Wizard to check file system errors and bad sectors. You can click the following button to download MiniTool Partition Wizard. Then install and launch it, right-click the partition to be checked, and select Check File System or Surface Test. You can see this guide.
MiniTool Partition Wizard FreeClick to Download100%Clean & Safe
Method 3. Manually Download and Install the Update
In addition to the above methods, you can try to download and install the update manually from the Microsoft Update Catalog website. To do this, follow these steps:
- Go to the official Microsoft Update Catalog website and search for KB4103727 in the search box.
- Find the update that matches your system architecture (32-bit or 64-bit) and click Download.
- Then click the link that appears and save the file to your PC.
- Double-click the file and follow the on-screen wizard to install the update.
- Then restart your computer and check if the update is installed successfully.
![[Tutorial] How to Download & Install Windows 10 Updates Manually](https://images.minitool.com/partitionwizard.com/images/uploads/2022/01/download-windows-10-updates-manually-thumbnail.jpg)
Conclusion
Now, this post comes to an end. It has told several methods to fix the “KB4103727 won’t install” issue. Do you have any suggestions or nice methods to solve this problem? You can feel free to share them with us in the following comment part.
User Comments :