What Is the AutoPlay Feature on Windows?
AutoPlay is a feature introduced since Windows 98. It examines newly discovered removable media and devices and, based on content such as pictures, music, or video files, launches an appropriate application to play or display the content.
It simplifies the use of peripheral devices – MP3 players, memory cards, USB storage devices, and others – by automatically starting the software needed to access and view the content on these devices.
How to Enable or Disable AutoPlay on Windows 11
To enable or disable AutoPlay on Windows 11, you can use the following 3 ways.
Way 1. Use Settings
- Press the Windows logo key + I to open Settings.
- Click Bluetooth & devices > AutoPlay.
- You will see a toggle under Use AutoPlay for all media and devices. Use this toggle to enable or disable AutoPlay on Windows 11.
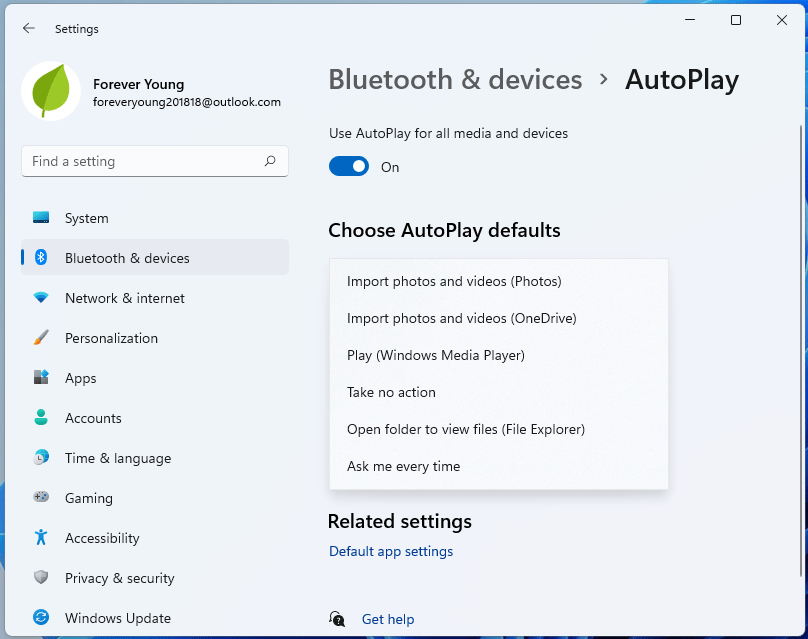
In general, after you enable AutoPlay on Windows 11, you can configure it to associate favorite applications with AutoPlay events and actions.
You will see your media here and then expand the drop-down menu to choose what you want AutoPlay to do.
Way 2. Use Control Panel
You can also enable AutoPlay on Windows 11 or disable it using Control Panel. Here is the guide:
- Search to open Control Panel.
- View by Small icons or Large icons.
- Click the AutoPlay icon.
- Tick (or untick) the Use AutoPlay for all media and devices box to turn AutoPlay on or off. If Autoplay is on, you can configure the default action for each type of media and device listed below.
Way 3. Use Group Policy Editor
On the Windows Pro PC, you can also use Group Policy Editor to enable AutoPlay on Windows 11 or disable it. Here is the guide:
- Press the Windows logo key + R to open the Run box.
- Type “gpedit.msc” and press Enter to open Group Policy Editor.
- Go to Computer Configuration > Administrative Templates > Windows Components, and click AutoPlay Policies.
- In the right-hand side details pane, double-click Turn off AutoPlay to open the Properties box.
- Click Enabled, and then select All drives in the Turn off AutoPlay box to disable AutoPlay on all drives, or choose CD-ROM and removable media drives to disable AutoPlay on these media.
AutoPlay Not Working on Windows 11
Some people report that AutoPlay doesn’t work on Windows 11. How to fix the AutoPlay not working on Windows 11 issue? You can try the following ways.
Way 1. Re-enable and Reconfigure the AutoPlay Feature
This way is worth trying. As for the specific steps, you can refer to the above content.
Way 2. Enable the AutoPlay Notification in Windows 11
If you have disabled notifications for AutoPlay, the feature may stop working. You need to enable the AutoPlay notification in Windows 11. Here is the guide:
- Open Settings and go to System > Notifications.
- Make sure the Notifications option is set to On.
- Scroll down and locate AutoPlay under the Notifications from apps and other senders section.
- Toggle the switch for AutoPlay to turn on notifications.
Way 3. Reconfigure the Shell Hardware Detection Service
This service is for the detection of AutoPlay hardware events and to provide notifications.
- Open the Run box, type “services.msc”, and click OK to open Services.
- Locate the Shell Hardware Detection service and right-click it. Choose Properties.
- In the Properties dialog, make sure the Service status is set to Running. If not, click on Start.
- Click the drop-down for Startup type and select Automatic.
- Click OK and Apply to save the changes.
Way 4. Reset AutoPlay to Its Default Settings
- Open Control Panel and go to Hardware and Sound > AutoPlay.
- Scroll down to the bottom and click on Reset all defaults.
- Click on Save to apply the changes.
MiniTool Partition Wizard is a nice disk and partition management tool. It can partition and manage disks, clone disks, migrate OS, recover lost data or partitions, etc. If you have these needs, you can try it.
MiniTool Partition Wizard DemoClick to Download100%Clean & Safe
About The Author

Position: Columnist
Linda has been an editor at MiniTool for seven years. She continuously learns about computers and puts her knowledge into practice. Moreover, she is particularly knowledgeable in disk management, data recovery, system installation, and PDF editing. Her articles typically reference multiple examples or are based on her own experience, providing users with the most suitable solutions.
User Comments :