Windows 11 is slow in different situations, such as slow boot, app opening, or gaming performance. These slow symptoms may be caused by different reasons. This post offers the corresponding methods to fix it by disabling startup programs, updating drivers, and upgrading the HDD to SSD using MiniTool Partition Wizard.
Many users upgrade to Windows 11 expecting a smooth, modern user experience. However, they often encounter computer running slow Windows 11 problems such as lag, slow startup, unresponsive applications, menu stuttering, and performance degradation during gaming.
This guide covers the various Windows 11 slow scenarios. For each common slow scenario, we will explain its symptoms, causes, and solutions to help you restore system speed.
Windows 11 Slow Boot & Long Wait After Login
Many Windows 11 users complained that their computer takes such a long time to start up. It makes them annoyed.
In the following part, it will show you the symptoms, causes, and solutions of Windows 11 slow boot.
Symptoms
- Extended boot time: Taking more than a minute to reach the login screen.
- “Welcome” screen hang: A spinning circle or “Please Wait” message that lasts for 30+ seconds after entering your password.
- Post-login unresponsiveness: The desktop appears, but icons, the taskbar, or apps take several minutes to become interactive.
Causes
- High-impact startup apps: Too many third-party programs (such as Steam, Spotify, or cloud sync tools) compete for CPU and disk resources immediately upon login.
- Fast startup conflicts: This feature sometimes fails to clear driver errors, resulting in an incomplete boot state.
- Driver issues: Outdated graphics card or disk drivers may cause Windows 11 slow.
- System corruption: Missing or corrupted system files, or an excessively large user profile.
- Hardware bottleneck: Using a mechanical hard drive (HDD) instead of a solid-state drive (SSD).
Solutions
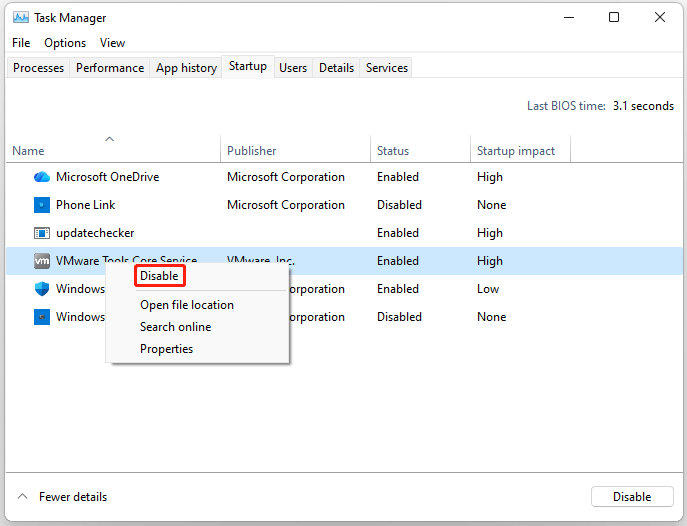
Method 1. Disable Unnecessary Startup Programs
- Press Ctrl + Shift + Esc to open Task Manager.
- Go to the Startup tab. Here, you’ll see every app set to launch at boot, with a “Startup impact” label (High/Medium/Low/None) that tells you how much it slows down startup.
- Right-click any app with High/Medium impact and select Disable.
Method 2. Turn off Fast Startup
- Search for Control Panel in the Windows Search bar and open it.
- Go to Hardware and Sound > Power Options.
- In the left-hand panel, click What do the power buttons do.
- Click Change settings that are currently unavailable.
- Uncheck the Turn on fast startup (recommended) checkbox.
- Click Save changes.
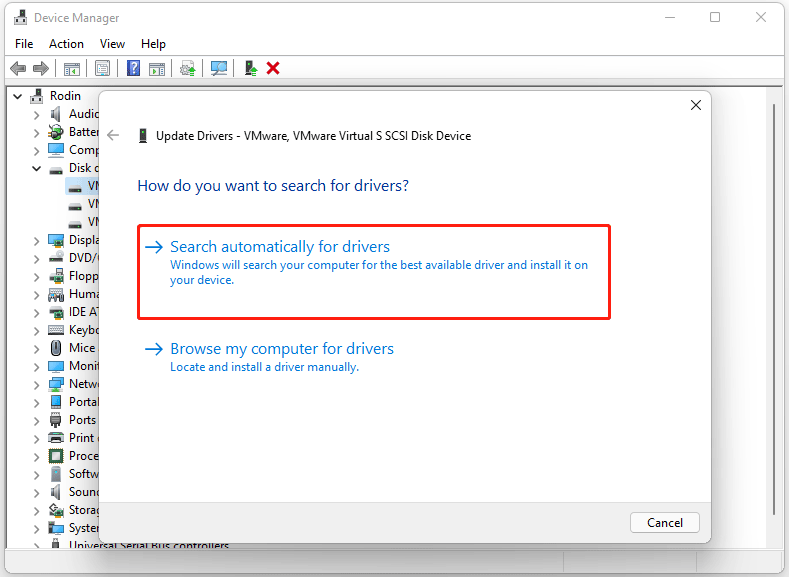
Method 3. Update Device Drivers
- Right-click Start and select Device Manager.
- Expand the Disk drives categories. Then right-click the device, choose Update driver, and select Search automatically for drivers.
- Then perform the same steps for Display adapters.
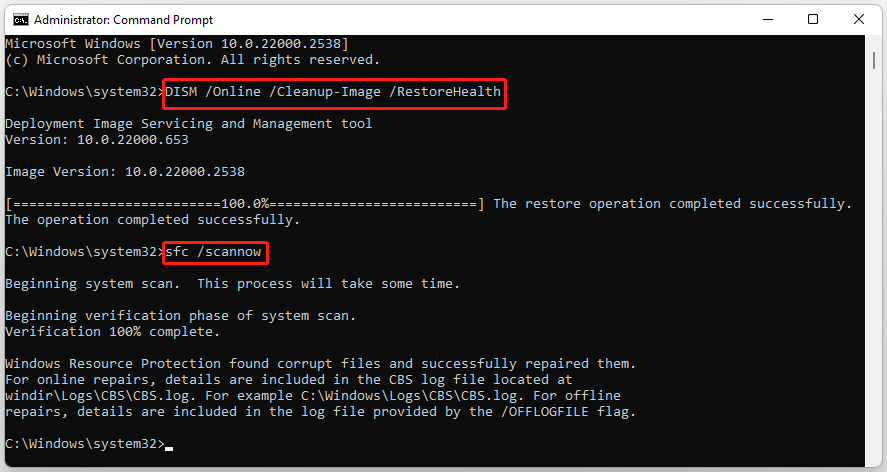
Method 4. Repair System Files
- Type cmd in the search bar, right-click Command Prompt, and then select Run as administrator.
- Type DISM /Online /Cleanup-Image /RestoreHealth and press Enter.
- After the DISM process finishes, type sfc /scannow and press Enter.
Method 5. Upgrade to an SSD
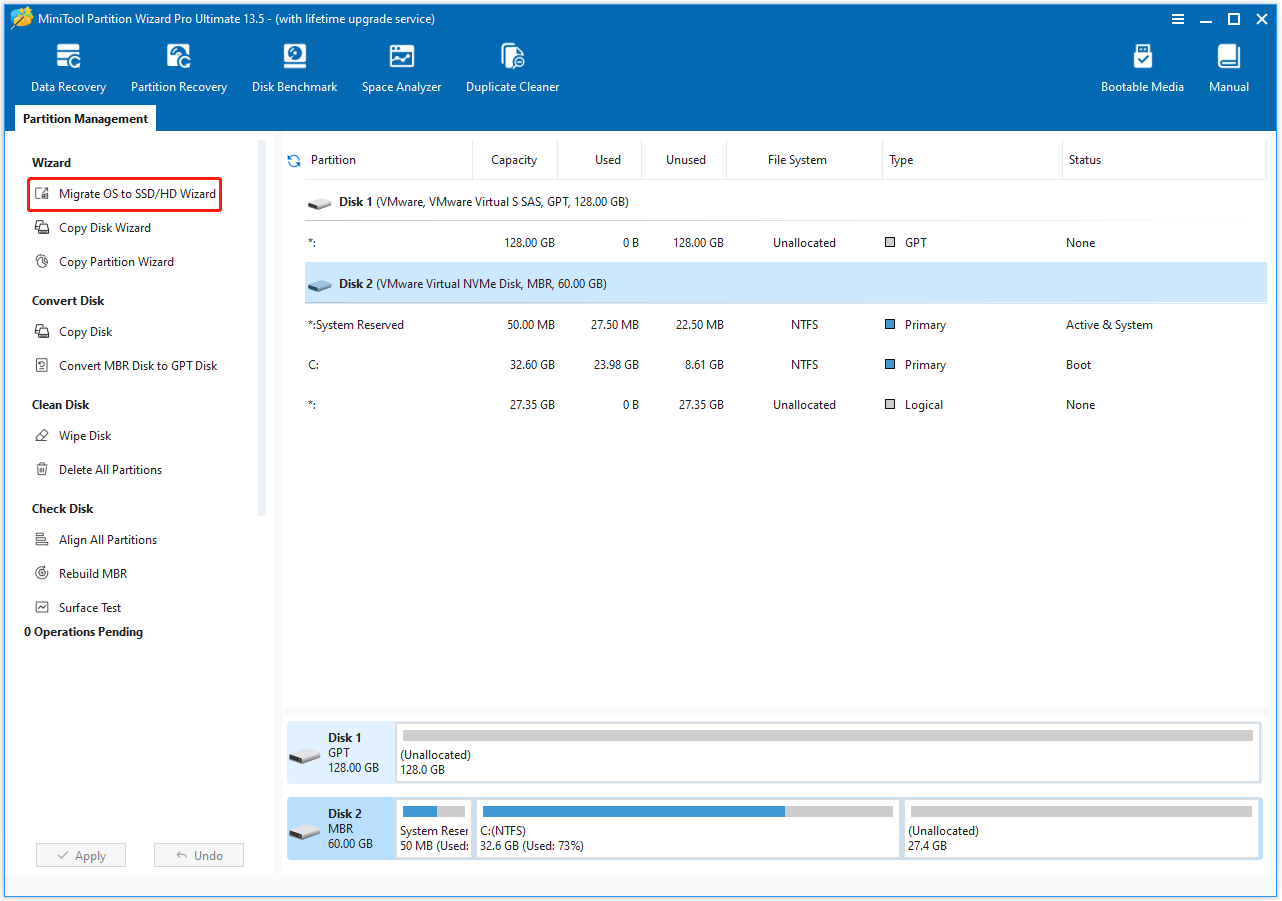
To upgrade to an SSD without reinstalling everything from scratch, you need to use MiniTool Partition Wizard. Its Migrate OS to SSD/HD feature can help you migrate the OS and other data to the SSD.
The steps are as follows:
MiniTool Partition Wizard DemoClick to Download100%Clean & Safe
Step 1. Launch MiniTool Partition Wizard and start the OS migration.
- Connect the SSD to your computer with an NVMe/SATA to USB adapter.
- Launch MiniTool Partition Wizard to its main interface.
- Select the Migrate OS to SSD/HD Wizard feature from the left action panel.
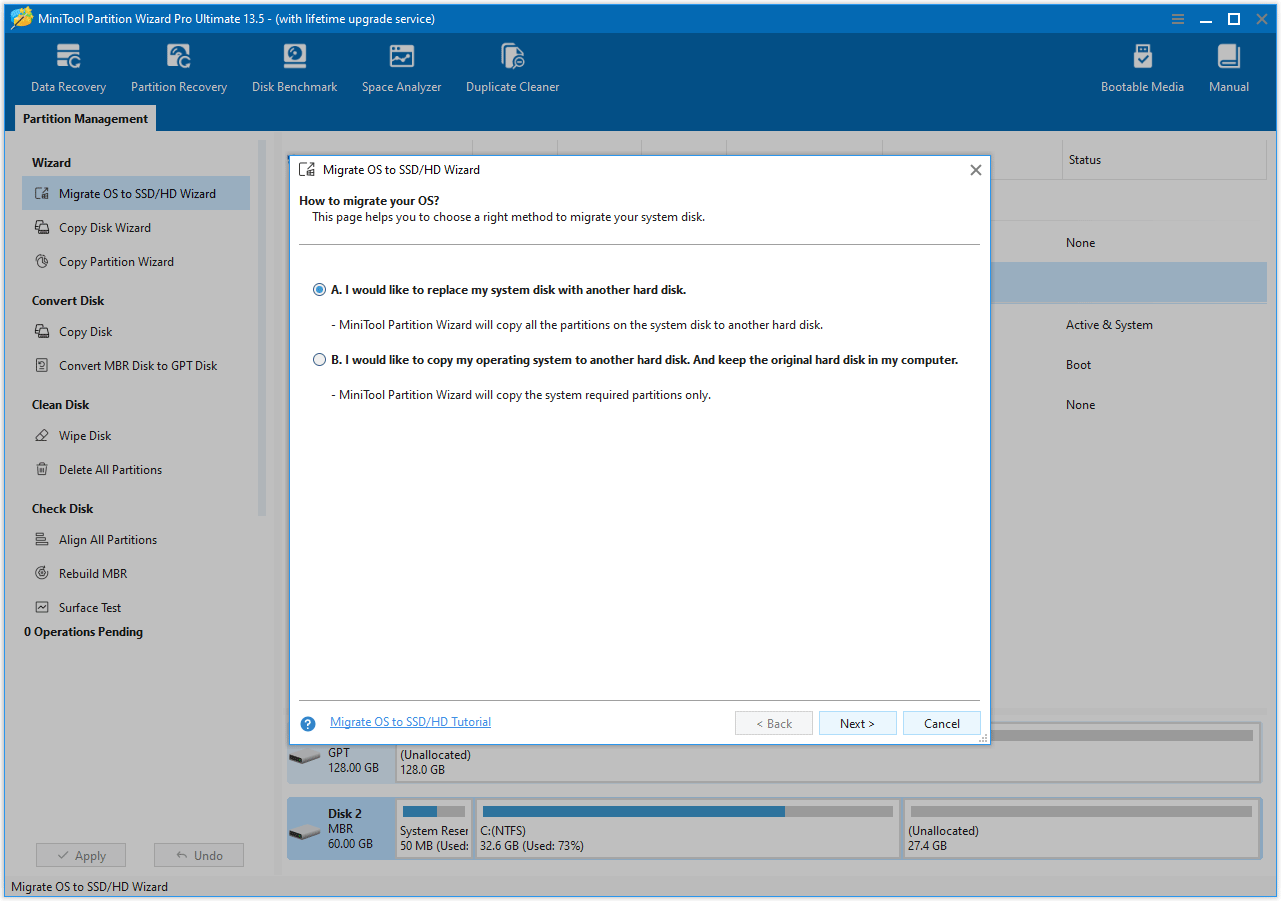
Step 2. Choose the migration method, and then click Next.
- Choose Option A to transfer all the data to the SSD.
- Choose Option B to migrate the operating system only.
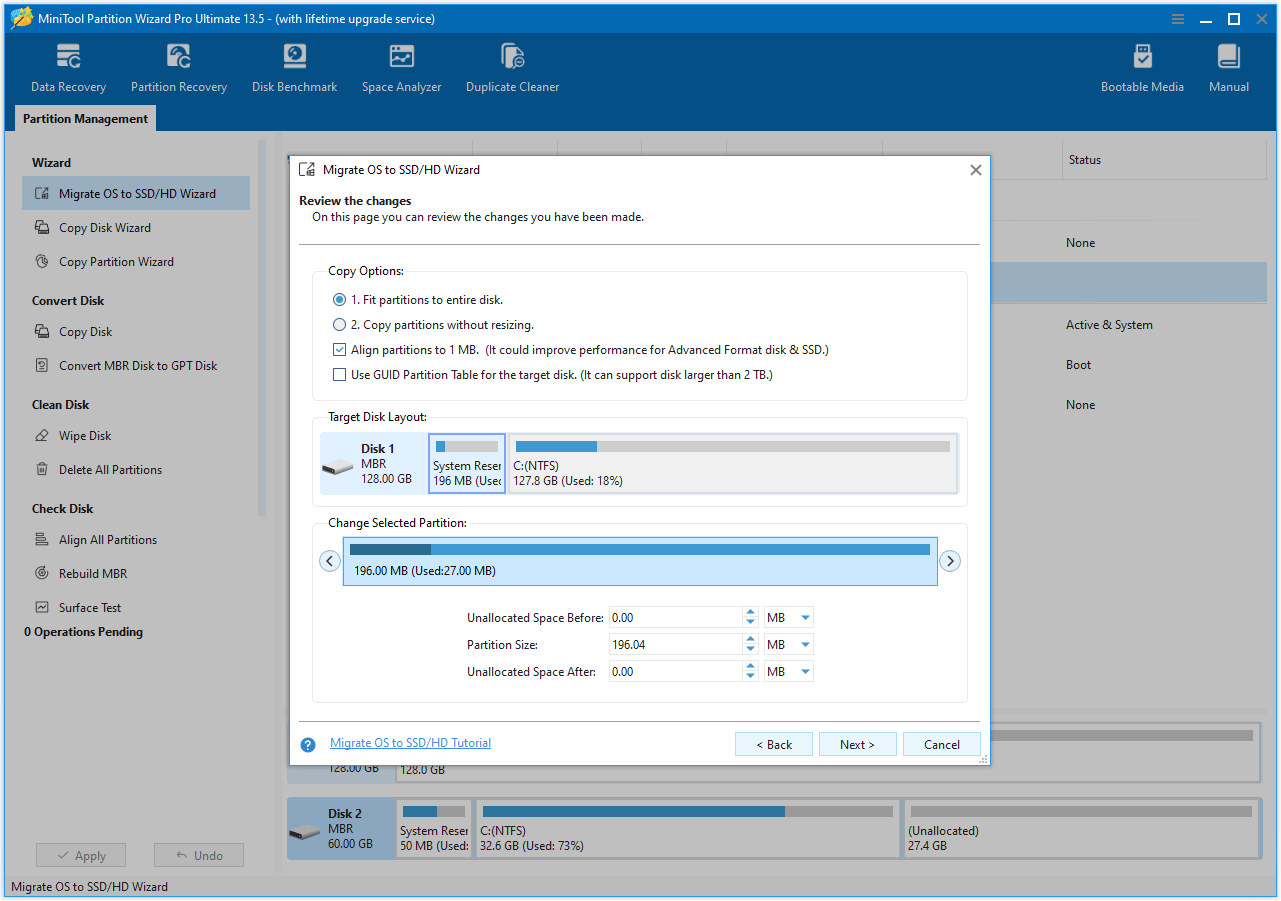
Step 3. Set the copy options.
- Select the SSD as the target disk and then click Next.
- Review the copy options and disk layout. Keeping the default option is recommended. Then, click Next.
- Click Finish.
- Click Apply to execute the operation.
Step 4. Make the computer boot from the SSD.
Windows 11 Slow Apps Opening
Windows 11 apps may open slowly due to resource contention or system-level bottlenecks that persist after the initial login phase.
Symptoms
- Delayed app opening: After clicking the icon, the app takes several seconds for the window to appear.
- Interface lag: After opening an application, menus or buttons are slow to respond or feel “sluggish.”
- Initial freeze: After opening, the application remains unresponsive for several seconds during the loading process.
Causes
- Resource contention: Other tasks consume too much background CPU or RAM, resulting in insufficient space for new applications to load.
- Storage insufficient: A nearly full main hard drive reduces the read and write speeds required to launch applications.
- Power mode throttling: Balanced or Power Saver modes may limit the CPU clock speed, causing lag when opening high-load software.
- Third-party conflicts: Antivirus software or programs that consume a lot of background resources may scan for applications as they attempt to open.
Solutions
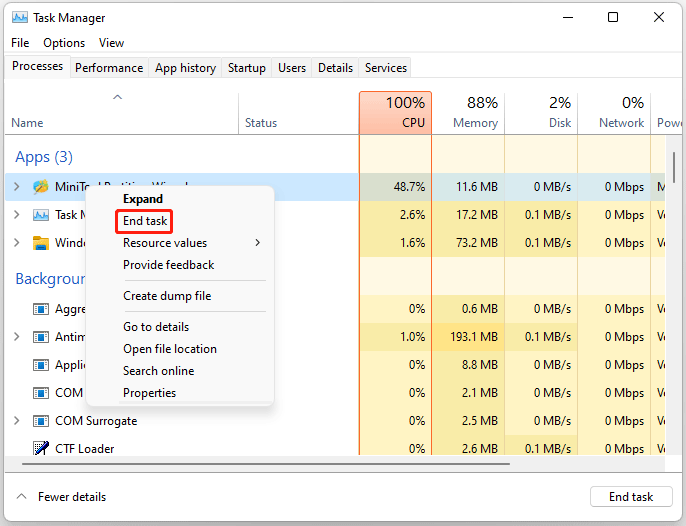
Method 1. Close Unnecessary Background Apps
- Press Ctrl + Shift + Esc to open Task Manager.
- Go to the Processes tab, right-click on unnecessary apps, and select End task.
Method 2. Free Up Disk Space
Ensure at least 15% free space on your system drive. To free up disk space, you can delete temporary files.
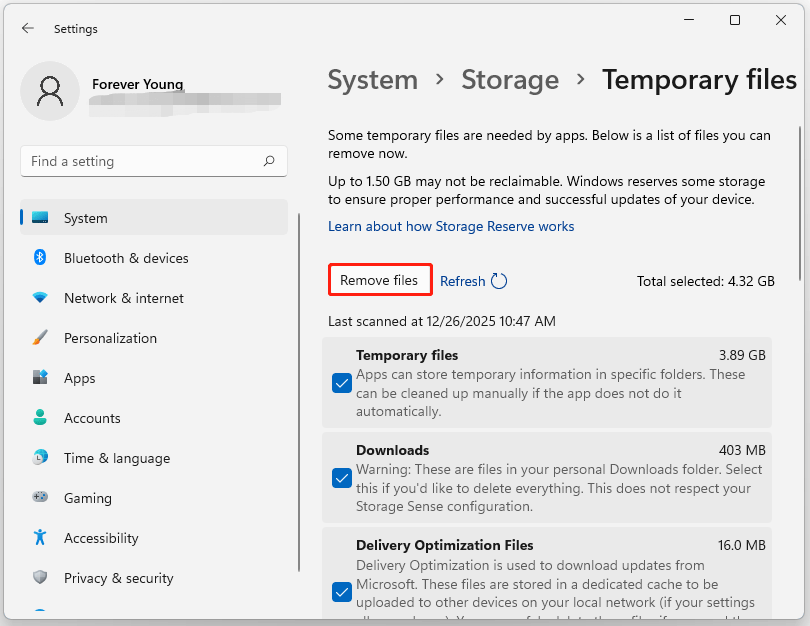
- Go to Settings > System > Storage.
- In the right panel of Storage, click the Temporary files category.
- Check boxes to select files to remove, like the Recycle Bin and Downloads.
- Click Remove files.
Method 3. Adjust Power Settings
- Open Settings, and then go to System.
- Click About, and then click Advanced system settings.
- In the System Properties window, go to the Advanced tab, and then click Settings under the Performance section.
- Select Adjust for best performance to turn off everything, or choose Custom and uncheck specific visual effects.
- Click Apply > OK.

Windows 11 Slow UI Responsiveness
The Windows 11 User Interface has slow responsiveness, which is usually caused by different causes. Keep reading to know it and the corresponding solutions.
Symptoms
- Input lag: A noticeable delay between mouse movement or typing and the corresponding action appearing on the screen.
- Animation stuttering: Smooth visuals when minimizing windows or opening the Start menu.
- Context menu lag: Menus take several seconds to appear after right-clicking on the desktop or a file.
Causes
- Visual overhead: High-quality transparency and blur effects put pressure on the GPU.
- Outdated graphics driver: The GPU cannot communicate effectively with the Windows Desktop Window Manager (DWM).
- Incorrect refresh rate: The monitor is set to 30Hz or 60Hz when it supports a higher refresh rate, causing the screen to appear sluggish.
Solutions
Method 1. Disable Transparency
- Open Settings, and then click Personalization.
- Click Colors.
- Toggle Transparency effects to Off.
Method 2. Check Refresh Rate
- Go to Settings > System > Display > Advanced display.
- Ensure Choose a refresh rate is set to the highest available.
Method 3. Update GPU Driver
Update your drivers via NVIDIA GeForce Experience, AMD Software, or Intel Driver Support.
Windows 11 Slow Gaming Performance
Windows 11 gaming performance often suffers due to a conflict between high-security defaults and the high-resource demands of modern games.
Symptoms
- Low frame rate/stuttering: Frequent frame drops or stuttering during fast movement.
- Input lag: The delay between pressing a keyboard/mouse button and the corresponding action appearing on the screen.
- Long loading times: Excessive loading times for levels or textures.
Causes
- Virtualization-Based Security (VBS) and Memory Integrity: A security feature enabled by default that may reduce game performance on some systems.
- High background resource consumption: Applications such as Chrome and Discord compete for CPU/RAM resources.
- Power throttling: Balanced mode limits CPU/GPU clock speeds to save energy.
- Outdated drivers: GPU drivers lack optimization for new games.
- Hardware bottlenecks: Installing the game on an HDD instead of an SSD, or insufficient memory.
Solutions
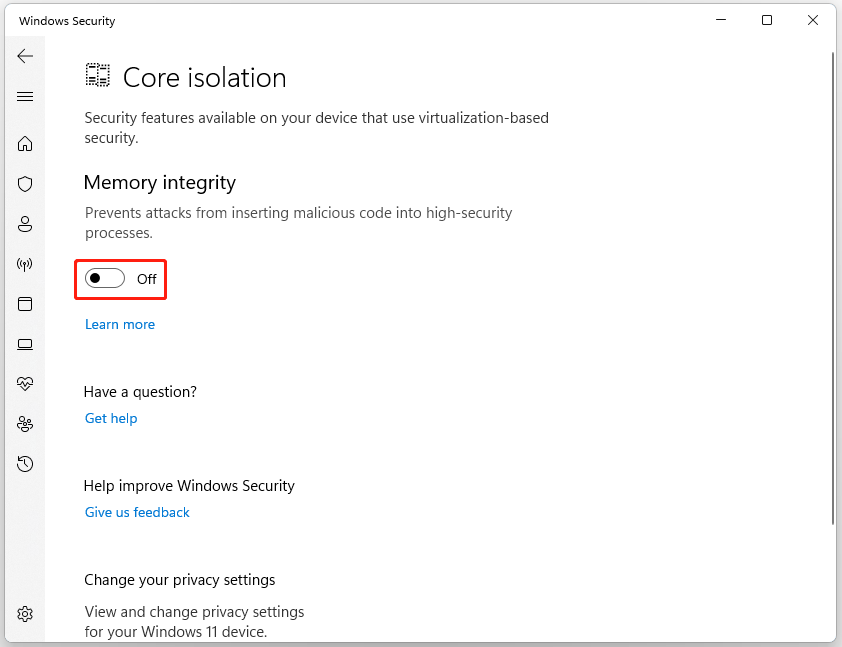
Method 1. Disable VBS/Memory Integrity
- Go to Settings > Privacy & Security > Windows Security Center > Device Security.
- Click Core Isolation details.
- If the Memory Integrity switch is on, turn it Off.
- Restart your computer and check if the problem persists.
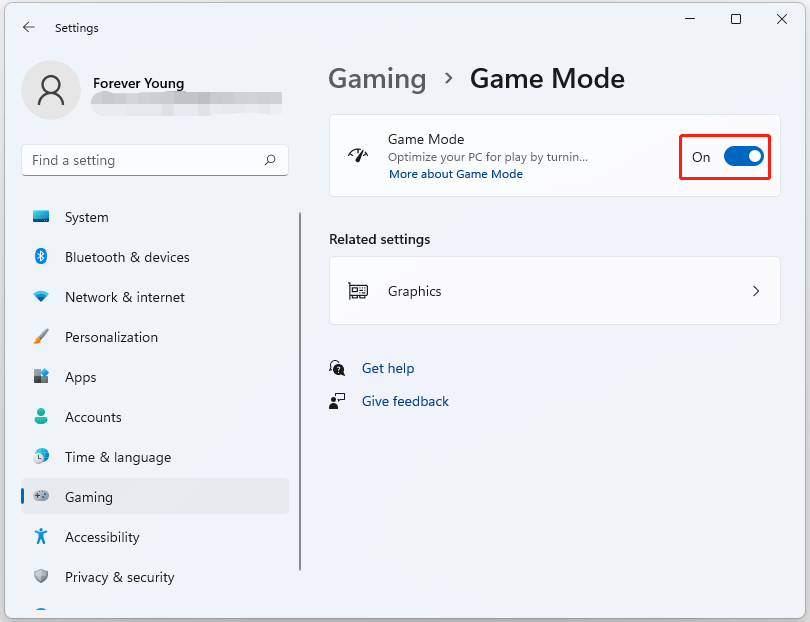
Method 2. Enable Game Mode
- Go to Settings > Gaming > Game Mode.
- Turn it On to prioritize game processes.
Method 3. Adjust Graphics Settings
- Navigate to Settings > System > Display> Graphics.
- Click Change default graphics settings and enable Hardware-accelerated GPU scheduling.
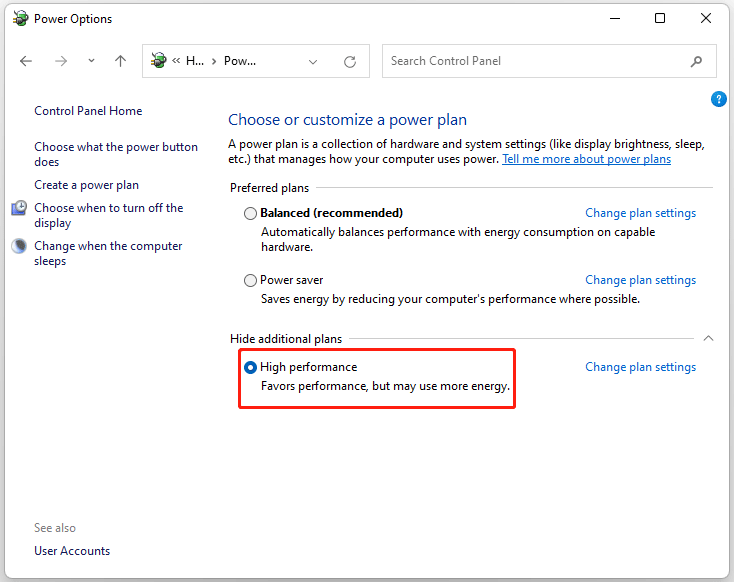
Method 4. Change Power Plan
- Type control panel in the Search bar to open it.
- Search for Power Options in Control Panel.
- Select High Performance.
Method 5. Update GPU Drivers
Use GeForce Experience or AMD Adrenalin to perform a clean install of the latest drivers.
Method 6. Upgrade HDD and RAM
Upgrade HDD to SSD following the steps above, and add more RAM to your computer.
Windows 11 Slow After Windows Updates
Many Windows 11 users feel their computer running slow after Windows updates. It’s a common problem.
Symptoms
- High disk/CPU usage: Task Manager shows TiWorker.exe or mscorsvw.exe consuming excessive resources.
- Decreased performance: Sudden performance drop after installing updates.
- Failure to functionality: Start Menu, search bar, or taskbar becomes unresponsive or fails to load.
- Temporary profile: Logged into a desktop that appears “reset” or is missing files.
Causes
- Background optimization: Windows runs .NET optimization services and indexing after updates to recompile code to suit your hardware.
- Driver incompatibility: Generic Windows Update drivers may override proprietary manufacturer drivers.
- Corrupted update cache: Incomplete or corrupted files downloaded during the update process cause installation attempts to loop.
Solutions
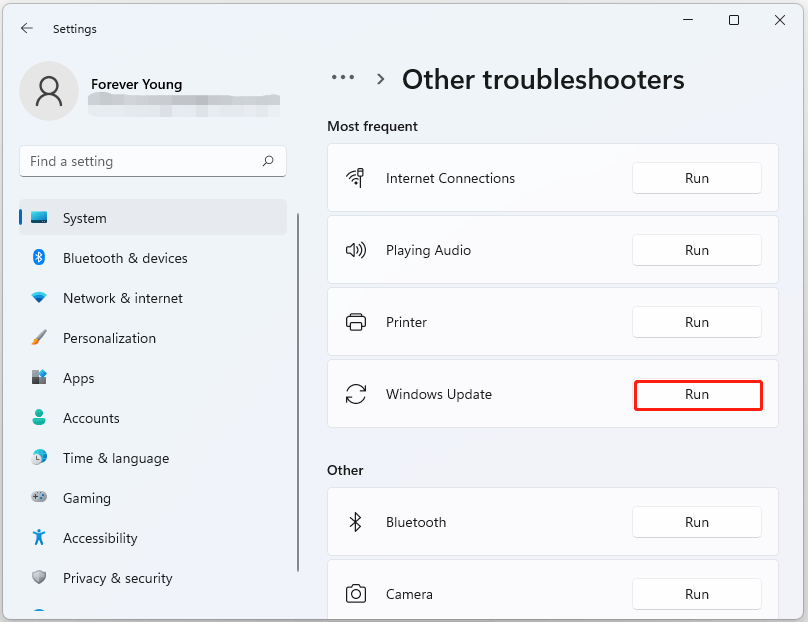
Method 1. Run Windows Update Troubleshooter
- Go to Settings> System > Troubleshoot > Other troubleshooters.
- Click the Run button next to Windows Update.
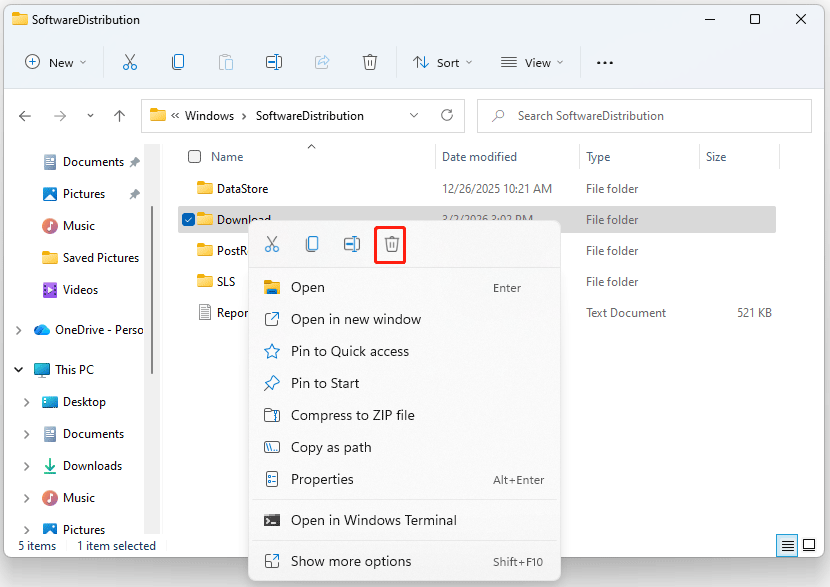
Method 2. Clear Update Cache
- Press Win + R, type services.msc, and press Enter.
- Locate Windows Update and Background Intelligent Transfer Service (BITS), right-click each, and select Stop.
- Open File Explorer and navigate to C:\Windows\SoftwareDistribution.
- Delete all files and folders inside the DataStore and Download folders.
- Go back to the Services window, right-click Windows Update and BITS, and select Start.
Method 3. Roll Back Drivers
If a specific device is failing, try to roll back drivers.
- Right-click Start and select Device Manager.
- Right-click the specific driver and select Properties.
- In the Properties window, go to the Driver tab, and then click Roll Back Driver.
Method 4. Run SFC & DISM
The steps are the same as Method 4 in Situation 1.
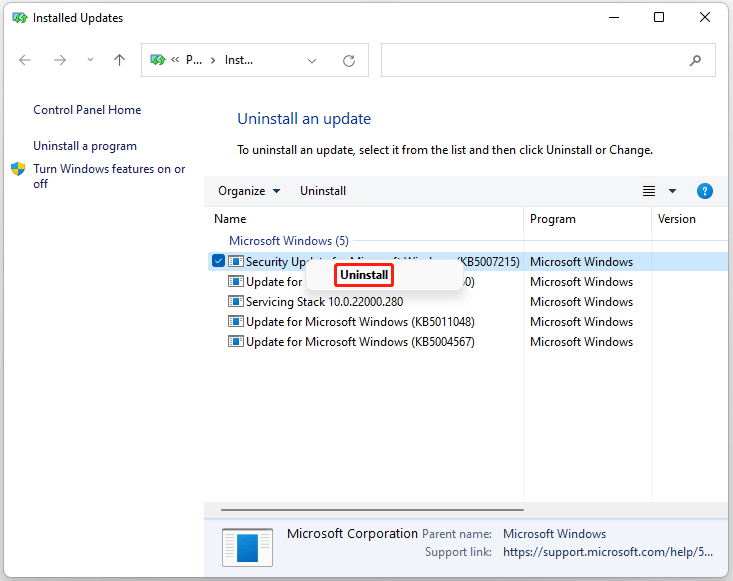
Method 5. Uninstall Update
- Go to Settings > Windows Update > Update history > Uninstall updates.
- In the pop-up window, right-click the most recent KB package and click Uninstall.
Windows 11 Slow File Copying/Moving/Deleting
When trying to perform copying/moving/deleting files, your Windows 11 computer is running slowly. The following content shows the causes and methods for it.
Symptoms
- Calculation time stalls: The “Calculating” dialog box remains on the screen for a long time before the transfer begins.
- Speed drops to zero: The transfer speed starts high, but suddenly drops to 0 KB/s or fluctuates drastically.
- Windows Explorer freezes: Windows Explorer becomes unresponsive or displays a white screen when moving or deleting large files.
- Completion stalls: The operation pauses for several minutes after reaching 99%.
Causes
- Real-Time antivirus scan: Microsoft Defender scans for each file being moved or copied, which increases resource consumption significantly.
- File Explorer history bloated: Accumulated cache and lists of recently used files slow down folder access.
- Disk errors: When a drive has bad sectors or a corrupted file system, Windows repeatedly attempts to read or write data, causing transfers to hang or drop to 0 KB/s.
- Hardware conflict: Using an older USB 2.0 port/cable to connect the external drive, or failing to enable the Better performance mode for the disk.
Solutions
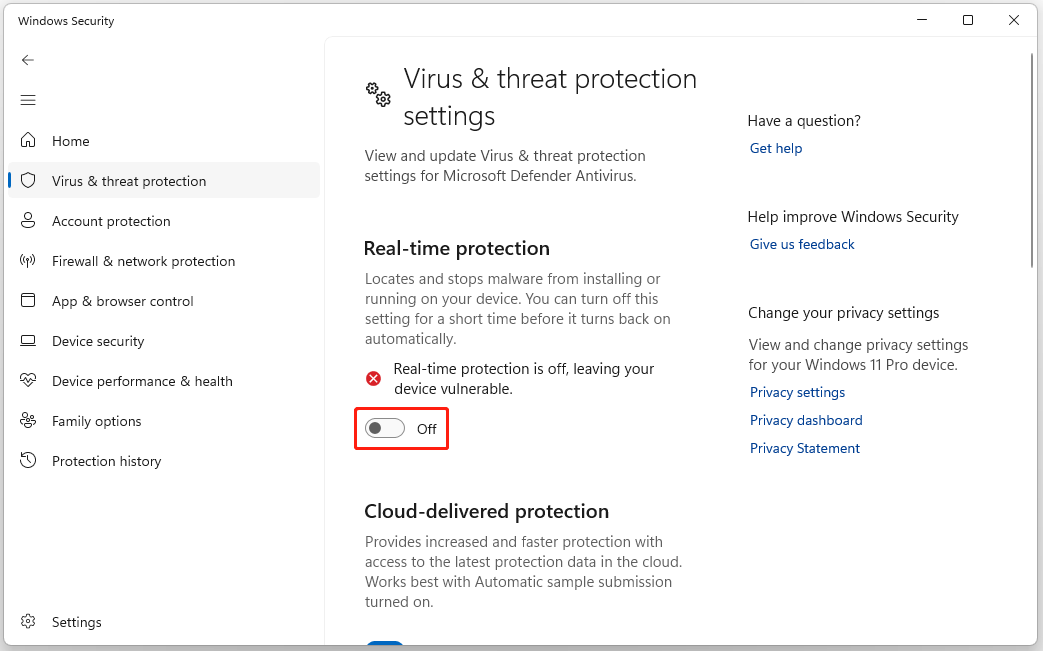
Method 1. Disable Antivirus Temporarily
- Go to Settings > Privacy & security > Windows Security > Virus & threat protection.
- Under Virus & threat protection settings, click Manage settings and toggle Real-time protection to Off.
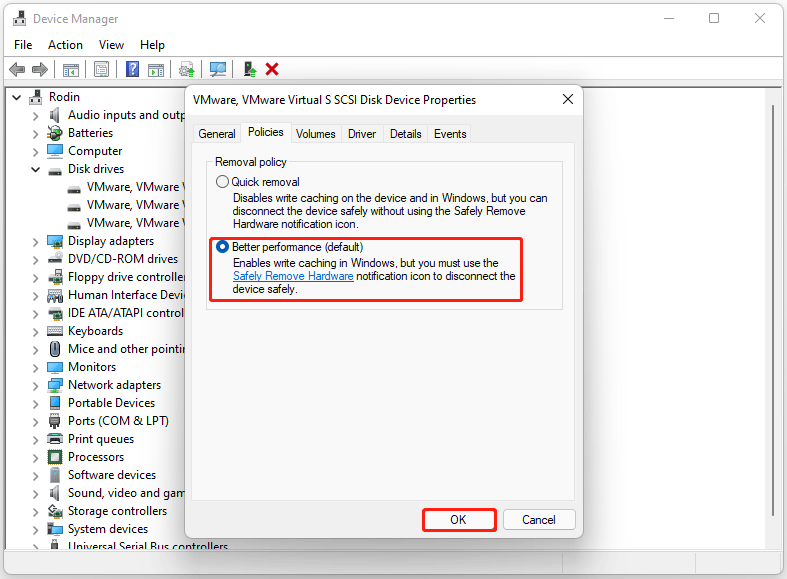
Method 2. Enable Write Caching
- Right-click Start and select Device Manager.
- Expand Disk drives to see your drives.
- Right-click your disk and select Properties.
- Go to the Policies tab and check Better performance.
- Click OK.
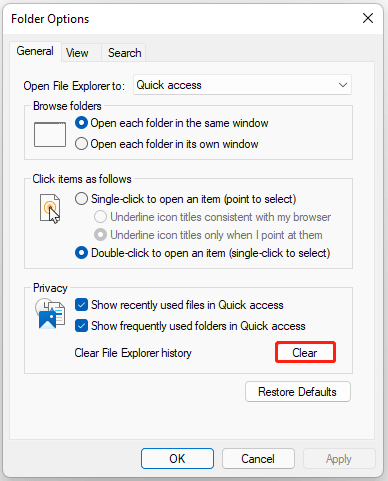
Method 3. Clear File Explorer Cache
- In File Explorer, click the three-dots icon on the top toolbar, and then select Options.
- In the pop-up Folder Options window, under the General tab, click Clear next to Clear File Explorer history.
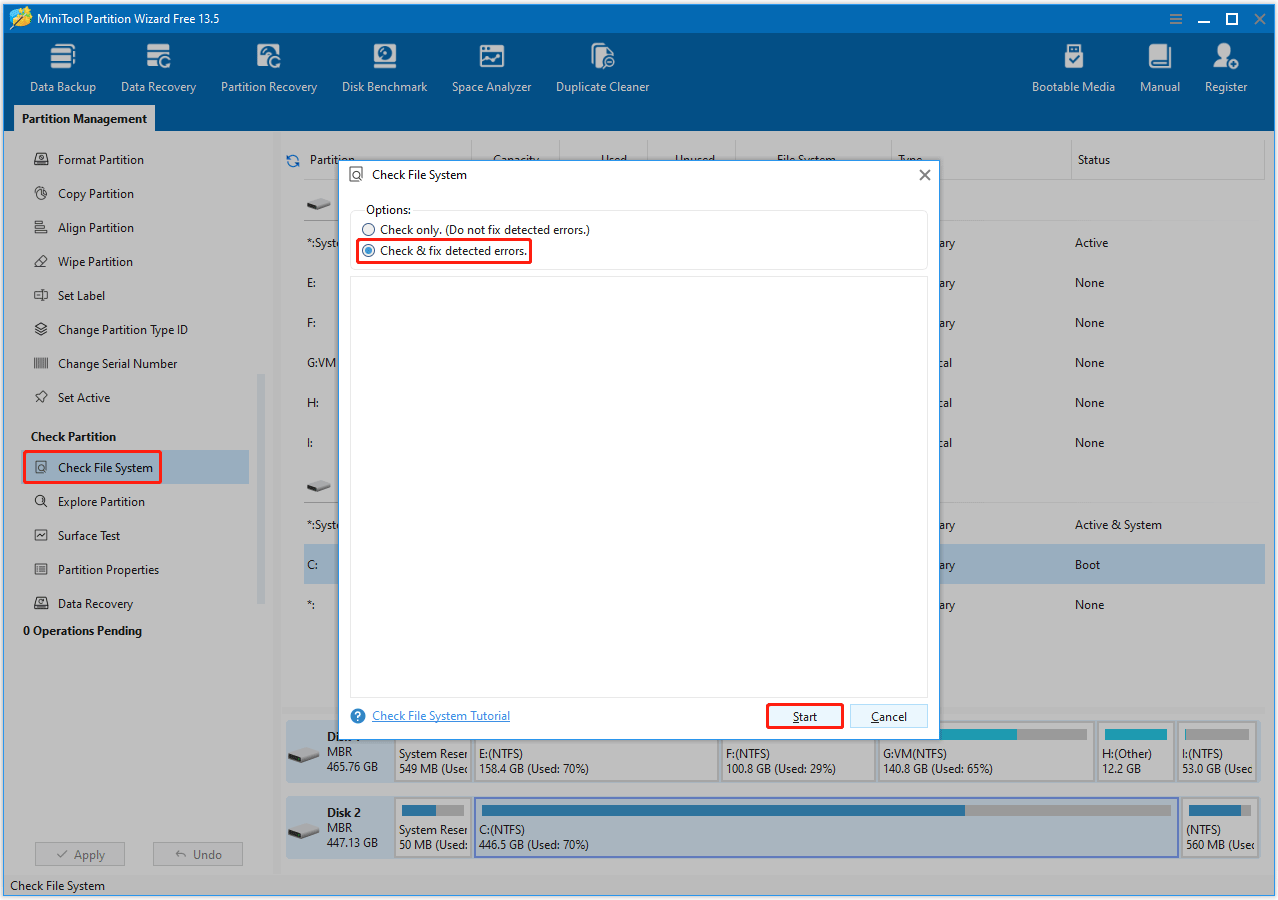
Method 4. Check Hard Drive for Errors
You can check the hard drive for errors with MiniTool Partition Wizard. It is a free partition manager that can help you check the file system errors and bad sectors on the drive.
Step 1. Check the file system errors.
- On the main interface of MiniTool Partition Wizard, highlight the partition on the disk and select Check File System from the left action panel.
- In the pop-up window, select Check & fix detected errors and click Start.
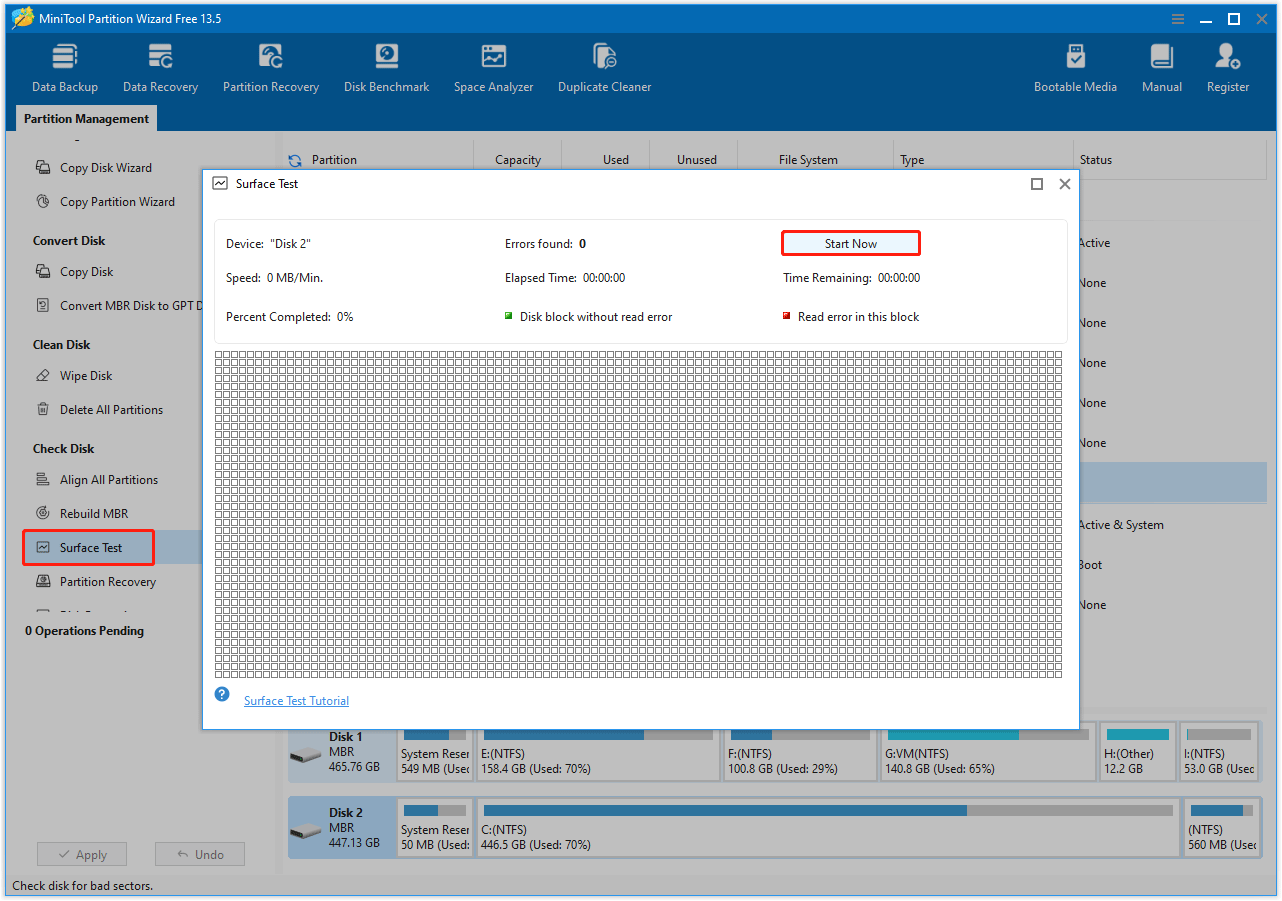
Step 2. Check bad sectors.
- On its main interface, right-click the hard drive and select Surface Test.
- In the pop-up window, click the Start Now button.
- The bad sectors will be marked as red blocks. If there are too many bad sectors, you need to replace the hard drive.
Method 5. Use Right Port
Ensure external drives are plugged into blue USB 3.0/3.1 ports or USB-C for maximum speed.
Windows 11 Slow Web Browsing
When Windows 11 web browser runs slowly, the causes can be various. Now, follow the content below to know the methods.
Symptoms
- Page load delay: The status bar displays “Waiting”.
- Video stuttering: Dropped frames or audio/video desynchronization occur in YouTube or Netflix, especially at 4K resolution.
- High memory usage: Task Manager shows the browser is using 80-90% of RAM.
- Scrolling lag: Noticeable jerking occurs when scrolling down pages containing large amounts of text.
Causes
- Bloody extensions: Each active extension acts as a mini-application that competes for CPU and RAM every time a new page loads.
- DNS latency: Your ISP’s default DNS server is slow or unable to resolve addresses quickly.
- Efficiency mode not turned on: Windows 11 Efficiency Mode or the browser’s memory saver feature can keep browsers fast.
- Hardware acceleration conflict: Browser incompatibility with GPU drivers.
- IPv6 issues: Your ISP may have implemented IPv6 poorly, or your router is older (not handling IPv6 efficiently), which all cause websites to hang.
Solutions
Method 1. Clear DNS Cache
- Type cmd in the search bar, right-click Command Prompt, and then select Run as administrator.
- In the Command Prompt window, type ipconfig /flushdns and press Enter.
- A message will appear: “Successfully flushed the DNS Resolver Cache”.
Method 2. Disable Extensions
- Type chrome://extensions or edge://extensions in the browser search bar.
- Toggle extensions from On to Off.
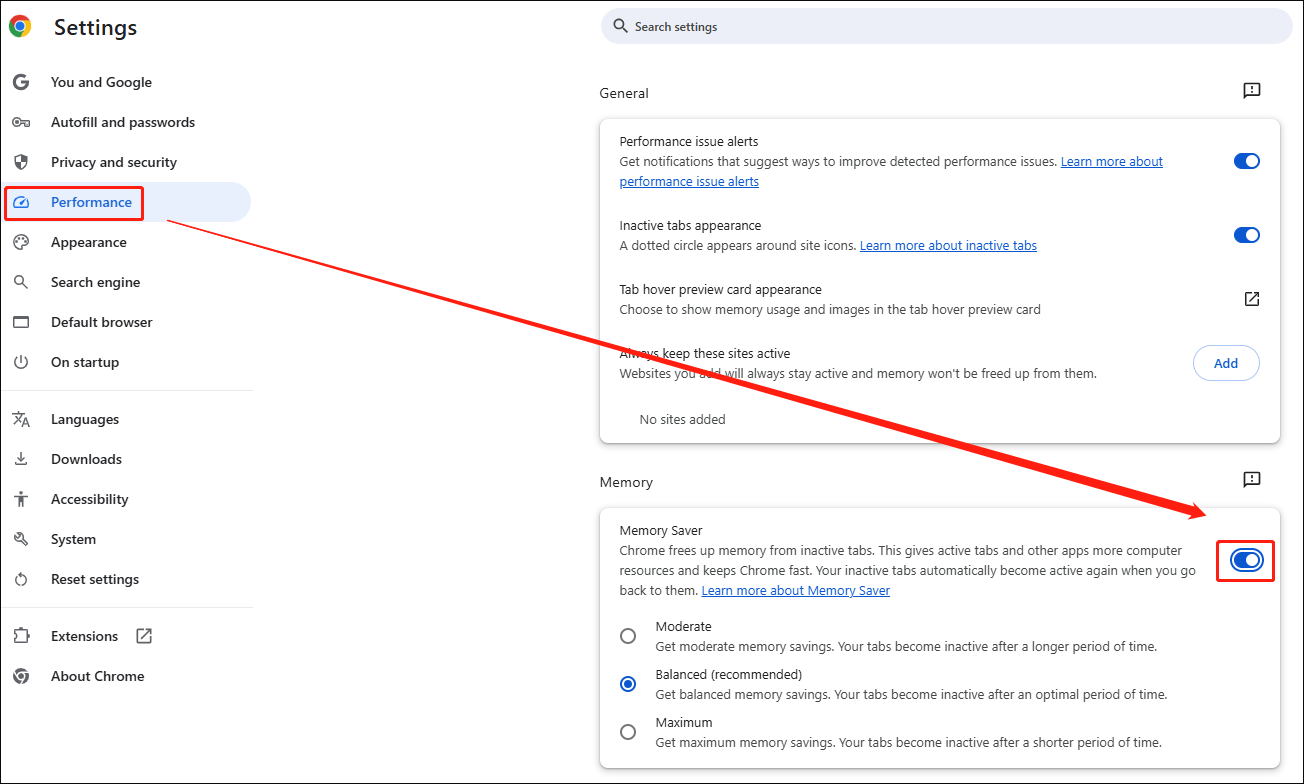
Method 3. Turn on Memory Saver (Chrome)
- Click the three-dot menu in Chrome and select Settings.
- Click on the Performance tab in the left-hand menu.
- Under the Memory section, switch the Memory Saver toggle to On.
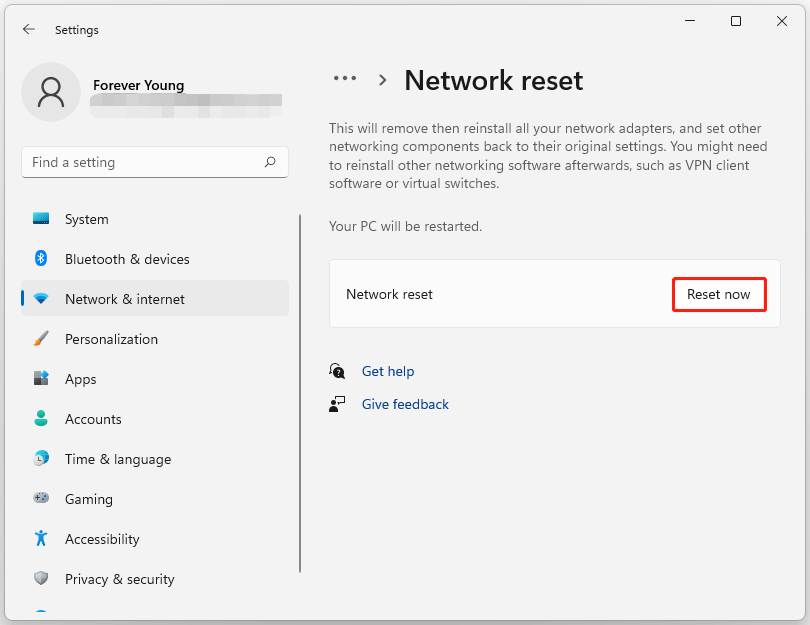
Method 4. Reset Network Settings
- Go to Settings > Network & internet.
- On the right-side, click Advanced network settings.
- Under the More settings section, click on Network reset.
- Click Reset now. Then click Yes to confirm.
- Your computer will automatically restart.
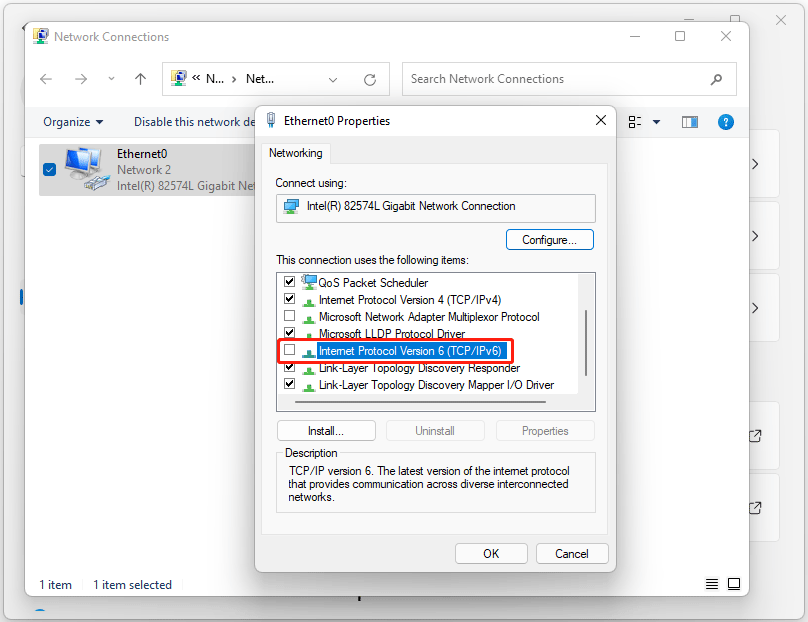
Method 5. Disable IPv6
- In the Advanced network settings window of Settings, click More network adapter options.
- Right-click Ethernet and select Properties.
- On the pop-up interface, uncheck the box next to Internet Protocol Version 6 (TCP/IPv6).
- Click OK to save the change.
Method 6. Enable Efficiency Mode
- Press Ctrl + Shift + Esc to open Task Manager.
- Under the Processes tab, right-click your browser and select Efficiency mode.
Windows 11 Slow FAQ
It also enables high-security features by default, such as VBS and Memory Integrity, which can add significant overhead to background operations.
1. Disable VBS
2. Disable startup apps
3. Adjust system & appearance settings
4. Perform system cleanup
5. Upgrade hardware
Bottom Line
Windows 11 slow performs in different situations, like slow startup, slow gaming performance, slow app opening, slow UI responsiveness, and slow file copying. This post analyzes each situation’s causes and offers the corresponding solutions.
If you have any questions related to MiniTool Partition Wizard, just contact us by sending an email via [email protected].
About The Author

Position: Columnist
Vega enjoys helping people with computer problems, including disk management, data recovery, data backup, and more. She is constantly expanding her knowledge in related fields. And she will continue to bring more easy-to-understand professional articles to help people solve various problems on the PC.
User Comments :