As 3DS games and applications take up more and more storage space, the system’s built-in 4GB or 8GB SD card will quickly become insufficient.
Fortunately, upgrading your 3DS’s SD card is one of the simplest and safest ways to expand storage space. As long as you back up and copy your files correctly beforehand, the entire process doesn’t require reinstalling the system or losing any data.
This article will guide you step-by-step on how to transfer data from your 3DS SD card to a larger 3DS card, ensuring that your games, save data, and system settings remain intact.
Preparation Before 3DS SD Card Upgrade
Before upgrading your 3DS’s SD card, please make sure you have the following items ready:
#1. A New SD Card
First, choose a reliable brand. Then, select an appropriate capacity based on your usage needs. The larger the capacity, the more games and applications you can store.
The Nintendo 3DS/3DS XL/2DS officially supports standard SD cards (up to 2GB) and SDHC cards with capacities from 4GB to 32GB.
Below are some recommended SD cards for 3DS:
Note: In the Nintendo 3DS series, older models used standard SD cards, while newer models used Micro SD cards. Specifically, the New 3DS, New 3DS LL/XL, and New 2DS LL/XL used Micro SD cards. The original 3DS, 3DS LL/XL, and 2DS used standard SD cards.
1. Sandisk Extreme Pro
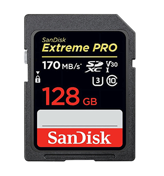
- Capacity: 32GB, 64GB, 128GB, 256GB, 512GB, 1TB
- Speed: Up to 200MB/s read and 140MB/s write speeds for 256GB-1TB models, and 90MB/s write speeds for other models
2. PNY Elite-X
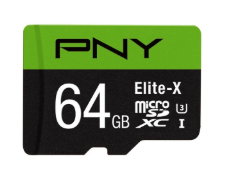
- Capacity: 32GB, 64GB, 128GB, 256GB
- Speed: Up to 100MB/s sequential read speed and meets the A1 performance rating
#2. A Computer (Windows or macOS)
3DS SD card upgrade requires you to transfer the data from the old card to the new one, which needs a computer. In addition, you also need to format the new SD card with a proper file system on the computer before the data transfer.
#3. An SD Card Reader
If your computer doesn’t have a built-in card reader slot, you’ll need a card reader to connect the SD card or microSD card to your computer.
Also read: What Is SD Card Reader & How to Use It.
How to Upgrade 3DS SD Card
To properly upgrade your 3DS’s SD card, you need to first format the new SD card to ensure the 3DS can read it correctly.
Then, safely transfer your existing data to the new card. Finally, insert and test the new card to confirm that all games and save data are working properly.
Format New SD Card
Before upgrading your 3DS SD card, properly formatting the new card is a crucial step.
The formatting method varies slightly depending on the SD card capacity:
1. SD Cards Smaller than 32 GB
These can be formatted directly using Windows File Explorer or Disk Management, which is a simple process.
Here are the steps:
- Insert a new SD card into the card reader and then insert the card reader into the computer’s USB port.
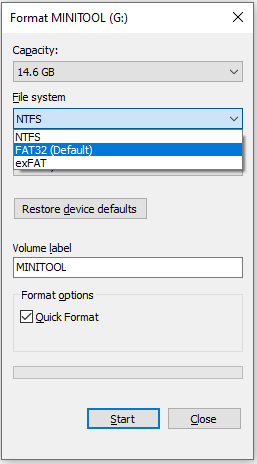
- Open File Explorer, right-click on the SD card partition, and then select Format from the context menu.
- In the pop-up window, select FAT32 from the file system drop-down list as the desired file system. Then click the Start button.
- A warning will appear on the screen, informing you that formatting will erase all data on the SD card. Click OK to continue.
2. SD Cards Larger than 32 GB
Windows cannot format SD cards larger than 32 GB to FAT32 by default, so you need to use specialized tools, such as MiniTool Partition Wizard, to complete the formatting.
MiniTool Partition Wizard is a free partition manager that can format USB to FAT32, resize/extend partitions, convert MBR to GPT, wipe hard drives, clone a disk, etc.
Now, follow the steps below to format SD card for 3DS.
Step 1: Open MiniTool Partition Wizard and enter the main interface.
Step 2: Right-click the 3DS SD card partition and choose Format.
Step 3: In the pop-up window, you can drop down the File System box and choose FAT32 as the destination file system. Then click OK.
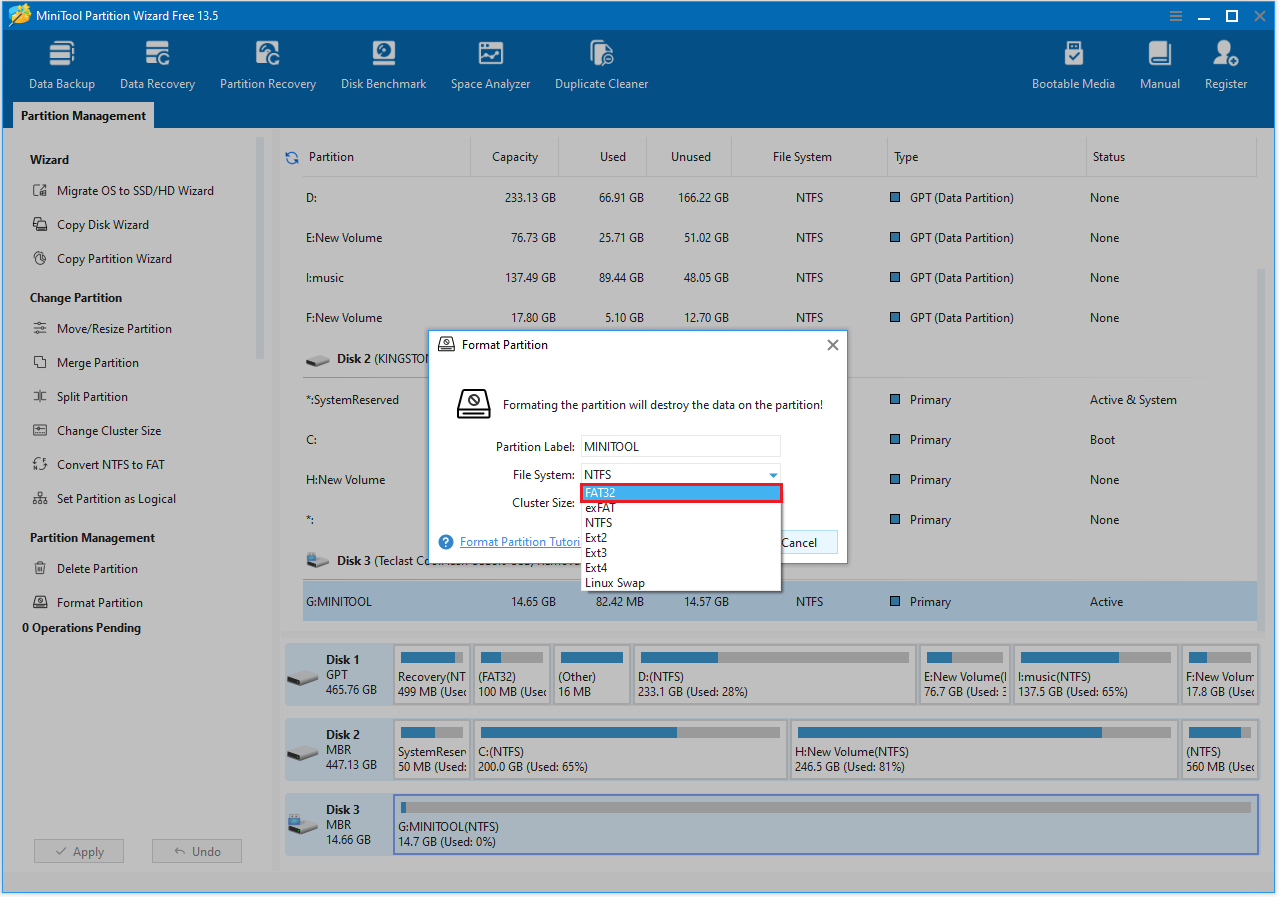
Step 4: You can preview that the SD partition will have a FAT32 file system. Now you need to click the Apply button in the top left corner to save all changes.
Remove the Old 3DS SD Card
Removing the SD card from your Nintendo 3DS is very simple, but be careful to avoid damaging the SD card or the console.
Step 1: Before removing the SD card, make sure to completely turn off your Nintendo 3DS.
Step 2: Locate the SD card slot.
- Original 3DS / 3DS XL / 2DS: The SD card slot is under a small cover on the side of the console.
- New 3DS / New 3DS XL / New 2DS XL: The microSD card slot is located under the battery cover on the back.
Step 3: Gently open the cover with your finger or a small plastic pry tool.
Step 4: Remove the SD card.
- Gently press the SD card in until it pops out slightly.
- Slowly pull the SD card out with your fingers. If the card is small or difficult to grasp, you can use tweezers to gently remove it.
Nintendo 3DS SD Card Data Transfer
The core of Nintendo 3DS SD card transfer is to copy all files and folders from the old SD card to the new SD card while maintaining the original file structure.
Here are the detailed steps:
Step 1: After removing the old SD card, connect it to your computer using an SD card reader. Open the old SD card and select all files and folders in the File Explorer.
Step 2: Right-click them and select Copy, then paste them to your computer’s desktop or another temporary folder.
Step 3: Once the copying is complete, safely eject the old SD card.
Step 4: Insert the new SD card via the card reader, which has been formatted to FAT32, into your computer.
Step 5: Open the new SD card in File Explorer and paste the files and folders from your desktop to the root directory of the new SD card.
Step 6: Wait for the files to be completely copied, then safely eject the new SD card.
Test New 3DS Card
After the data has been successfully copied, the process is not yet complete. You need to insert the new SD card into your Nintendo device and test if it works correctly.
- Insert the new SD card into the 3DS’s SD card slot.
- After turning on the device, check if the games, save data, and downloaded content are displayed correctly.
- If everything is working properly, the data transfer is complete.
Common Issues after Upgrade 3DS SD Card
After upgrading the 3DS SD card, you may encounter some issues.
1. 3DS cannot recognize the new SD card.
Symptom: After inserting the new SD card and turning on the 3DS, the device displays “unable to read SD card” or fails to start at all.
Possible causes:
- Incorrect SD card format (3DS requires FAT32 format).
- Damaged or low-quality SD card.
- Poor contact of the SD card read/write interface.
Solutions:
- Format the SD card to FAT32 using a computer.
- Check the card’s speed class (by looking at the symbols on the card). Class 6 or higher is sufficient for 3DS, and Class 10 (minimum 10 MB/s) fully meets the usage requirements.
- It is recommended to use SD cards from well-known brands to avoid counterfeit or low-quality cards.
- Try reinserting the SD card to ensure good contact.
2. Slow game loading.
Symptom: Noticeable delay when switching games or entering the game interface
Possible causes:
- Insufficient SD card speed.
- Unoptimized system cache.
Solutions:
- Use a high-speed SD card.
- Avoid storing too many unnecessary files on the card. If you already have many unnecessary files, delete them.
3. Save data lost.
Symptom: The game starts normally, but the save data is missing, and progress cannot be loaded.
Possible causes:
- The Nintendo 3DS/Private folder was not completely copied.
Solution:
- Ensure that all files have been copied, including hidden files and folders.
- Try copying the save data for only one or two games first, then turn on the device to confirm that it can be read, before copying all of them.

How to Deal with Your Old 3DS SD Card
After upgrading the SD card for your Nintendo 3DS, the handling of the old SD card becomes a matter to consider.
If you have confirmed that the new SD card is working properly and all game data and save files have been successfully transferred, the old SD card can be reused.
One common and effective method is to delete all partitions on the old SD card and create new ones. For this, you can use MiniTool Partition Wizard.
Now, please follow the steps below to use MiniTool Partition Wizard.
MiniTool Partition Wizard FreeClick to Download100%Clean & Safe
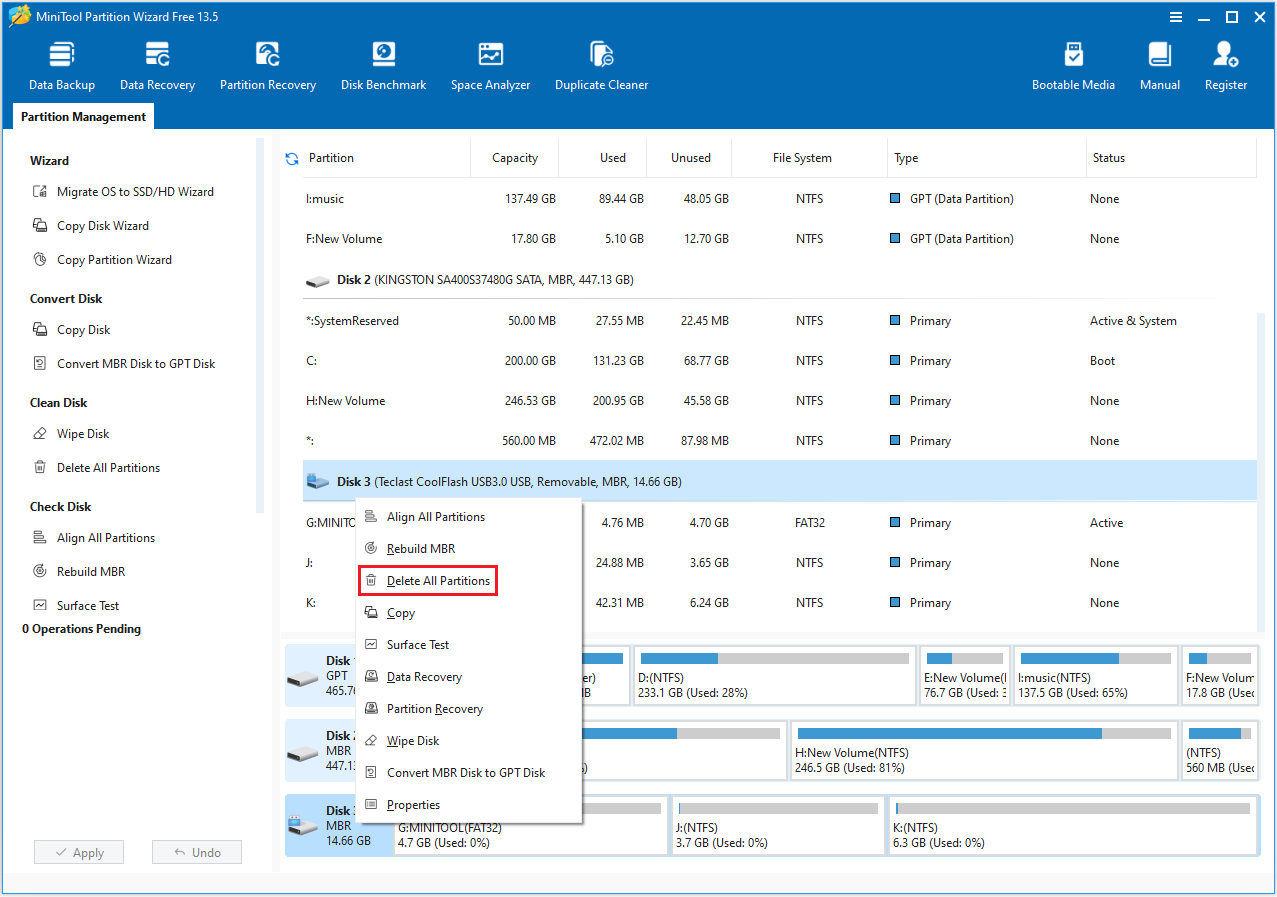
Step 1: Connect the old SD card to your PC via an SD card reader.
Step 2: Launch MiniTool Partition Wizard to enter its main interface. Then right-click the SD card and choose Delete All Partitions. Click Yes to confirm.
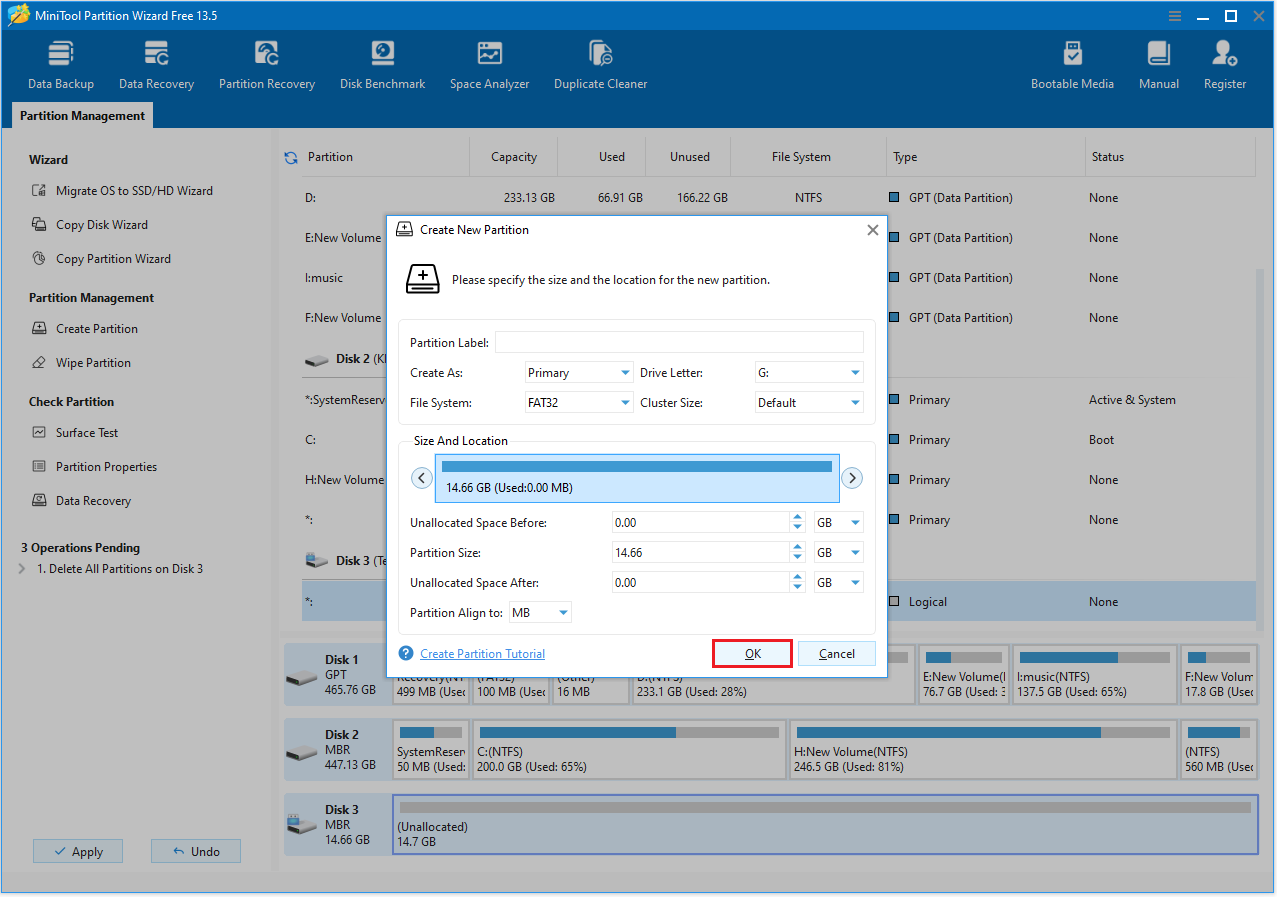
Step 3: Right-click the Unallocated space and select Create.
Step 4: In the new pop-up window, you can set Partition Label, Partition Type, Drive Letter, File System, Cluster Size, etc. Then click OK.
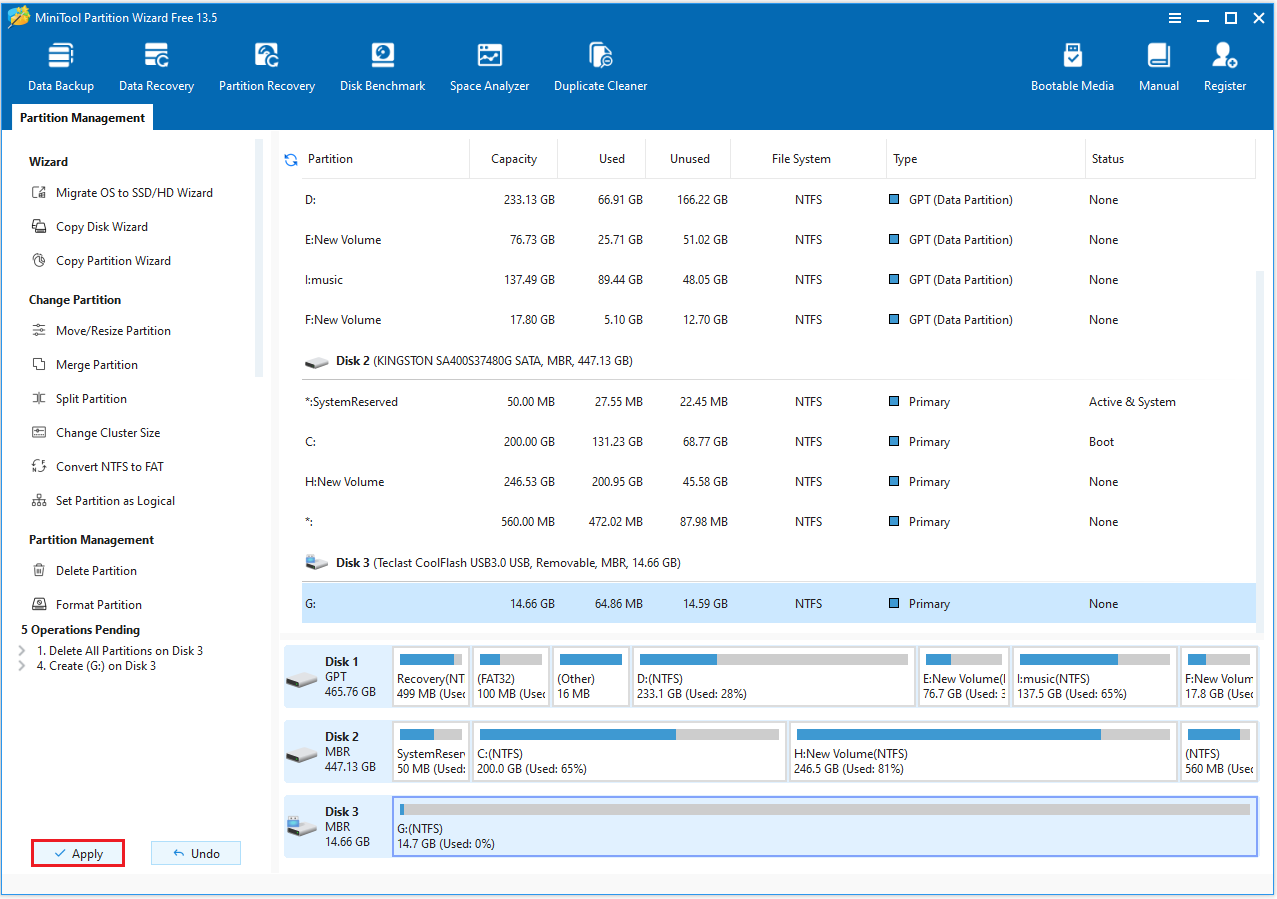
Step 5: Click Apply to execute the pending operations.
Upgrade 3DS SD Card FAQ
Performing a system update during this time may increase the complexity of the process and the risk of errors.
Bottom line
This article describes “what SD card does a 3DS use”, how to upgrade the 3DS SD card, and what to do with the old SD card after the upgrade.
If you have any questions or suggestions while using MiniTool Partition Wizard, contact us via [email protected] for further assistance.
About The Author

Position: Columnist
Cecilia has been an editor at MiniTool for two years. She primarily focuses on disk and partition-related content, with particular expertise in disk cloning, partition recovery, and PDF document conversion. She is dedicated to providing users with clear and accurate solutions to help them efficiently resolve common computer problems.
User Comments :