In this post, MiniTool Partition Wizard shows you three Switch data transfer cases. With this guide, you can transfer data to new Switch, transfer save data Switch to an SD, or move Switch data from one SD card to another.
Why Do You Need to Transfer Switch Data
You may want to transfer data after you get a new Switch console. Besides, transferring Switch data to an SD card or another Switch console is recommended after its storage is full. If you are going to sell or give away the old Switch, you’d better perform a Switch data transfer.
Both Nintendo Switch and Switch Lite only have 32GB space, while Switch OLED has 64GB.
What Can You Transfer on Nintendo Switch
Now you can transfer user data, saves, profiles, and some photos from one Switch to another. However, you need to know that Nintendo used to handle the account, game permissions, and saved-game data in a restrictive and complicated manner.
The situation has changed since the release of 4.0.0 system update on Nintendo Switch consoles.
You are allowed to transfer data to the standard Switch, Switch OLED, or Switch Lite from the current Switch console. The Switch data transfer between Nintendo Switch and Switch OLED is the most common scenario. To learn the differences among the three consoles, please read: Nintendo Switch vs Switch OLED vs Lite: Which Is the Best Console
How to transfer Nintendo Switch data? Three cases related to Switch data transfer have been offered to you. According to your demand, follow the provided steps to transfer save data Switch now!
Case 1: Transfer Nintendo Switch Data from One Nintendo Switch to Another
How to transfer data from one Switch to another? Well, you have two options to transfer data to new Switch. Before starting the steps below, you should pay attention to the following things.
- The two Switch consoles should connect to the same Wi-Fi network and be updated to 4.0.0 or higher versions.
- The Nintendo account of the source Switch must be linked to the target user account, but you don’t do that prior to the Switch data transfer.
- The target Switch can’t have more than seven users during the transfer process.
- The target console should have enough space to hold the transferred data.
- After the Switch data transfer finishes, the user information, the associated save data, and the software bought with the user account won’t be available on the source system. However, save data shared by all users on the system including Animal Crossing: New Horizons will not be transferred.
- Screenshots and video captures saved to the internal memory won’t be transferred to the new Switch.
Option 1: Use the Data Transfer Tool
Ensure that both two Switch consoles are plugged into a power source.
Step 1: Turn on the old Nintendo Switch, open System Settings, and then navigate to Users and click Transfer Your User and Save Data after finding it.
Step 2: Choose Next twice and then select Source Console to confirm the operation.
Step 3: Run the new Switch, and then search and click the Transfer Your User and Save Data option.
Step 4: Likewise, select Next twice and choose Target Console to continue.
Step 5: Sign into your Nintendo account as required with your email and password.
Step 6: Move to the source console. If it has detected the target console, select Transfer to start the Switch data transfer process.
Step 7: After the process ends, hit Enter on the source console. Then you will find that the user account and save data will appear on the target Switch.

Option 2: Use Cloud Saves
Compared with the data transfer tool, cloud saves let you transfer save data Switch easier. However, this way also has some drawbacks.
- Not all Switch games support cloud saves like Dark Souls: Remastered and Animal Crossing: New Horizons.
- It’s more prone to screwups in the process.
- It’s more expensive as it requires a Nintendo Switch Online subscription.
- It might need more time.
Step 1: Back up Switch Save Data to the Cloud. If you haven’t backed up save data to the cloud, you can’t download Switch saves from the cloud. Hence, you need to make a backup first. To do that, you need a Nintendo Switch Online account and follow these steps.
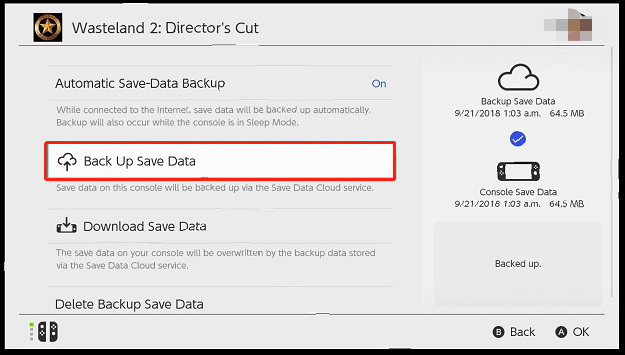
To automate the backup process, go to Settings and enable Automatic Save-Data Backup. Turn on the old Switch console.
- Head to System Settings > Data Management > Save Data Cloud.
- If the status of the cloud save is “backed up”, you can skip this step. On the contrary, choose a file and click Back Up Save Data.
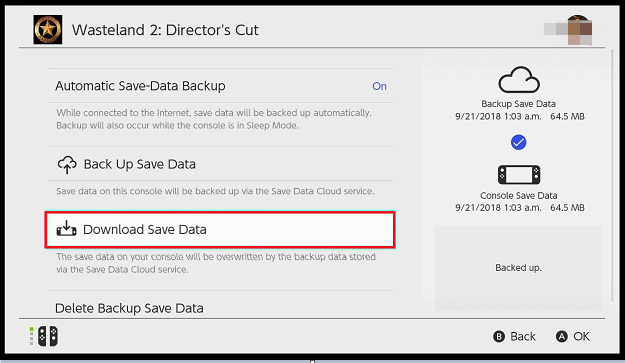
Step 2: Download save data from the cloud. To do that, run the new Switch console and go to System Settings > Data Management > Save Data Cloud.
Step 3: After heading to Save Data Not on This Console, you will see all the cloud saves from the old Switch.
Step 3: Choose the needed save data and click Download Save Data.
If you have multiple could saves and don’t want to back up them one by one, you can choose Automatic Save-Data Download under Save Data Cloud.
How to transfer data from one Switch to another? With the above methods, you can transfer data to new Switch easily. Try them now!
Also read: Get Samsung TV Software Update | Solve Issues with the Update
Case 2: Transfer Nintendo Switch Data from One MicroSD Card to Another
If you don’t want to use the current SD card but want to keep the content on it, you are supposed to transfer Nintendo Switch data to a larger SD card. Before transferring, here are some things you should be aware of.
- You can only transfer Nintendo Switch data from one microSD card to another in Windows.
- Games that are downloaded to a microSD card on one system will not play on other systems. In addition, do not transfer data between multiple microSD cards or transfer microSD cards between multiple systems.
- You need two microSD cards, an SD card slot, or a commercially available SD card reader at least. If there isn’t a microSD card slot on your computer, you can use a card adapter. The MicroSD card slot can be found behind the kickstand on the Nintendo Switch.
- Make sure you have formatted the new microSD card before inserting it into your computer.
- Do not recopy to the same microSD card to overwrite data.
- Be sure to copy the entire folder and do not change or erase the files it holds.
Here are three ways to transfer Nintendo Switch data from one microSD Card to another. Pick one from them randomly.
#1. Transfer Data from One MicroSD Card to Another via File Explorer
If there are two SD card slots on your computer or two SD card readers, you can insert the two SD cards at the same time and drag the files from the old SD card to the new one directly. If there is only one SD card slot or one SD card reader, you can try the following steps.
Step 1: Press the Power button for a few seconds to turn off your Nintendo Switch.
Before pressing the Power button, make sure you’ve exited the game that you are playing.
Step 2: In the new interface, you ought to select Power Options.
Step 3: Select Turn Off.
Step 4: Now, you are supposed to open the kickstand on the back of your Nintendo Switch and remove the microSD card.
Step 5: Insert the microSD card into your computer.
Step 6: Press Windows + E to open File Explorer on your computer.
Step 7: Select your SD card.
Step 8: Open the microSD card folder and drag the files to the desktop.
Step 9: Wait for a few seconds and remove the SD card from your computer.
Step 10: Insert your new microSD card into the computer.
Step 11: Open the new microSD card and drag the files you just dragged to the desktop to this new microSD card.
Step 12: After transferring, you are supposed to remove the new microSD card from your computer.
Step 13: Insert the new microSD card into your Nintendo Switch.
#2. Transfer Data from One MicroSD Card to Another via Command Prompt
Step 1: Follow Step 1 to Step 5 from the above method to remove the old microSD card and insert it into your computer.
If there are two SD card slots on your computer or two SD card readers, you can insert the two SD cards at the same time.
Step 2: Hit the Magnifying Glass icon and type “cmd”.
Step 3: Right-click Command Prompt to select Run as administrator.
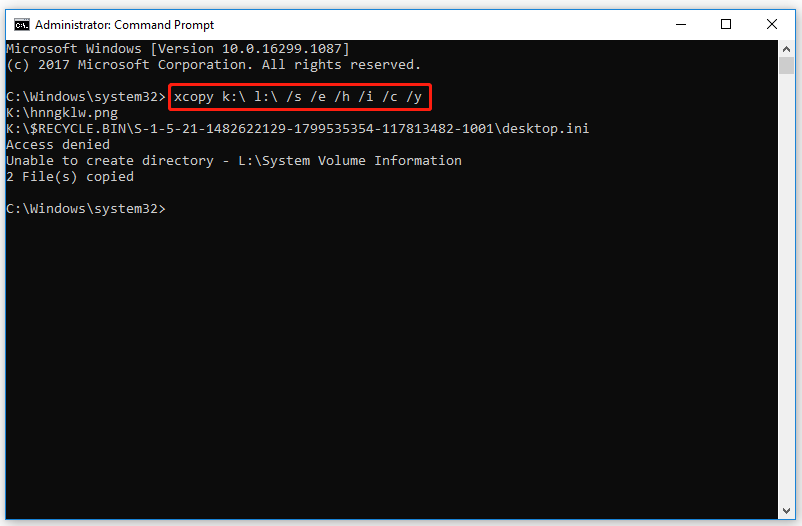
Step 4: Type xcopy k: l: /s /e /h /i /c /y and press Enter. The k refers to the original SD card, while the l stands for the new card.
Here are the detailed descriptions of each parameter.
- /s: Copy directories and subdirectories unless they are empty. If you don’t type it, xcopy will work in a single directory.
- /e: Copy all subdirectories, even if they are empty.
- /h: Copy the hidden and system file.
- /i: Always assume that the destination is a folder.
- /c: Copy even if an error occurs.
- /y: Disable prompting confirmation to overwrite files.
#3. Transfer Data from One MicroSD Card to Another via MiniTool Partition Wizard
You can transfer data from one microSD card to another by copying disk. Being a hard drive clone software, MiniTool Partition Wizard can help you do that with ease. In addition to copying disk, you can also create/delete/move/resize/extend partition, convert MBR to GPT, check file system, and execute other operations related to disks and partitions with this program.
MiniTool Partition Wizard DemoClick to Download100%Clean & Safe
Step 1: Follow Step 1 to Step 4 from the method via file explorer to remove the old microSD card from your Nintendo Switch.
Step 2: Here, we suppose that there are two SD card slots on your computer or two SD card readers. You could insert the two microSD cards at the same time.
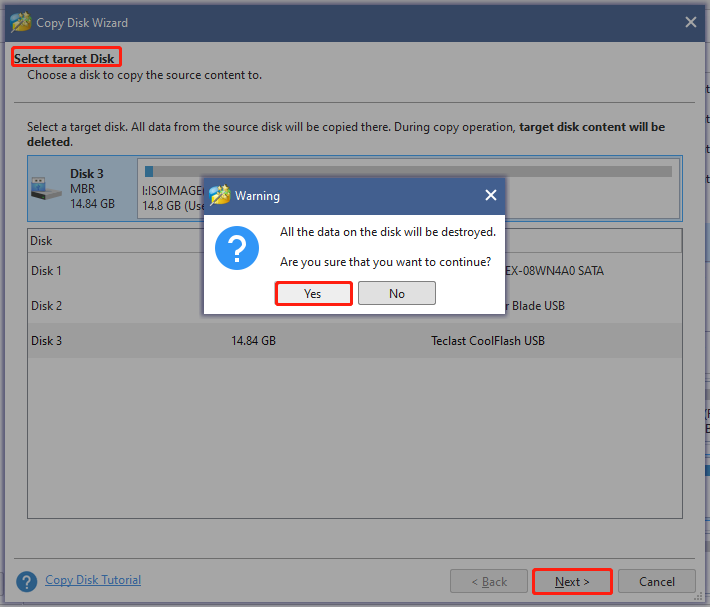
Step 3: After launching MiniTool Partition Wizard, you need to right-click the old SD card and hit the option of Copy.
Step 4: In the prompted window, you ought to select the new SD card as the target disk and click Next. Then you will get a warning window. As there’s no data on the new SD card, directly click Yes to continue.
Step 5: You can view changes and choose copy options in the window below. If you don’t have specific demand, use the default options and click Next.
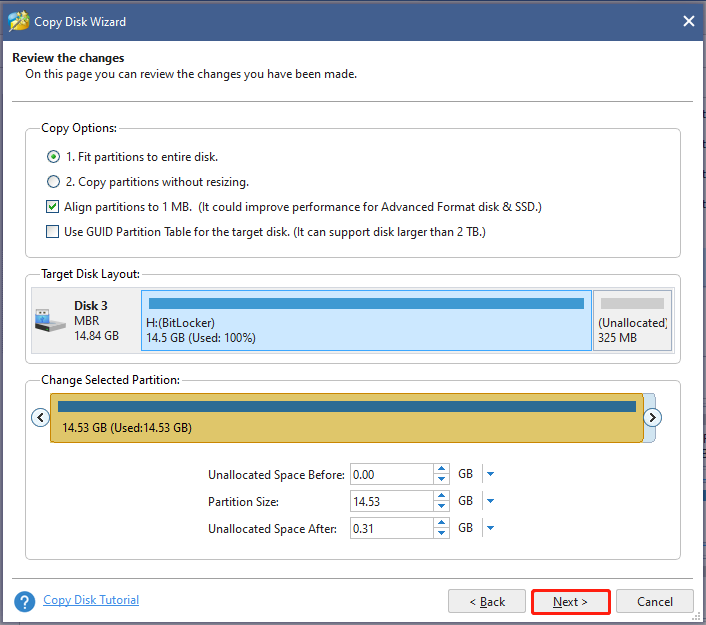
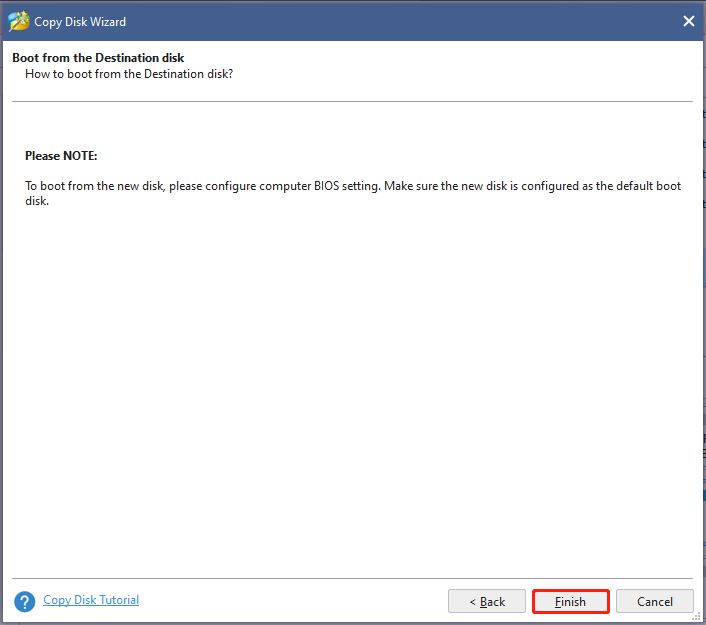
Step 6: After clicking the Finish button, click Apply in the main interface to execute the operation.
Case 3: Transfer Nintendo Switch Data to a MicroSD Card
If you’re going to run out of memory on your Nintendo Switch, you can transfer the data from your Nintendo Switch to an SD card to free up space.
The game save data is stored in the console’s local storage, so it won’t be moved to the SD card.
Step 1: Turn off your Nintendo Switch and insert the microSD card into it.
Step 2: Turn on the Nintendo Switch and choose System Settings from the main menu.
Step 3: In the interface of System Settings, you ought to select the Data Management option and hit Move Data Between System/microSD Card.
Step 4: Tap Move to microSD Card.
Step 5: Choose the game you would like to transfer and click Move data. Then the selected games will be moved to the SD card.
Bottom Line
This post mainly tells how to transfer Nintendo Switch data in three cases. If you are planning to transfer save data Switch, follow the corresponding steps according to your situation. For any thoughts about “Nintendo Switch transfer save data”, directly tell us in the following comment area. If you meet any issues while using MiniTool Partition Wizard, please contact us via [email protected].
User Comments :