Do you play Fallout 4 on Windows 10? Have you ever encountered long loading times in Fallout 4? Here, MiniTool analyzes some reasons for Fallout 4 long loading times on Windows 10, and you can try the solutions below to fix the problem.
Why does the Fallout 4 Take So Long to Load
Fallout 4 is an action role-playing game released on November 10, 2015. It is available on Microsoft Windows, Xbox One and PlayStation 4. Players need to survive by growing food and building water pumps. Besides, they are able to build various defenses (such as turrets and traps) around their settlements to defend against random attacks.
This game has received a lot of positive review from critics since it is published. However, some players complain about some bugs and problems in the game on Windows 10. Fallout 4 long loading times issue is one of them.
This issue happens to users all over the world. Why does the Fallout 4 take so long to load? Here are some possible reasons.
- Full-screen mode
- Improper Frames Per Second settings
- Cloud sync
- Vertical Sync
- Corrupted or outdated graphics card driver
- Outdated game or system
- Slow disk access speed
Solution 1: Launch in Windowed Borderless Mode
To get better gaming experience, you may use full screen mode in Fallout 4. However, this mode consumes more resources and may cause some issues like Fallout 4 long loading times.
In this case, you need to change the settings and launch the game in windowed borderless mode.
Here is how to do it.
Step 1: Completely exit Fallout 4.
Step 2: Launch Steam and click LIBRARY to view your game list.
Step 3: Right-click Fallout 4 in the list and then select Properties.
Step 4: In the pop-up window, switch to GENERAL tab. Then click SET LAUNCH OPTIONS.

Step 5: Set the launch options to “–windowed-noborder”. Press OK to save the change you have made.
Then you can relaunch Fallout 4 and check if the issue has been solved.

Solution 2: Disable Steam Cloud Sync
Steam Cloud enables you to save your progress and configurations, which will be helpful when you plan to change a computer. However, when the game saves the files that are too large but you don’t have a high upload speed, Fallout 4 long loading times might appear.
In this case, you need to disable the Cloud sync. Please follow the steps below.
Step 1: Under the LIBRARY category in Steam, right-click your Fallout 4 and select Properties.
Step 2: Choose UPDATES tab. Then uncheck the option Enable Steam Cloud Synchronization for Fallout 4.
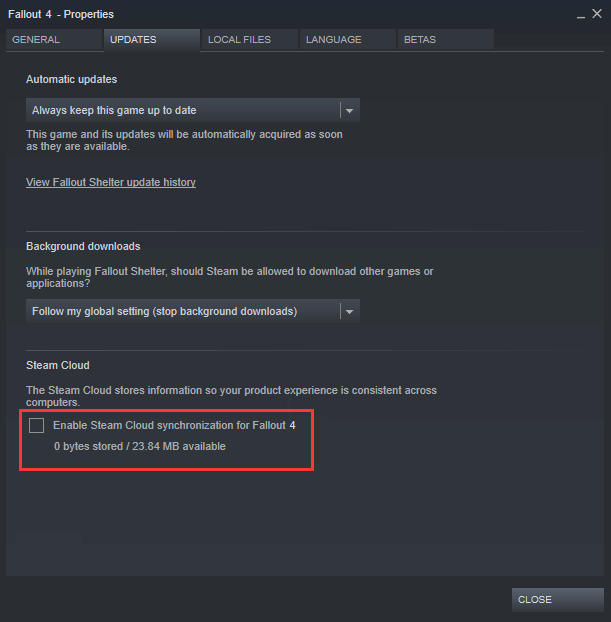
Step 3: Save the settings and restart Steam. Then run Fallout 4 to check if the issue has been fixed.
If you still face Fallout 4 long loading times on Windows 10 after disabling Cloud sync, you need to move on to the next solution.
Solution 3: Change FPS Settings
Fallout 4 loading time has something to do with the FPS (Frames Per Second). FPS shows the times of that the images on the screen are refreshed per second. Fallout 4 allows you to select a predetermined FPS value according to your requirements. However, this feature may also cause long loading times in Fallout 4.
To solve the problem, you can change your FPS settings.
- In Fallout 4, navigate to Options > Video > Graphics.
- Locate the option Maximum Frames Per Second and move the slider to maximum value.
Then you can restart the game and check if the problem is gone.
Solution 4: Disable Vertical Sync
Vertical Sync, a built-in feature in Fallout 4, allows players to sync their game frame rate with the monitor’s refresh rate. It’s usually used to improve the stability and performance of the graphics in the game. Many players benefit from this feature, but it could also lead to Fallout 4 long loading times issue.
To make Fallout 4 load faster, you may need to disable Vertical Sync feature.
Step 1: Launch Fallout 4 and click Options from the main menu.
Step 2: Then go to Video > Graphics.
Step 3: In Graphics, turn the option VSync (Vertical Sync) off.
Step 4: Save the changed settings and close the window.
Now you can restart Fallout 4 and the problem should be solved.
Solution 5: Edit Fallout 4 Preferences
Another way to fix long loading times in Fallout 4 is to change some preferences for Fallout 4. In this way, you can add buffer settings in the preferences files.
Step 1: Find your Fallout 4 installation folder.
Step 2: Double-click Fallout4Prefs.ini file to open it.
Step 3: Add the following lines under the heading of General:
- iNumHWThreads=X (X is the number of your CPU cores)
- uExterior Cell Buffer=64
Then you can save and close the file. Relaunch Fallout 4 to see if the loading time has been sped up. If it hasn’t, you should try the next solution.
Solution 6: Update the Graphics Card Driver
You may also encounter long loading times in Fallout 4 due to corrupted or outdated graphics card driver. So, you have to update your graphics card driver in this case.
Here are three options for you.
Option 1: Update the Driver via Device Manager
Device Manager is a control panel applet in Microsoft Windows. It allows you to check the hardware connected to your computer. You can easily update your graphics card driver with it.
Step 1: Press Win + R to open Run window. Then input devmgmt.msc and click OK to launch Device Manager.
Step 2: Expand Display adapters category by double-clicking it.
Step 3: Right-click your graphics card and choose Update driver.

Step 4: In the pop-up window, choose Search automatically for updated driver software. Then follow the given wizard to finish the left steps.
In this way, Windows will search, download and install the latest driver software for you automatically. This may take some time. Please wait patiently. Once it’s completed, you can restart your computer and then check if the annoying issue is fixed.
![[Solved] No AMD Graphics Driver is Installed on Windows 10/11](https://images.minitool.com/partitionwizard.com/images/uploads/2020/01/no-amd-graphics-driver-is-installed-thumbnail.jpg)
Option 2: Update the Driver Manually
If you want to update your graphics card manually, you may need some computer skills.
You have to visit the official website of the manufacturer and find the right driver. Then download and install it step by step.
It’s not a recommended option if you have never updated your driver manually.
Option 3: Update the Driver with a Professional Software
If there is any available software professed in device drivers updating, you can use it.
It’s a quick and easy way for some users. However, you need to protect your computer from virus or malware attack and keep your computer safe.
Solution 7: Update Windows
You might also experience the Fallout 4 long loading times issue if your operating system is outdated. So, if you fail to solve the problem with all the solutions above, you may need to update Windows.
Step 1: Press Win + I to open Settings.
Step 2: Select Update & Security in the homepage of Settings.
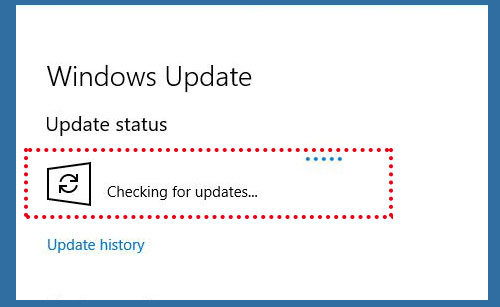
Step 3: Choose Windows Update from the left pane, and then click Check for updates in the right pane.
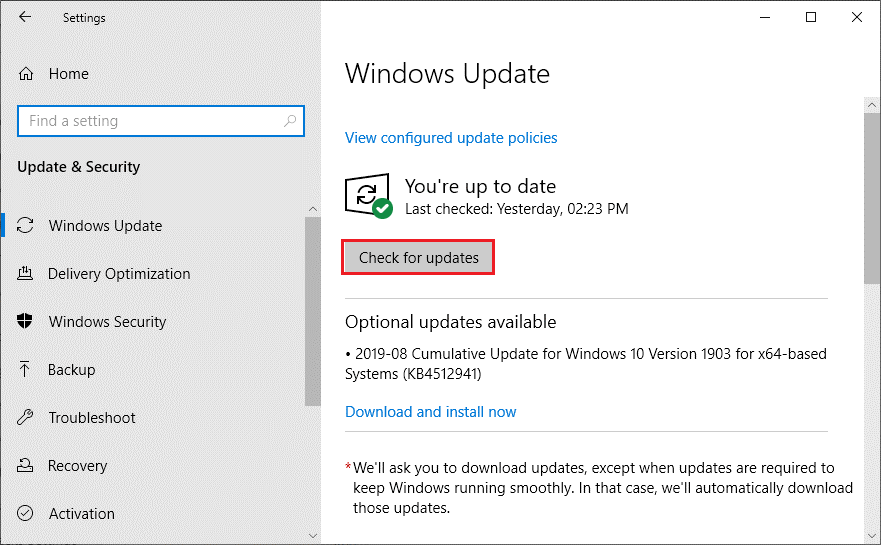
Step 4: Follow the onscreen instructions to finish the left steps.
Then you can restart your computer and run Fallout 4 to see if your problem disappears. If it still exists, you should try the next method.
Solution 8: Move Fallout to an SSD
Slow disk access speed is another reason for Fallout 4 long loading times.
When the computer is running, CPU will transfer the data that needs to be operated from the hard drive to RAM. If you’re using an HDD (Hard Disk Drive), the game will take more time during the process. SSD runs much faster than an HDD. Click to know more about the difference between HDD and SSD.
So, you can move your game to an SSD to improve the disk performance. Here are two methods for you: use Steam or MiniTool Partition Wizard. You can choose one according to your condition.
Method 1: Use Steam
If you already have an SSD installed on your computer, you can use Steam to move your Fallout 4 to it. Just follow the steps below.
Move 1: Create a Steam library folder on the SSD
Before you move your Fallout 4 to an SSD, you need to create a Steam library folder on the SSD. Let’s see how to do it.
Step 1: Launch Steam.
Step 2: Click Steam from the upper-left corner of the homepage and then select Settings.
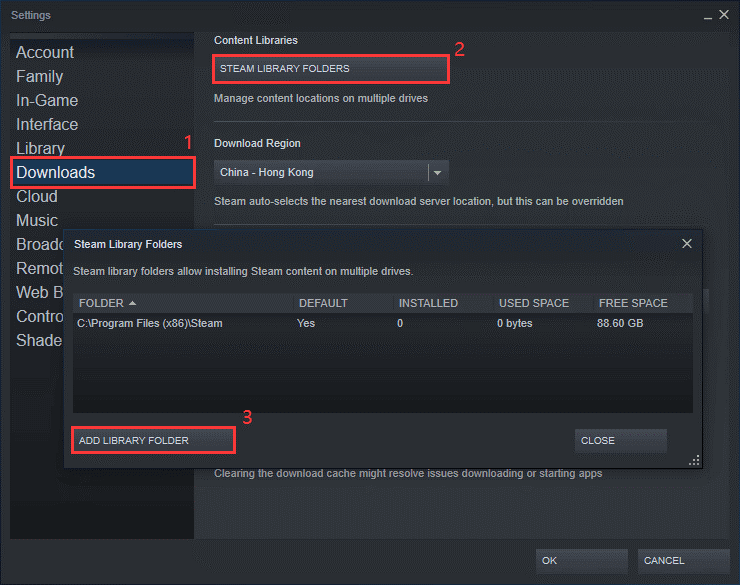
Step 3: In Settings, choose Downloads from the left side and click STEAM LIBRARY FOLDERS.
Step 4: In the pop-up window, click ADD LIBRARY FOLDER.
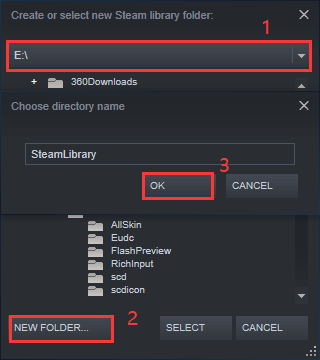
Step 5: Select a location on your SSD where you want to save Fallout 4 files and click NEW FOLDER to build the new Steam library folder.
Step 6: By default, the new folder is named as SteamLibrary. You can change the name according to your needs. Then click OK to confirm the operation.
Move 2: Move Fallout 4 to the SSD
Step 1: Go back to the homepage of Steam and click LIBRARY.
Step 2: Right-click Fallout 4 and choose Properties.
Step 3: In the Properties window, choose LOCAL FILES tab. Then click MOVE INSTALL FOLDER.
Step 4: Select the SteamLibrary folder you created on the SSD and click MOVE FOLDER to move your Fallout 4 to the SSD.
Method 2: Use MiniTool Partition Wizard
If you haven’t installed an SSD on your computer, it’s time to upgrade your HDD to SSD now. With MiniTool Partition Wizard, you are able to move your Fallout 4 to the SSD and copy all the data on your HDD.
You can follow this guide to solve the problem.
Step 1: Connect the SSD to your PC.
Step 2: Download and install MiniTool Partition Wizard by clicking the button below. Then launch the tool.
MiniTool Partition Wizard FreeClick to Download100%Clean & Safe
Step 3: When you get the interface, select the HDD you’re using currently and click Copy Disk from the action panel.
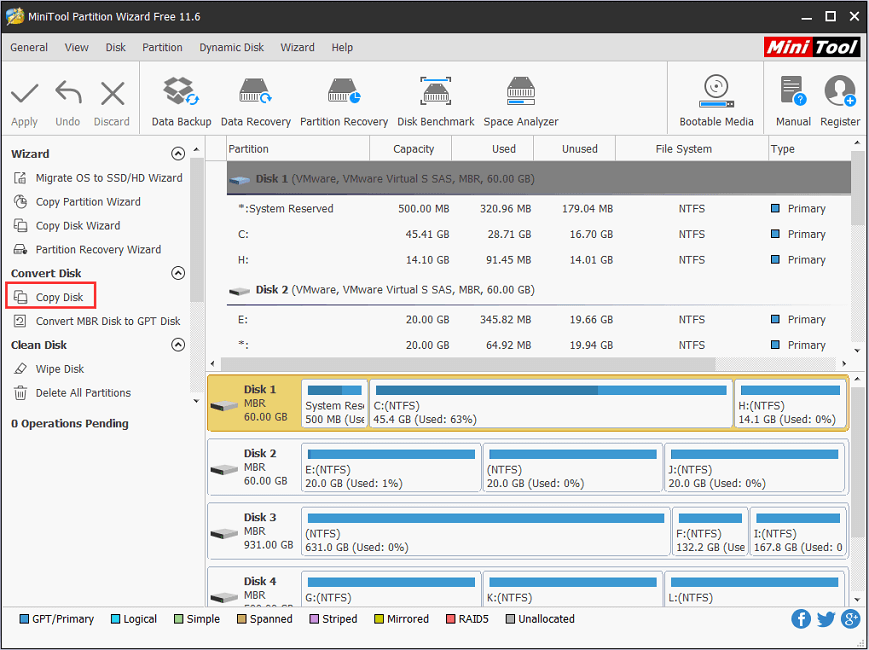
Step 4: In the pop-up window, choose the SSD as the target disk to save the data (including your games, files and the operating system) on your original HDD.
Step 5: Choose a copy method and click Next. Then follow the wizard to finish the copy settings.
Step 6: Finally, click Apply to execute the copy process.
After cloning the hard drive to SSD, you can boot your computer from the SSD and run Fallout 4 to check if the problem still exists. For the old HDD, you can choose either to keep it as a backup drive or sell it.
Bottom Line
For game lovers, Fallout 4 is so popular for its characters, crafting and soundtrack. There are also some bugs and problems in Fallout 4. In this post, 8 solutions to Fallout 4 long loading times are introduced. You can try them one by one to troubleshoot the issue.
Please leave a message in the comment section below if you have any ideas or questions. For any problems, you can send us an email to [email protected].
Fallout 4 Long Loading Times FAQ
Reasons for Fallout 4 long loading times are various.
This issue usually occurs if you are running the game in full-screen mode, or you are using the Cloud sync or Vertical Sync feature. Faulty graphics card driver or outdated operating system could also cause the problem. Besides, when your disk access speed is too slow, Fallout 4 will also take a long time to load.
User Comments :