Do you need to do Windows 11 shrink partition? This post from Partition Magic shows you how to shrink or resize Windows 11/10 partitions without formatting or losing data in 5 ways. You can have a try.
In most cases, the hard drives in the computer are well partitioned by the PC/disk manufacturers. There is no unallocated space on the disk. However, you may want to shrink partition Windows 10/11 for the following reasons:
- Your computer only has the C drive or your partitions are not enough, so you want to create another partition to save personal files. In this case, you want to do Windows 11 shrink partition to get unallocated space to create the new partition.
- You want to dual boot Windows and another system. Then, you need to shrink partition Windows 10/11 to make room for the second system.
As for the Windows 11 resize partition, it means changing the partition size Windows 11/10. Then, it could be either shrinking the partition or extending the partition in Windows 11/10.
If you want to extend the partition in Windows 11, you can refer to this post: How to Extend the System or Data Partition in Windows 11 [5 Ways]. That post will explain the cases and ways of extending the partition in detail to you.
Here, I will show you how to do the Windows 11 shrink partition and the shrink part of the Windows 11 resize partition.
Way 1. Use Disk Management
Disk Management is a Windows built-in GUI tool designed for managing hard drives and partitions. It can create/format/delete a partition, change the drive letter, and shrink or extend a partition. Its Shrink Volume feature can be used to do Windows 10 or Windows 11 shrink partition. Here is the guide:
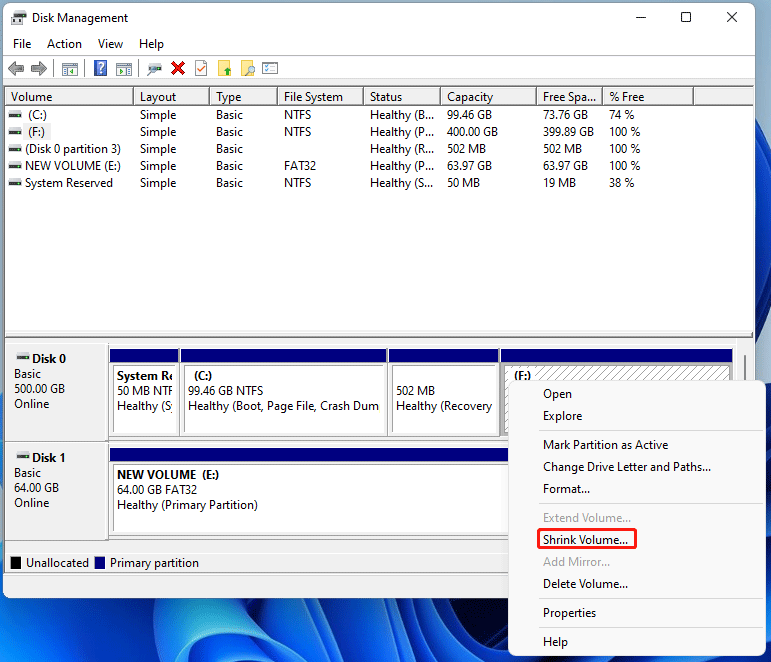
Step 1: Press the Windows logo key + X and then select Disk Management from the menu. The Disk Management tool will open. Now, right-click on an NTFS partition, including the C drive, and then select Shrink Volume.
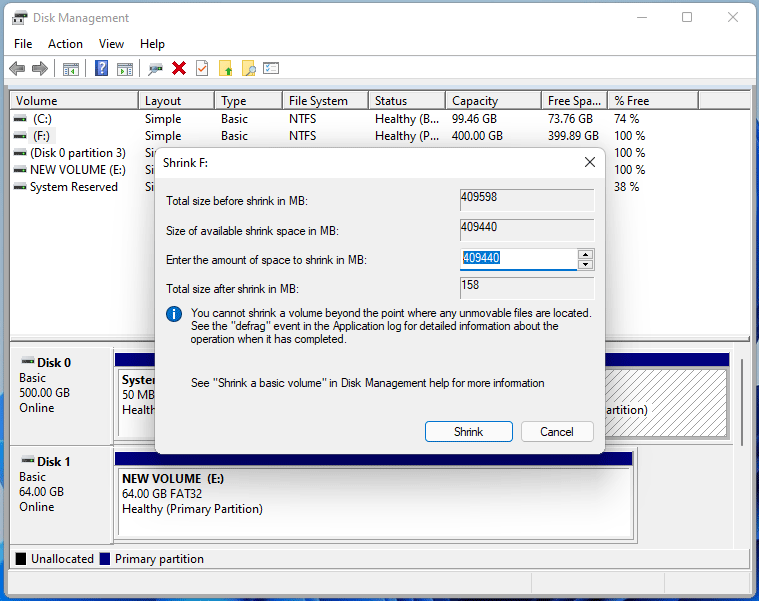
Step 2: After querying shrink space, you can enter the amount of space to shrink in MB. After that, click the Shrink button to start the shrinking process.
Further Reading:
Sometimes, you may encounter the Windows 11 shrink partition not working issue. The reason may be that Disk Management can only shrink NTFS partitions. If the partition uses other file systems or it is the System Reserved/EFI partition, Recovery, or other OEM partitions, the Shrink Volume option will be greyed out.
Besides, you may fail to shrink the partition to the specified size as expected because the size of available shrink space does not equate to the free space. In most cases, the reason for the issue is unmovable files, which are fragments on the disk, so that Disk Management will not shrink past those files.
To solve this issue, you can open the Drive Optimization utility in Windows to defrag that drive fully, which will move the unmovable files. Then, try shrinking the partition again. The issue can usually be solved and you can shrink a larger space. Or, you can use third-party software to shrink the partition.
Way 2. Use DiskPart Commands
DiskPart is a command-line disk partitioning utility included in Windows 2000 and later Microsoft operating systems. Its functions are very similar to those of Disk Management. Therefore, you can also use it to do the Windows 11 shrink partition work. Here is the guide:
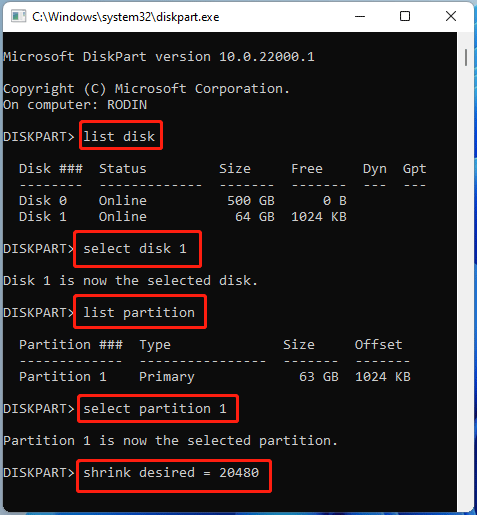
Step 1: Press the Windows logo key + R and type “diskpart”. Then, press Enter and click Yes to open the diskpart.exe input window.
Step 2: On the window, execute the following commands one by one to shrink a partition.
- list disk (it will list all disks connected to the PC)
- select disk * (* is the disk number of the hard drive where the volume you want to shrink is located)
- list partition (it will list all partitions located on the selected disk)
- select partition # (# is the volume number of the partition that you want to shrink)
- shrink desired = xx (the unit of the number is MB and the command means that the partition will be shrunk by xx MB)
Way 3. Use PowerShell Commands
PowerShell is a task automation and configuration management program from Microsoft, consisting of a command-line shell and the associated scripting language. It is not a dedicated disk and partition management tool. The partition resize feature is just one of the insignificant features of this tool.
How to resize partition Windows 10/11 easily using PowerShell. Here is the guide:
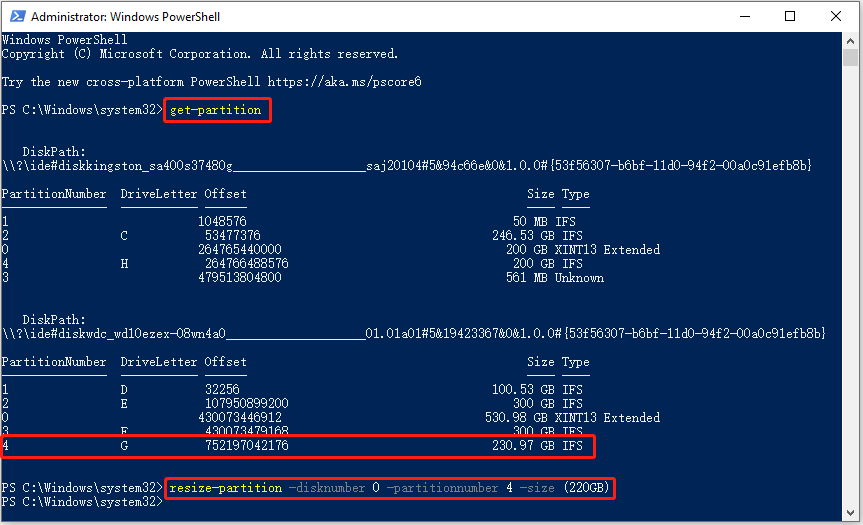
Step 1: Open Disk Management to check the disk number of the hard drive where you want to resize partition Windows 10/11. You need to write down it. In my case, I want to resize the G drive on Disk 0.
Step 2: Press the Windows logo key + X and then select Windows PowerShell (Admin) from the menu. Then, execute the following commands one by one:
- Get-Partition (this will list all partitions and display their details. You can write down the volume number of the partition that you want to shrink or extend. In my case, the partition number of the G drive is 4)
- Resize-Partition -DiskNumber * -PartitionNumber # -Size (XX) (* is the disk number you wrote down before, # is the volume number you wrote before, and XX is the final size you want the partition to be)
2. If you want to use this command to extend a partition (the final size is larger than the current size), you should ensure there is adjacent unallocated space to the right of the partition. Otherwise, the command may fail.
Way 4. Use Windows 11 Storage Settings
Changing partition size in Settings is a feature introduced in Windows 11. Therefore, this method is only available for Windows 11 resize partition. It can’t work on Windows 10. How to change partition size Windows 11 via Settings? Here is the guide:
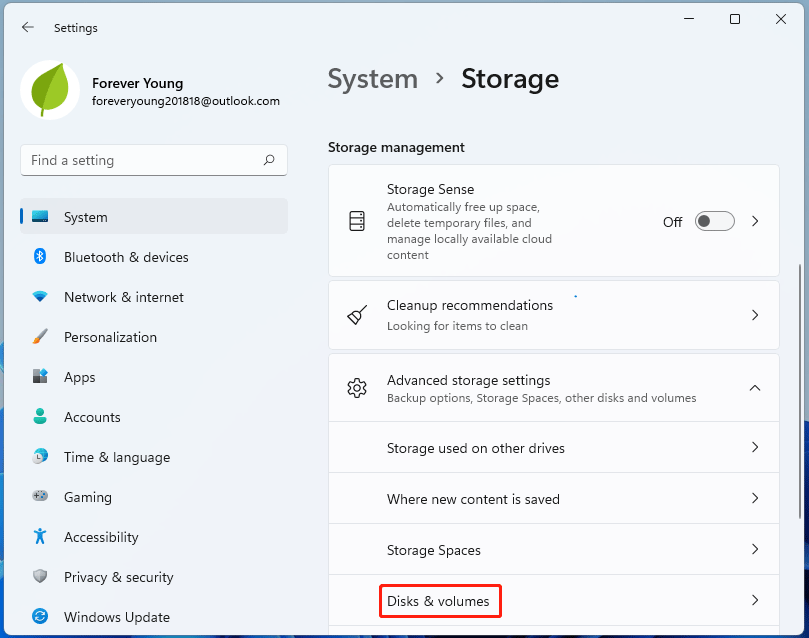
Step 1: Press the Windows logo key + I to open Settings. Go to System > Storage. Under Storage management, expand Advanced storage settings, and then click Disks & volumes.
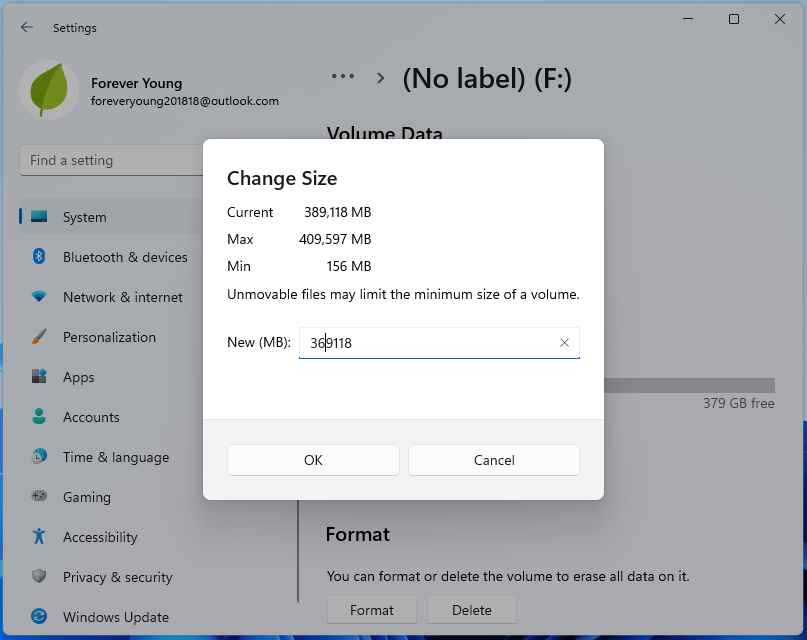
Step 2: Click the partition that you want to resize and then click the Properties button. Click the Change size button. On the pop-up window, type the new size of the partition in MB. You can see the Max size and Min size you can enter. Then, click OK.
Way 5. Use MiniTool Partition Wizard
MiniTool Partition Wizard is a professional disk and partition management tool. It has a move/resize feature to help you do Windows 11 resize partition without losing data. When do you choose this software? Here are some cases:
- You encountered the Windows 11 shrink partition not working issue.
- You want to resize the FAT32 partition. MiniTool Partition Wizard can change the size of both FAT32 and NTFS partitions. In addition, if there is enough unallocated space behind the FAT32 partition, it can increase the FAT32 partition to up to 2TB.
- You want to move the location of the partition while resizing it. MiniTool Partition Wizard can move the location of the FAT32, NTFS, exFAT, and EXT partitions.
- You want to shrink multiple partitions and gather the unallocated space. Sometimes, one partition can’t have enough free space. Then, you need to shrink multiple partitions to get enough unallocated space. Then, MiniTool Partition Wizard can move the location of the unallocated space.
Besides, MiniTool Partition Wizard has many useful features. For example, it can help you partition a hard drive, format FAT32 on various storage media, convert MBR to GPT, recover data from hard drives, etc. It’s worth trying.
How to change partition size Windows 11/10 using MiniTool Partition Wizard? Here is the guide:
MiniTool Partition Wizard FreeClick to Download100%Clean & Safe
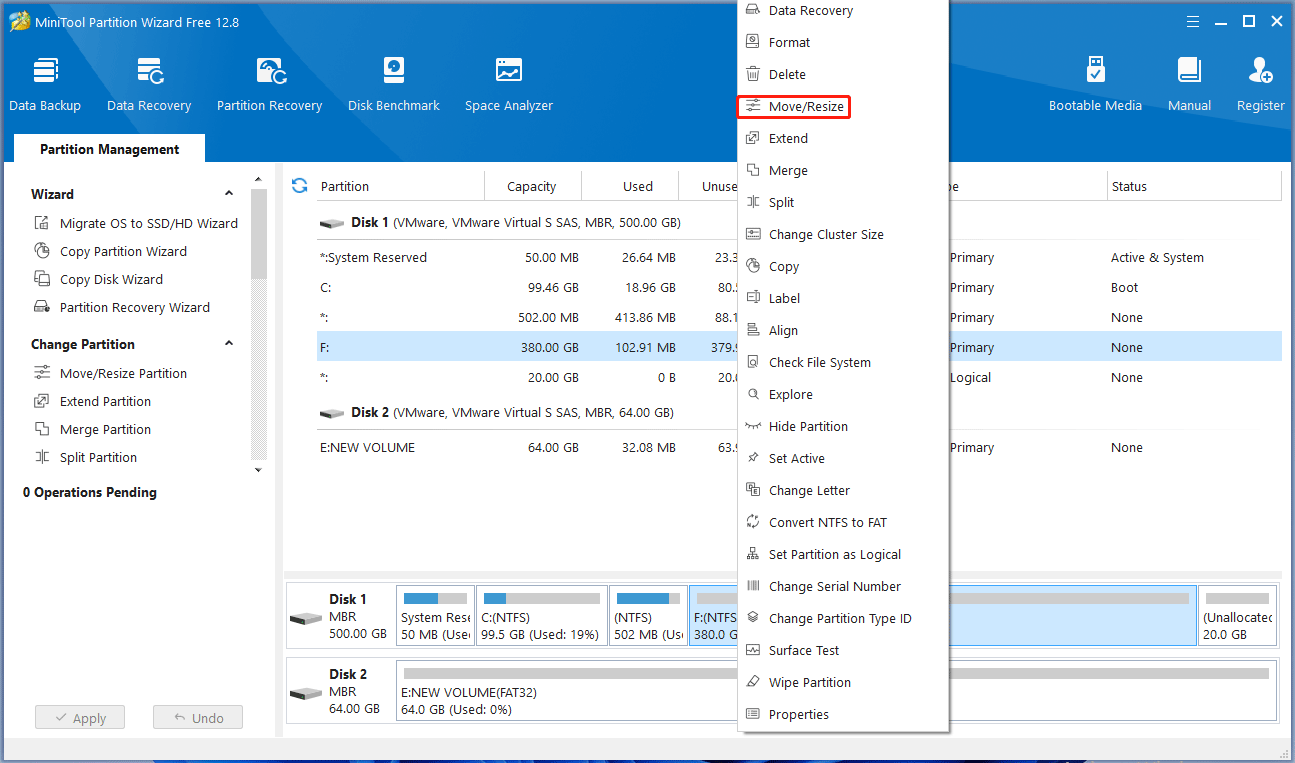
Step 1: Download, install, and launch MiniTool Partition Wizard. Right-click on the partition that you want to resize and then select the Move/Resize option from the menu.
Step 2: On the pop-up window, you can drag the arrow icons on the two sides of the partition to resize it. You can also drag the block of the partition to the left or right to move its location. Then, click OK.
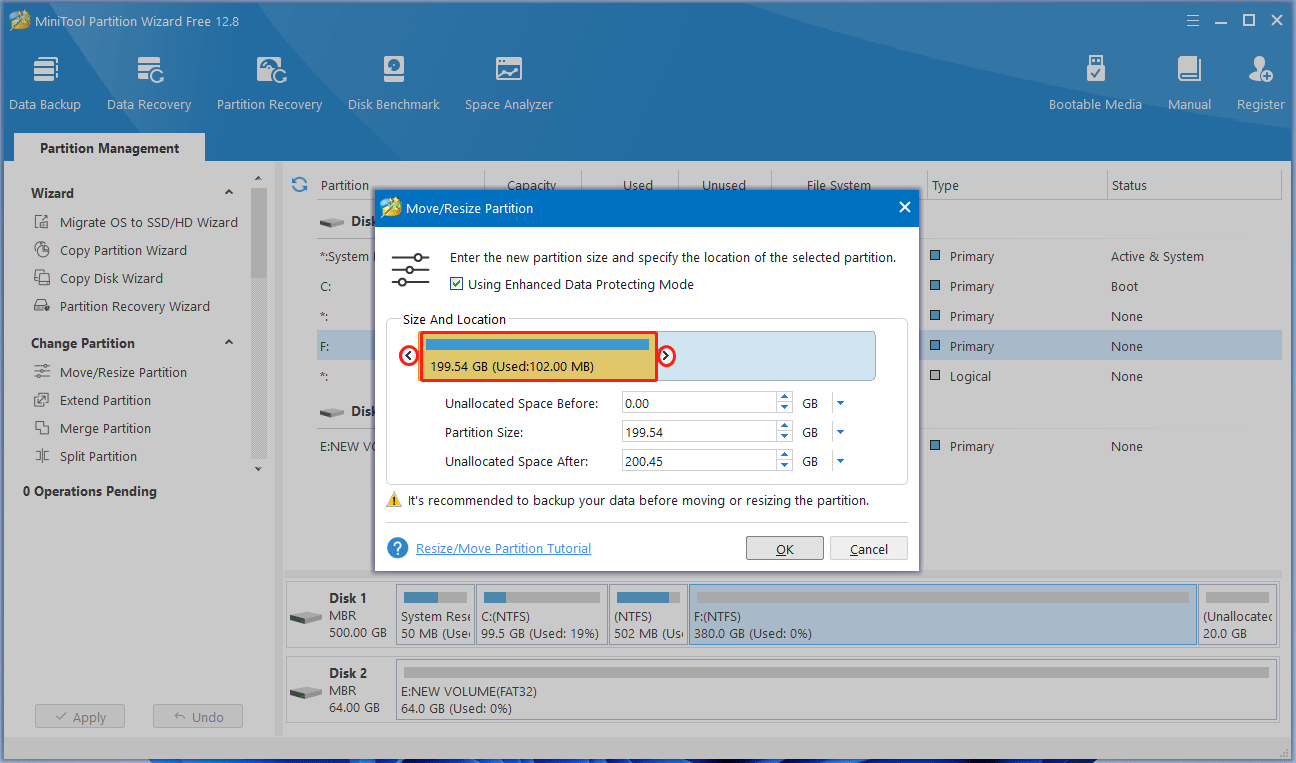
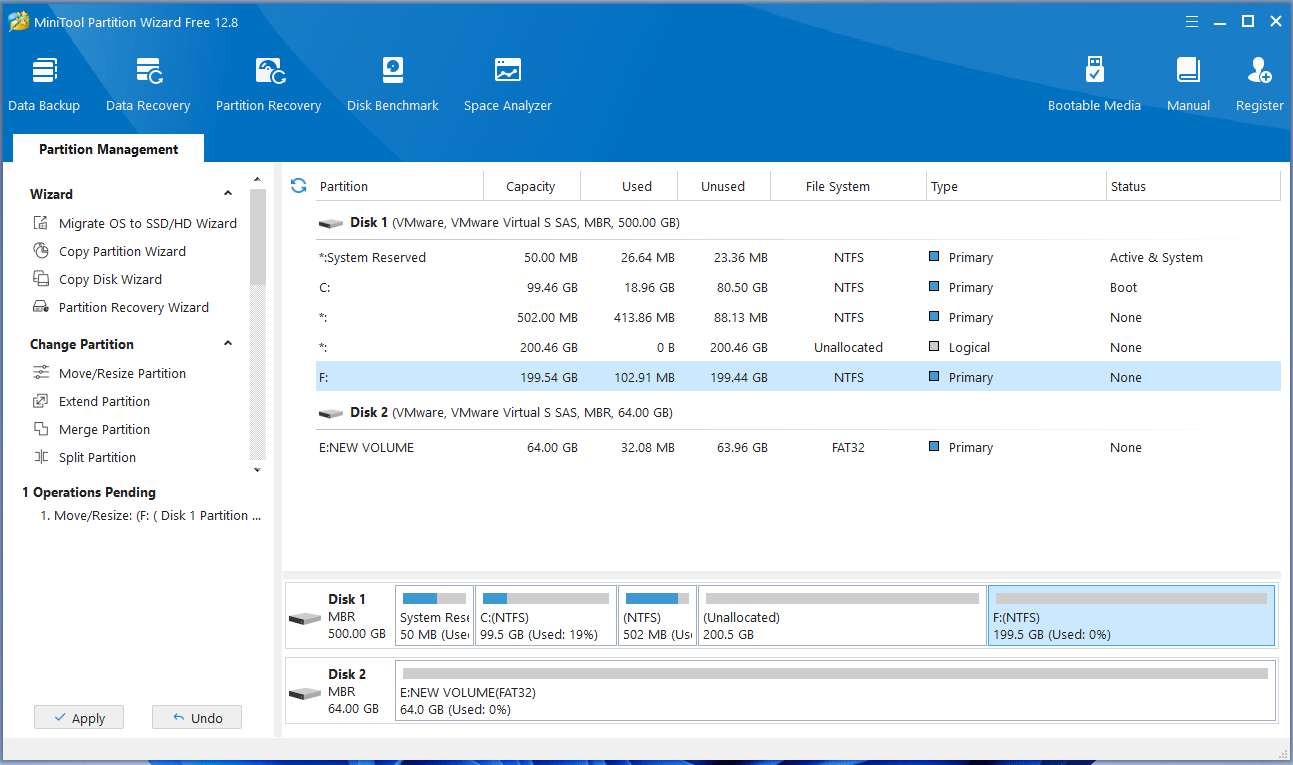
Step 3: Click the Apply button to execute the pending operation. If you resize the C drive, a PC restart may be required.
Bonus Tip
Sometimes, according to your conditions, MiniTool Partition Wizard can offer you better methods to do Windows 11 resize partition without losing data. For example:
- If you want to shrink a partition and then create a new partition using the unallocated space, MiniTool Partition Wizard’s Split Partition feature is recommended. It can split a FAT32 or NTFS partition into two partitions.
- If the reason why you want to shrink a partition is to add the unallocated space to another partition, MiniTool Partition Wizard’s Extend Partition feature is recommended. It can extend a partition by taking free space from other partitions or unallocated space directly, regardless of the distance.
Bottom Line
This post offers you 5 ways to shrink or resize partitions in Windows 11/10. Among them, MiniTool Partition Wizard is recommended because of its powerful features. However, if you encounter issues when using this software, contact us via [email protected]. We will get back to you as soon as possible.
About The Author

Position: Columnist
Linda has been an editor at MiniTool for seven years. She continuously learns about computers and puts her knowledge into practice. Moreover, she is particularly knowledgeable in disk management, data recovery, system installation, and PDF editing. Her articles typically reference multiple examples or are based on her own experience, providing users with the most suitable solutions.
User Comments :