“Error compiling movie” is a common problem in Adobe Premiere Pro and the error message will give the specific causes in most cases. If you rely on the application and encounter the problem unfortunately, don’t worry. This guide developed by MiniTool Partition Wizard will help you fix the annoying Adobe Premiere error compiling movie issue.
About Adobe Premiere Error Compiling Movie
Adobe Premiere Pro, a successor of Adobe Premiere which was first launched in 1991, is a timeline-based video editing software application launched in 2003. Today, Premiere Pro refers to versions released in 2003 and later, while Premiere commonly refers to the earlier released versions. And the latest release you can get is Adobe Premiere Pro CC that was released in November 2019.
As the industry-leading video editing software, Adobe Premiere Pro provides many advanced features that enable users to complete common video editing tasks and craft footage into polished films and videos with ease. It supports editing videos of high resolution at up to 10240 x 8192 and exporting video to the medium and format necessary for the distribution.
Adobe Premiere Pro is a popular video editing tool in the film and video industry and has been used in many noble films like Superman Returns. However, many users complain that they receive the error compiling movie notification window while performing various actions in Premiere Pro.
The error compiling movie is a common problem related to Adobe Premiere and it can occur on both Windows 7/8.1/10 and macOS. Sometimes, the error message reads “Error compiling movie. Unknown error”. But in most cases, the error compiling movie message could be different and show the various causes behind the error, including:
- Codec compression error
- Accelerated renderer error
- Disk full
- Duplicate file
- File not found
- Invalid output drive
- I/O error
- Out of memory
- Unable to create/open output file
- …
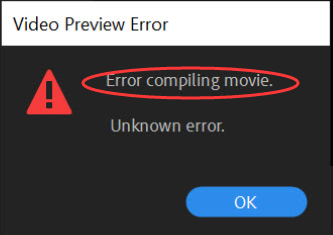
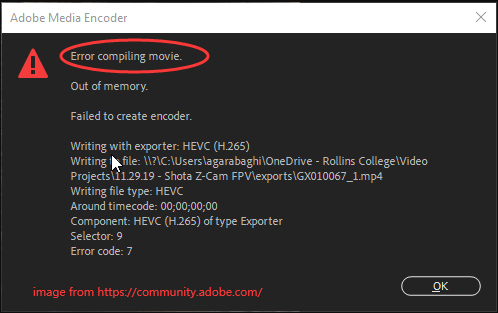
What can you do if the error compiling movie problem hinders your video compilation in Adobe Premiere Pro? Depending on the different causes given by the error message, you might need to adopt different solutions to solve the problem. In the following contents, I provide an overall introduction on solutions to the Adobe Premiere error compiling movie in Windows.
If you are facing “Error compiling movie. Unknown error”, you can work your way down the list until the problem is removed. If the specific reason for the error compiling movie Premiere is displayed, try the corresponding solutions then.
7 Solutions to Adobe Premiere Error Compiling Movie
- Perform a restart
- Update your Adobe Premiere Pro
- Check the file name
- Try another format
- Change video renderer
- Free up disk space
- Disable advanced effects and special features
Fix 1: Perform A Restart
This is a generic solution to most computer issues and software problems. If you are experiencing certain errors during video editing or rendering like “error compiling movie”, a simple restart of Adobe Premiere Pro may help you get the task back on track.
After closing the software, go to refresh your system a few times and then restart Premiere to check if you can compile movies properly.
If the error message pops up again, you can save your current tasks, close all the running applications, and restart your computer. A simple restart of your system can flush the system memory and free up your computer’s processor, which may help you fix the problem effectively. When the PC boots up, launch Premiere Pro and try rendering the same video.
Fix 2: Update Your Adobe Premiere Pro
In some cases, the error compiling movie problem is caused by software bugs, and you can fix it simply by update the Adobe Premiere Pro to the latest version. To do that, you can follow the procedure below.
Step 1: Press Windows + S, input control panel in the search bar, and click the result to open it.
Step 2: Choose to view by Category and navigate to Programs > Programs and Features.
Step 3: Right-click your Adobe Premiere and choose Uninstall. You can also click the Uninstall button after selecting the software.
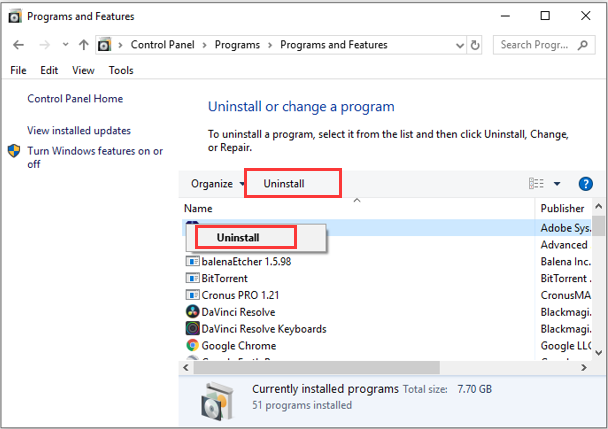
Step 4: After uninstalling the program according to the onscreen instructions, restart your computer and visit the official download page to get the latest version of Premiere. Then, install the software properly and insert your license key to activate your Premiere.
If you are using the Creative Cloud application, updating Premiere can be easier. Just click the action button in the main interface of Creative Cloud, choose Check for App Updates from the menu, and follow the given instructions to update Premiere Pro to the latest version.
Fix 3: Check the File Name
An improper file name could also lead to the error compiling movie Premiere problem. If you find that the name of the involved file is not as common as your other files’, perhaps you can rename it to solve the problem. While renaming the file, you need to avoid invalid special characters (like / : * ? < > |) and the name length shouldn’t be too long.
If the error message gives the “duplicate file” cause, it means that there is another file with the same name and format as the target file. To solve the error compiling movie issue in this case, you can change the name of the target file by adding a letter or word in the end or simply save it to a different location on your disk.
Besides, if the project source file is not linked, the error message might give the “file not found” cause. If so, you should use the Locate File or Link Media functions to re-associate any missing input files. Of cause, if the source files are on an external device, you should make sure the device is properly connected to your computer.
Fix 4: Try Another Format
Sometimes, the Adobe Premiere error compiling movie problem just happens to a specific format – users are unable to export the video to the file format which is not supported by the software for editing and rendering. Besides, if the compilation video contains a clip that is using an unsupported format, you might also fail to complete the compiling process due to the error.
If this applies to your case, you can convert the involved file into a different format that is supported widely, such as AVI, MOV, WMV, and so on. Also, you might need to remove irregular clips that are different from most of your clips, such as differences in format, decode, frame size, frame rate, and so on.
Fix 5: Change Video Renderer
If you always experience the error compiling movie while you are trying to render up a video, then changing the video renderer might help you to fix the problem effectively. Some users have resolved the problem successfully in this way, and you can feel free to have a try.
You just need to:
Step 1: In the video that gives the error, click File from the upper ribbon bar to expand the menu.
Step 2: Choose Project Settings and click General.
Step 3: Under the Video Rendering and Playback section, choose Mercury Playback Engine Software Only from the list of Renderer. Click the OK button to save changes.
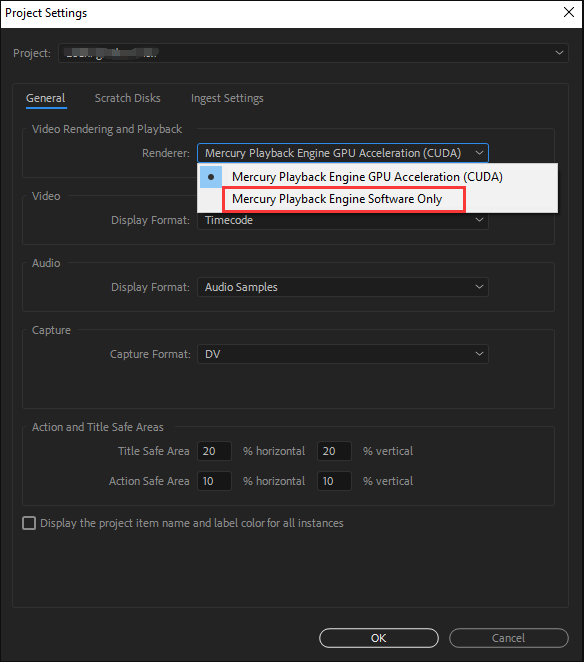
Once it’s done, try rendering the video again to check if the error compiling movie problem has been resolved.
Fix 6: Free Up Disk Space
As mentioned above, the “disk full” is a common instance of Premiere Pro compiling error, and it could appear when the location where you are rendering the video doesn’t have enough free space. If you are facing this kind of error compiling movie problem, then you’ll need to take some measures to free up your disk space.
You can delete some unwanted files and clear the system cache, including the Adobe Premiere Pro cache. If deleting data cannot spare much space for you or you don’t want to affect the existing data, you can choose to extend the target drive. For the sake of data security, you are recommended to use a reliable third-party disk manager to complete the process.
MiniTool Partition Wizard is a powerful and professional utility that can help you extend a partition by taking free space from another partition on the same disk with ease. You can follow the steps below to have a try.
MiniTool Partition Wizard FreeClick to Download100%Clean & Safe
Step 1: Download the latest version of MiniTool Partition Wizard and properly install it on your computer.
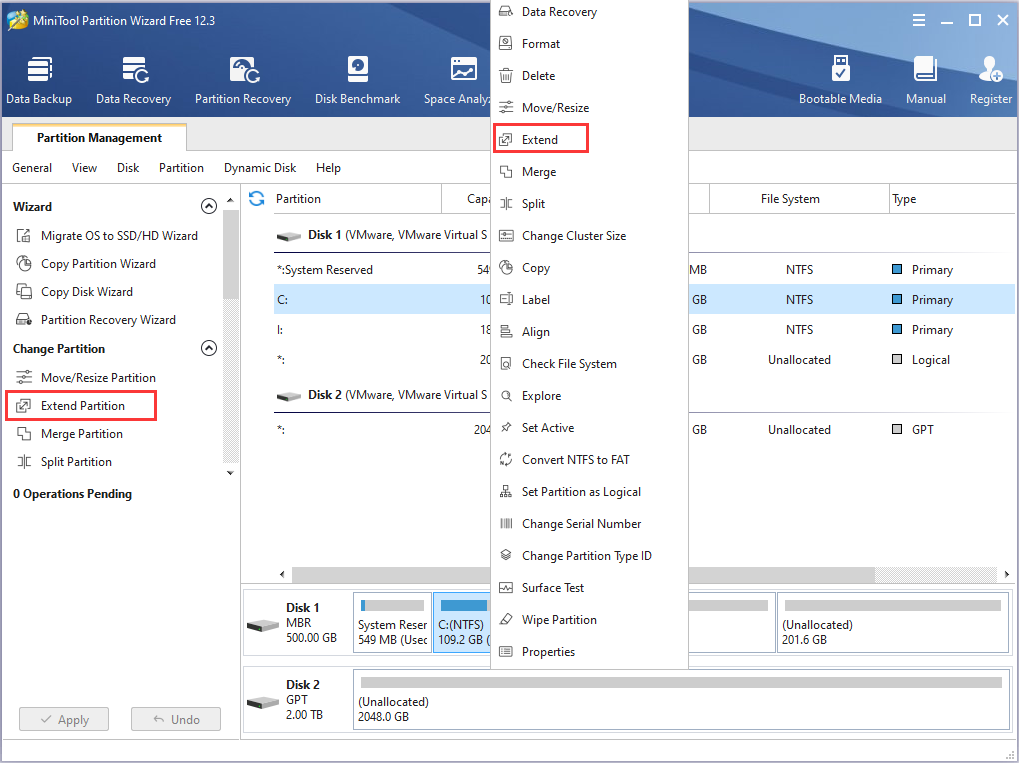
Step 2: After launching the program, right-click the target drive and choose Extend from the context menu to activate the feature. You can also choose Extend Partition after highlighting the drive.
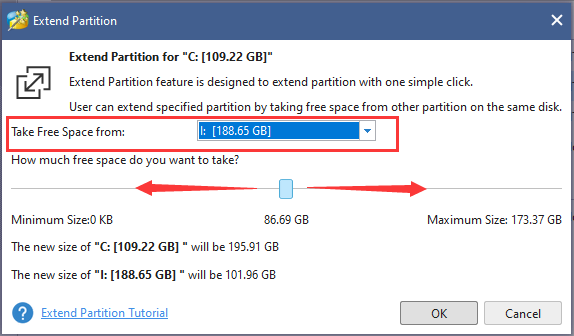
Step 3: In the pop-up window, choose a partition from the list of Take Free Space from, drag the slider rightward or leftward to decide the free space size you want to take, and click the OK button.
Step 4: When you go back to the main interface, click the Apply button to execute the pending operations and wait for the process to complete.
Fix 7: Disable Advanced Effects and Special Features
Premiere Pro provides some advanced effects and special features to meet users’ various requirements for video editing, but they might affect the normal rendering of the video and cause the Premiere compiling error in some cases. So, remove some advanced video effect and disable special features, including:
- Auto Levels
- Auto Color
- Auto Contrast
- Shadow/Highlight
- Smart rendering
- Force GPU rendering
After you finish these changes, save the rest of the settings and restart your Premiere Pro. Then, compile the movie again to check if the compiling error has been resolved.
Bottom Line
This article has introduced 7 possible solutions to the error compiling movie Premiere problem. Have you resolved the issue with the above methods? Do you have any better solutions? We will appreciate it if you share your experience, ideas, and suggestions with us in the comment zone below.
If you encounter any problems while using MiniTool Partition Wizard software, you can also contact us via [email protected] for further support. We will get back to you as soon as possible.
Error Compiling Movie FAQ
To export a sequence from Adobe Premiere, you need to:
- Make sure the Timeline panel is active and go to File > Export > Media.
- In the Export Settings window, click the blue Output Name to open the Save As window, choose an export location, assign a file name, and click Save.
- Then click the Export button in the main interface to start the process.
There are multiple reasons for Premiere Pro not exporting, including:
- Inefficiency storage space
- Application conflicts
- Lack of permissions to access the target folder
- Media file corruption
- Improper codec format
- …

User Comments :