Microsoft recently announced a new operating system, Windows 11, which makes a lot of people excited. In this post, MiniTool Partition Wizard introduces how to dual boot Windows 10 and Windows 11. You can have a try if you are hesitating which operating system to choose.
Should I Upgrade to Windows 11?
People have discussed Windows 11, a new operating system (OS), for a long time since last year. Eventually, Microsoft announced Windows 11 in June this year. According to Microsoft, Windows 11 will be coming later this year, but users can experience the Windows 11 Insider Preview Build in the Dev Channel now.
You might ask: is Windows 11 different from Windows 10? What are the differences? Should I upgrade to Windows 11?
Actually, this new operating system does come with many new features, such as new snap assistant controls, a new Microsoft Store, the support of Android apps, new gaming features, etc. Besides, it has a different outlook compared with the previous versions of Windows. For the details, you can refer to this post: Windows 11 vs Windows 10: What Are the Differences?
It’s usually hard to decide whether to upgrade to a new operating system. You might hesitate to upgrade to Windows 11 because you worry about the stability and user experience of the new OS. There is a wonderful solution to this problem: you can dual boot Windows 10 and Windows 11. In this way, you can enjoy Windows 11 and keep Windows 10 on your computer at the same time.
Editor’s Choice: Create a New Partition for Windows 11 via MiniTool Partition Wizard
In this post, it is recommended to create a special partition for installing Windows 11 with MiniTool Partition Wizard to improve the performance of your PC. Here is a quick guide:
MiniTool Partition Wizard FreeClick to Download100%Clean & Safe
- Launch MiniTool Partition Wizard.
- Right-click a non-system partition and select Move/Resize. Then shrink the partition to spare at least 64 GB of unallocated space.
- Right-click the unallocated space and click Create to create a new partition. Then specific some configurations for this partition.
- Click Apply to execute the changes.
How to Dual Boot Windows 10 and Windows 11?
As mentioned, you can dual boot Windows 10 and Windows 11 if you are not sure whether to upgrade your PC to Windows 11. It might be a little difficult but you can complete the operation by following this tutorial. It’s highly recommended to back up your important files as well as your system in advance in case that anything wrong happens.
Generally, there are four stages to dual boot Windows 11 with Windows 10:
- Make sure your PC meets the Windows 11 system requirements.
- Create a new partition for Windows 11.
- Create a bootable USB for Windows 11.
- Install Windows 11 on Windows 10 PC.
Now, let’s see them one by one.
Stage 1: Check Windows 11 System Requirements
Before installing Windows 11 on your computer, the first thing you need to do is to check whether your PC can run Windows 11. Here are the main Windows 11 system requirements, according to Microsoft:
- Processor: 1 gigahertz (GHz) or faster with 2 or more cores on a compatible 64-bit processor or System on a Chip (SoC)
- Graphics card: DirectX 12 compatible graphics / WDDM 2.x
- Memory: 4 GB RAM
- Storage: 64 GB or larger storage device
- System firmware: UEFI, Secure Boot capable
- TPM: Trusted Platform Module (TPM) version 2.0
Please check computer compatibility for Windows 11 now. If your computer meets the requirements, you can continue with the following content.
Recommended article: This PC Can’t Run Windows 11: What Should You Do to Fix It?
Stage 2: Create a New Partition for Windows 11
To install Windows 11 on Windows 10 PC, you’d better create a new partition that contains no files for Windows 11 installation. In this way, you can keep Windows 10 on your computer at the same time.
There are many ways to create a new partition on a Windows PC, such as using Disk Management, using diskpart, and using a reliable third-party tool. Here I recommend you to use MiniTool Partition Wizard, a professional and reliable partition manager program. You can follow the steps below to create a new partition for Windows 10.
Step 1: Download MiniTool Partition Wizard by clicking the following button. Then install and launch it.
MiniTool Partition Wizard FreeClick to Download100%Clean & Safe
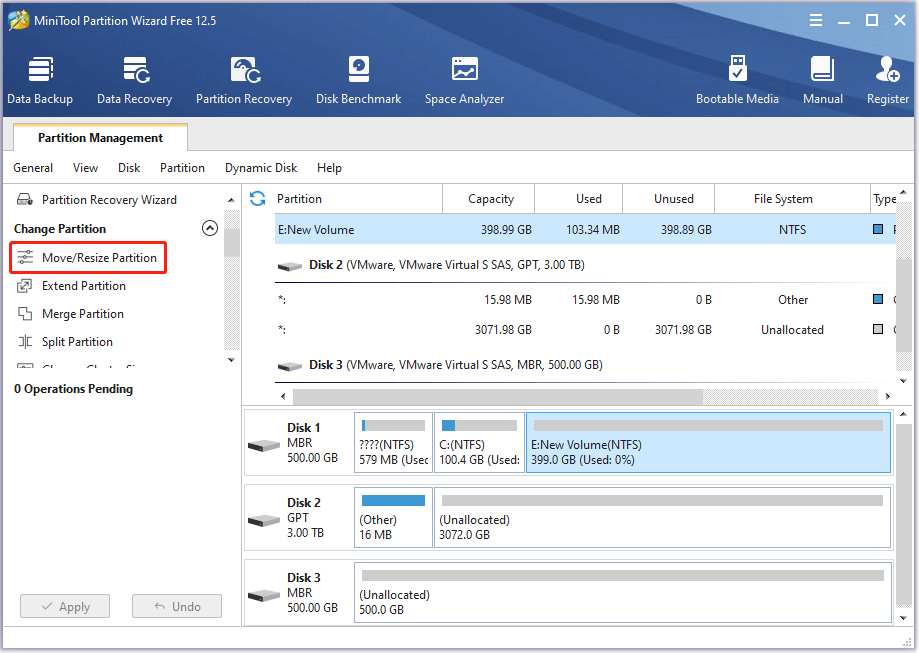
Step 2: When you get the main interface of MiniTool Partition Wizard, select a non-system partition and click the Move/Resize Partition feature. If there is unallocated space that is larger than 64 GB on your disk, you can ignore this step and jump to Step 4.
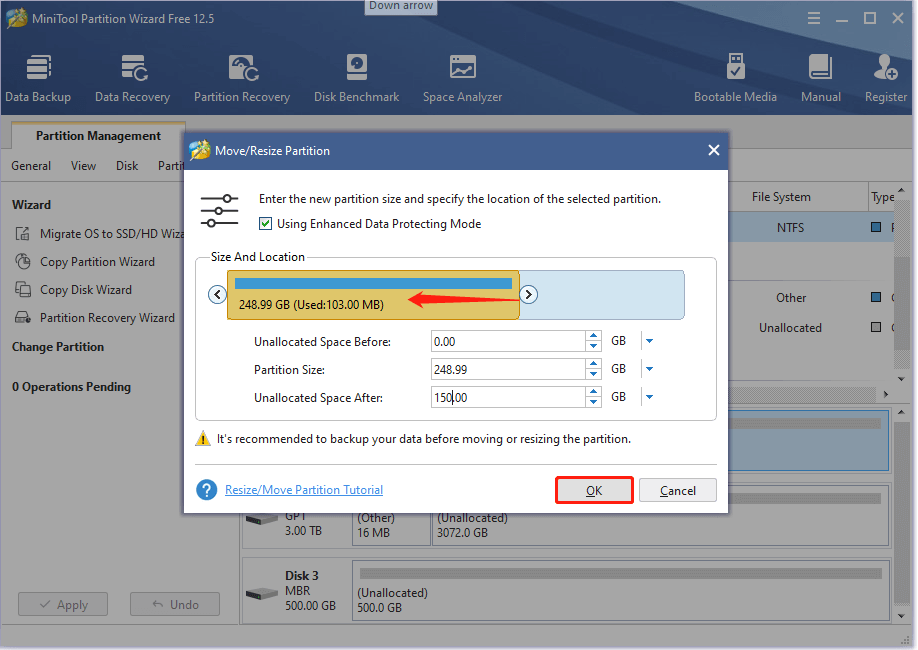
Step 3: In the pop-up window, drag the slider to shrink the selected partition. Then click OK and you will get unallocated space that can be used to create a new partition later. Please note that you need to make sure the unallocated space is larger than 64 GB.
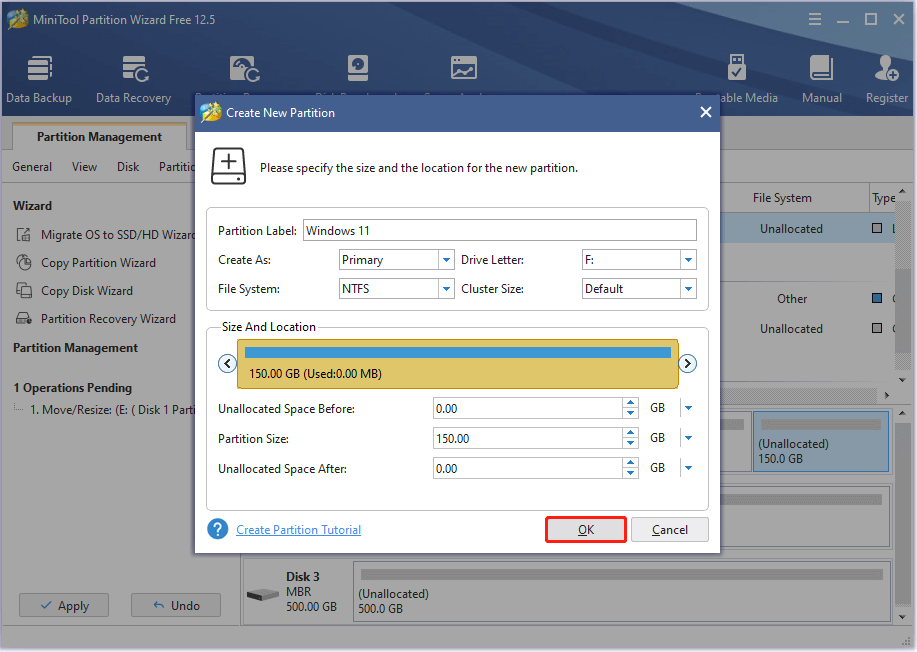
Step 4: Right-click the unallocated space and select Create to create a new partition.
Step 5: In the pop-up window, configure the partition label, drive letter, file system, size (at least 64 GB), and location for the new partition. Please note that the partition for Windows 11 should be a primary partition instead of a logical partition. Then click OK to continue.
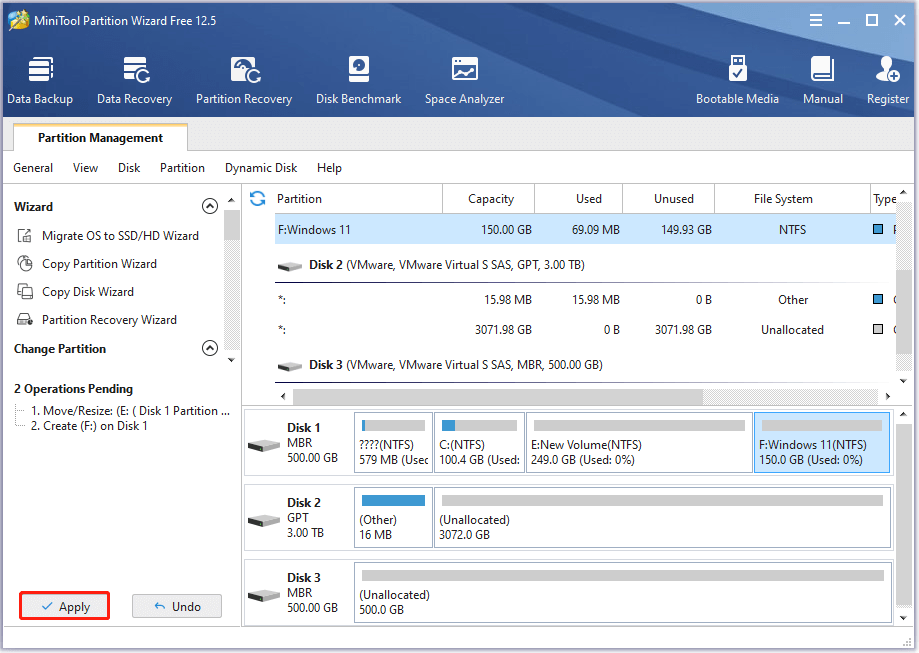
Step 6: Click the Apply button to execute the pending operations.
Then you just need to wait until the process is finished and move on to the next stage.
Stage 3: Create a Bootable USB Flash Drive for Windows 11
To install Windows 11 on Windows 10, you need to download a Windows 11 ISO file for Insider Dev Channel Build and burn it to a USB flash drive.
Step 1: Download Windows 11 ISO file. Since the official version of Windows 11 has not been released yet, you might need to download Windows 11 ISO from a trusted third-party tool to dual boot Windows 10 and Windows 11. However, it’s recommended to respect the copyright of software. To download Windows 11 ISO, you’d better wait for the public release by Microsoft later this year.
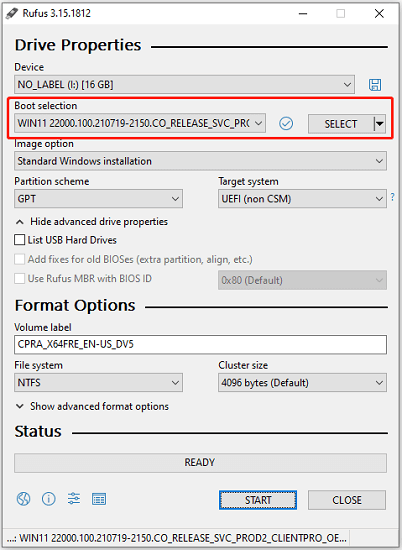
Step 2: Once you get the Windows 11 ISO, you can burn it to a USB flash drive. Connected a USB flash drive that contains no needed files and then download an ISO burner such as Rufus.
Step 3: In Rufus, select your USB flash drive under the Device section. Under the Boot selection section, click the Select button and choose the Windows 11 ISO. Then click START. Wait patiently until the burning process is finished.
After creating the USB flash drive, you can go to the next stage to install Windows 11 on Windows 10 PC.
Stage 4: Install Windows 11
After creating the bootable USB flash drive for Windows 11, you can start to install Windows 11. Here are the detailed steps.
Step 1: Save your work and shut down your computer.
Step 2: Keep the USB flash drive connected and turn on your computer. When you see the logo of your computer’s manufacturer, press F2 or Delete continuously to enter the BIOS Settings.
Step 3: Find the Boot option and change the boot order to boot your computer from the USB flash drive.
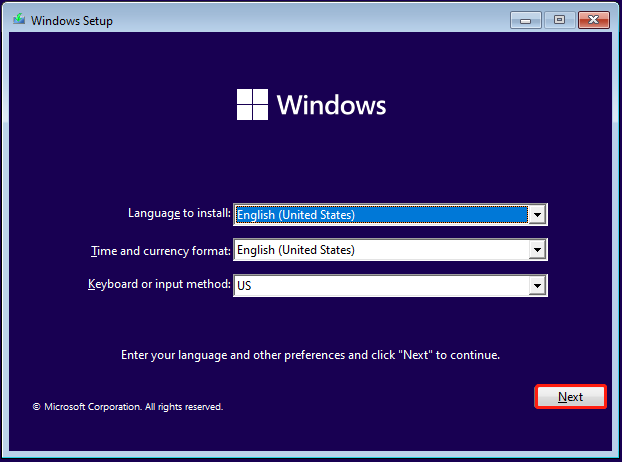
Step 4: After booting from the USB flash drive for Windows 11, you can get a Windows Setup window, as the following picture shows. Choose the language to install and click Next to continue.
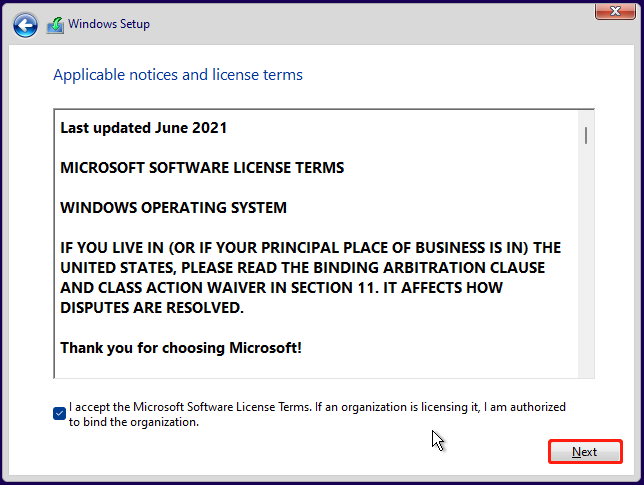
Step 5: Enter the product key and click Next to continue. If you don’t have a product key, click “I don’t have a product key”. Then click Install now. In the following window, select a Windows 11 version and click Next. Then tick “I accept the Microsoft Software License Terms” and click Next.
Step 6: When you are asked to choose an installation type, select Custom: Install Windows only (advanced).
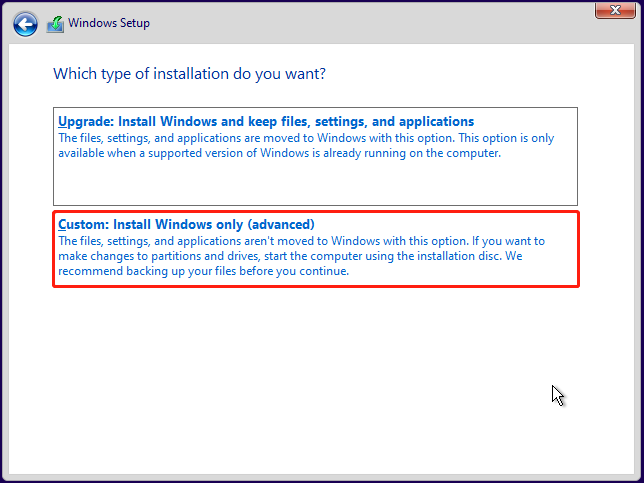
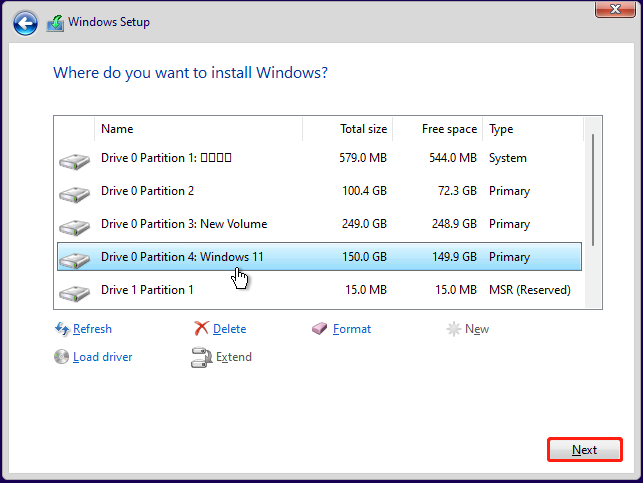
Step 7: When you are asked where to install Windows, select the partition for Windows 11 that you created in Stage 2. Then click Next to start to install Windows 11 on Windows 10 PC.
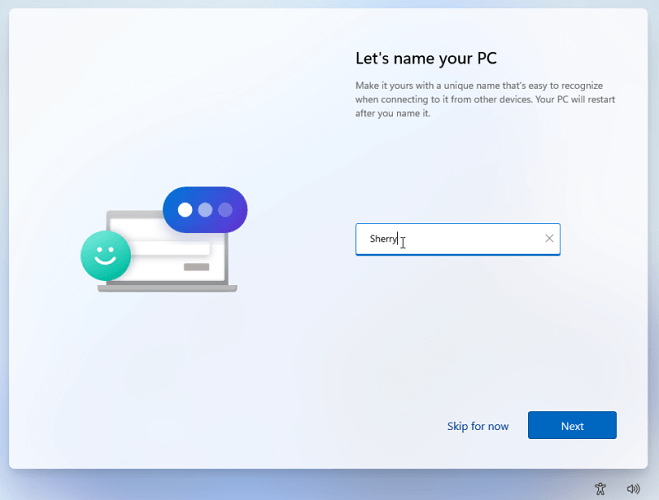
Step 8: After that, you just need to wait patiently until Windows 11 is completely installed on your computer. Then you need to follow the on-screen instructions to configure settings for the new operating system, including the region, keyboard layout, PC name, etc. You can also skip the operation.
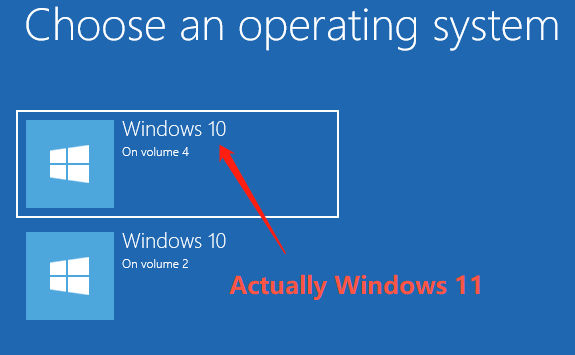
Step 9: You will be asked to choose an operating system to start. Select Windows 11 you just installed. Then you need to sign in with your Microsoft account and make more configurations, such as creating a PIN, choosing privacy settings, etc.
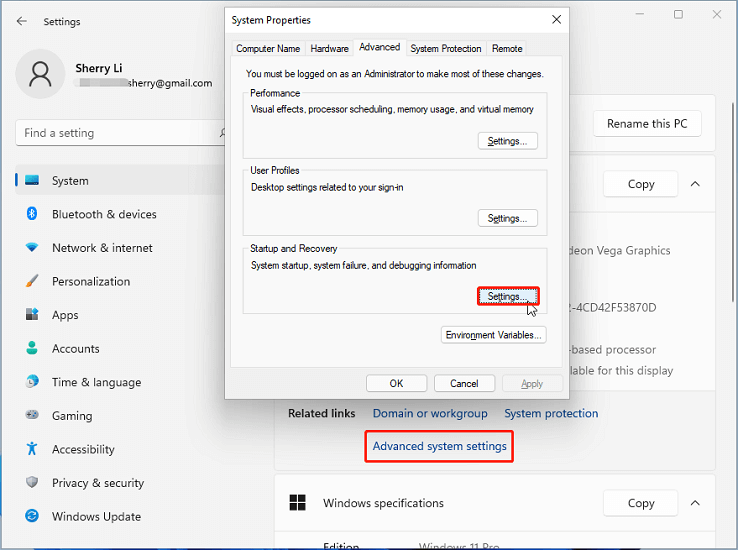
Here is a further tip for you. If you want to change the default OS to boot, you can follow the steps below:
- Press Win + I to go to Windows Settings.
- Click System > About > Advanced system settings.
- In the pop-up window, click the Settings button under the Startup and Recovery
- On the next page, click the drop-down icon under the System startup section to choose the default operating system. Then save the changes.
How to dual boot Windows 11 with Windows 10? Here is a detailed tutorial.Click to Tweet
Bottom Line
If you don’t know whether you should upgrade your Windows 10 to Windows 11, you can choose to dual boot Windows 10 and Windows 11 on your PC. It is easy to operate under the guide of this post. Now, it’s your turn to have a try.
You can share your ideas with us in the following comment section. If you encounter any problems while using MiniTool Partition Wizard, you can contact our support team via [email protected].
User Comments :