Group Policy Client service, also called GPSVC for short, is a Windows tool that can help to control the policies related to computer security and access restrictions.
If your Windows fails to connect to the Group Policy Client service, you cannot log in with a standard user account. While using an administrator account, you can log in to Windows successfully, but the same message will be shown in the notification bar.
Therefore, when you receive the message that Windows couldn’t connect to the Group Policy Client service, you have to find ways to fix the issue. Below are some efficient methods for you. Please note all the methods require you to log in to your computer, so you must log in with the administrative account.
Method 1: Set Group Policy Client Service to Automatic
When the GPSVC startup type is changed improperly, it can cause the issue that Windows couldn’t connect to the GPSVC service. As for this, you need to set GPSVC to automatic.
Step 1: Press Windows + R keys to open the Run box.
Step 2: Type services.msc in the blank and click OK to enter the Services panel.
Step 3: Scroll down to find Group Policy Client and then double-right it to reach its properties window.
Step 4: Choose Automatic from the Startup types, and click Start to start the service again if the service was stopped.
Step 5: Remember to click Apply and then OK to save the change.
After the operation, you should restart your computer and the Windows couldn’t connect to the Group Policy Client issue will be resolved.
Method 2: Run SFC and DISM Scans
Something wrong with the system files on Windows may cause the issue that Windows could not connect to the Group Policy Client, too. To fix it, you can run both SFC and DISM scans to find and repair the corrupted files.
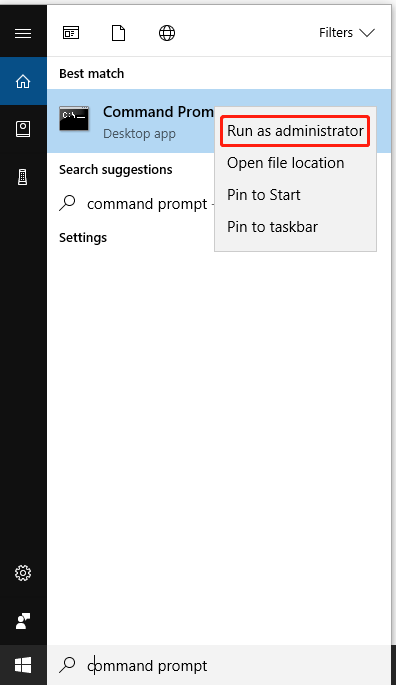
Step 1: Search for Command Prompt in the search bar and then right-click the Command Prompt from Best match to select Run as administrator.
Step 2: Type the following commands one by one, and press Enter after each to execute them.
- sfc /scannow
- Dism /Online /Cleanup-Image /CheckHealth
- Dism /Online /Cleanup-Image /ScanHealth
- Dism /Online /Cleanup-Image /RestoreHealth
Step 3: Reboot your computer after these commands are completed.
The issue that Windows couldn’t connect to the Group Policy Client has been fixed.
Method 3: Fix the Registry Settings
Using Registry Editor may fix the error that Windows couldn’t connect to the Group Policy Client as well.
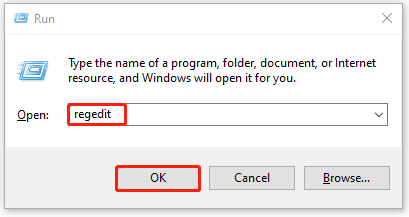
Step 1: Press Windows + R keys to open the Run box.
Step 2: Type regedit and then click OK or press Enter to open the Registry Editor.
Step 3: Unfold the following contents to find gpsvc:
ComputerHKEY_LOCAL_MACHINESYSTEMCurrentControlSetServicesgpsvc
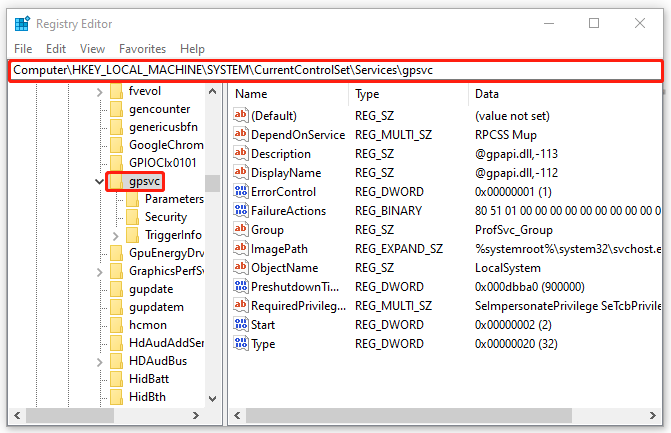
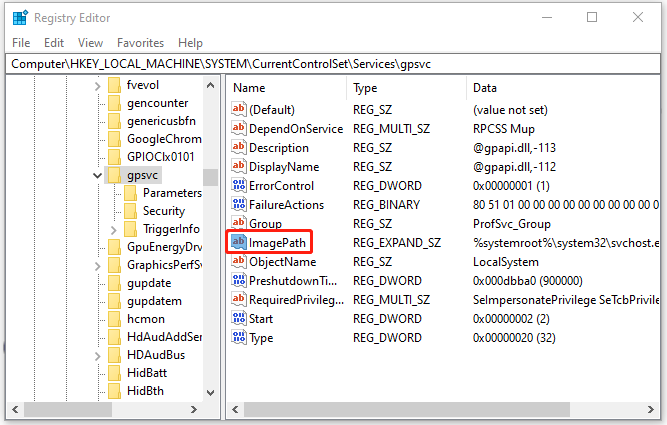
Step 4: Double-click ImagePath in the right pane to check its value data. The data is in charge GPSVC service.
Step 5: Then navigate to the path: ComputerHKEY_LOCAL_MACHINESOFTWAREWOW6432NodeMicrosoftWindows NTCurrentVersionSvchost. Double-click the netsvcs in the right pane to check the Value data.
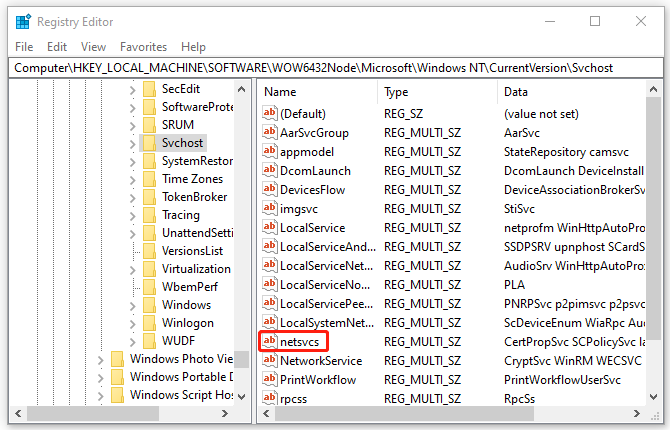
Step 6: Make sure gpsvc is included in the Value data. If it misses, you need to add it carefully. Finally, click OK.

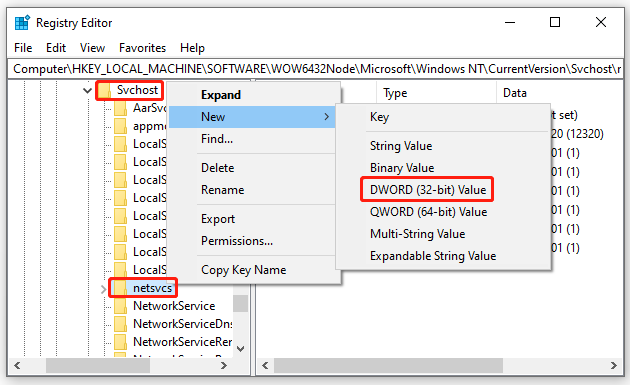
Step 7: Expand the Svchost folder at the left pane, and right-click Netsvcs below it. Then choose New to create DWORD (32-bit) Value named AuthenticationCapabilities. Set its value data as 12320 in decimal base. Next, create another DWORD (32-bit) Value named CoInitializeSecurityParam with 1 as its value data.
When all the steps above are completed, reboot your computer and the issue that Windows couldn’t connect to the Group Policy Client is repaired.
There are three methods provided for you to fix the issue that Windows could not connect to the Group Policy Client. Try them when you meet the issue. Any comment can be left in our comment part if you still have questions about the issue.
User Comments :