While installing Windows 10, your system will experience multiple boot phases. During this process, you are likely to run into some unexpected errors. The error 0xC1900101 – 0x30018 is one of them. It occurs in the first phase with the message: the installation failed in the FIRST_BOOT phase with an error during SYSPREP operation.
This error can be caused by various reasons, such as software conflicts, insufficient storage space, corrupted system files, incompatible drivers, etc. It may trouble you a lot. If you have no clue how to fix the error, just keep reading the following guide.
Method 1: Remove All the External Devices
If there are external devices connected to your computer, the system will try to find compatible drivers for all the devices. That may sometimes lead to the “Windows 10 the installation failed in the FIRST_BOOT phase with an error during SYSPREP operation” issue.
Therefore, to avoid this error, you should remove all unnecessary devices, such as printers, USB flash drives, external hard drives, and so on.
Method 2: Perform an Old Devices and Drivers Cleanup
A driver crash can also cause the “Windows 10 installation failed in the FIRST_BOOT phase with an error during SYSPREP operation” issue. In this case, it’s recommended that you delete the unused drivers on your PC.
Step 1: Press Windows + R to open the Run dialog.
Step 2: Type cmd in the text box and then press Ctrl + Shift + Enter to open Command Prompt as an administrator.
Step 3: Type the following command and then press Enter to execute it:
rundll32.exe pnpclean.dll,RunDLL_PnpClean /DRIVERS /MAXCLEAN
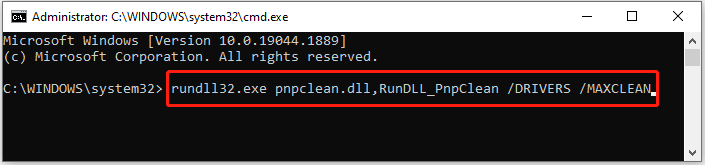
Step 4: After the command is executed, restart your computer and try installing Windows 10 again to see if the error is solved.
Method 3: Temporarily Disable Antivirus
Sometimes, third-party antivirus software and Windows Defender Firewall on your PC will prevent you from updating your Windows and cause the “Windows 10 the installation failed in the FIRST_BOOT phase with an error during SYSPREP operation” issue. As for this, you can try fixing the error by disabling the antivirus temporarily.
Viruses and malware may attack your system after the antivirus software is disabled. Therefore, you’d better enable it as soon as you repair the error.
Method 4: Free Up Disk Space
Installing Windows requires at least 30GB of free space on your computer. So, if you install Windows in a drive with low disk space, the “the installation failed in the FIRST_BOOT phase with an error during SYSPREP operation” issue may show up. To ensure the installation will succeed, you have to free up enough disk space.
To free up disk space, there are two ways you can try.
Way 1: Use Disk Cleanup
It’s simple to free up some disk space by deleting unused files with Disk Cleanup.
Step 1: Search for Disk Cleanup in the search bar and then open it.
Step 2: Select your system disk and click OK.
Step 3: In the Files to delete section, select the file types you want to remove.
Step 4: Click OK and Delete to delete the selected files.
Way 2: Use MiniTool Partition Wizard
If you want to view the disk usage more clearly while deleting files, you can choose the third-party software – MiniTool Partition Wizard. It is a professional partition manager that can help you check your disk health including checking the file system, doing a surface test, and analyzing disk space.
Here, we will tell you how to free up disk space with Space Analyzer in MiniTool Partition Wizard.
Step 1: Download and install MiniTool Partition Wizard on your computer. Then launch it to get into the main interface.
MiniTool Partition Wizard FreeClick to Download100%Clean & Safe
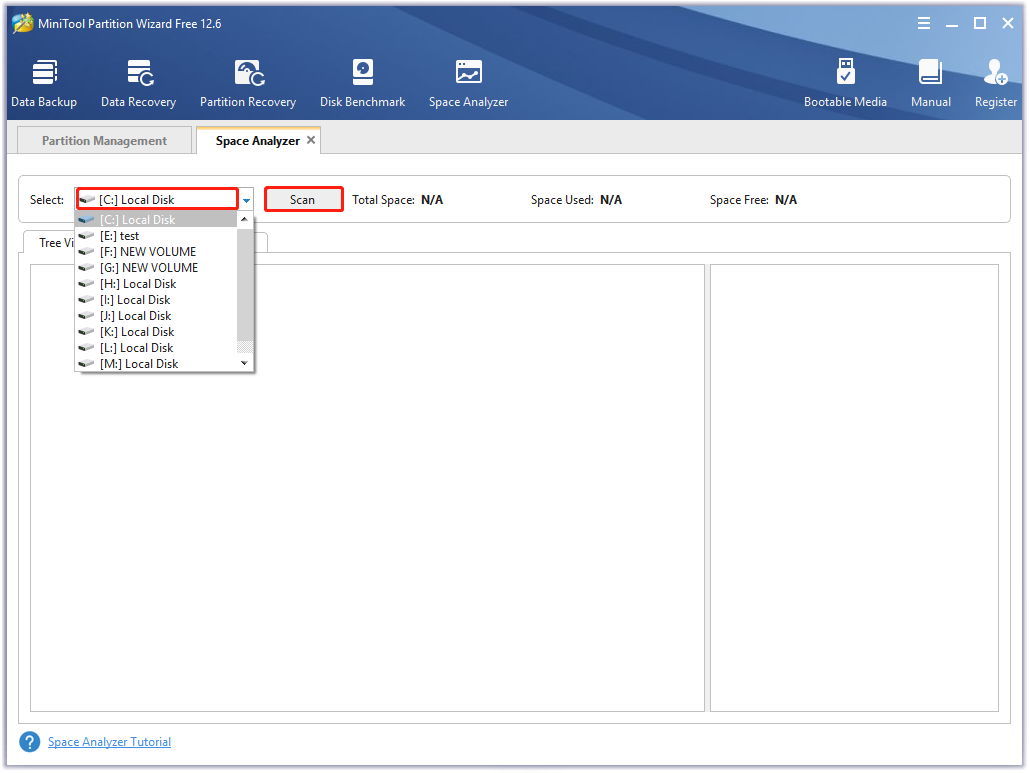
Step 2: Click Space Analyzer on the top toolbar.
Step 3: Select your system disk and then click Scan to start scanning your disk.
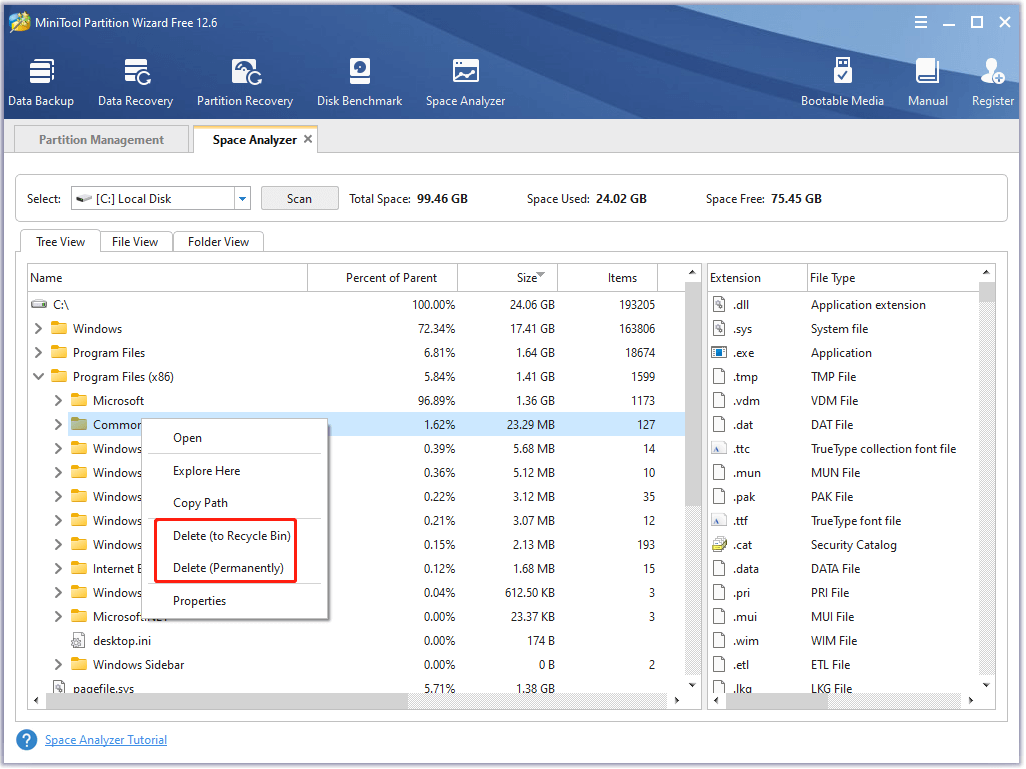
Step 4: After the process is finished, you can see all the files on the disk. Right-click the unnecessary and space-consuming files and select Delete (to Recycle Bin) or Delete (Permanently).
Please be very careful while deleting the files in your system disk, or some unexpected issues like system crashes will happen.
After you get enough space on the disk, try installing Windows again to check if the error is fixed.
Method 5: Run the Windows Update Troubleshooter
The Windows Update troubleshooter is a Windows built-in utility that can help you resolve plenty of issues related to Windows updates. Hence, you can also try using this troubleshooter to fix the error 0xC1900101 – 0x30018: the installation failed in the FIRST_BOOT phase with an error during SYSPREP operation.
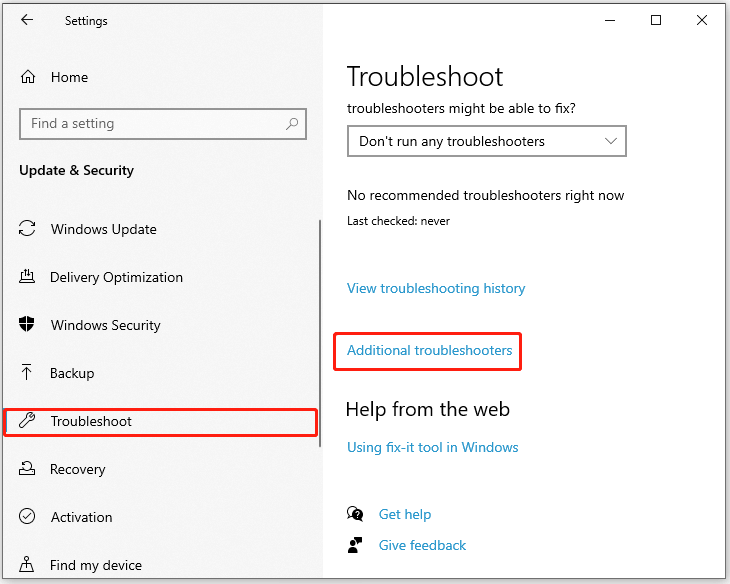
Step 1: Press the Windows and I keys together to open Windows Settings. Then select Update & Security.
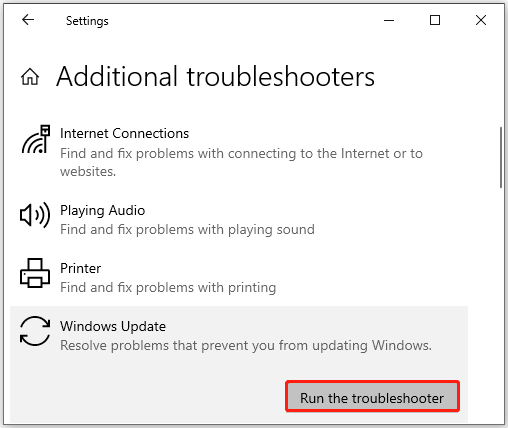
Step 2: Go to Troubleshoot and then click Additional troubleshooters in the right section.
Step 3: In the next window, click Windows Update and then click Run the troubleshooter.
Step 4: After that, this troubleshooter will begin detecting problems associated with Windows updates. If any issues are found, you should follow the on-screen instructions to repair them.
Once you finish the process, restart your computer to see if the error is repaired.
Method 6: Delete or Rename the SoftwareDistribution Folder
The SoftwareDistribution folder is an essential component for Windows Update. It is used to store temporary files needed for installing new Windows updates. If certain files in this folder get corrupted, you may fail to update your Windows and receive the error message: the installation failed in the FIRST_BOOT phase with an error during SYSPREP operation. In this case, you can try to fix this issue by deleting or renaming this folder.
Here are the detailed steps below.
Rename the SoftwareDistribution Folder
Step 1: Open Command Prompt as an administrator.
Step 2: Type the following commands one by one and press Enter after each one to execute them:
- net stop wuauserv
- net stop bits
- rename c:\windows\SoftwareDistribution SoftwareDistribution.bak
- net start wuauserv
- net start bits
Delete the SoftwareDistribution Folder
Step 1: Run Command Prompt as an administrator.
Step 2: In the elevated Command Prompt window, type the following commands one by one and press Enter after each one:
- net stop wuauserv
- net stop bits
Step 3: After that, press Windows + E to open File Explorer. Then navigate to the directory: C:\Windows\ SoftwareDistribution.
Step 4: Press Ctrl + A to select all the files and folders inside. Then right-click them and select Delete.
Step 5: Go back to the elevated Command Prompt window, and carry out the following commands one by one.
- net start wuauserv
- net start bits
After you rename or delete the SoftwareDistribution folder, try updating Windows again to check if the error is repaired.
Is It Safe to Delete Software Distribution Folder Windows 11?
Method 7: Reset Windows Update Components
Resetting the Windows Update components is also a possible way to fix the “Windows 10 the installation failed in the FIRST_BOOT phase with an error during SYSPREP operation” issue. To do this, you can follow this guide: How to Reset Windows Update Components in Windows 11/10?
Method 8: Run SFC and DISM Scans
Corrupted system files on your computer may also be the reason for the “Windows 10 installation failed in the FIRST_BOOT phase with an error during SYSPREP operation” issue. On this occasion, we recommend you use SFC (System File Checker) and DISM (Deployment Image Servicing and Management) tools to repair these files.
Step 1: Open the elevated Command Prompt on your PC.
Step 2: Type sfc /scannow in the panel and then press Enter.

Step 3: Wait until the process is completed. Then restart your computer and run Command Prompt as an administrator again.
Step 4: Type the following commands and press Enter after each one.
- Dism /Online /Cleanup-Image /CheckHealth
- Dism /Online /Cleanup-Image /ScanHealth
- Dism /Online /Cleanup-Image /RestoreHealth
Once the process is finished, restart your PC to see if the error disappears.
Method 9: Edit Registry Keys
It’s possible for you to solve the “the installation failed in the FIRST_BOOT phase with an error during SYSPREP operation” issue by modifying registry keys.
Any incorrect operations during the process of editing registry keys will cause new errors. So, you’d better back up your registry first.
Step 1: Type regedit in the Run dialog and press Enter to open Registry Editor.
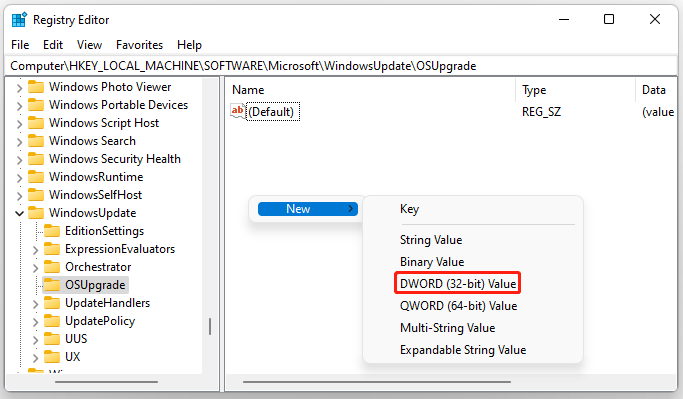
Step 2: Navigate to the path: Computer\HKEY_LOCAL_MACHINE\SOFTWARE\Microsoft\WindowsUpdate\OSUpgrade.
If you don’t find the OSUpgrade folder, just right-click WindowsUpgrade to create a new folder named OSUpgrade.
Step 3: In the OSUpgrade folder, right-click anywhere in the empty area and click New. Then select DWORD (32-bit) Value.
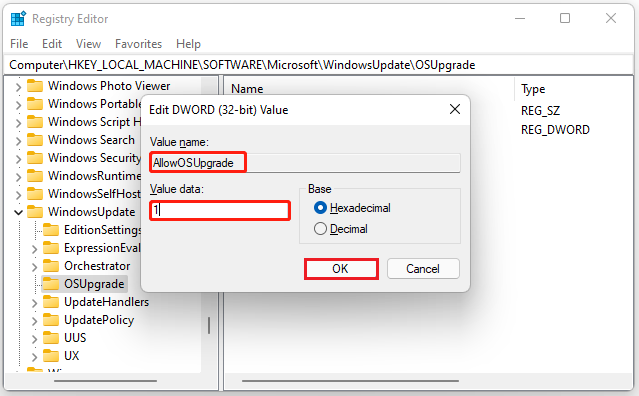
Step 4: Name the key as AllowOSUpgrade and then double-click it to set its value as 1. Then click OK and close Registry Editor.
Step 5: Once done, restart your PC and the error might be removed.
Method 10: Perform a Clean Boot
The Windows 10 error 0xC1900101 – 0x30018 may come out as well due to software conflicts. In this situation, it’s better to perform a clean boot. In this way, the computer will start with a minimal set of drivers and programs so that you are able to avoid possible conflicts. To do this, follow the steps below.
Step 1: Right-click the Start icon and select Run.
Step 2: In the Run dialog box, type msconfig in the text box and then press Enter.
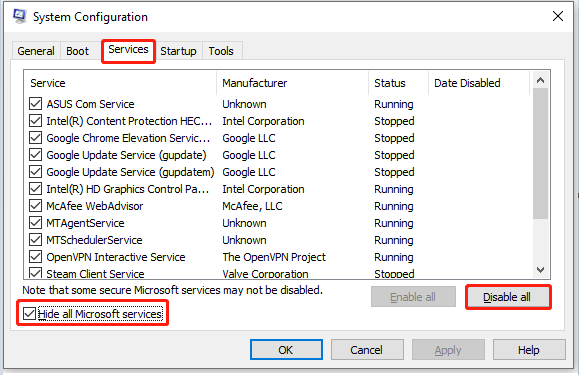
Step 3: Go to the Services tab and check the Hide all Microsoft services option. Then click Disable all.
Step 4: Switch to Startup and click Open Task Manager.
Step 5: In Task Manager, right-click each item under the Startup tab and select Disable.
Step 6: After you disable all the items in Startup, exit Task Manager and restart your computer.
Bottom Line
This post summarizes some effective solutions to the “the installation failed in the FIRST_BOOT phase with an error during SYSPREP operation” issue. When you are facing this error, you can follow them one by one until you fix it. If you have any suggestions for this issue, you can leave a message in the comment part below.
If you have trouble using MiniTool Partition Wizard, you can contact us via [email protected].
User Comments :