How can you manage disk and partition in Windows 7? Usually, the Disk Management Windows 7 is a great tool, but it has some limitations. Thus, you can use the partition manager Windows 7 – MiniTool Partition Wizard to partition Windows 7 64-bit system and it can break the limitations of Disk Management.
Limitations in Windows 7 Disk Management
Windows 7 became generally available on October 22, 2009. Years later, many of you are still using this version. There are both 32-bit and 64-bit versions of Windows 7 for your choice. 32-bit and 64-bit refer to the way a computer’s processor (also called a CPU), handles information.
In 2003, 64-bit CPUs were introduced to the mainstream personal computer arena, while 32-bit was popular previously. The 64-bit version of Windows can handle large amounts of random access memory (RAM) more effectively than a 32-bit system. To know about the differences between 32-bit and 64-bit in Windows 7, please read the introduction of Windows 7.
To make full use of Windows 7 hard disks, you need to manage them according to your individual needs. In general, you can apply the Windows 7 snap-in Disk Management tool to partition Windows 7 32/64-bit system. But there are so many limitations in it.
For instance, in the basic disk, you can only extend a primary partition if there is adjacent unallocated space right behind the target partition, or extend a logical partition if there is adjacent free space right behind it (find out what caused extend volume greyed out). Otherwise, the basic disk will be converted into a dynamic disk.
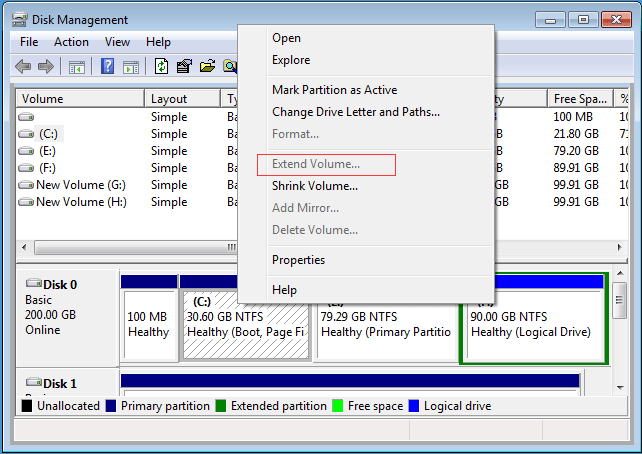
In addition, some conversion functions can cause data loss, for example, conversion between MBR disk and GPT disk and converting dynamic disk to basic disk request you to delete all partitions in the target disk. All these limitations may cause inconvenience to you at any time.
Thus, do you know how to partition Windows 7 64-bit system with ease?
Partition Windows 7 32/64-Bit by MiniTool Partition Wizard
Because there are some limitations of Disk Management in Window 7, you can take a piece of third-party software to manage the partition and disk. Thus, the professional partition manager Windows 7 – MiniTool Partition Wizard is the best choice.
MiniTool Partition Wizard is designed to optimize the partition and use with its powerful features. Thus, in order to manage partition and disk without limitations, you can download it from the following button.
MiniTool Partition Wizard FreeClick to Download100%Clean & Safe
Partition a New Hard Drive by MiniTool Partition Wizard
When you get a new hard drive, you may need to partition it. Thus, you can try this program and we will show you how to create a partition step by step.
Step 1: Install the software and launch it to enter its main interface.
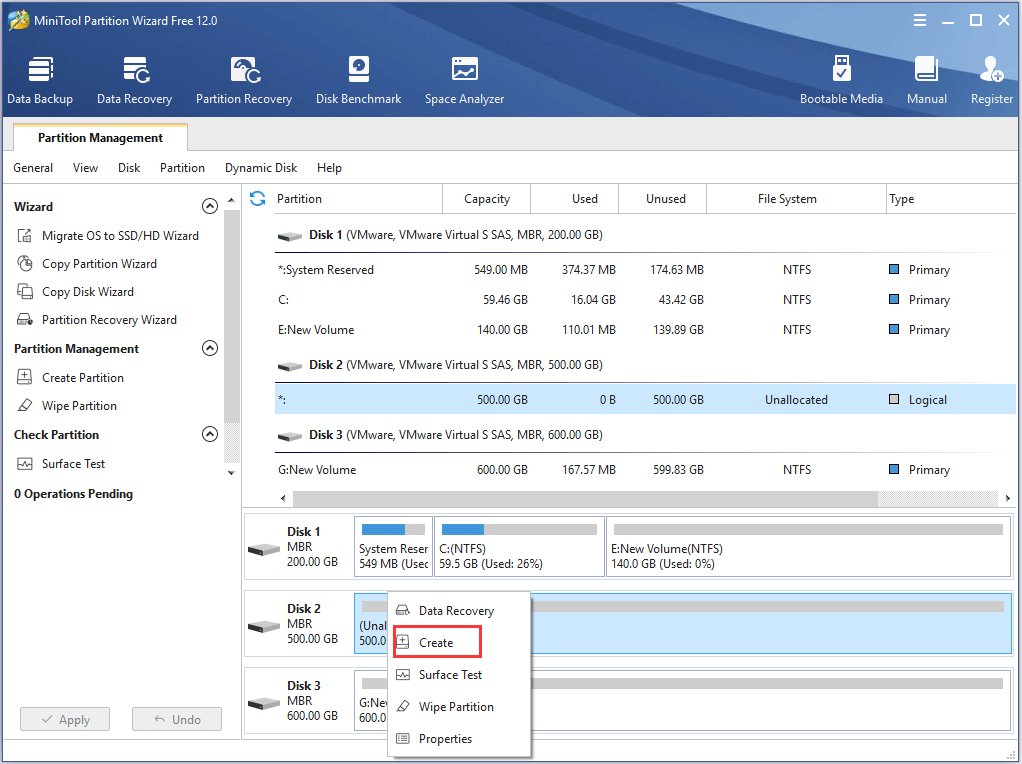
Step 2: Select the unallocated space and choose Create from the context menu to continue.
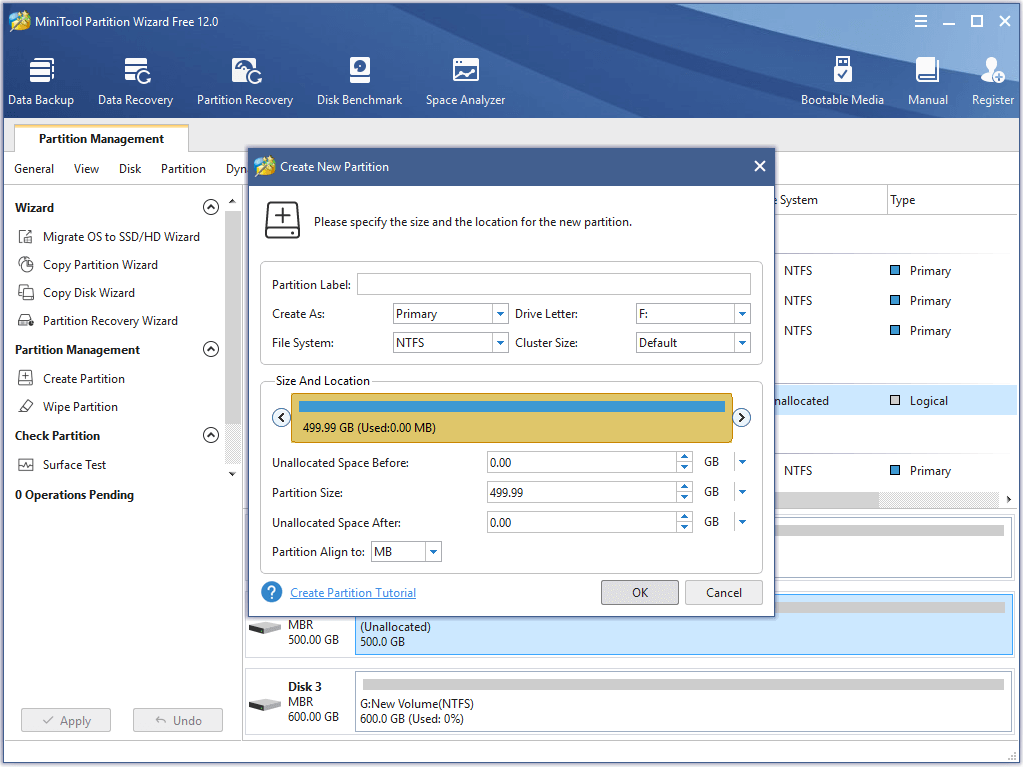
Step 3: Next, you need to set some properties of this partition and click OK to continue. You can also drag the arrow to decide the size of this partition.
Step 4: Returning to the main interface, click Apply to confirm the changes.
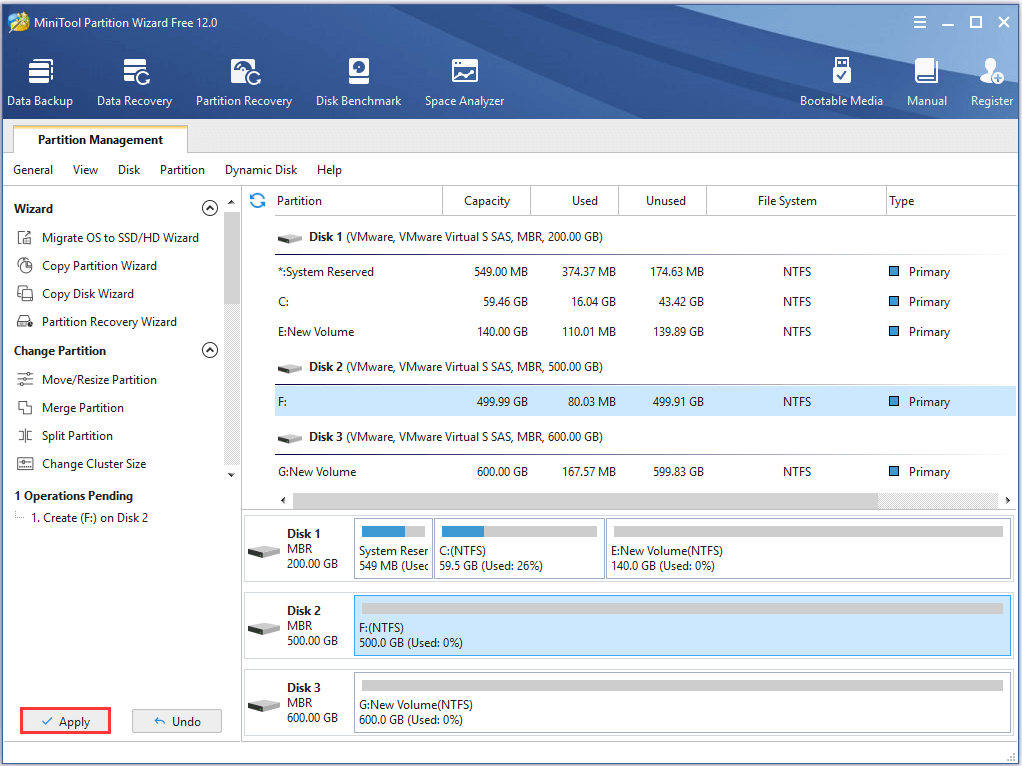
When all steps are finished, you can successfully create a partition.
Repartition a Hard Drive by Using MiniTool Partition Wizard
If you want to resize partition Windows 7 when there is/are adjacent unallocated space/spaces in the same disk, you can apply the function Move/Resize Partition.
Then we will show you how to move/resize a partition when there is adjacent unallocated space in the same disk.
MiniTool Partition Wizard FreeClick to Download100%Clean & Safe
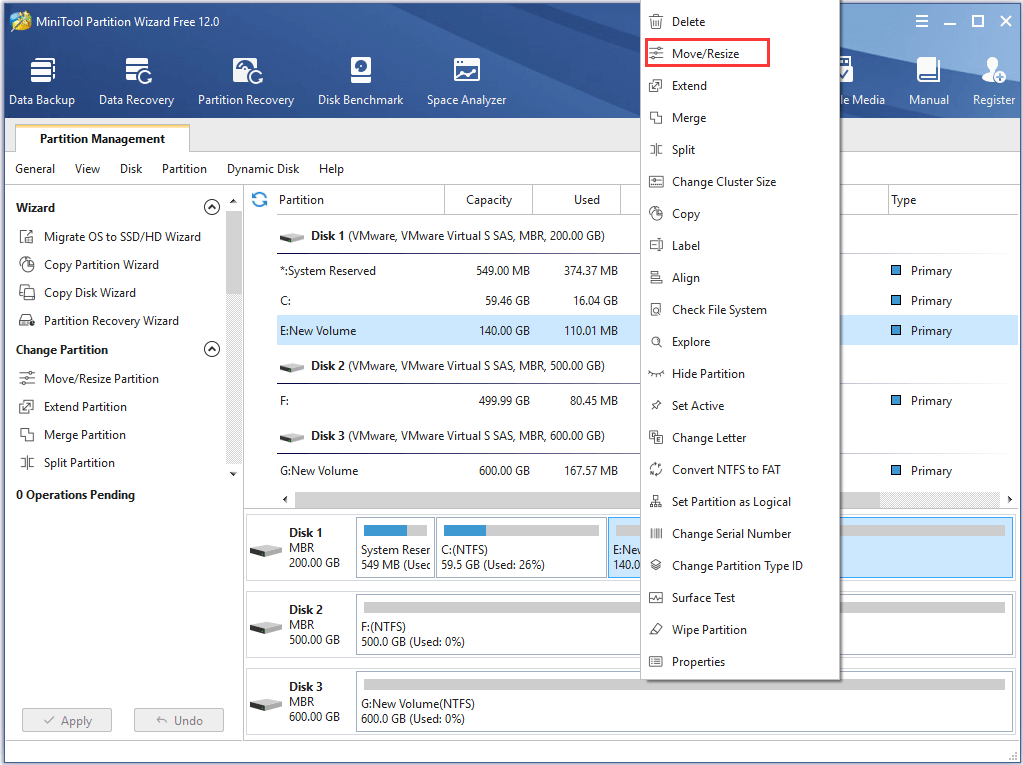
Step 1: Launch the software to enter its main interface and select the partition which needs to be moved or resized. Then choose Move/Resize from the context menu.
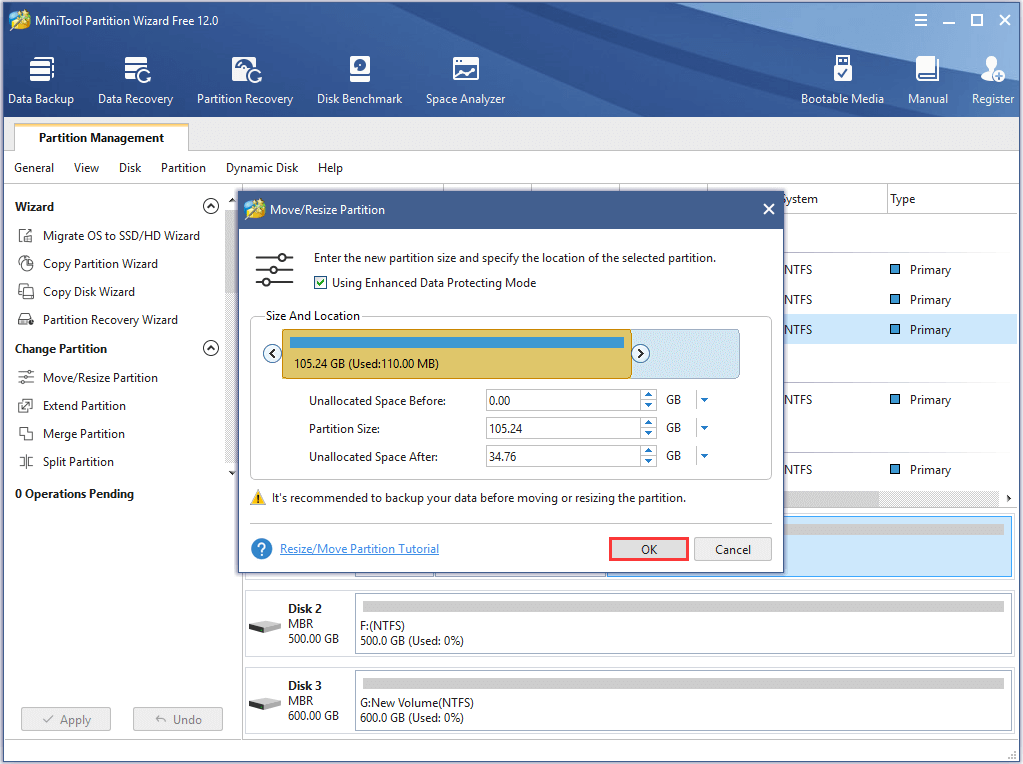
Step 2: In the popup window, you can drag the arrow to resize the partition and move the partition. Then click OK to continue.
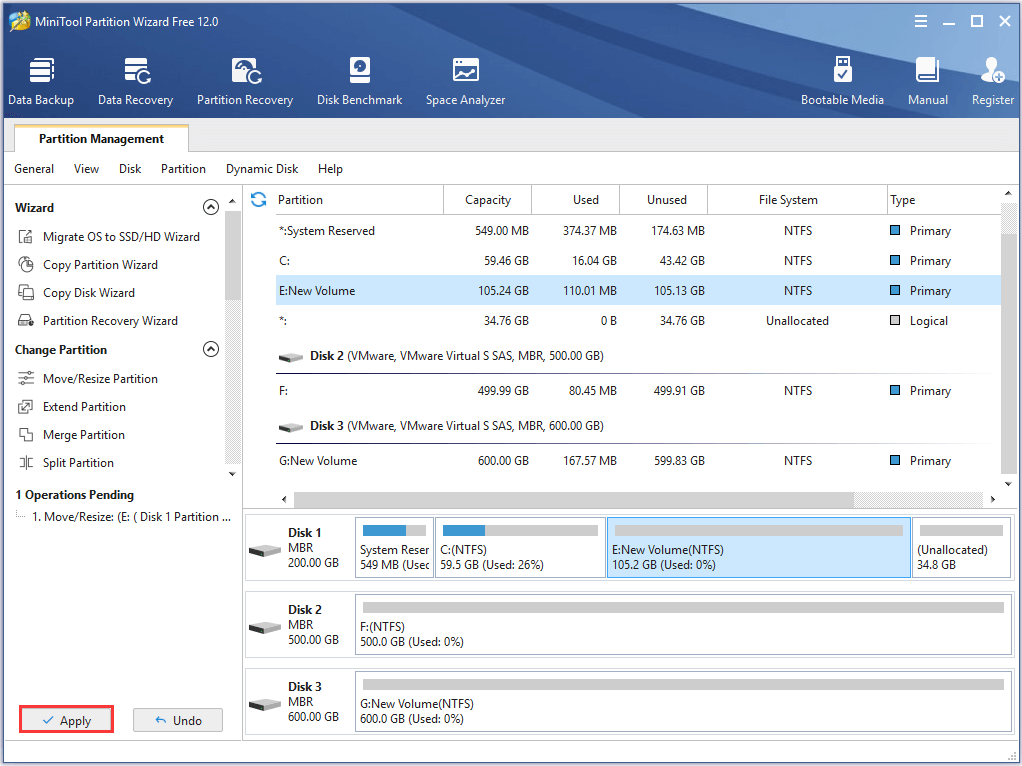
Step 3: Click Apply to confirm the changes.
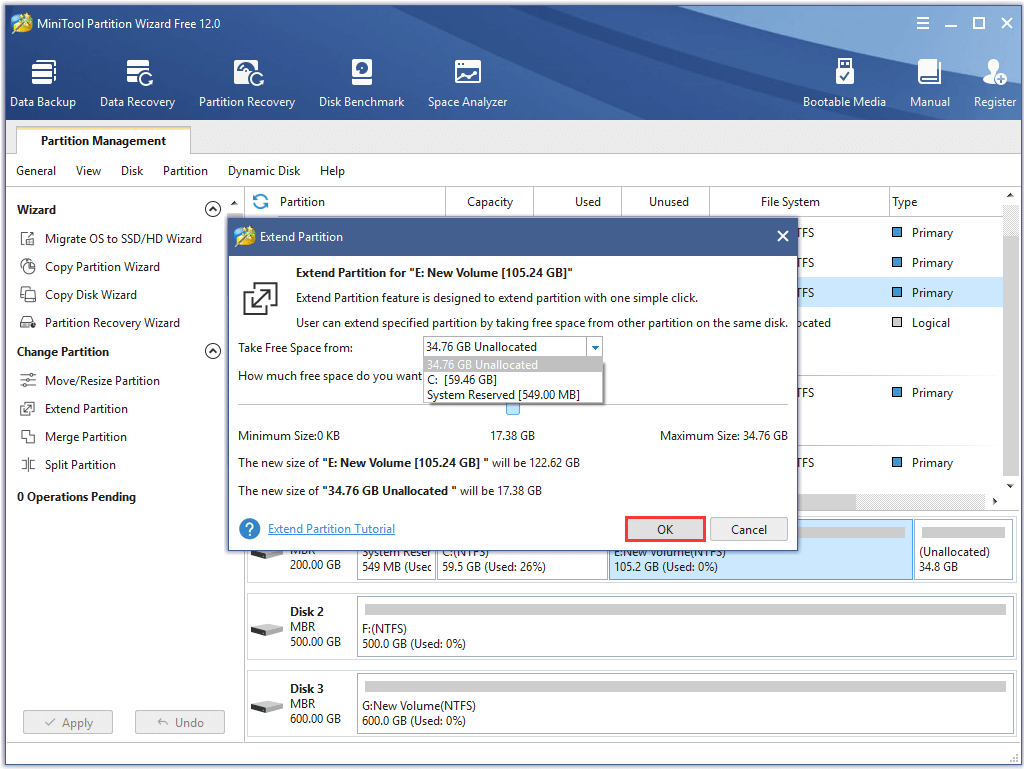
How to Extend Partition When There Is No Adjacent Unallocated Space?
However, if there is no adjacent unallocated space or unallocated space in the same disk, how can you extend partition?
Don’t worry. The Extend Partition feature of MiniTool Partition Wizard can help you.
MiniTool Partition Wizard FreeClick to Download100%Clean & Safe
Step 1: Launch the software to enter its main interface.
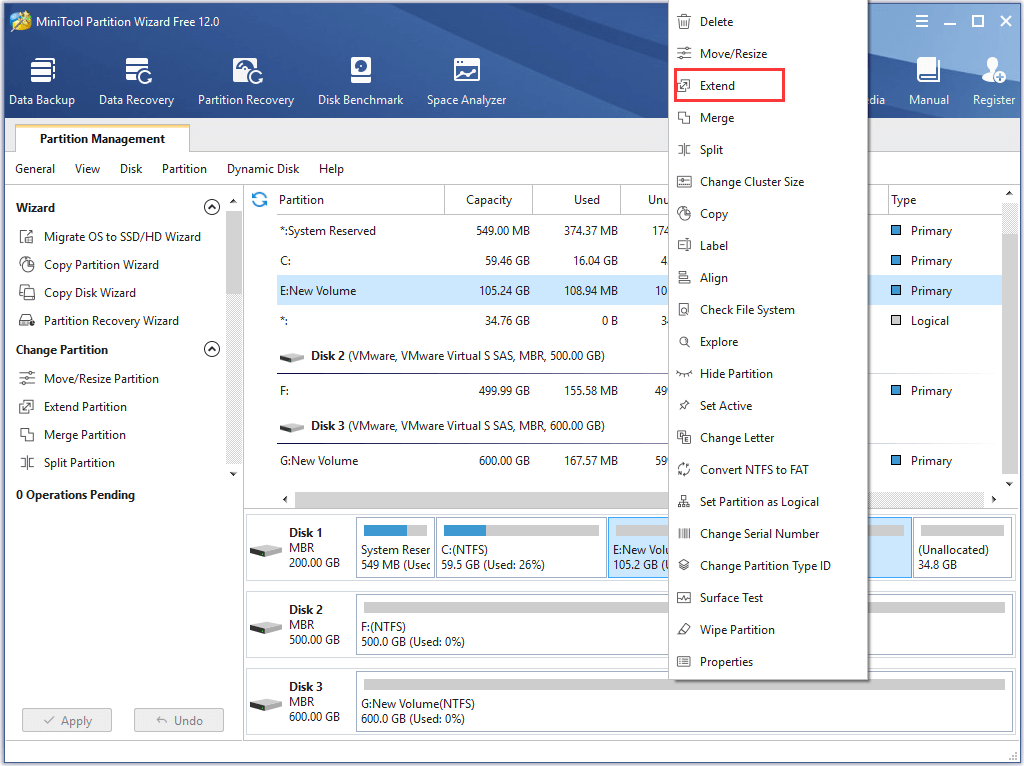
Step 2: Select the partition which needs to be extended and choose Extend from the context menu.
Step 3: In the popup window, open the drop-down list of Take Free Space from and choose a partition or the unallocated space to take space. You can drag the slide to decide how much space you want to take. Then click OK to continue.
Step 4: Then click Apply to confirm the changes.
All in all, MiniTool Partition Wizard can help you to extend Windows 7 partition even though there is no adjacent unallocated space in the same disk. However, Disk Management Windows 7 tool can’t achieve that. What’s more, besides those features we have introduced in the above part, MiniTool Partition Wizard has many other powerful features, such as converting FAT to NTFS.
Click to tweet MiniTool Partition Wizard FreeClick to Download100%Clean & Safe
Bottom Line
In this post, we have introduced the professional partition manager Windows 7which can be used to partition Windows 7 64-bit system when the Disk Management Windows 7 tool can’t achieve that. You also can download MiniTool Partition Wizard to manage your disk and partition without losing data.
In addition, if you have any problem of MiniTool Partition Wizard, please contact us via the email [email protected].
User Comments :