The .NET Framework is a crucial software framework that lets Windows run the C, C++, and Visual Basic apps. At present, the latest .NET framework version has been updated to 4.8, but many apps and programs still need the .NET Framework 3.5 version.
Many users find that the .NET Framework 3.5 is missing from Windows, while some other people encounter various errors like 0x800f081f when installing NET 3.5. How to get NET Framework 3.5 downloaded and installed successfully? Let’s try the following 5 methods.

Is Microsoft .NET Framework 3.5 Installed on My PC
Before installing NET Framework 3.5, we recommend you check if you have already installed it on your PC. Here’s how:
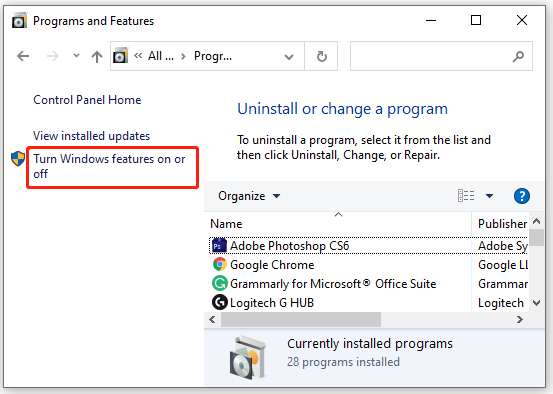
Step 1. Type control in the Windows Search box and select Control Panel from the top result.
Step 2. Change the View by type to Large icons and select Programs and Features.
Step 3. Click on Turn Windows features on or off from the left pane.
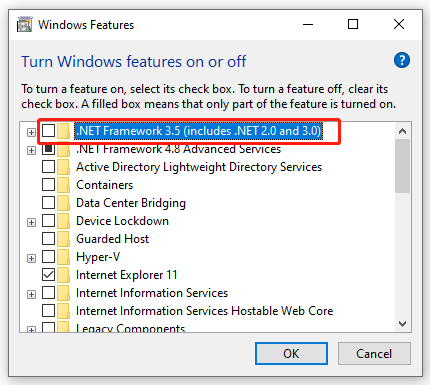
Step 4. In the pop-up window, you should see the .NET Framework 3.5 at the top of Windows features. If the box next to .NET 3.5 is not shaded in black, it means that it’s not installed on your PC. In this case, you can use the following methods to install NET 3.5 Windows 10.
NET Framework 3.5 Download and Install on Windows 10/11
There are 5 applicable ways to download NET Framework 3.5. You can choose one based on your actual situation.
# 1. Installing NET Framework 3.5 from Windows Features
The most straightforward way is to download NET Framework 3.5 from the Windows Features section. For that:
Step 1. Open the Windows Features window like Step 1 to Step 3 in the above section.
Step 2. Select the checkbox beside .NET Framework 3.5 (includes .NET 2.0 and 3.0) and click on OK.
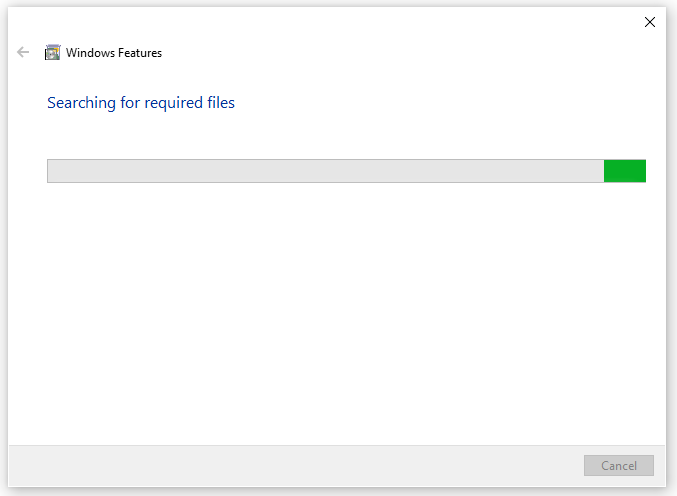
Step 3. After that, Windows will start installing NET 3.5 automatically. Here you need to reboot your computer to finish the installation.
# 2. Installing NET Framework 3.5 Manually from the Official Website
If you fail to download NET Framework 3.5 from the Windows Features, you can manually download it from Microsoft’s official website.
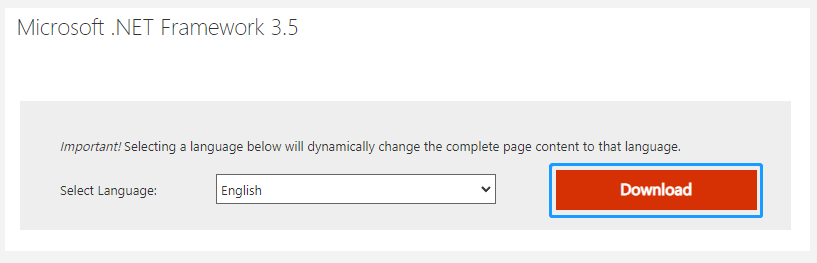
Step 1. Click here to open the Microsoft download center, and then go to the Microsoft .NET Framework 3.5 section and click on Download. Then save the downloaded file to your desktop.
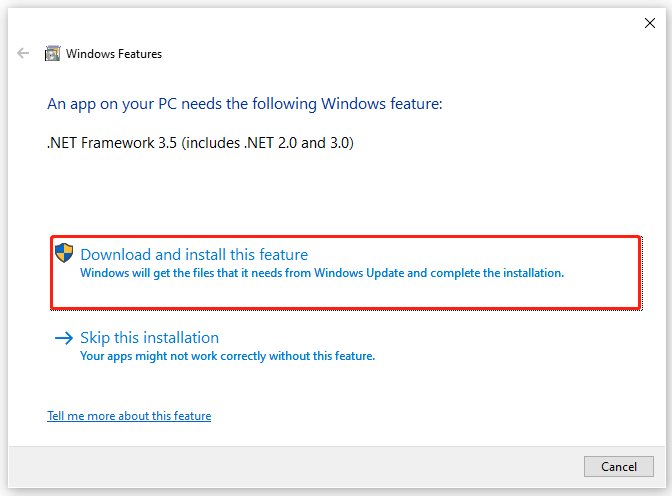
Step 2. Double click the NetFx35setup.exe file and click on Yes in the UAC confirmation window.
Step 3. Select the Download and install this feature link. Then Windows will start downloading the required files. Once complete, you can restart the PC and see if you get the NET 3.5 downloaded and installed.
# 3. Installing NET Framework 3.5 via the Offline Installer
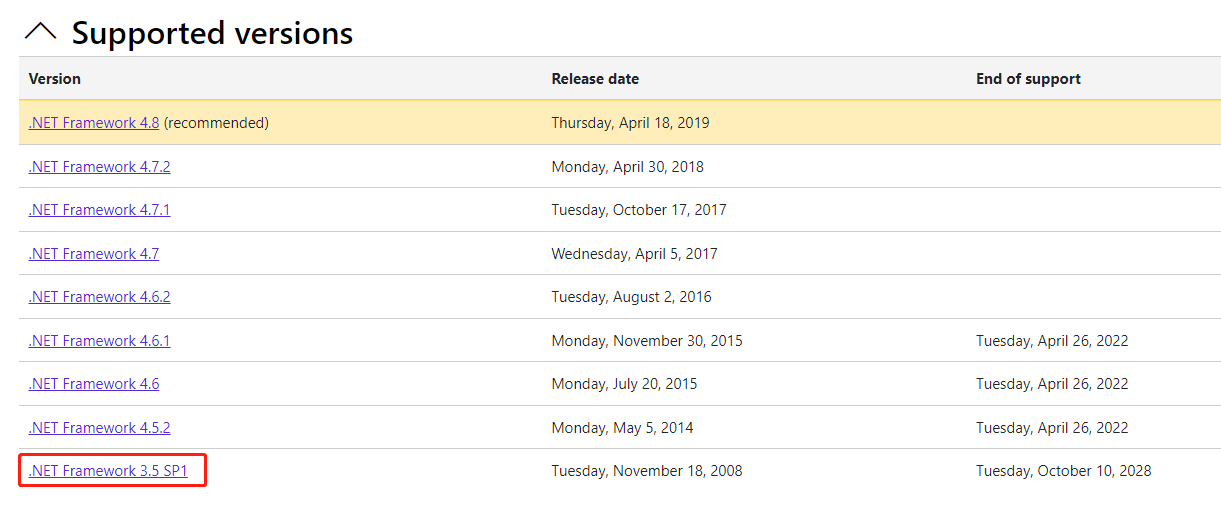
Microsoft provides an offline installer for .NET Framework 3.5 on its dotnet website. However, you need to select a supported version of the .NET Framework on the download page. Here you should find the NET Framework 3.5 SP1 listed as a supported version, click on it, and follow the on-screen instructions to complete the installation.
# 4. Installing NET Framework 3.5 via CMD or Windows PowerShell
Another quick method to get the NET 3.5 downloaded is to use either Command Prompt or Windows PowerShell. Here’s how:
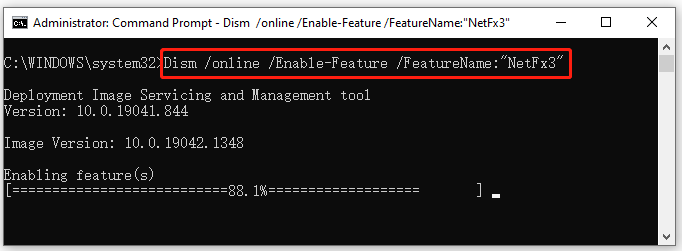
Step 1. Type cmd in the Search box, and then right-click Command Prompt and select Run as administrator. Then click on Yes to confirm it. If you want to use PowerShell, type PowerShell instead of cmd.
Step 2. In the elevated Command Prompt window, type the following command and hit Enter. This command will start installing NET 3.5.
Dism /online /Enable-Feature /FeatureName:”NetFx3″
For Windows PowerShell, run the Enable-WindowsOptionalFeature -Online -FeatureName "NetFx3" command to install the Net 3.5.
# 5. Installing NET Framework 3.5 via Windows Installation Media
If you have Windows bootable media like DVD or USB, you can use it to download .NET Framework 3.5. To do so, follow the steps below:
Step 1. Insert your Windows installation media into your computer and check the drive letter you assigned to it.
Step 2. Open the Command Prompt with admin right just like Step 1 in Way 4.
Step 3. Type the following command and hit Enter. Here you need to replace H with the actual drive letter you assigned for the installation media.
Dism /online /enable-feature /featurename:NetFX3 /All /Source:H:sourcessxs /LimitAccess
This process may take you a while. Once completed, reboot your computer and see if the NET 3.5 is installed successfully.
User Comments :