How to install Brother printer without CD-ROM? In this post, MiniTool Partition Wizard shows you two ways to complete Brother printer install on Windows 10 – install the printer wirelessly and install the printer via a USB cable.
When there is no Brother printer installation disc, how to install Brother printer? There are two ways. Scroll down to learn about them.
Way 1: Install Brother Printer Wirelessly
This way is feasible when your Brother printer has wireless capability. So, make sure your Brother printer allows you to connect it to a wireless network.
Step 1: Connect Your Brother Printer to Wi-Fi
There are two methods to connect your Brother printer to Wi-Fi.
# 1: Connect your brother printer to Wi-Fi manually
Step 1: Go to your Brother printer’s control panel and then open the Wireless settings.
Step 2: Enter the Wi-fi network name and password.
# 2: Connect your Brother printer to Wi-Fi automatically
Compared to the first way, this way is much simpler. However, this way is feasible if there is a WPS button both on your Brother printer and your router. WPS (Wi-Fi protected setup) aims to help communicate routers with other wireless devices.
So, check whether there is a WPS button on these two devices. If the two devices have such button, you can start to connect your printer to Wi-Fi:
- Press the WPS button on the Brother printer.
- Keep your Brother printer near to the router to make it in the range of the Wi-fi connection.
- Press the WPS button on the router in two minutes.
Step 2: Add Your Brother Printer to Windows 10 PC
Step 1: Turn on your Brother printer.
Step 2: Open your Windows 10 PC, hit the Windows key on the keyboard, and click the Settings icon.
Step 3: On the Settings window, click the Devices option.

Step 4: Select the Printer & scanners option on the left side and then click the Add a printer or scanner option on the right side.
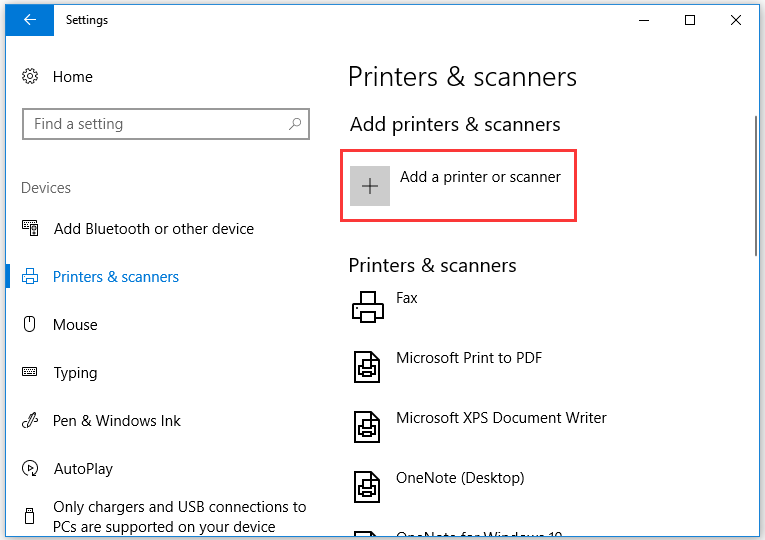
Step 5: Find your Brother printer from the list and click the Add device button.
Step 6: Wait for Windows 10 to install the corresponding driver for your printer.
Now, you have finished installing Brother printer on your PC and you can print something you want.
Way 2: Install Brother Printer via USB Cable
Alternatively, you can use a USB cable to install Brother printer on Windows 10.
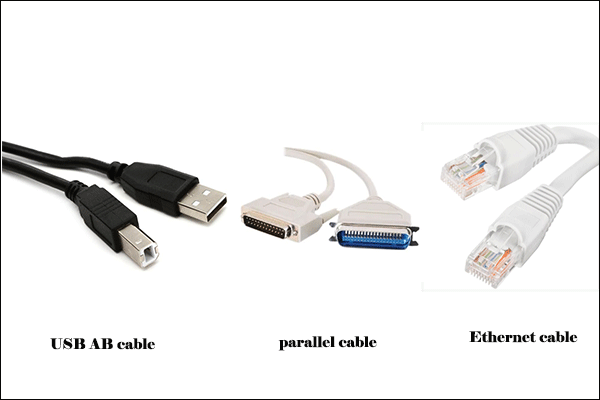
Firstly, you should prepare a compatible USB cable. Check the ports of your Brother printer and your computer to see which type of cable can connect the two devices. Generally, there are three types of printer cables:
- The USB AB cable;
- The parallel cable;
- The Ethernet cable.
Then, you can attach a compatible cable to your Brother printer and your router. After that, your computer will detect the connected printer and install the corresponding driver for it automatically. If it does not, you can repeat the steps about how to add a Brother printer to Windows 10 PC.
User Comments :