GIMP (GNU Image Manipulation Program) is a free image editor that handles tasks such as image scaling, image cropping, and image rotation. However, many users report that their GIMP keeps crashing. Well, this post from MiniTool Partition Wizard will tell you what to do if this problem occurs.
What to Do If GIMP Keeps Crashing
Most users think that GIMP is very helpful for their photos. However, GIMP can easily crash due to various reasons. When this happens, what should you do? There are several methods to help you solve this problem.
Method 1: Scale Image
The reason why GIMP keeps crashing may be that the files you are dealing with are very large. For example, if you want to edit a 14-inch x 14-inch GIMP workbook with a resolution of 300 pixels per inch, your computer may need to use more than half of the virtual memory to create the file.
However, a computer with less RAM (Random-access memory) may not be able to handle any multitasking challenges. So, if GIMP crashes when you edit a large file, you’d better scale the image. How to do that? Here is a guide:
Step 1: Click the File tab and import your image by choosing the Open option. (You can also press CTRL + O on the keyboard.)
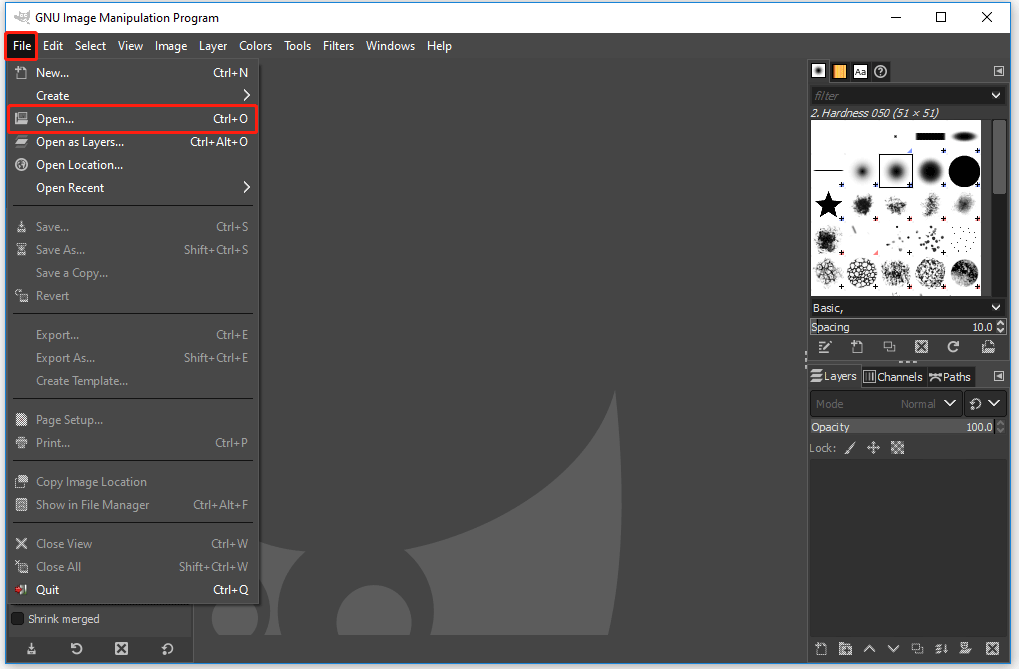
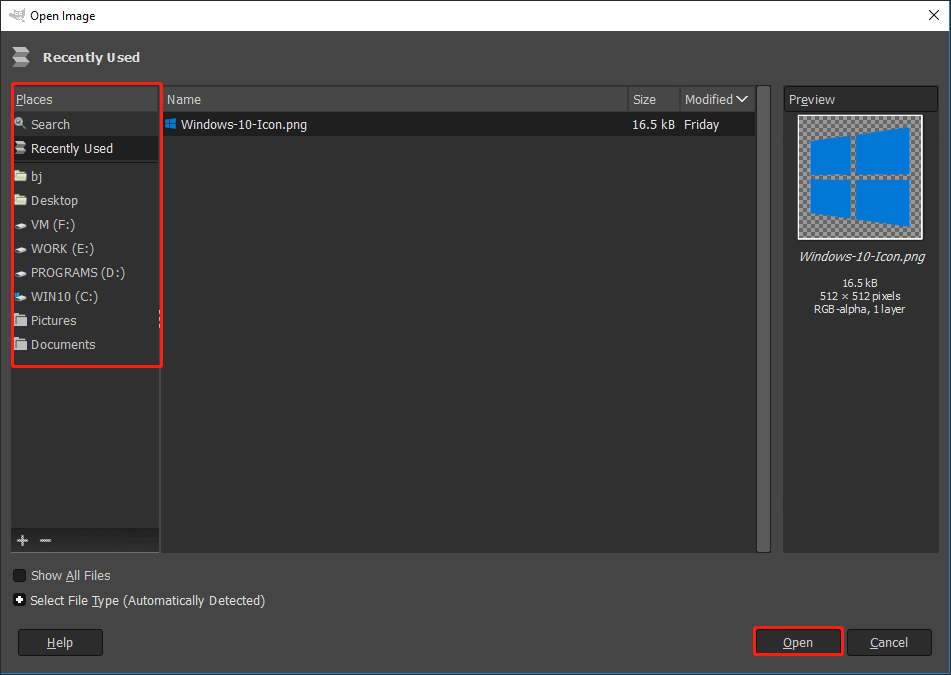
Step 2: Then, choose the image that is too large, and click Open.
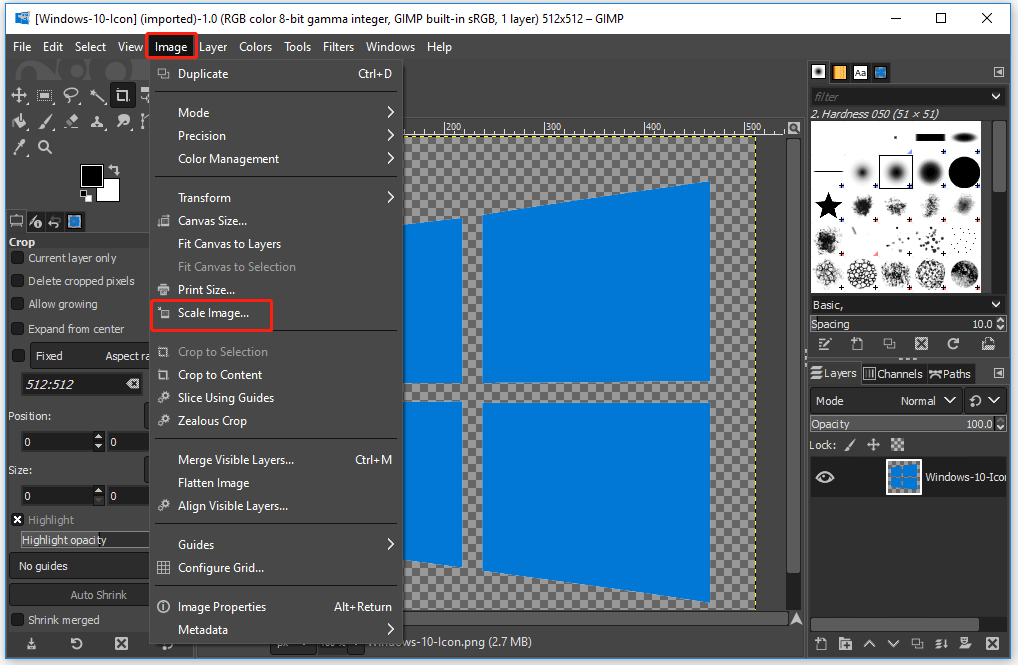
Step 3: After the image is imported successfully, immediately click the Image tab and then choose Scale Image.
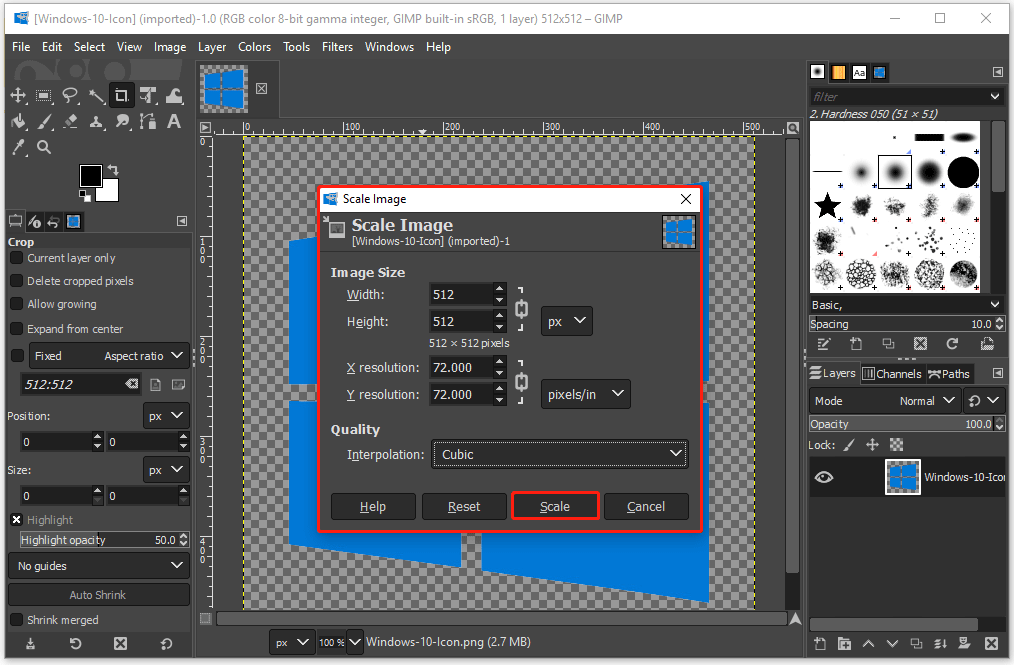
Step 4: A new window will appear, and you can scale your image using the options provided to make the computer easier to manage files.
- Adjust the image by width and height or the X, Y resolution.
- It can be modified in pixels, percentages, centimeters, etc.
Step 5: Once parameters have been adjusted, click Scale.
After reducing the image size and resolution, you can try to edit your image to see if GIMP crashes again.
Method 2: Remove Non-Essential Brushes and Fonts
In addition to large files, additional brushes and fonts can also cause Gimp to crash. If you download more than 50 additional brushes and fonts to your computer and install them in GIMP, it may cause GIMP to crash during startup.
Every time you launch GIMP, these attachments will be loaded and may cause GIMP to crash. So, you should remove non-essential brushes and fonts.
How to remove brushes?
Step 1: Click the Windows tab, choose Dockable Dialogs, and then choose Brushes. Then, it will show all the brushes.
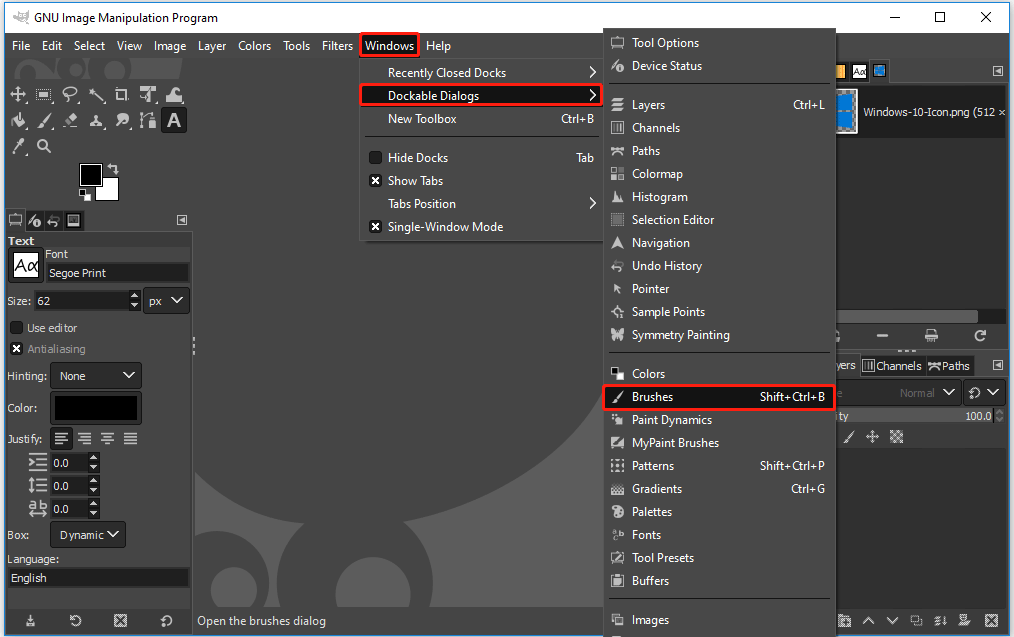
Step 2: Right-click a brush, and then choose the Show in File manager option.
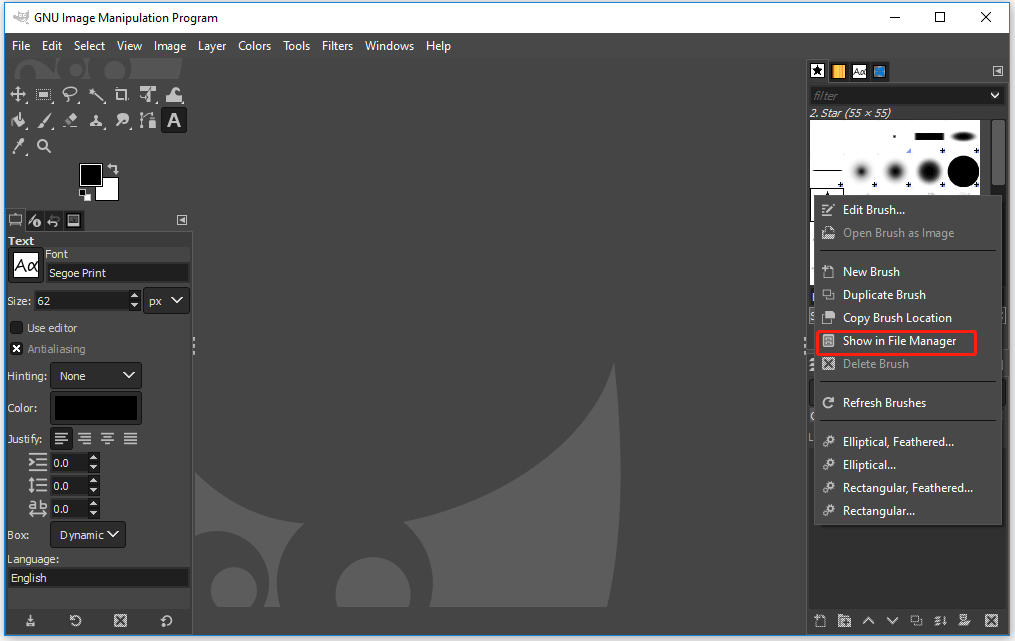
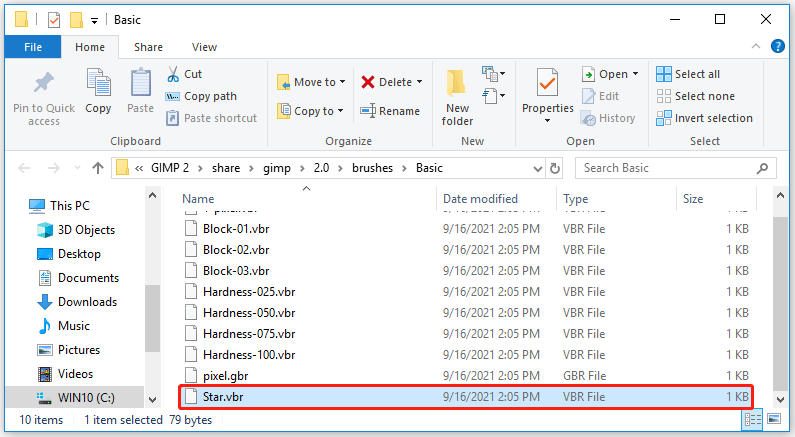
Step 3: When the brushes folder opens, delete the brush that is highlighted.
How to remove fonts?
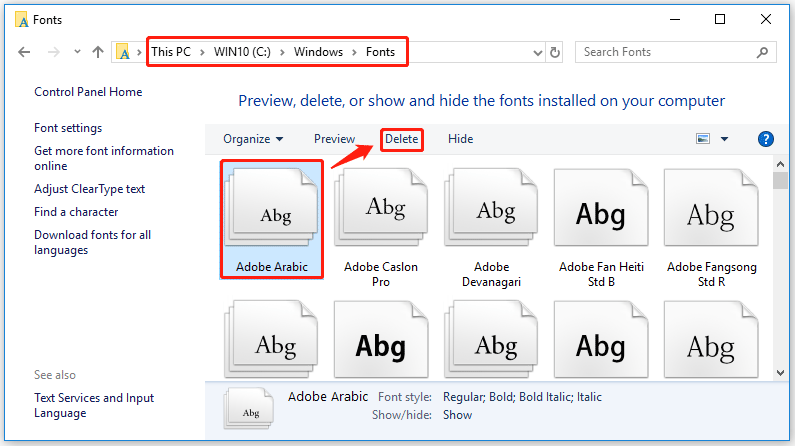
Step 1: Go to File Explorer on your computer.
Step 2: Locate and open the Fonts folder through this path: C:WindowsFonts.
Step 3: Delete the font that you don’t want, and then the font will automatically be deleted from GIMP.
After removing the non-essential brushes and fonts, please restart GIMP.
Method 3: Update GIMP to Latest Version
If your GIMP is not the latest version, it may trigger GIMP crashing. In this case, you need to update GIMP to the latest version. The steps to do that are as follows:
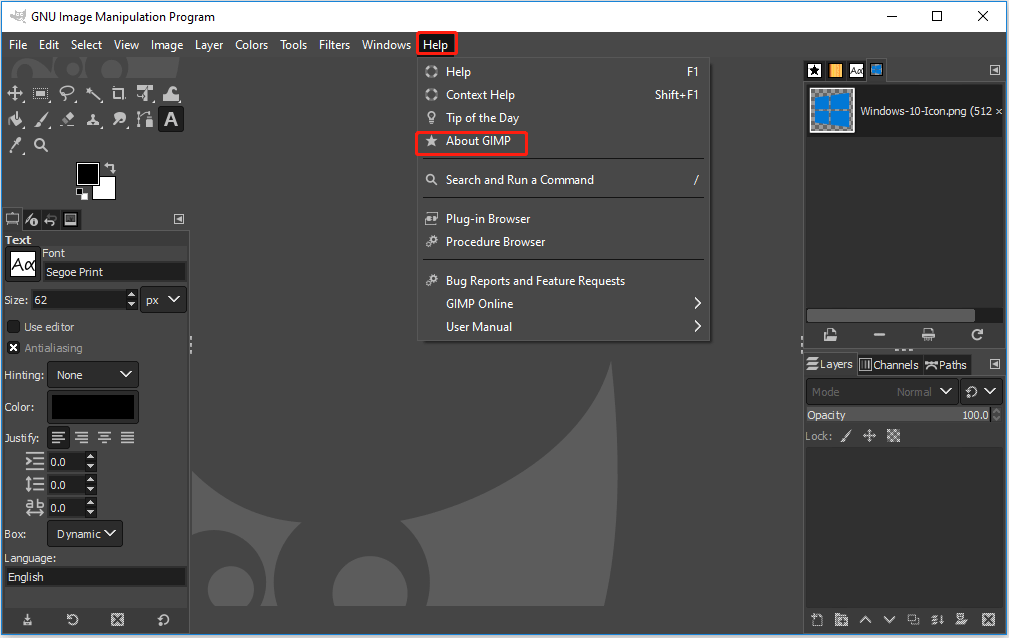
Step 1: Click the Help tab, and then click About GIMP to check the version number.
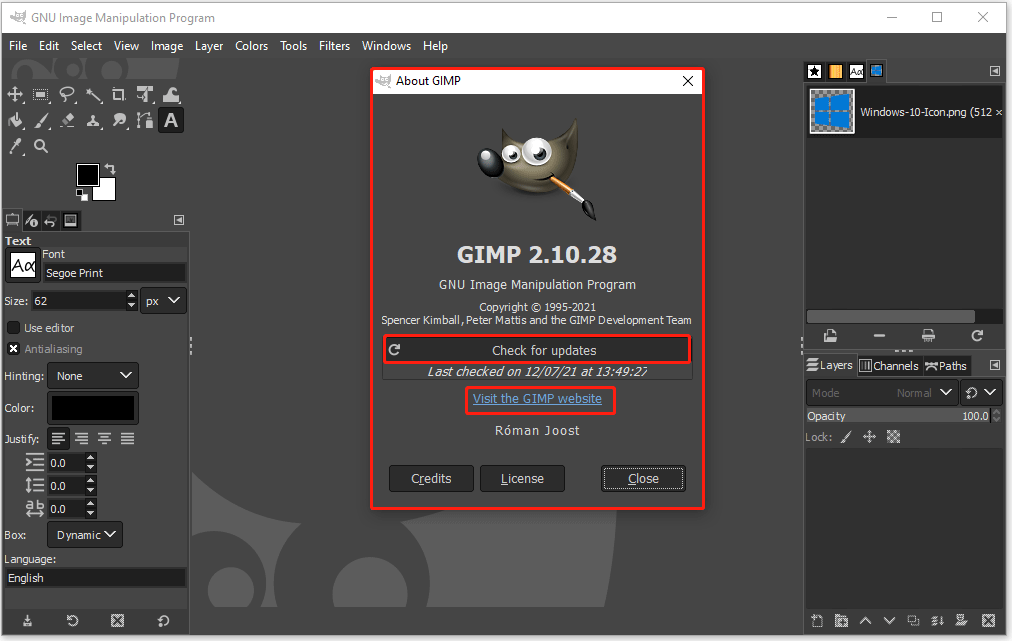
Step 2: Click Check for updates. If your GIMP is not the latest version, please click Visit the GIMP website.
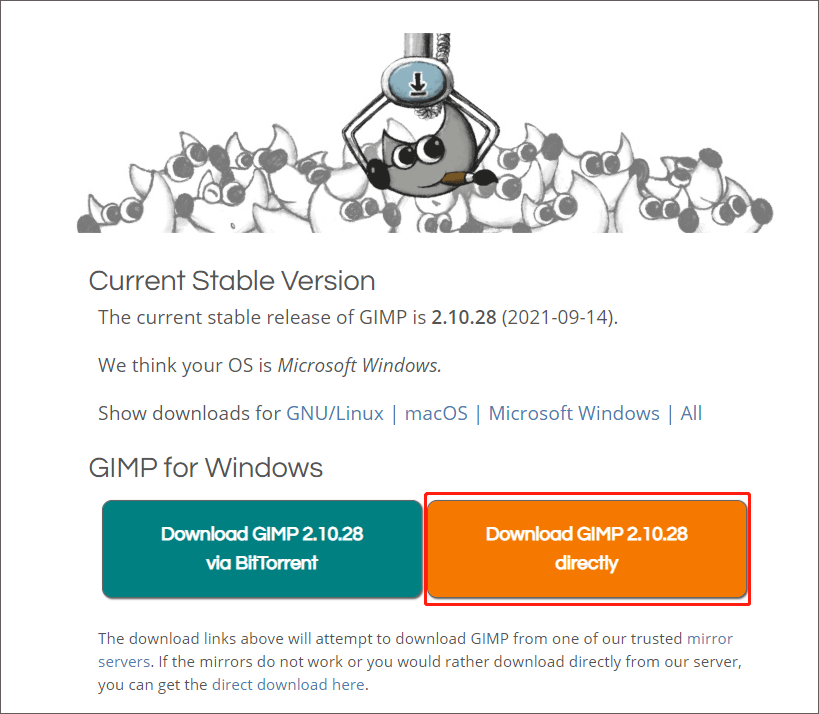
Step 3: On this page, click the orange DOWNLOAD 2.10.28 button.

Step 4: Continue to click Download GIMP 2.10.28 directly to download the latest version of GIMP.
Once the installer is downloaded, run it directly from your browser and follow the on-screen instructions to install it on your computer. This installation will update your current version to the new version.
Method 4: Reinstall GIMP
After trying the above three methods, if GIMP keeps crashing, please remove GIMP from your computer and reinstall it. Navigate to the developer’s website and select your download, and then open the downloaded file. Follow the on-screen instructions to complete the GIMP setup on your computer.
Method 5: Save as You Go
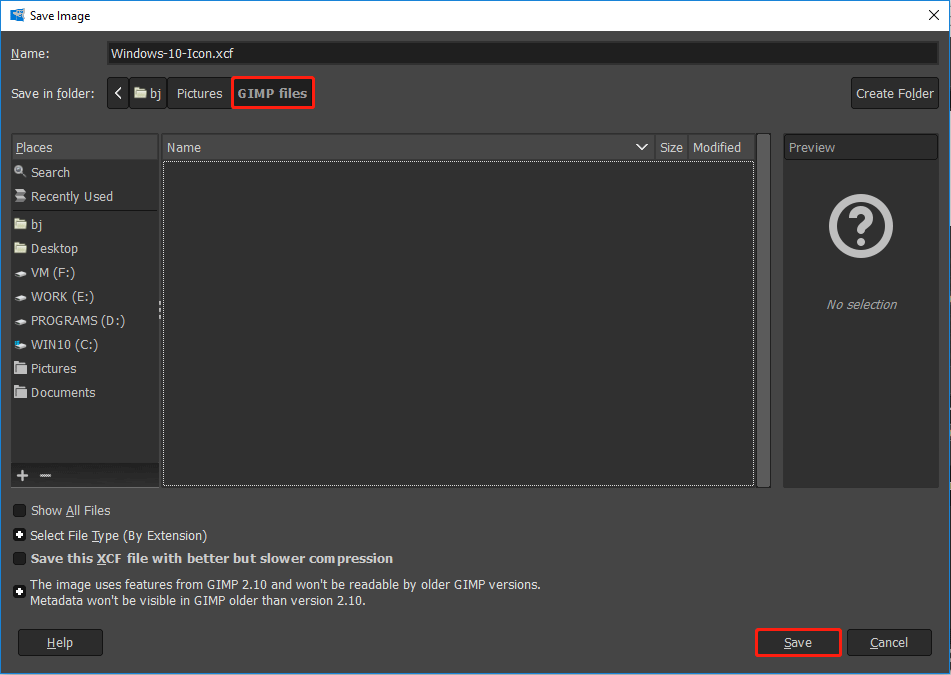
Saving as you go can help you create backups for GIMP files. In this way, you can preserve most of your work even if the GIMP crashes suddenly. So, how to save your GIMP files for backup? Here is a guide:
Step 1: Click the File tab, and then choose Save.
Step 2: Select a location and create a new folder for your GIMP files.
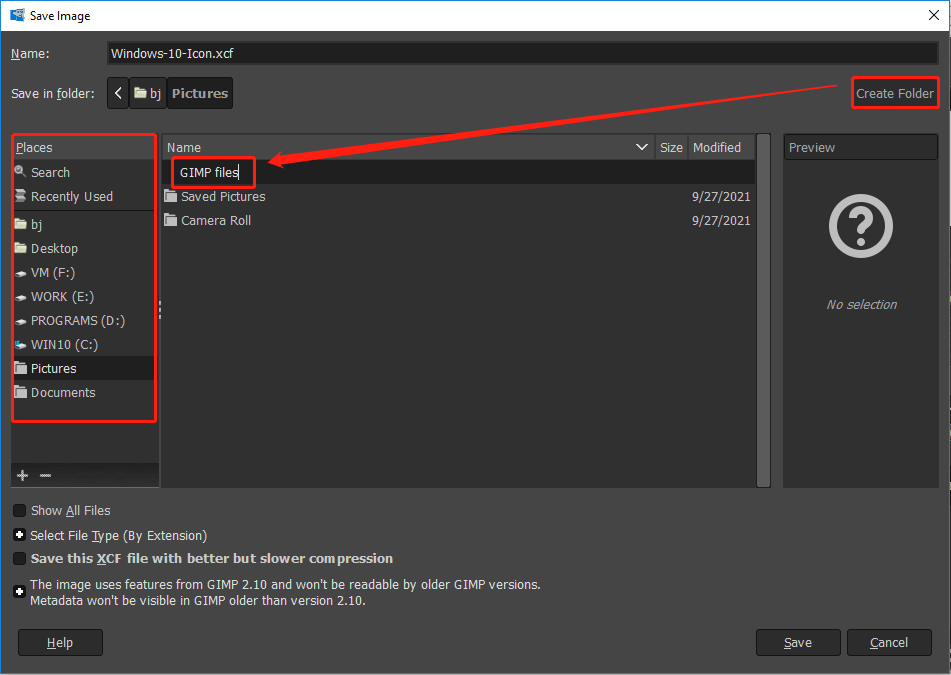
Step 3: Click the new folder, and then click Save.
In addition, if saving the workbook takes a long time for your computer, you may need to scale the image or switch to another computer to complete your work.
How to Recover GIMP Files After GIMP Crashing
In fact, Gimp does not provide an AutoSave function to store data automatically. If GIMP crashes, there is no way to save the data until the error is closed. Therefore, I recommend you save your files after every step (just like Method 5 that I mentioned above).
So, if you have created backups for GIMP files, you can follow the steps below to recover GIMP files:
Step 1: Open GIMP, click the File tab. Then, choose Open Recent and continue to choose Document History.
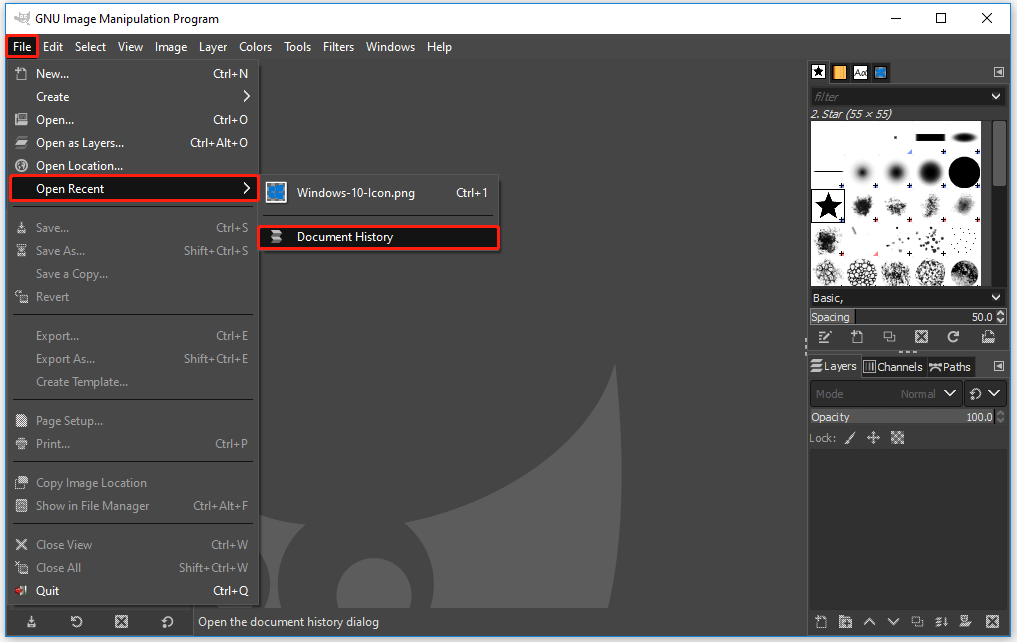
Step 2: In the Document History, you can find all the recently used GIMP files. Then, you can copy the lost files and save them on your computer.
How to Recover Deleted or Lost GIMP Files Using Professional Software
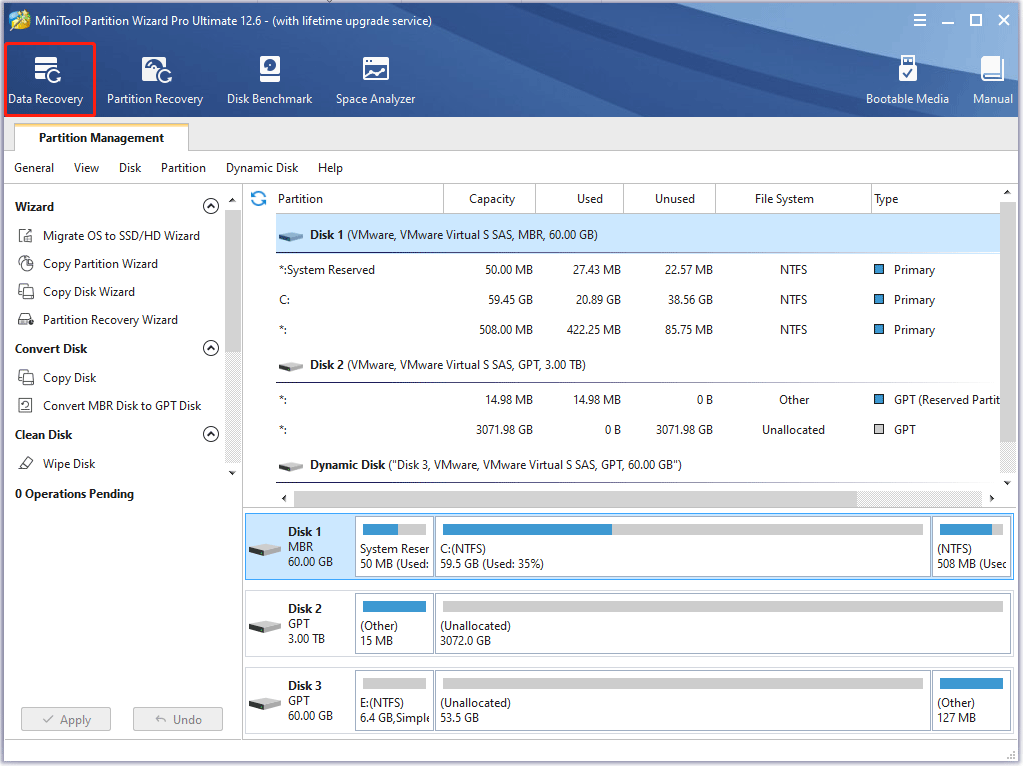
In addition, if you want to recover accidentally deleted or lost GIMP files, you can use professional software to do that. In MiniTool Partition Wizard software, Data Recovery is used to recover lost or deleted files from the logically damaged partition, formatted partition, and so on.
So, with the help of MiniTool Partition Wizard, you can easily recover all lost or deleted GIMP files in simple steps. How to do that? Scroll down to know the detail.
Using Data Recovery to recover lost or deleted GIMP files is very simple. Get MiniTool Partition Wizard and launch it to access its interface. Follow the on-screen instructions to install it on your computer.
MiniTool Partition Wizard DemoClick to Download100%Clean & Safe
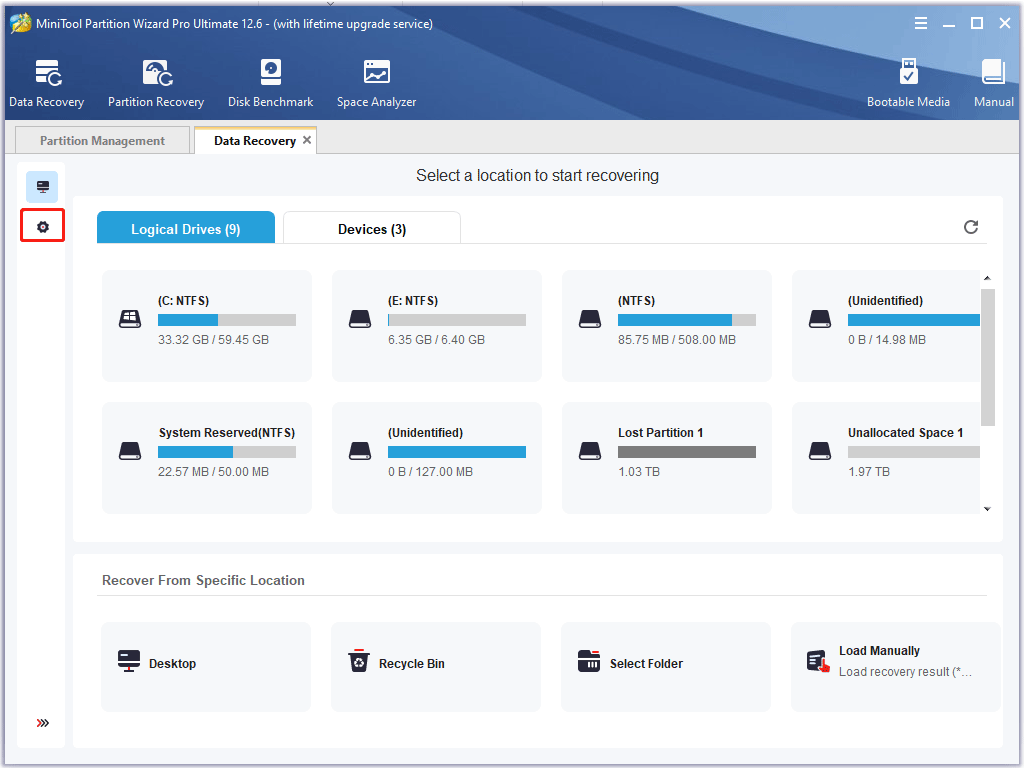
Step 1: Launch MiniTool Partition Wizard to its main interface, and click Data Recovery on the top toolbar.
Step 2: In this interface, you can see all detected storages devices on the computer. Then, click the Scan Settings icon.
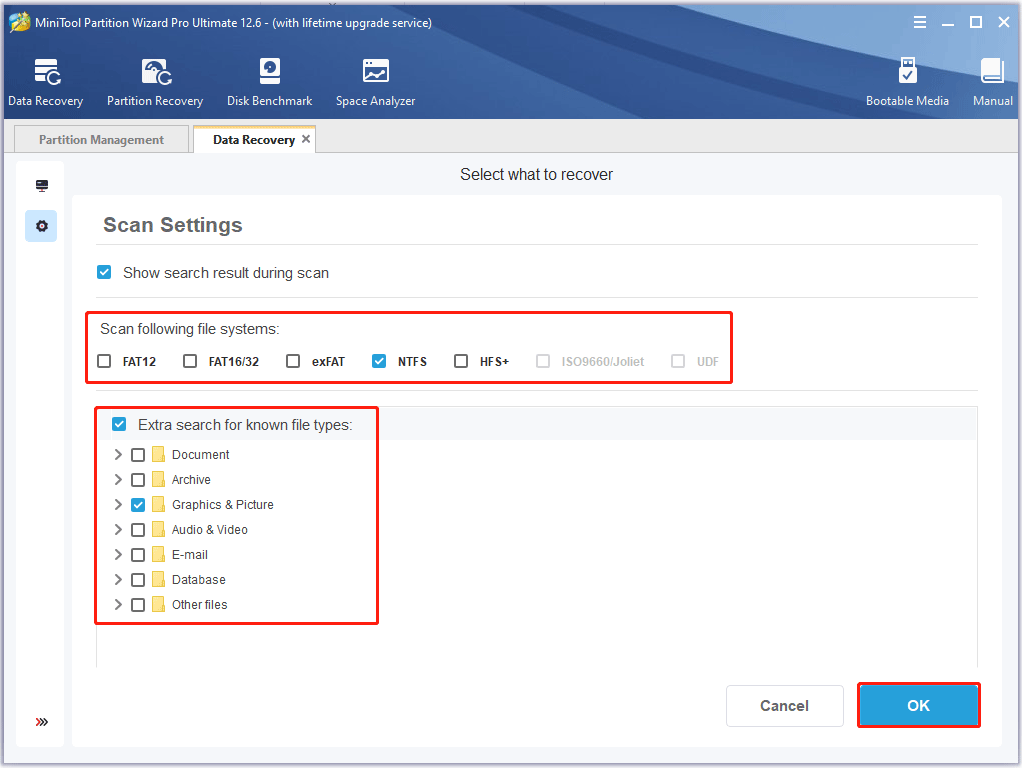
Step 3: In Scan Settings, choose the file system, and only tick Graphic & Picture. Then, click OK. To do this, you can save some scanning time. (If you don’t know what the file system of your drive is, you can also choose all.)
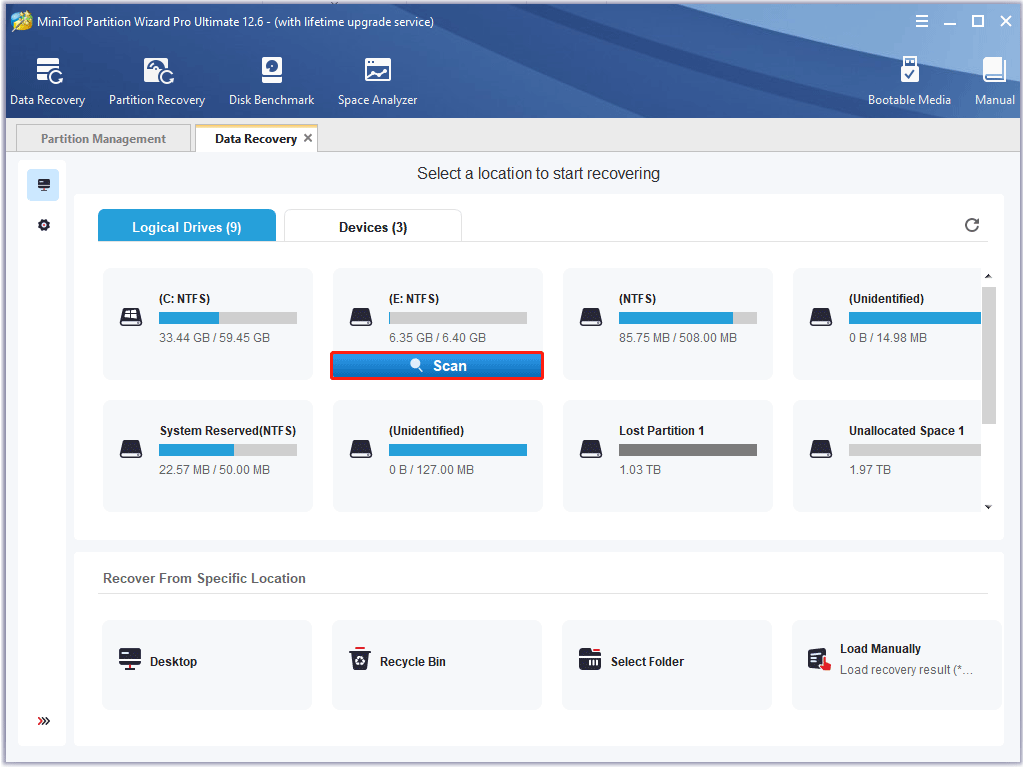
Step 4: Back to the Data Recovery window, you can select the drive where your GIMP files are lost or deleted. Then, click Scan and give it a few minutes to scan. (Here I take drive E: as an example)
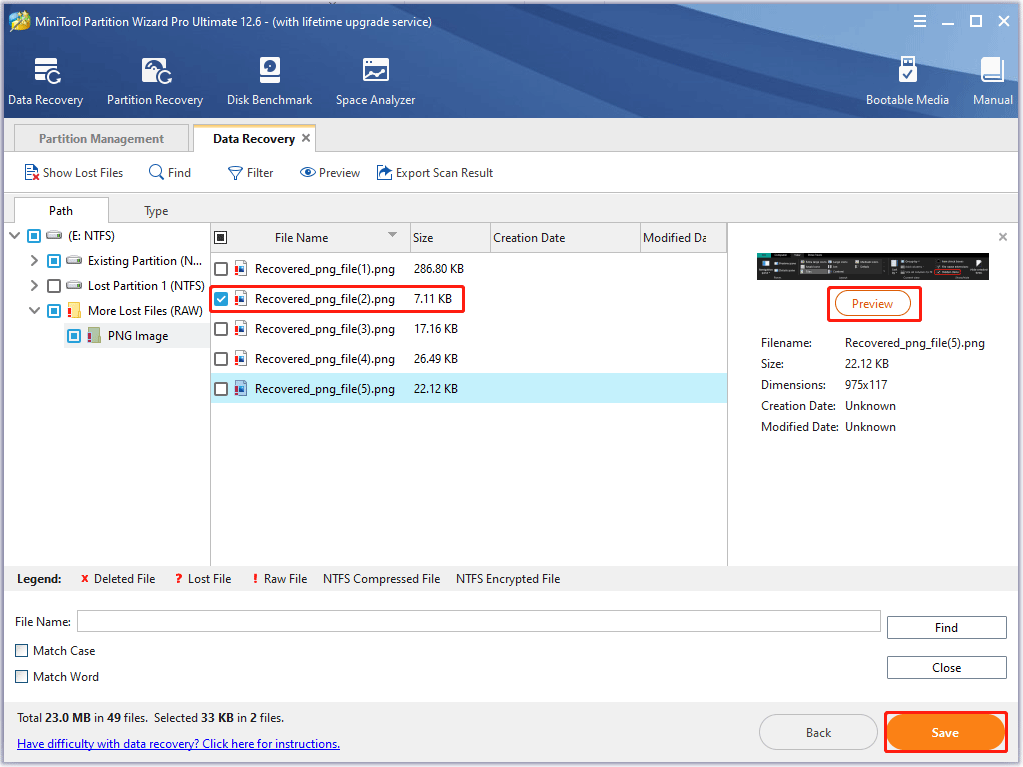
Step 5: After scanning, you can preview the files. Then, tick the file that you want to recover, and click the Save button.
In addition, Data Recovery provides users with the following options so that they can quickly find the data they need.
- Type: All the found files will be displayed by file type. Just unfold the file type and select some items of this type to recover.
- Show Lost Files: Users just need to click the Show Lost Files button to make the software display only the lost files.
- Find: This option allows users to enter a specific file name to quickly find the desired file. Match Case requires users to pay attention to the capital and small letter of the file name. Match Word requires the user to enter the complete file name, including the file extension.
- Filter: This option allows users to search for files by Filename/Extension, Size, Creation, or Modification Date. Besides, users can choose to show deleted, lost, or normal files as needed.
Why Does My Computer Keeps Crashing? Here Are Answers and Fixes
Related Information
Here is some basic information about GIMP:
Where Is Gimp 2.10 Folder?
By default, GIMP creates a program settings folder in the root directory of the Windows 7, 8, and 10 user folders. So, how to find the Gimp 2.10 folder?
Step 1: Open File Explorer, and then choose drive C:.
Step 2: Find the AppData folder through this path: C:Usersuser_name. If the AppData folder doesn’t appear, please click the View tab, and tick the Hidden items option. Then, the AppData folder will appear.
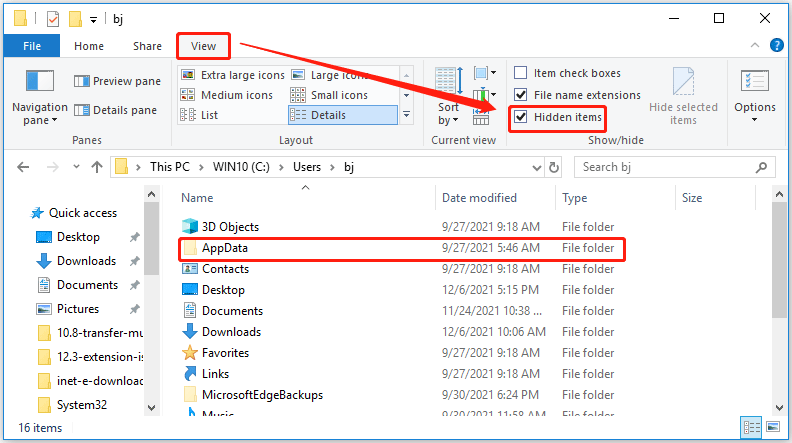
Step 3: Then, follow this path: C:Usersuser_nameAppDataRoamingGIMP2.10 to find the Gimp 2.10 folder.
How to Recover Overwritten Files
If your data is overwritten, you can try the method below to recover an overwritten file:
Step 1: Open File Explorer, and find the folder where the file was located in.
Step 2: Right-click the folder and choose Properties.
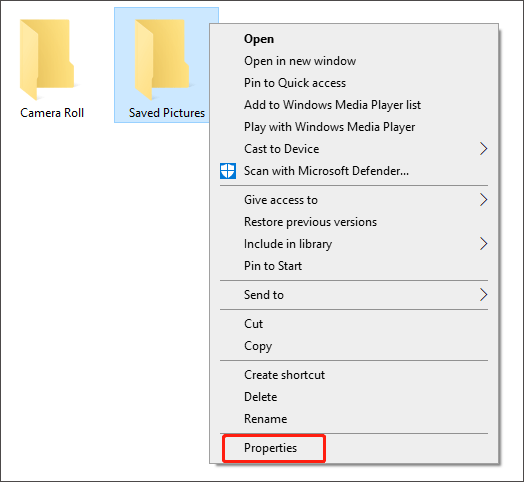
Step 3: Click the Previous Versions tab. Then, find the earlier version of the overwritten file and click Restore. At last, click OK.
Bottom Line
After reading this post, now you know what to do if GIMP keeps crashing. You can try these methods if your GIMP crashes. In addition, you can also recover the lost or deleted GIMP files using MiniTool Partition Wizard after GIMP crashing.
If you have any questions about how to recover lost or deleted GIMP files, please leave them in the comment zone and we will try our best to answer them. If you need any help when using MiniTool Partition Wizard software, you can contact us via [email protected].
User Comments :