DHCP Is Not Enabled for Ethernet
Sometimes, your PC may disconnect from the network. In this case, you may want to diagnose the network. The process is as follows:
- Right-click on the network icon in the lower right corner of the Windows screen and choose Open Network & Internet settings.
- In the newly-opened window, click Change adapter options in the right pane. This will open the Control Panel\Network and Internet\Network Connections window.
- In the new window, right-click the problematic network (Ethernet) and choose Diagnose. This will detect and fix network issues. If the issue can not be fixed, it will tell you more details about the network issue.
Some people report that they received the message “DHCP is not enabled for Ethernet” after running the Windows Network Diagnostics.
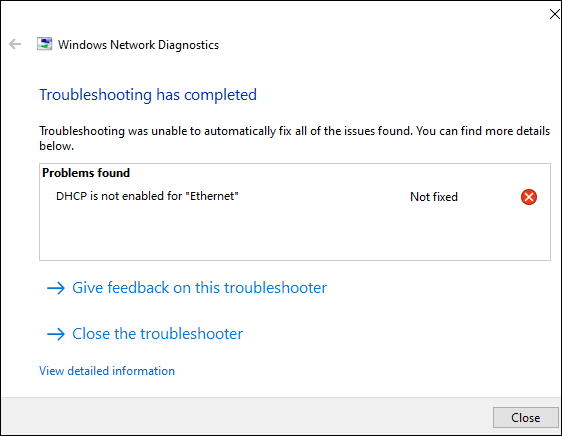
Why does this error occur? Dynamic Host Configuration Protocol (DHCP) is used to automatically assign unique IP addresses to computers attempting to connect to a network. If you have manually assigned your computer an IP address and subnet mask, the DHCP not enabled Windows 10/11 issue will occur.
Of course, other factors may also interfere with DHCP and the resolution is to make it able to assign IP addresses automatically.
5 Ways to DHCP Is Not Enabled for WiFi Windows 10
How to Fix the DHCP Not Enabled for Ethernet Issue
To solve the “DHCP is not enabled for Ethernet” issue, please refer to the following 4 ways.
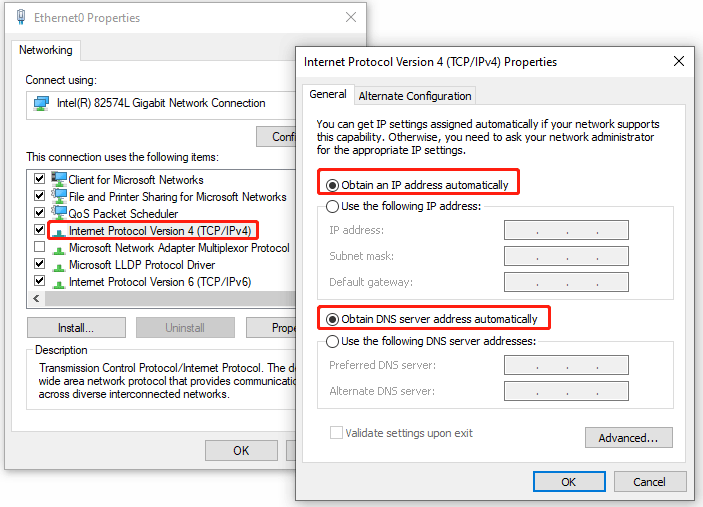
Way 1. Change Network Properties
- Follow the above steps to open the Control Panel\Network and Internet\Network Connections window again.
- Right-click on the problematic network (Ethernet) and choose Properties.
- In the Networking tab, double-click Internet Protocol Version 4 (TCP/IPv4). This will open another window.
- In the new window, select Obtain an IP address automatically and Obtain DNS server address automatically.
- Click the OK button to save change and exit. Then, restart your PC and connect to the network to see if the problem is solved.
How To Enable DHCP Or Change TCP/IP Settings In Windows 11/10
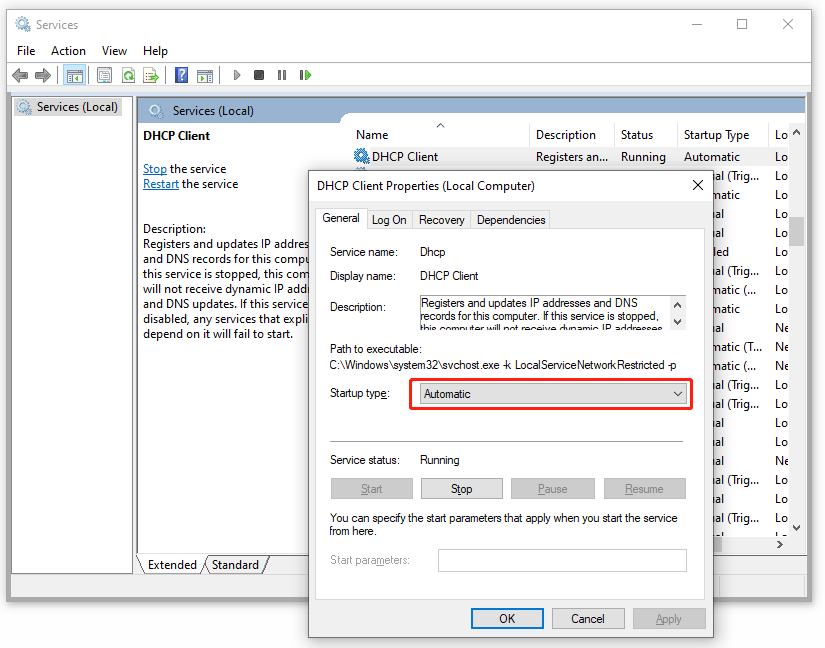
Way 2. Make Sure the DHCP Client Service Is Enabled
- Press Windows key + R to open the Run box.
- In the Run box, type “msc” and press Enter to open the Services tool.
- Scroll down to find the entry of DHCP Client. If it is not running, please right-click it and choose Properties. Set the Startup type as Automatic. Click the Start button to run it. Then, click the Apply and OK buttons the save changes.
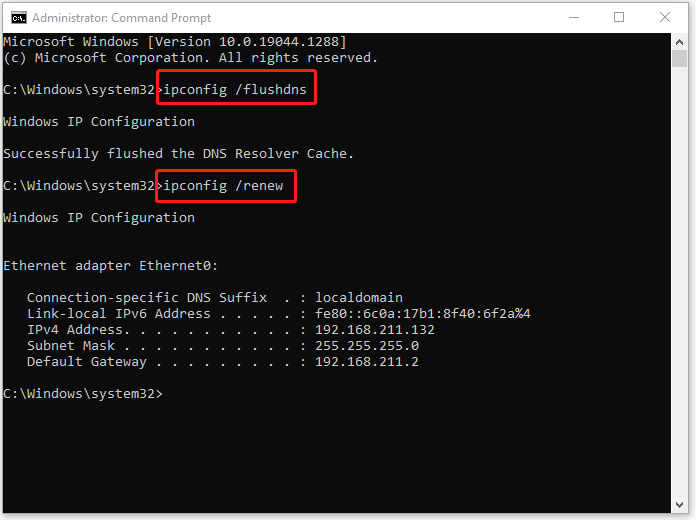
Way 3. Reset Network Configurations
- Type “cmd” in the Windows search bar. Right-click Command Prompt and choose Run as administrator.
- In the Command Prompt window, execute the command ipconfig /flushdns and the command ipconfig /renew one by one.
Fix: Unable to Contact your DHCP Server Error – 3 Useful Methods
Way 4. Reset the Router
If you are using a home network with your router acting as your DHCP server, the DHCP not enabled issue may be caused by router errors. In this case, you may need to enable DHCP on the router admin page. The specific steps may vary and please search them online.
About The Author

Position: Columnist
Linda has been an editor at MiniTool for seven years. She continuously learns about computers and puts her knowledge into practice. Moreover, she is particularly knowledgeable in disk management, data recovery, system installation, and PDF editing. Her articles typically reference multiple examples or are based on her own experience, providing users with the most suitable solutions.
User Comments :