A lot of users encounter the “Crucial SSD not detected” issue on their computers and don’t know how to fix it. If you are also trying to figure it out, this post from MiniTool Partition Wizard is worth reading. It analyzes the issue in two scenarios and offers multiple solutions.
About Crucial SSD Not Detected Windows 10
Some people encounter the “Crucial SSD not showing up” error on their computer. This error bothers them a lot, as it delays their plans or work. After investigating many reports and posts on the Internet, I found this error mainly occurs in two different cases. They are:
- Crucial SSD not detected in BIOS.
- Crucial SSD not detected in Windows.
Case 1 is mainly caused by incorrect BIOS settings and improper installation of SSD while Case 2 is caused by various reasons. Here are some of the most common reasons:
- Faulty connection
- Outdated SSD firmware
- Damaged SSD
- Incorrect BIOS Settings
- SSD partition is missing the drive letter.
- Disk initialization or partition issue.
Although there are a few common reasons for Crucial SSD not showing up in the BIOS or Windows, most of them are different. To resolve the issue, you need to choose the appropriate method based on your specific situation. The next section outlines several solutions for both scenarios.
Recover Data from Crucial SSD
Before fixing the Crucial SSD not detected in BIOS issue and the Crucial SSD not detected in Windows 10 issue, you’d better recover the data from the Crucial SSD to avoid making data unrecoverable.
How to recover computer data safely and easily? To do that, I recommend you use the MiniTool Partition Wizard. It is a trustworthy and feature-rich partition manager that can help you recover data on partitions and disks.
Moreover, it can help you create/extend/resize/format/copy partitions, check the file system, check for bad sectors, clone hard drive, change the cluster size, rebuild the MBR, wipe the disk, etc. You can use it to manage your partitions and disks with ease.
Here’s how to recover data via the MiniTool Partition Wizard:
Step 1. Click the Download button to get the MiniTool Partition Wizard installation package, and then follow the on-screen instructions to complete the installation.
MiniTool Partition Wizard DemoClick to Download100%Clean & Safe
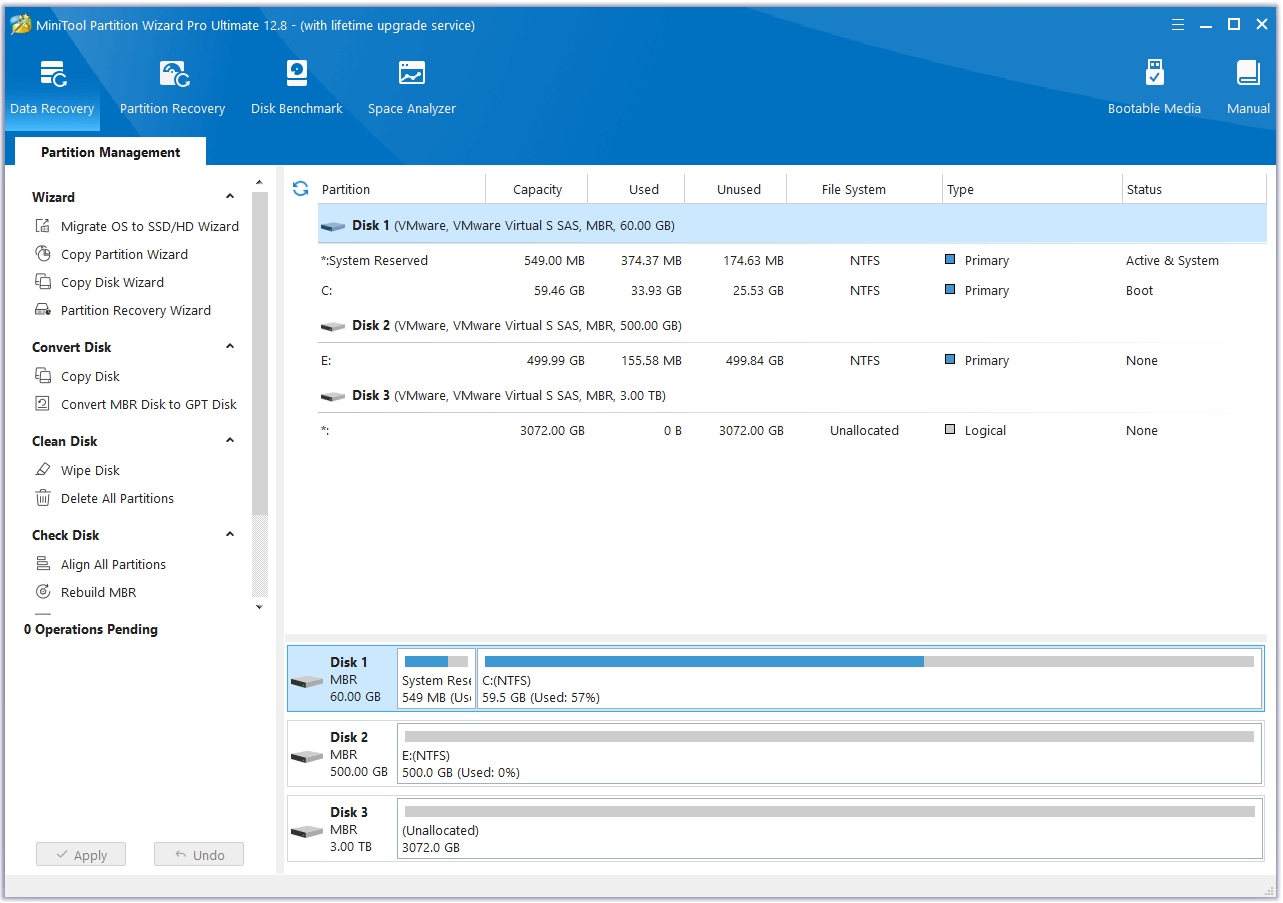
Step 2. Launch into its main interface and click Data Recovery in the top toolbar.
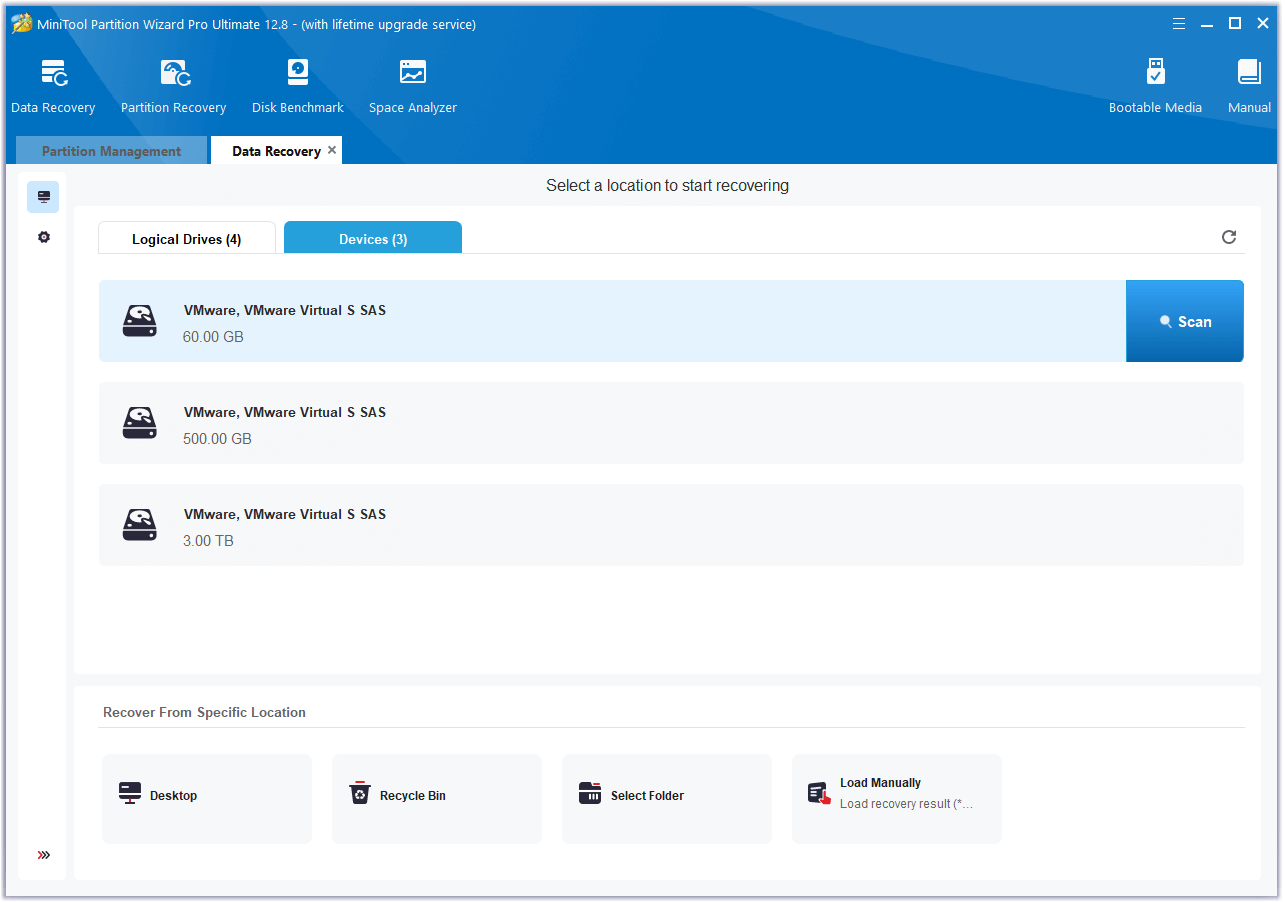
Step 3. Next, select a place to recover data, and then click Scan. Here I select the first disk under the Devices tab.
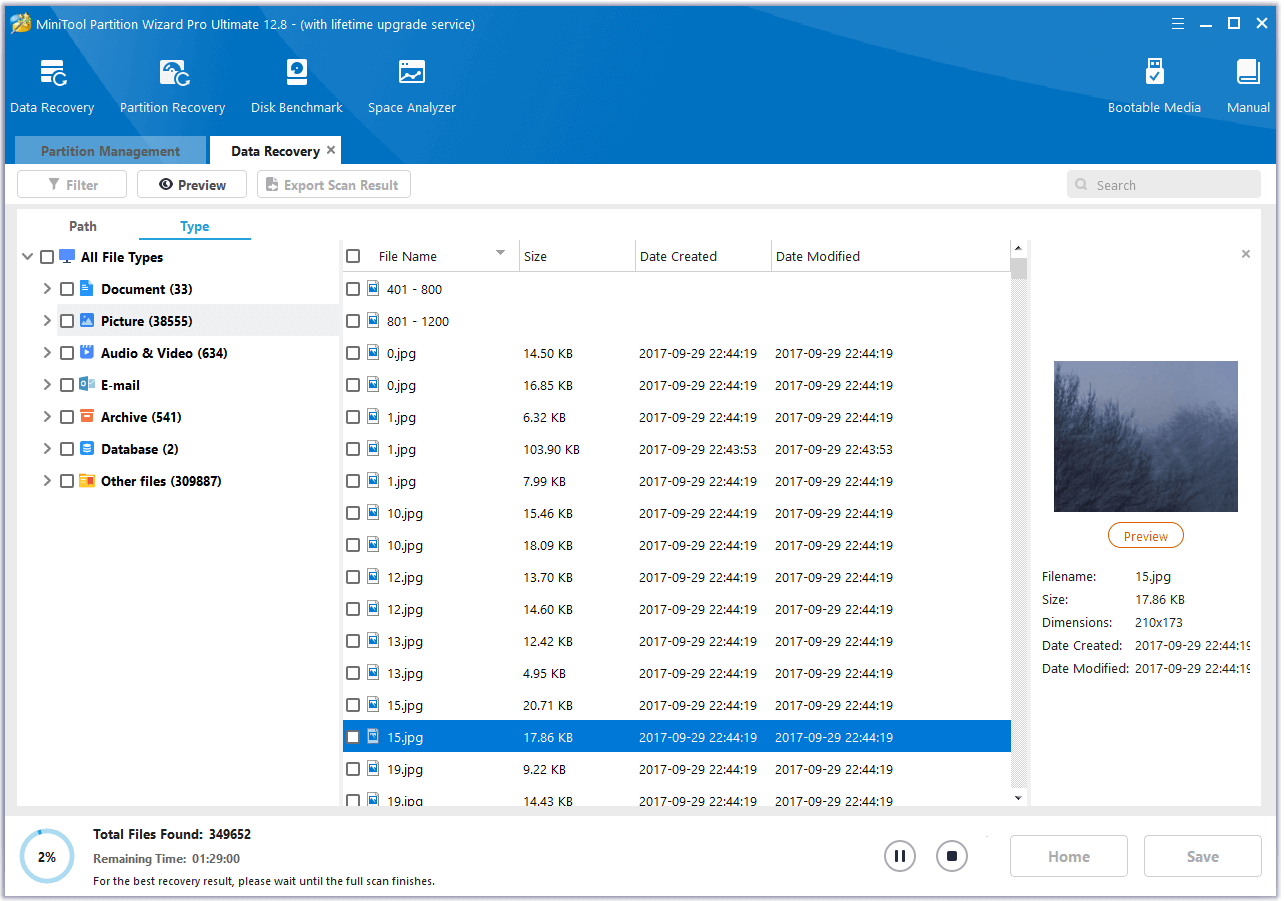
Step 4. After that, you can see the program scanning your disk. While the scan is underway, you have the option to pause or stop it prematurely if you find all the necessary files by previewing the scanning files. Here are some of the tools that can assist you:
- Path: All lost files in this tab are listed in the order of directory structure.
- Type: All lost files in this tab are classified by types.
- Search: You can find files by their names.
- Filter: You can filter the files by File Type, Date Modified, File Size, and File Category.
- Preview: You can preview up to 70 kinds of files, but you need to install a package first.
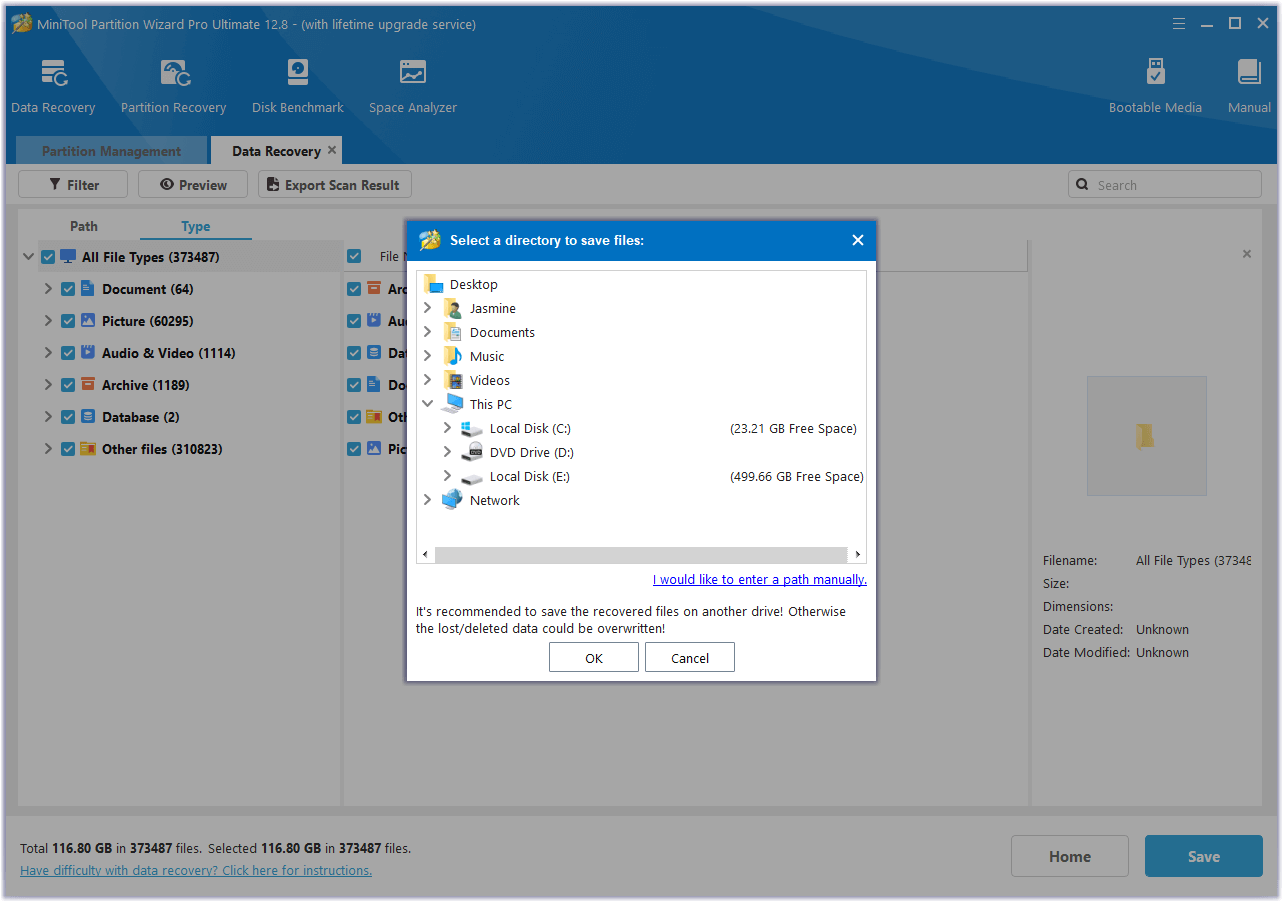
Step 5. Check the files you want to recover, and then click Save. Make sure to choose a secure location to store the recovered data. It is recommended not to save it on the original hard drive.
How to Fix the “Crucial SSD Not Detected” Issue?
This section provides some effective methods to fix the Crucial SSD not detected in BIOS and the Windows system issue. You can try these methods according to your situation.
Case 1. Crucial SSD Not Detected in BIOS
Fix 1. Configure the Crucial SSD
Sometimes, if your BIOS has a wrong configuration, you can easily encounter the Crucial SSD not detected in BIOS error. For example, the SSD is unable to communicate with your PC if the SATA controller mode is IDE.
In this situation, you need to change the controller mode to AHCI to fix this error. If you don’t know how to do it, you can follow these steps:
Step 1. Restart your PC and press the BIOS key to enter the BIOS interface.
Step 2. Navigate to Storage Options > Serial ATA > SATA Configuration or a similar setting.
Step 3. Select the IDE Compatibility Mode.
Step 4. Press the F10 key to save the changes and exit.
Fix 2. Reinstall the Crucial SSD
In addition to the first way, you can choose to reinstall the Crucial SSD to fix the Crucial SSD not detected in BIOS error. Here are the steps to follow:
- Disconnect your PC’s power supply.
- Use a screwdriver to open the PC’s case.
- Disconnect the Crucial SSD and cable.
- Wait for a few seconds, and then reinstall it.
Case 2. Crucial SSD Not Detected on Windows
#1. Check Crucial SSD Connection
If there is something wrong with your Crucial SSD connection, you can easily encounter the Crucial SSD not detected issue. In this case, you need to check if all the cable connections are okay. For example, you need to check if the SSD’s USB cable has been plugged into the right port. If there is anything wrong, you need to fix or replace it.
#2. Change the BIOS Settings
If there is a wrong configuration in the BIOS, it can not only cause you to be unable to see the Crucial SSD in the BIOS but also to be unable to check it on Windows. In this situation, you can do it the same way as the steps mentioned in Fix 1.
#3. Update the Crucial SSD Driver
The outdated or missing Crucial SSD driver can also cause the Crucial SSD not detected issue. If the Crucial SSD driver is outdated or missing on your computer, it may be unable to recognize the SDD on your Windows PC, resulting in the Crucial SSD not detected issue.
So, it is very necessary to keep your Crucial SSD driver up-to-date. Here’s the guide about how to update the Crucial SSD driver:
- Open your Browser on your PC.
- Navigate to the Crucial SSD official website.
- Download the latest Crucial SSD driver.
- Follow the on-screen instructions to install the driver.
#4. Initialize the New Crucial SSD
A new SSD will not be recognized by File Explorer or the Disk Management Utility until you manually initialize it. You may receive a notice stating “You must initialize a disk before Logical Disk Manager can access it.”
So, if you haven’t initialed the new Crucial SSD and created partitions before you use it, you can easily encounter the Crucial SSD not detected issue. In this case, you can try initializing the new Crucial SSD in Disk Management and creating partitions to fix this error. Here’s how to do it:
Step 1. Press the Windows and R keys simultaneously to open the Run window.
Step 2. Type “diskmgmt.msc” in the box and then click the OK button.
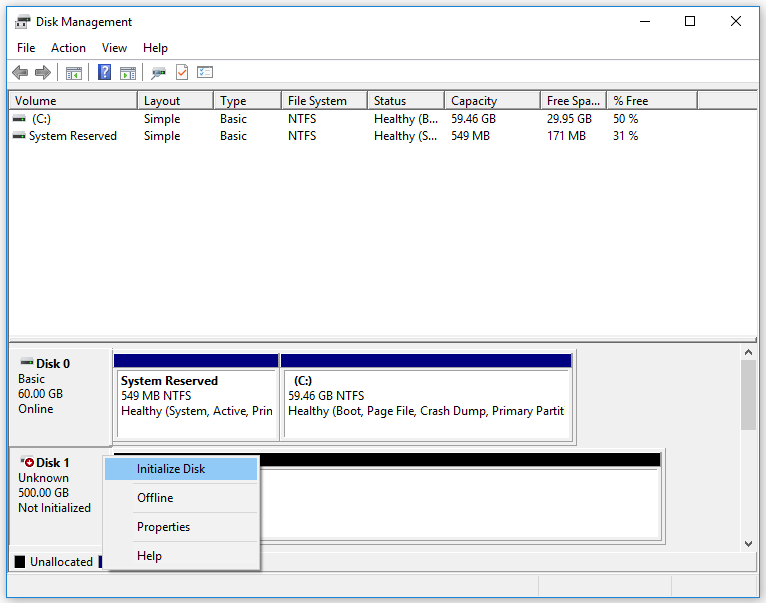
Step 3. In the Disk Management window, find the new SSD drive that is not showing up.
Step 4. If it shows “Not Initialized”, right-click the disk and select Initialize Disk.
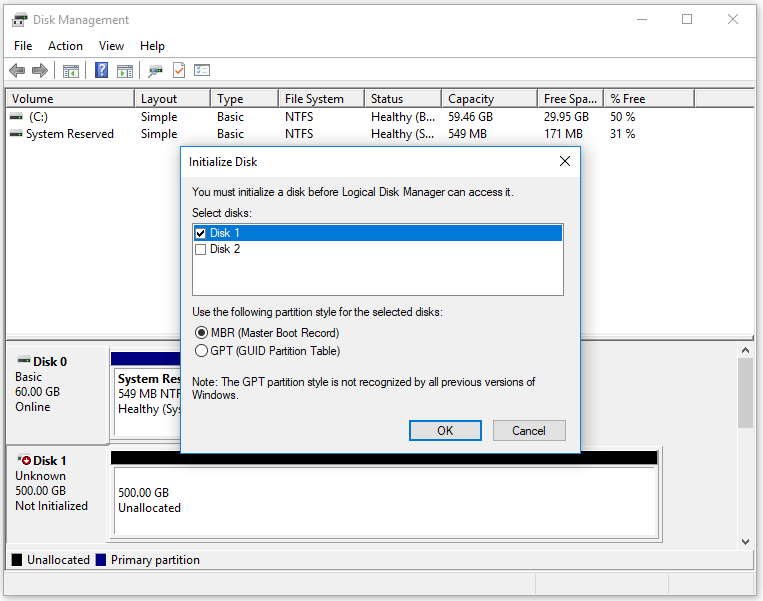
Step 5. Choose the partition style MBR or GPT as per your requirements for your SSD and click OK to initialize the SSD.
Step 6. After initializing the SSD successfully, you need to create and format a new partition. Right-click the unallocated space on the SSD and select “New Simple Volume“.
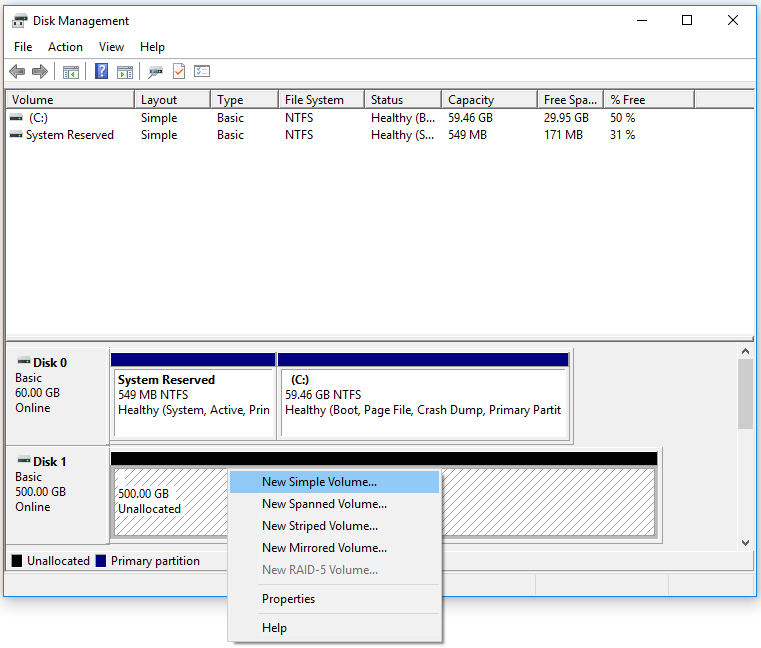
Step 7. Follow the instructions on the screen to create and format a new partition. After the partition is created and formatted, restart your PC and see if the SSD is showing.
#5. Run Hardware and Devices Troubleshooter
There is a built-in Hardware and Devices troubleshooter on each Windows computer that can be used to find and solve your hardware and device issues. So, you can also use it to detect and resolve the Crucial SSD not detected issue. To run the Hardware and Devices troubleshooter, you can do as follows:
Step 1. Press the Windows and S keys simultaneously to open the Search window.
Step 2. Type “cmd” in the search box, and then you can see the results under Best Match.
Step 3. Right-click Command Prompt and select Run as administrator.
Step 4. In the Command Prompt window, type “msdt.exe -id DeviceDiagnostic” and press Enter.
Step 5. Click Advanced and check if the Apply repairs automatically box has been checked. If not, tick it.
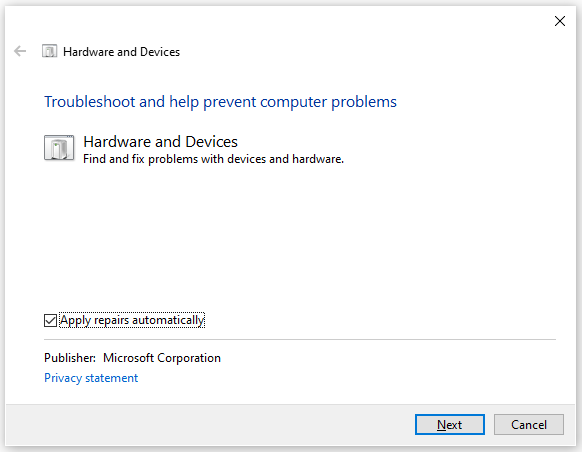
Step 6. Then, click on Next to run the troubleshooter. After that, wait patiently for Windows to detect and fix the issue.
Step 7. Once done, check if the error has been resolved.
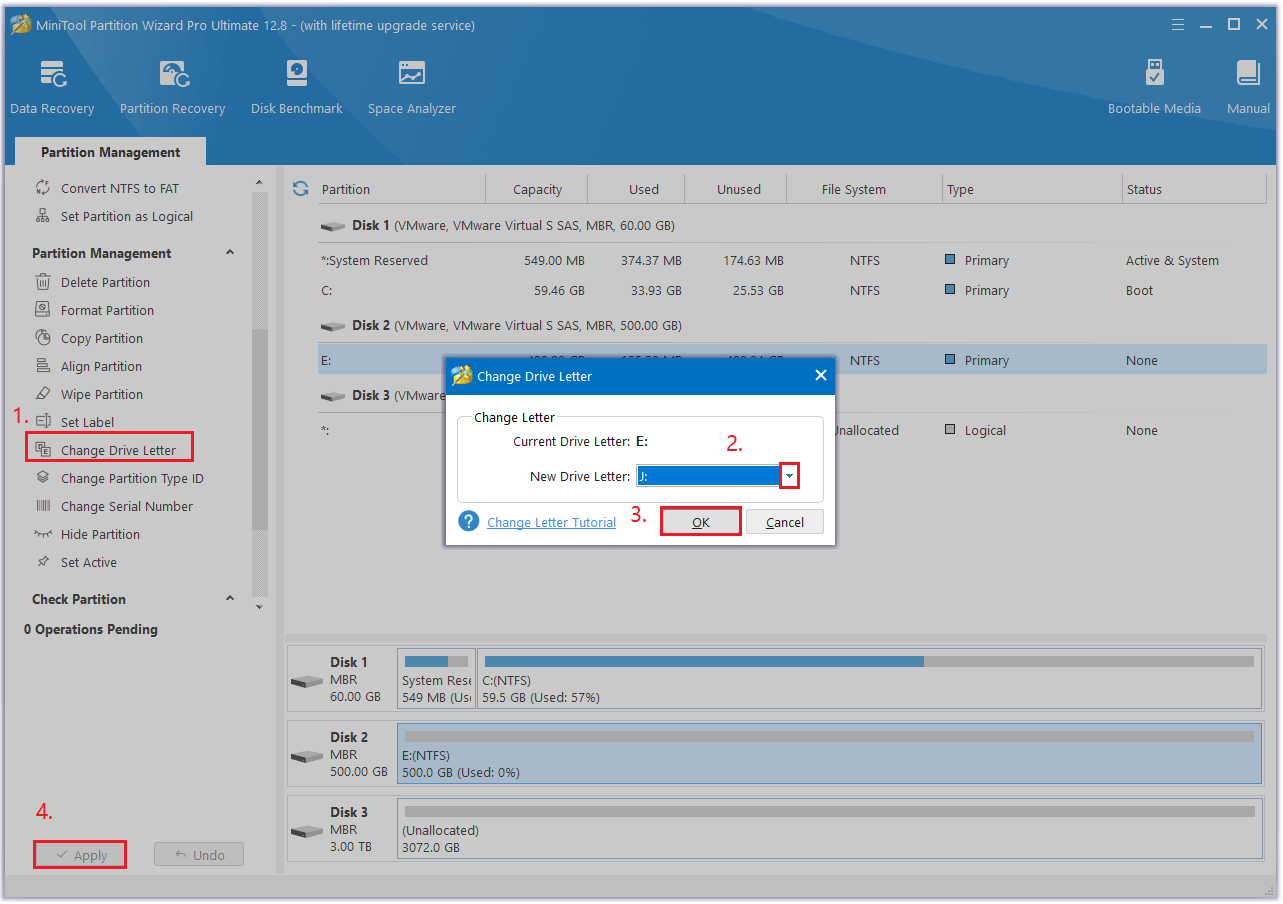
#6. Assign or Change the SSD Partition’s Letter
Crucial SSD not showing up in Windows 10 can also be caused by a conflicting or missing drive letter. In this case, you can try assigning or changing the SSD partition’s letter to fix this error. To do that, you can use MiniTool Partition Wizard’s Change Drive Letter feature. Here are the detailed steps:
MiniTool Partition Wizard FreeClick to Download100%Clean & Safe
- Download and install MiniTool Partition Wizard on your computer. Then, launch it to its main interface.
- Select the SSD partition and click the Change Drive Letter option from the left pane.
- In the Change Drive Letter window, click the down arrow to open a drop-down menu, and then select a new drive letter here.
- Then, click the OK button.
- Next, click Apply and Yes to execute the changes.
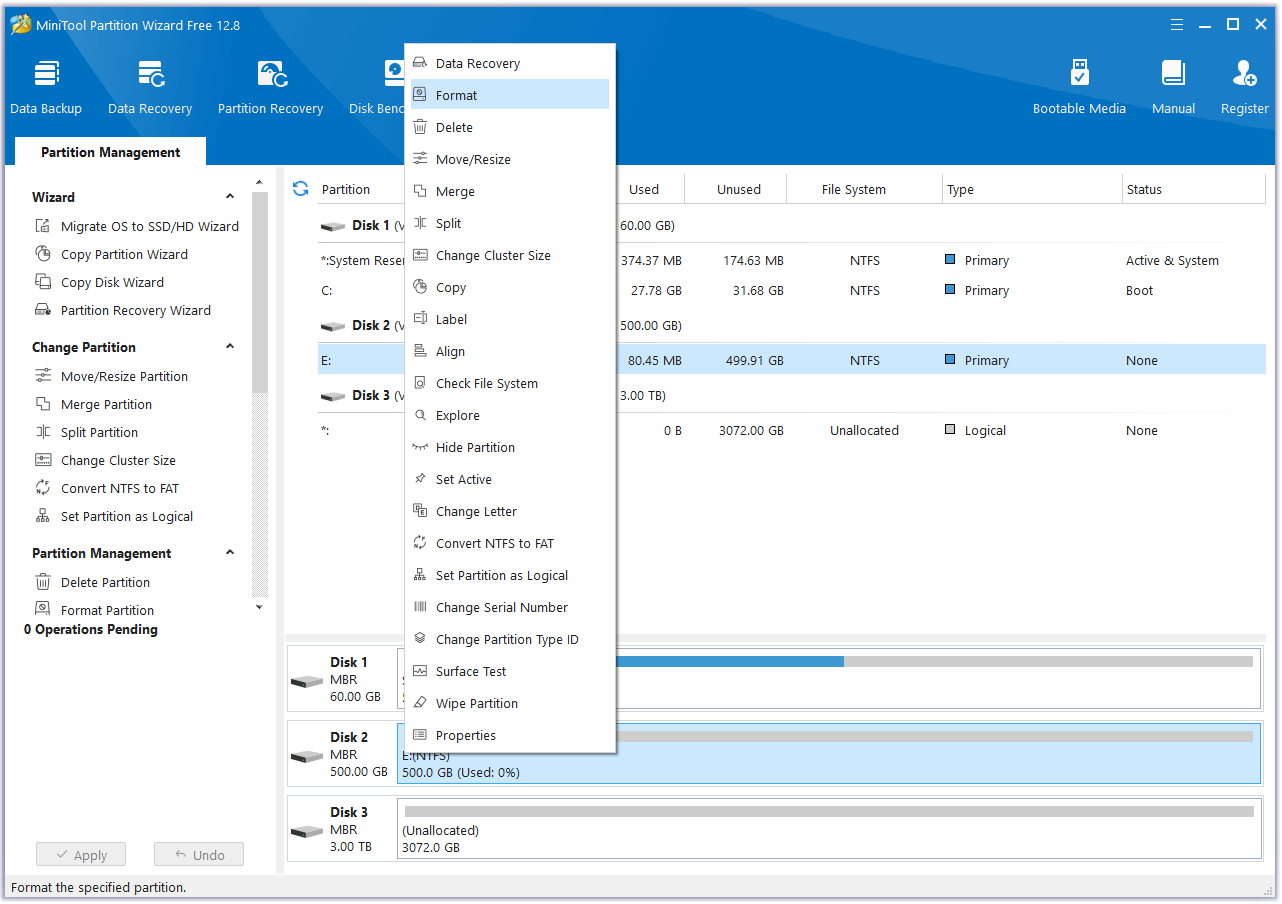
#7. Format Crucial SSD
If none of the above solutions can help you fix the Crucial SSD not detected issue, then formatting the Crucial SSD is the last choice for you. To do that, you can also use the MiniTool Partition Wizard, as it provides a format feature. Here’s the guide on how to format Crucial SSD via MiniTool Partition Wizard:
Step 1. Click the Download button below to get the MiniTool Partition Wizard installation package. Then, follow the on-screen instructions to complete the installation process.
MiniTool Partition Wizard FreeClick to Download100%Clean & Safe
Step 2. Launch into its main interface, and then locate the SSD you want to format.
Step 3. Right-click it and select Format from the menu.
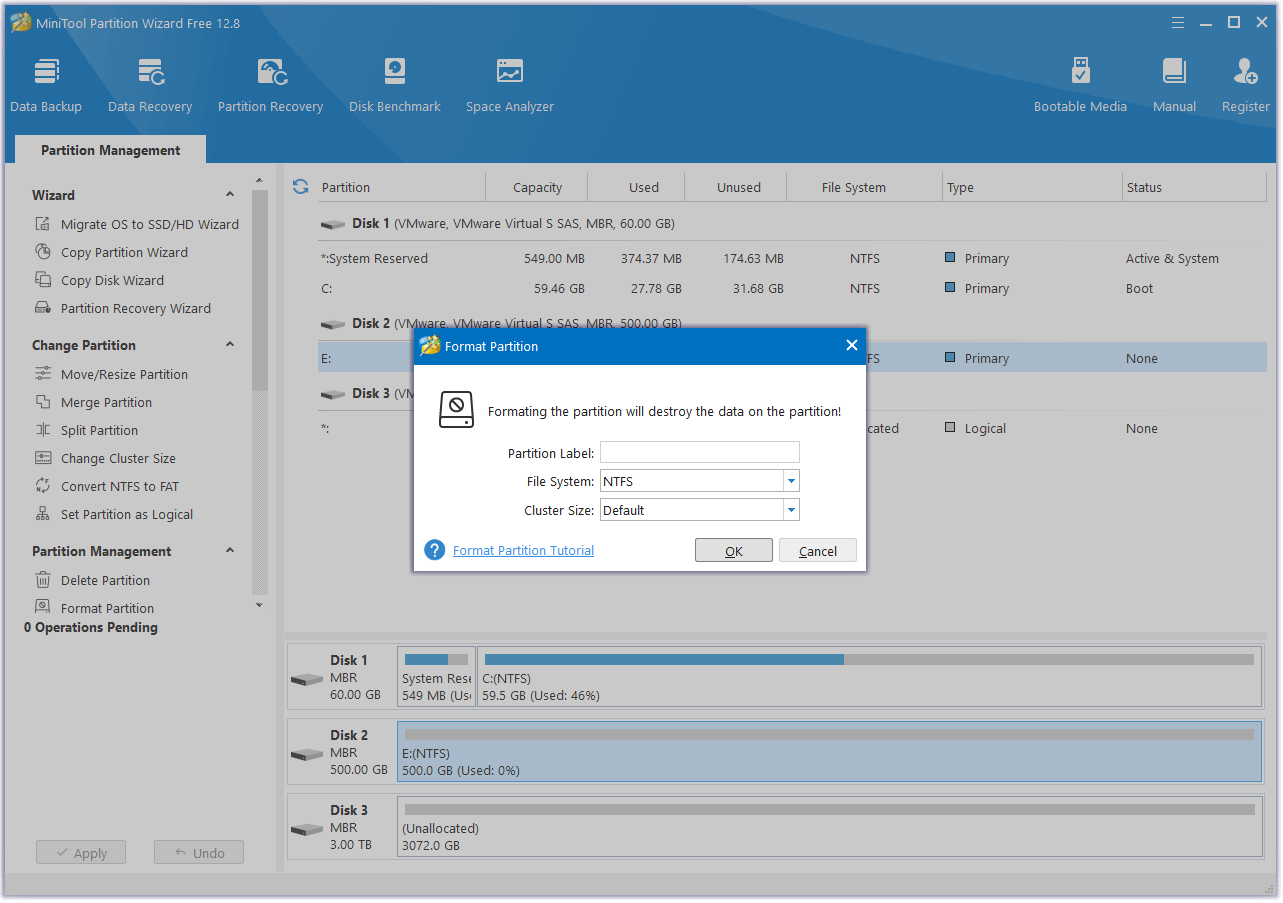
Step 4. In the Format Partition window, choose File System and Cluster Size by clicking the down arrow beside them. You can also set the Partition Label according to your needs in this window.
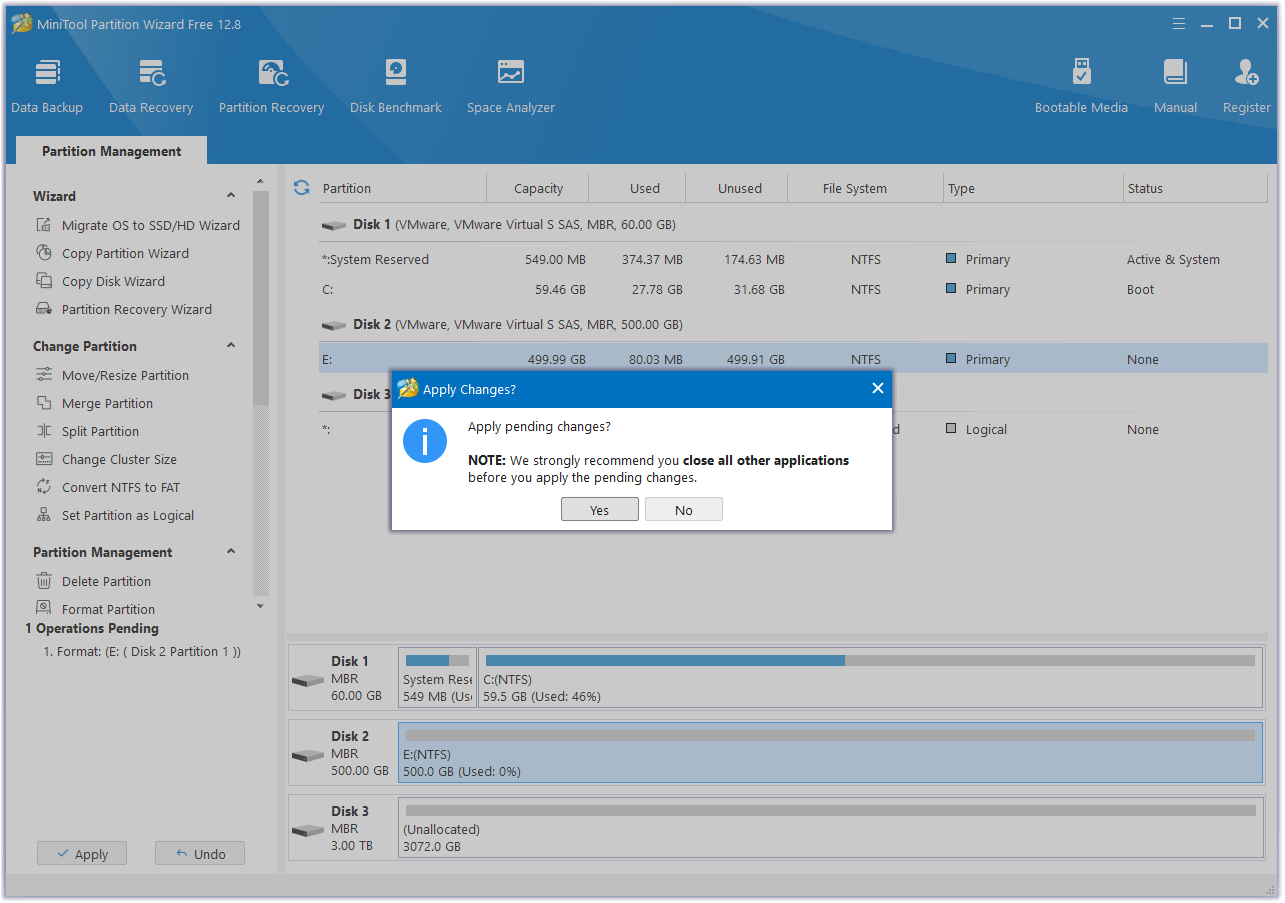
Step 5. Next, click the Apply button on the left bottom of the window. Then, click Yes in the pop-up window to execute all the changes.
Have A Try Now
This post focuses on 2 cases of the “Crucial SSD not detected” issue. You can choose solutions according to your situation. If you have any other useful solutions to this problem, please leave them in the comment zone.
Also, you can send us an email at [email protected] if you have difficulty using the MiniTool software. We will get back to you as soon as possible.
About The Author

Position: Columnist
Charlotte is a technology columnist with a strong focus on the Windows operating system, specializing in disk management, backup, and data recovery. She is passionate about analyzing computer errors, identifying root causes, and delivering practical solutions. In her free time, she stays updated on the latest developments in computer systems and hardware while continuously learning new technologies to broaden her expertise. Her writing style is clear and easy to understand, making complex technical topics accessible even to users with limited computer knowledge.
User Comments :