The code 80244010 is a common Windows update error that always comes along with the error message: Windows could not search for new updates. This error can be caused by multiple reasons and some of them are listed below:
- Generic glitches
- Damaged temporary files
- Corrupted system files
- Lack of conventional updates
Based on the above reasons, we summarize a couple of feasible methods for the Windows update error 80244010. Continue reading this post to work the error out.
Method 1: Run the Windows Update Troubleshooter
The Windows Update troubleshooter is a Windows built-in tool that can help you solve many issues related to Windows updates. Therefore, after the error 80244010 comes out, you can try this troubleshooter first.
Step 1: Press Windows + I to open Windows Settings. Then select Update & Security.
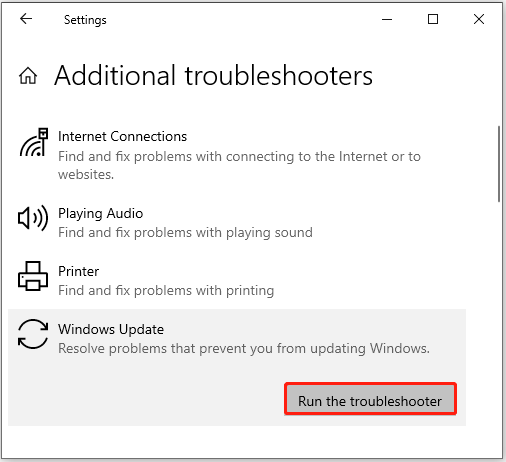
Step 2: Go to the Troubleshoot tab and then click Additional troubleshooters from the right side.
Step 3: Click Windows Update and then click Run the troubleshooter.

Step 4: After that, this troubleshooter will detect Windows Update problems. If any are found, follow the on-screen instructions to repair them.
Method 2: Perform an SFC Scan
In some cases, corrupted system files may lead to the Windows update 80244010 code. To fix it, it’s recommended you use the SFC (System File Checker) utility.
Step 1: Right-click the Start icon and then select Run.
Step 2: In the Run dialog, type cmd and then press Ctrl + Shift + Enter to open Command Prompt as an administrator.
Step 3: After you enter the elevated Command Prompt, type sfc /scannow and then press Enter to execute this command.

Once the scan completes, restart your computer to see if the Windows update error 80244010 is resolved.
Method 3: Reset the Windows Update Components
If the Windows update error 80244010 is caused by certain corrupted temporary files in your system. You can try resetting the Windows Update components to fix this error. If you have no idea how to carry out this operation, this article may help you: How to Reset Windows Update Components in Windows 11/10?
Method 4: Clear the SoftwareDistribution Folder
The SoftwareDistribution folder is used to save temporary files that are required by Windows updates. If some files get corrupted or damaged, you may run into the Windows update 80244010 code. In this case, you need to clear this folder.
Step 1: Press Windows + R to open the Run dialog.
Step 2: Type services.msc in the text box and press Enter.
Step 3: After entering the Services window, scroll down to find Windows Update. Then right-click this service and select Stop to disable it.
Step 4: Open File Explorer and navigate to the C:\Windows\SoftwareDistribution folder. Then delete all the files and folders in this folder.
Step 5: After that, go back to Services. Then right-click the Windows Update service again and select Start to enable it.
Method 5: Enable the Detection Frequency in Group Policy Editor
Enabling the Detection Frequency is also worth trying when you are facing the Windows update error code 80244010. To do this, follow the steps below.
Step 1: Open the Run dialog. Then type gpedit.msc in the box and click OK.
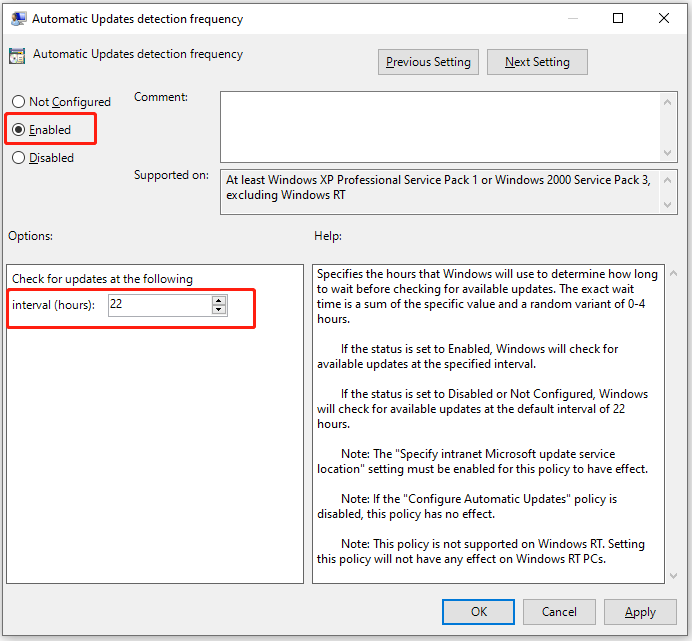
Step 2: In Local Group Policy Editor, navigate to the path: Computer Configuration > Administrative Templates > Windows Components > Windows Updates. Then double-click Automatic Updates detection frequency in the right pane.
Step 3: In the pop-up window, select Enabled. Then set a value less than the default one (22) in the Options section.

Step 4: Finally, click Apply and OK to save the changes.
All these methods mentioned in this post are available. You can follow them one by one until you fix the Windows update error code 80244010, If you have any problems with the error 80244010, you can leave a message in our comment part.
If you are interested in MiniTool Partition Wizard, an all-in-one partition management program, you can visit its official website to attain more detailed information.

User Comments :