Sysprep, also called System Preparation, is a useful Windows tool that can remove the specific information of a PC from the Windows installer so that it can be installed on different PCs. It can help you save time when you need to deploy multiple PCs.
However, when you use the tool, you may encounter some bothering issues from time to time, such as the “Sysprep was not able to validate your Windows installation” issue. Once you meet the error, you can follow these solutions introduced in this post to solve it.
Solution 1: Disable BitLocker
The “Sysprep was not able to validate your Windows installation” may appear due to the BitLocker encryption feature on your Windows 10. On this occasion, you should try to resolve the issue by disabling BitLocker.
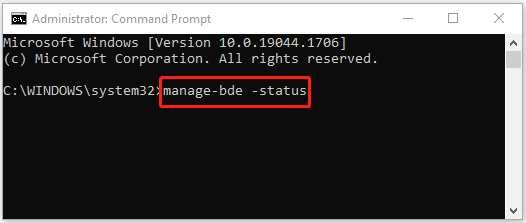
Step 1: Open Command Prompt as administrator.
Step 2: Type manage-bde -status in the panel and then press Enter to check the status of the BitLocker.
Step 3: Type Disable-Bitlocker –MountPoint ‘N:’ (N is the driver letter of the disk where the BitLocker status is active) and press Enter to disable BitLocker.
Step 4: Exit Command Prompt and run Sysprep again to see if the “Sysprep was not able to validate your Windows installation” disappears. If not, go on with the next solution.
Solution 2: Remove the UWP Apps You Have Installed
The UWP (Universal Windows Platform) apps are applications that can be used for all compatible Microsoft Windows devices.
However, in some cases, the UWP apps you have installed on your PC by yourself might be a reason for the “Sysprep was not able to validate your Windows installation windows 10” issue. To fix it, you need to uninstall those apps.
Step 1: Press Windows + I to open Windows Settings. Then select Apps.
Step 2: In the Apps & features section, uninstall all the UWP apps you have installed by yourself from the right panel.
Once you finish the operation, restart your computer to check if the “Sysprep was not able to validate your Windows installation windows 10” error is resolved. If not, try the next solution.
Solution 3: Reinstall Default Windows UWP Apps
If a certain default Windows UWP app is missing from your PC, then the “Sysprep was not able to validate your Windows installation” probably comes out. In this case, you are supposed to reinstall the missing default apps.
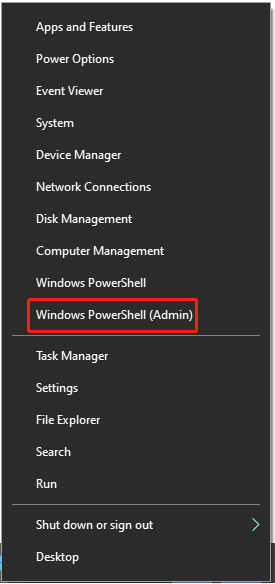
Step 1: Right-click the Start icon and select Windows PowerShell (Admin).
Step 2: Type the following command and then press Enter to execute the command.
Get-AppxPackage -AllUsers| Foreach {Add-AppxPackage -DisableDevelopmentMode -Register “$($_.InstallLocation)\AppXManifest.xml”}
After the command is completed, restart your computer and run Sysprep once again to check if the error has been repaired. If the error persists, you should continue with other methods.
Solution 4: Modify Registry Values
Sometimes, modifying the registry key is likely to help you repair the “Windows 10 Sysprep was not able to validate your Windows installation” error.
Note: In case some other unexpected errors happen during the process, you’d better back up the registry keys first.
Step 1: Press Windows + R to open the Run dialog.
Step 2: Type regedit in the box and press Enter to open Registry Editor.
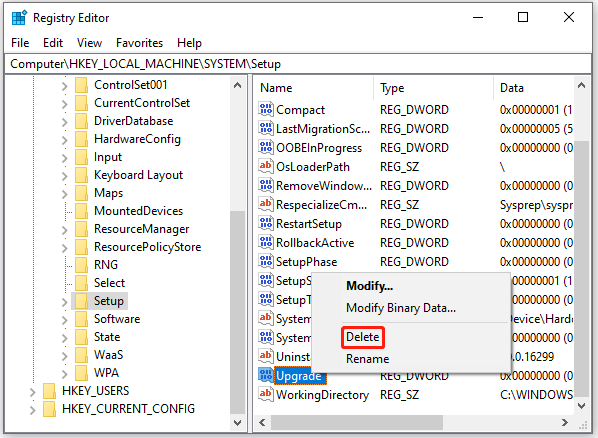
Step 3: Navigate to the following path: Computer\HKEY_LOCAL_MACHINE\SYSTEM\Setup.
Step 4: Right-click the Upgrade key from the right pane and select Delete.
Step 5: Go to the path: HKEY_LOCAL_MACHINE\SYSTEM\Setup\Status\SysprepStatus. Then double-click the CleanUpState key to edit it.
Step 6: Set the Value data as 7 and then click OK to save the change.
After that, restart your PC and you may get rid of the “Windows 10 Sysprep was not able to validate your Windows installation” error successfully.
When you meet the “Sysprep was not able to validate your Windows installation” issue, try to work it out with the above solutions. If you have any other problems with the issue, you can leave a message below.
User Comments :