You may find that the Net.Tcp Port Sharing Service failed to start sometimes. How to fix the problem? In this guide developed by MiniTool Partition Wizard, several possible solutions have been displayed and you can have a try.
The Net.Tcp Port Sharing Service (NetTcpPortSharing) is available on all the operating systems that support .NET Framework 3.0. This service provides the ability for multiple user processes to share TCP ports over the net.tcp protocol. By default, the Net.Tcp Port Sharing Service is disabled and you need to enable it manually for the first use.
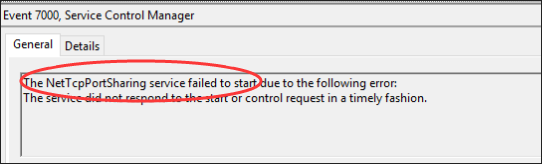
Some users report that the Net.Tcp Port Sharing Service fails to start and find the relevant events in the Windows Event Viewer. The description of the event reads:
The NetTcpPortSharing service failed to start due to the following error: The service did not respond to the start or control request in a timely fashion.
Here are some methods to fix “Net.Tcp Port Sharing Service cannot be started” issue. If you are experiencing the problem, you can try the following solutions one by one. Let’s check the detailed information.
Fix 1: Restart the Net.Tcp Port Sharing Service
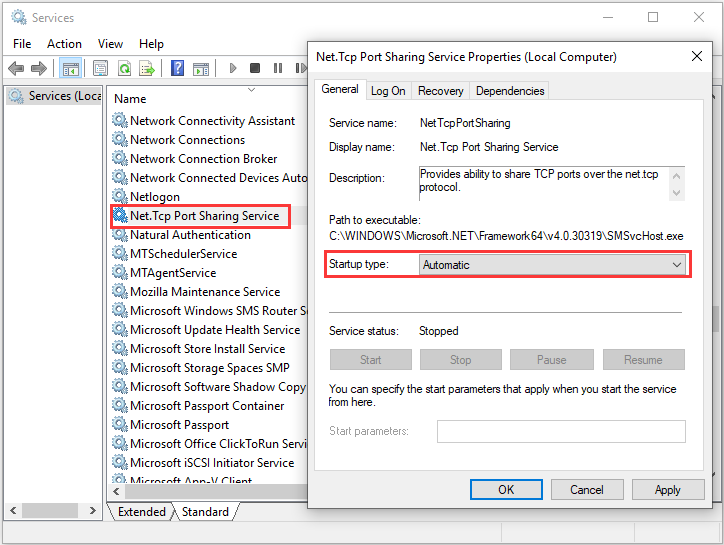
If the Net.Tcp Port Sharing Service filed to start, you can go to restart the service manually. Just follow the steps below to complete the operation:
Step 1: Press Windows + R to invoke the Run window.
Step 2: Input services.msc and click the OK button to open the Services app.
Step 3: Find and double-click the Net.Tcp Port Sharing Service to open its properties. Set its Startup type to Automatic and click Apply and OK to save changes.
Fix 2: Reset Winsock Component
Some affected users also recommend resetting the Winsock component, which will clear the temporary data related to the current Internet connection. Here’s a simple guide on how to reset the Winsock component.
Step 1: Open the Run window, input cmd, and press Ctrl + Shift + Enter to launch Command Prompt as an administrator.
Step 2: Input the following commands one by one and press the Enter key after each.
- ipconfig /flushdns
- nbtstat -R
- nbtstat -RR
- netsh int reset all
- netsh int ip reset
- netsh winsock reset
Step 3: After all the commands have been executed successfully, restart your computer to check if the problem is fixed.
If the issue still exists, please move on to the next solution.
Fix 3: Enable .NET Framework 3.5
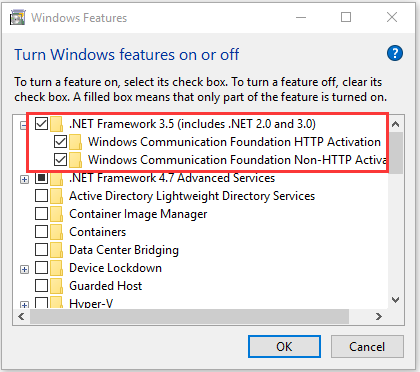
The .NET Framework 3.5 is a necessary dependency of the Net.Tcp Port Sharing service. If Net.Tcp Port Sharing service failed to start, enabling or reenabling .NET Framework 3.5 might help you to fix the issue.
Step 1: Type control panel in the Search bar and click the result to open it.
Step 2: Navigate to Programs > Programs and Features and click Turn Windows features on or off in the left pane.
Step 3: In the pop-up window, tick the box associated with .Net Framework 3.5. You should also make sure its subitems are selected as well. Click the OK button to save changes and then restart your computer.
Now, you can open the Event Viewer to check if the error has been resolved.
Fix 4: Perform A System Restore
In some cases, Net.Tcp Port Sharing Service cannot be started after users just make certain changes for the system, such as application installation and Windows/driver update. If this applies to your case, you can perform a system restore to fix the problem.
Here’s a simple guide for you.
Step 1: Type restore in the Search box and click Create a restore point from the search results.
Step 2: Under the System Protection tab, click the System Restore button and click the Next button to skip the welcome page.
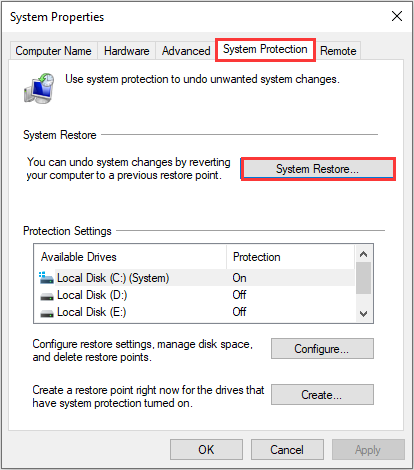
Step 3: Choose a system restore point that was created before the problem has occurred and click the Next button. Hit the Finish button. Then, restart your computer to perform the system restore.
User Comments :