Do you know the usage of a flash drive? This article will tell you how to use a USB flash drive on Windows 10 to store data, recover files, kill virus, install operating system, and update firmware.
What Is a Flash Drive?
A flash drive, namely USB flash drive, is also known as pen drive, thumb drive, and jump drive. It is a small portable storage device which usually connects to a computer through USB (Universal Serial Bus) interface and stores data through flash memory.
Further Reading:
Universal Serial Bus: It is a serial bus standard that aims to guide the manufacturer to produce interfaces connecting computer systems to external devices. In addition, USB standard also defines the data transfer rate.
Flash Memory: It is a semiconductor memory chip that won’t lose information when powered off. It is mainly divided into NAND type and NOR type. The NOR type is suitable to serve as computer system memory and the NAND type is the core memory of all USB flash drives and the memory card of various digital devices.
Furthermore, flash memory has the advantages of small size, low power consumption, and strong physical damage resistance.
The USB flash drive has advantages of compact design, relatively large storage capacity, low price, strong seismic performance, strong moisture and magnetic resistance, and reliable performance. In addition, it realizes plug and can play function and hot plug function.
USB flash drive can help you do a lot of things. This article mainly tells you how to use a flash drive on computer. However, USB flash drive can also work on phone. Please click 4 Cool USB Flash Drive Hacks to know the details.
Common Usage: Transport and Store Data
When you get a USB flash drive, you may know how to connect it to your computer. You should find a USB port and insert the USB flash drive into the port. Then, it will be displayed on Desktop or in File Explorer.
A common usage of a USB flash drive is to transport and store data. You can transfer the data on computer into USB flash drive through copy and paste feature and then transport it safely to another place for use. This usage is widely adopted especially in transporting data of large size.
Besides, due to the strong physical damage resistance advantage that USB flash drive has, it is always used for secure stored data. Some people like to use it to back up important data just in case data stored on computer is lost.
Here is a tutorial on how to use a flash drive on Windows 10 to store data.
Step 1: Copy/Cut the file you want to transfer.
- Open File Explorer and Find the file.
- Right click on it and choose Copy/Cut.
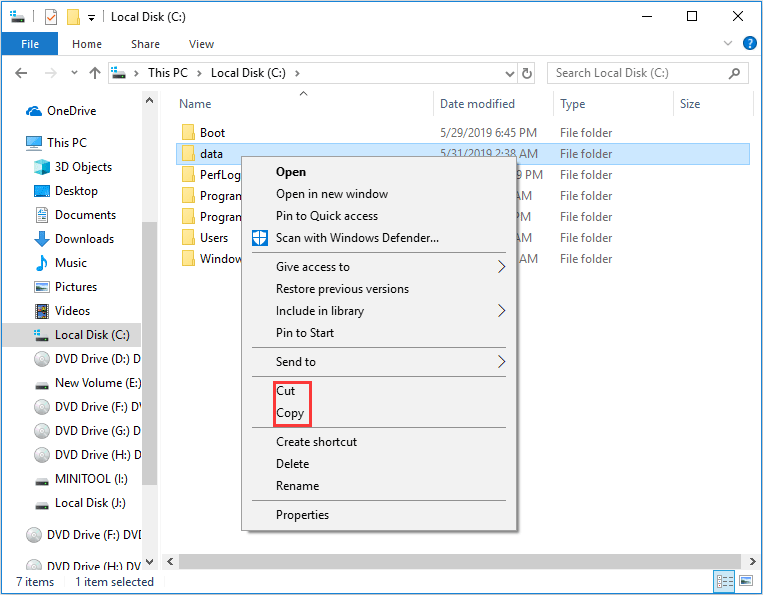
Step 2: Paste the file to USB flash drive.
- Open USB flash drive.
- Right click on blank place and choose Paste.
If the file is saved on Desktop, you can drag it to USB flash drive to complete copy process.
Common Usage: USB Management
Usually, most flash drives are preformatted with FAT32 system, which means that the USB flash drive only supports a single file smaller than 4 GB. So, you may fail when you store large files on USB flash drive.
But fortunately, MiniTool Partition Wizard can help you solve these problems.
MiniTool Partition Wizard FreeClick to Download100%Clean & Safe
Method 1: Format USB Flash Drive If It Is Empty.
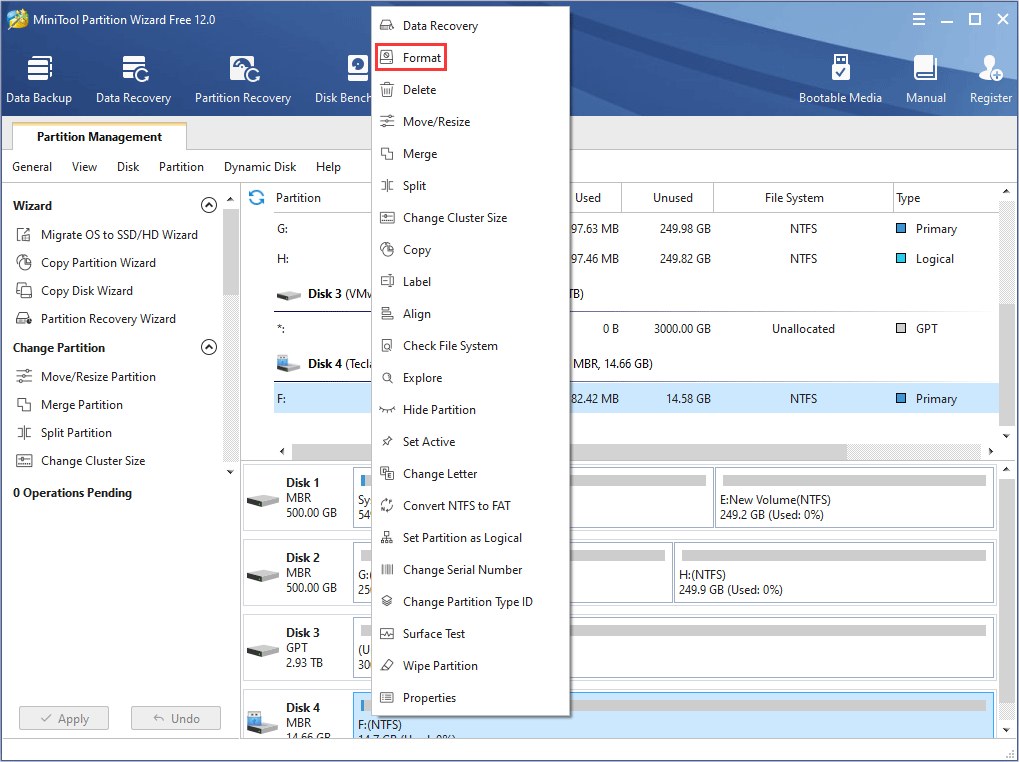
Step 1: Activate Format feature.
- Download MiniTool Partition Wizard and launch it to get its main interface.
- Right click a partition on USB flash drive and choose Format.
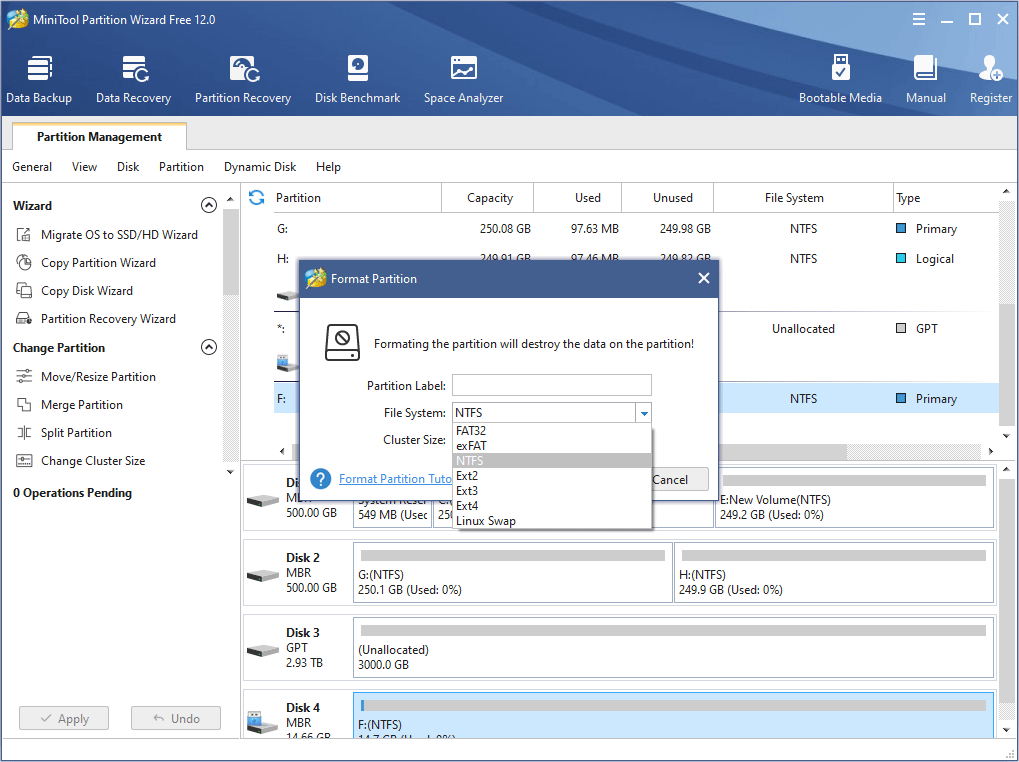
Step 2: Choose a file system and click OK on the pop-up window.
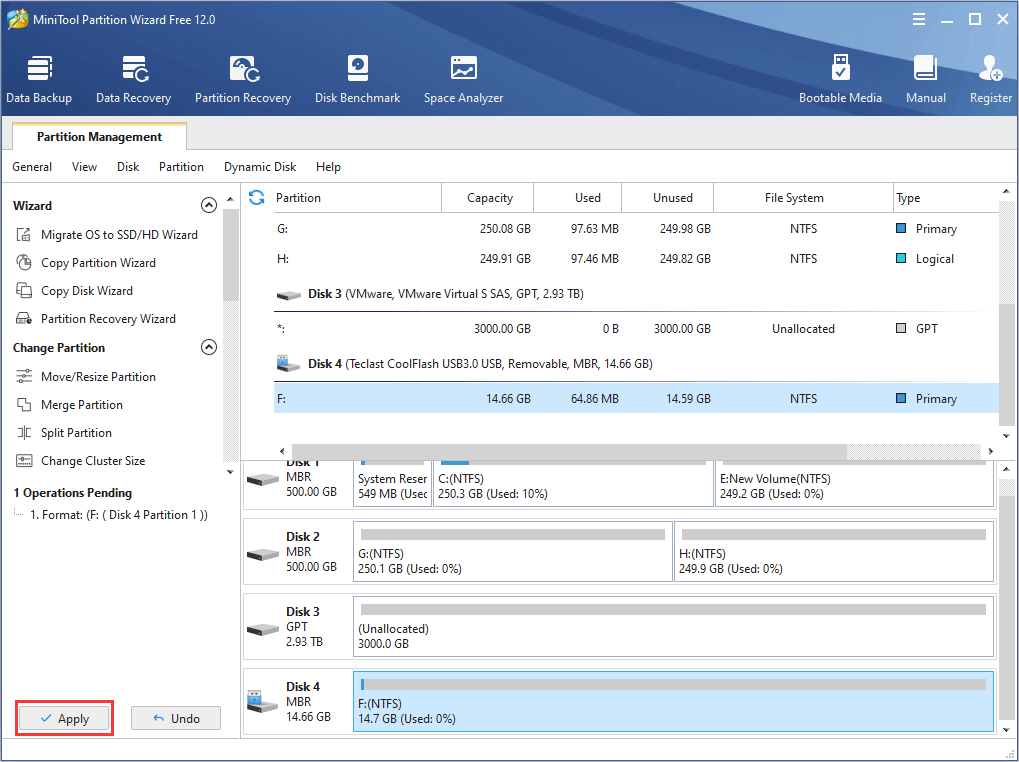
Step 3: Click Apply button.
Surely, you can also format partition in Disk Management or File Explorer.
Method 2: Convert FAT to NTFS.
Here is the tutorial.
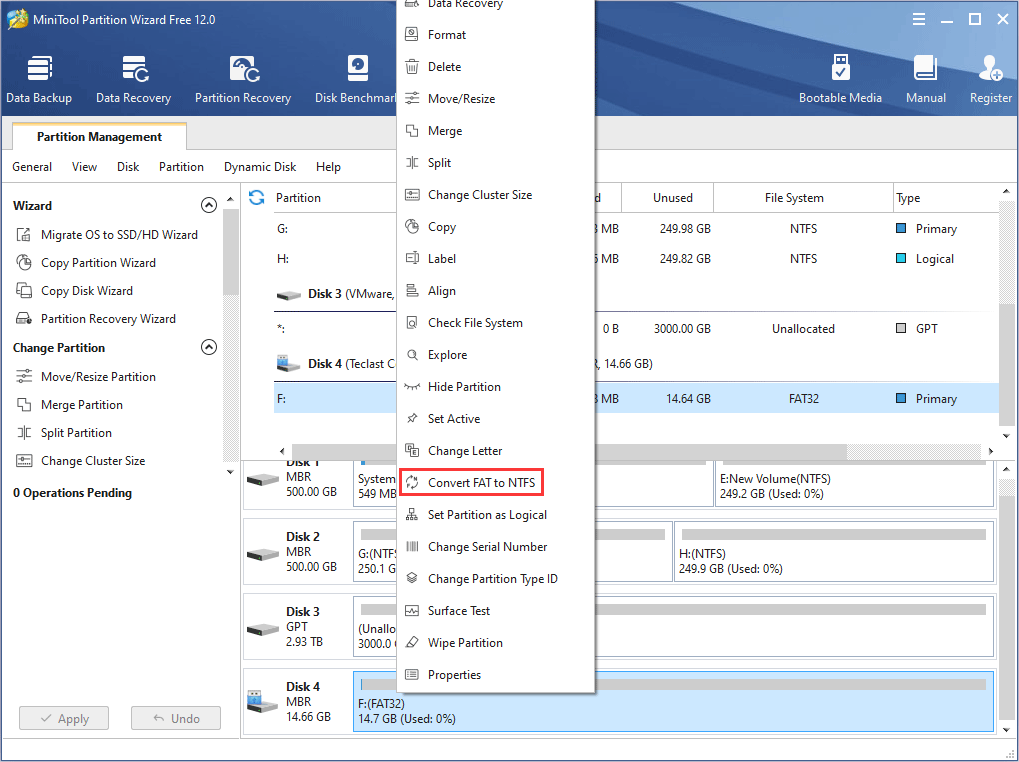
Step 1: Activate Convert FAT to NTFS feature.
- Download MiniTool Partition Wizard.
- Right click a partition on USB flash drive and choose Convert FAT to NTFS.
Step 2: Click Start button on the pop-up window to perform converting process.
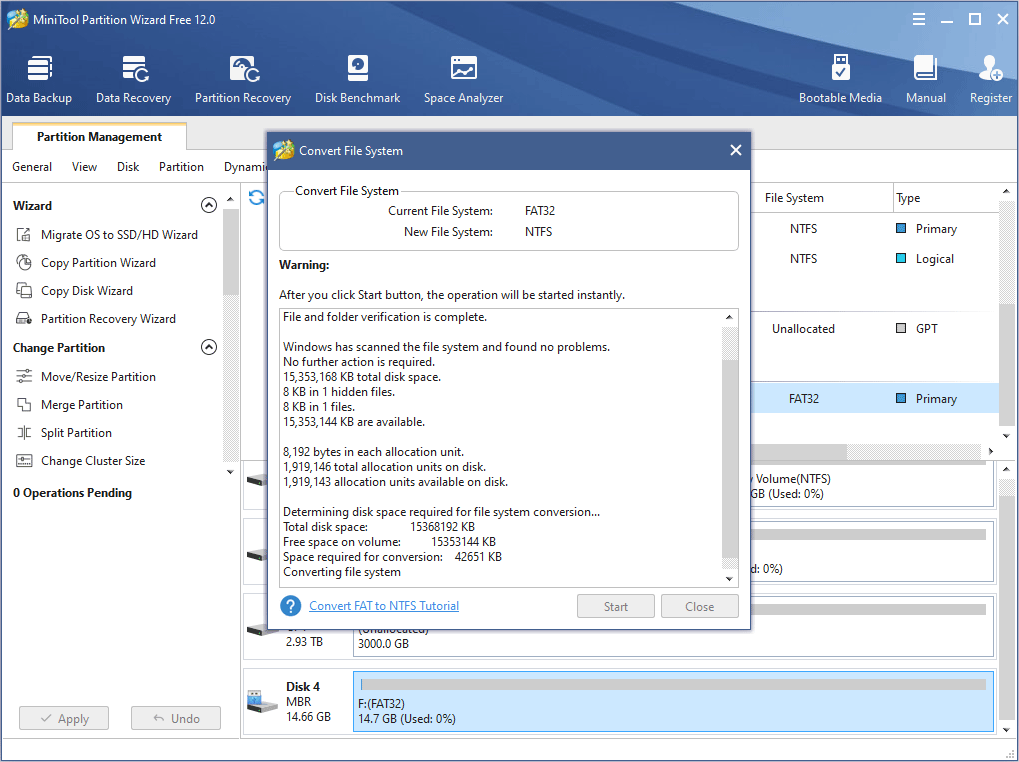
Step 3: Click Close after the converting process is finished.
Similarly, there are other features to manage USB flash drive. For example: delete partition, split partition, merge partition, etc.
Advanced Usage: Create a USB Data Recovery Tool
The above usages to USB flash drive are very basic. The USB flash drive can also help you recover data, kill virus, install OS, update firmware, and many more. In this section, this tutorial will show you how to use a flash drive to create a USB data recovery tool and then use it to recover data step by step when your computer can’t boot up. But first, you need the help from a third-party data recovery software like MiniTool Partition Wizard.
Here is a tutorial on how to use a thumb drive to create a USB data recovery tool.
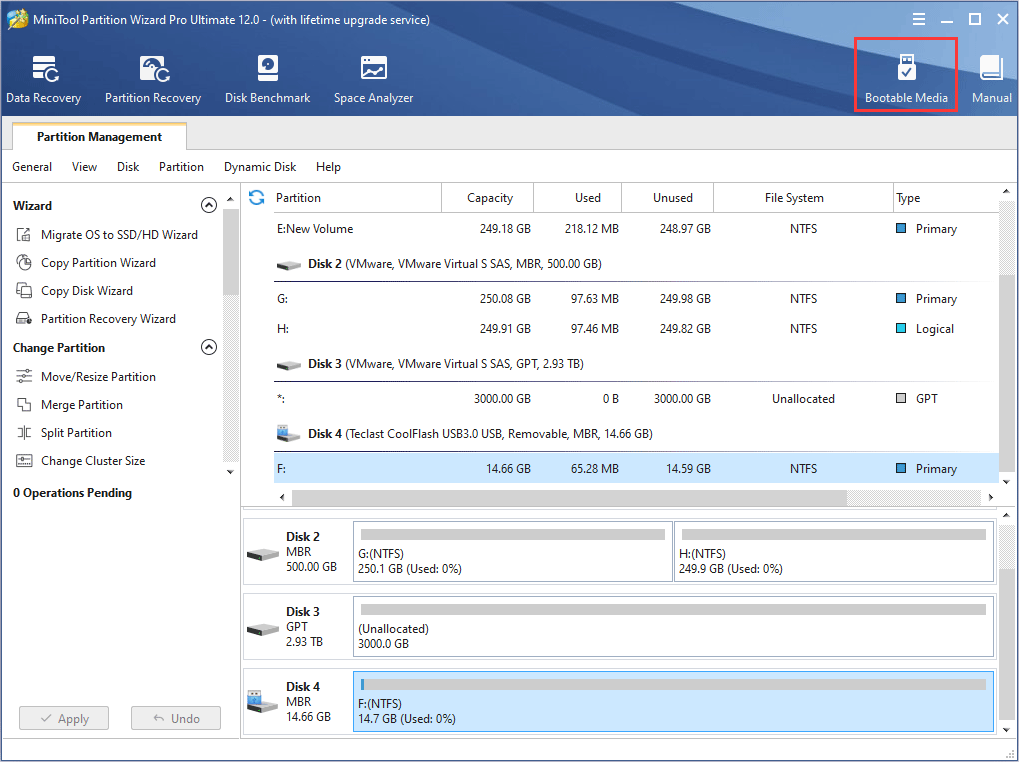
Step 1: Activate Bootable Media feature to make a bootable data recovery flash drive.
- Plug the USB flash drive on a normal running computer.
- Buy MiniTool Partition Wizard and launch it on the normal running computer.
- Click Bootable Media on the toolbar.
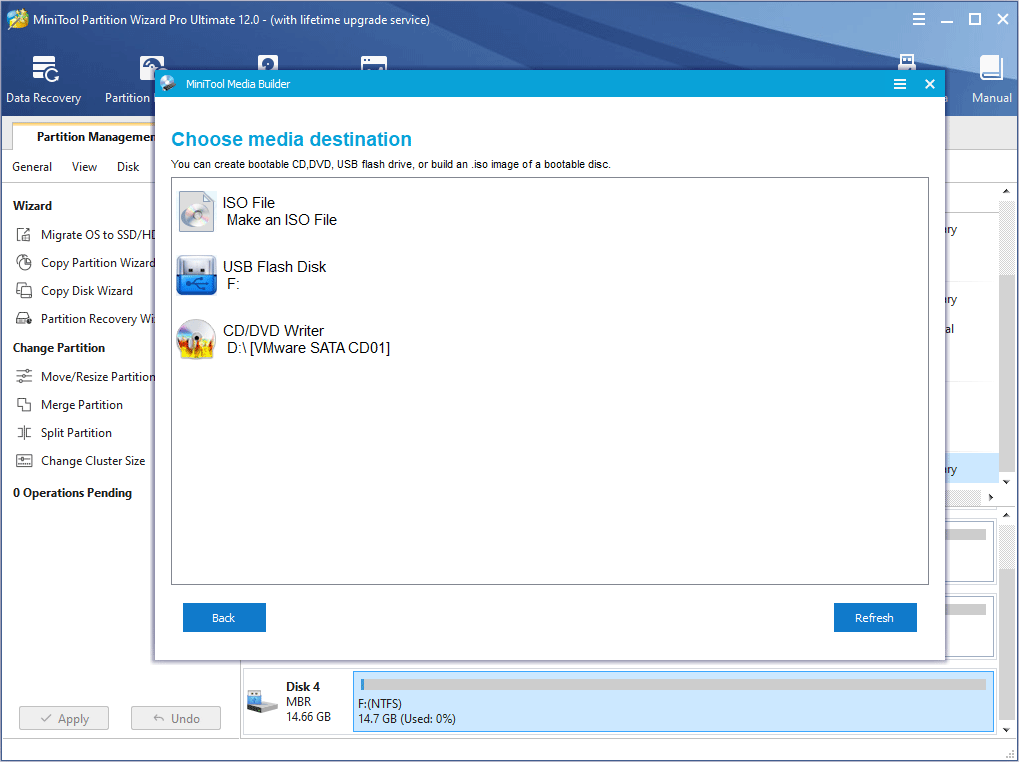
Step 2: Follow the wizrd to complete a bootable disk.
- Click WinPE-based media with MiniTool plug-in.
- Choose USB Flash Disk to burn the mtboot.iso file into the USB flash drive directly.
Finally, the USB data recovery tool is completed and you can use it to recover data.
Here is a tutorial on how to use a USB flash drive to recover data when the computer can’t boot.
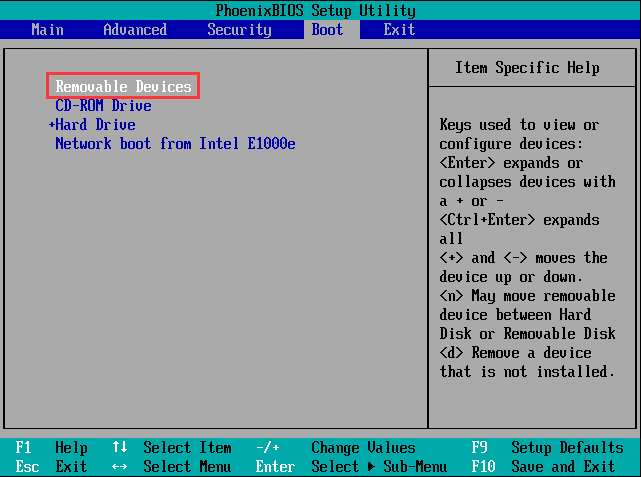
Step 1: Set Firmware to make the problematic computer boot from the bootable disk.
- Plug the USB flash drive into the problematic computer.
- Follow the wizard to enter BIOS.
- Set Removable Devices at the first place of boot sequence. And then boot computer.
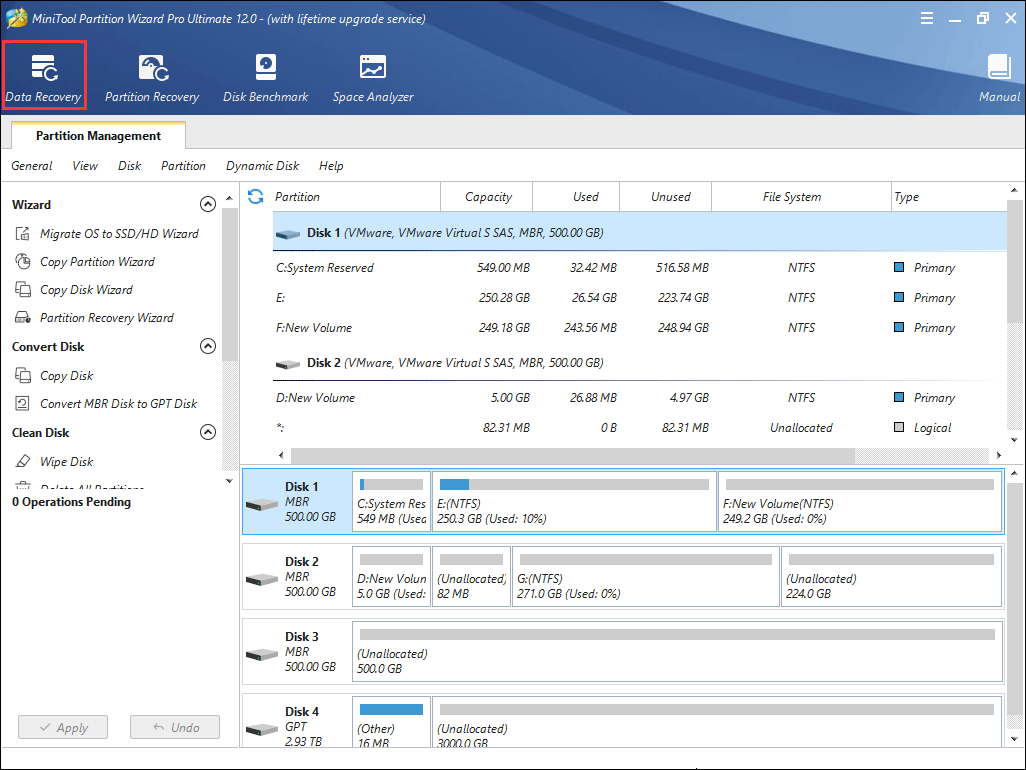
Step 2: Activate Data Recovery feature.
- Wait a few seconds until MiniTool Partition Wizard opens automatically.
- Click Partition & Disk Management to get its main interface.
- Click Data Recovery.
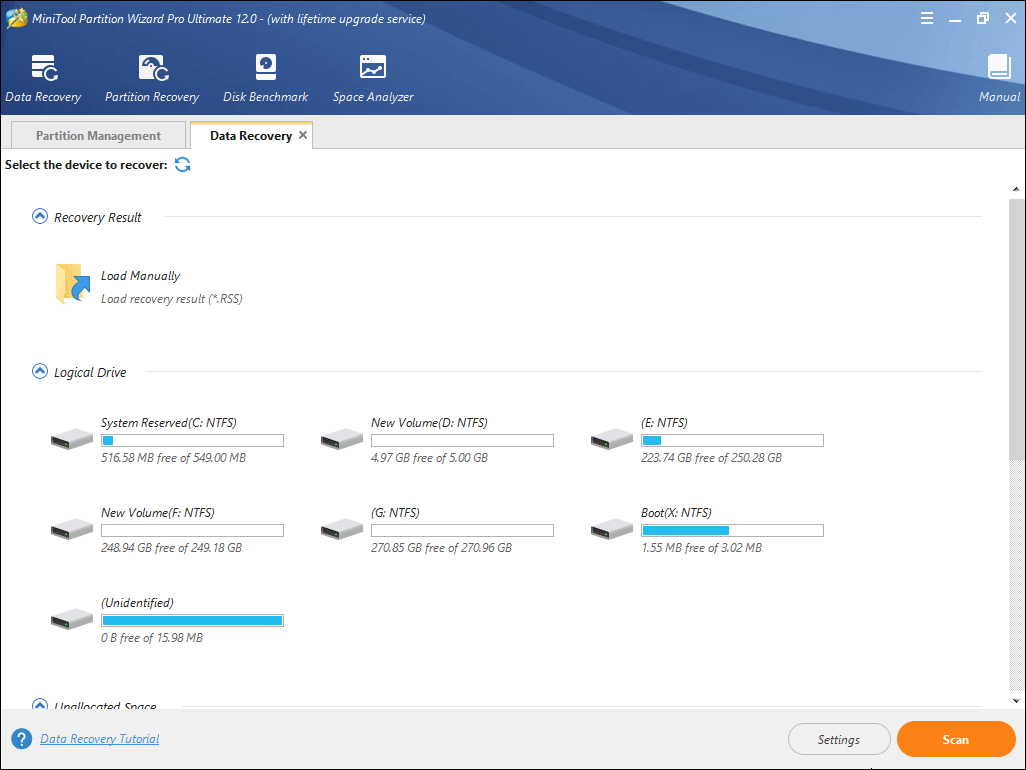
Step 3: Choose a partition or a disk and then click Scan.
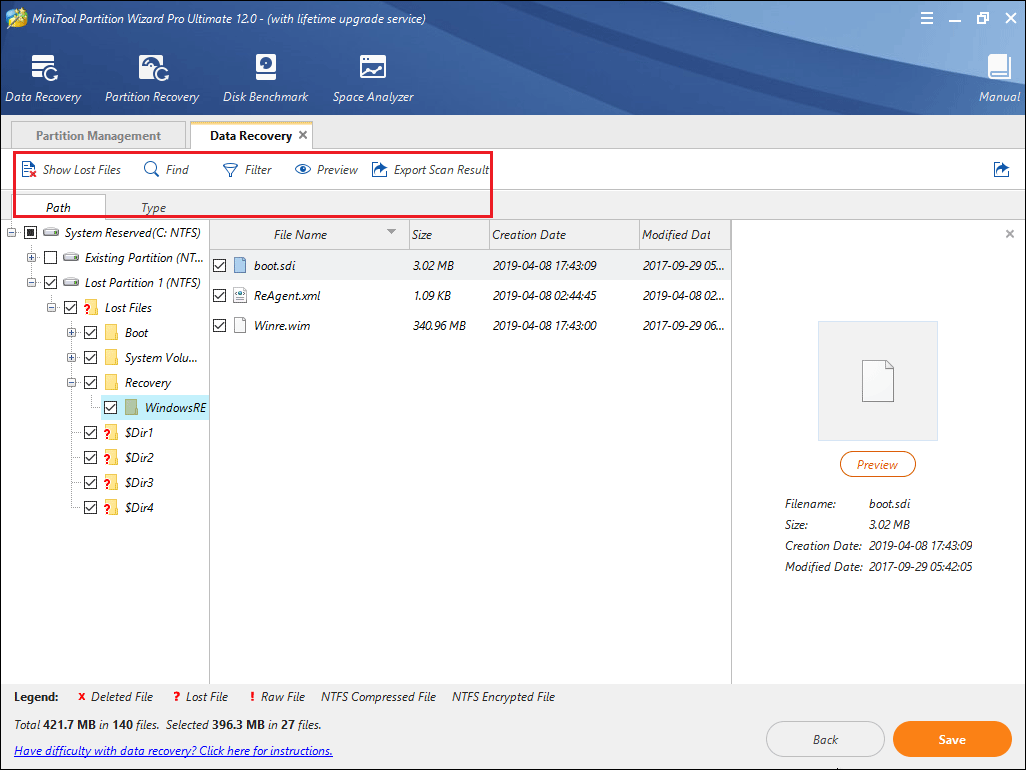
Step 4: Find the files you want to recover with built-in tools.
- Path: You can find files according to their paths.
- Type: You can find files according to their file types.
- Show Lost Files: You can find lost files in this place.
- Find: You can find files by typing continuous part of their file names.
- Filter: You can find files through narrowing down the files range according to filename/extension, file size, creation/modification date, etc.
- Preview: This feature allows you to preview the files that don’t exceed 100 MB before the data is saved. Besides, it supports 70 file types.
- Export Scan Result: This feature allows you to export the scan result file. Then you can continue data recovery later without a second time scan by loading this file through Recovery Result – Load Manually feature.
Step 5: Select files and then Save them into a safe position.
Advanced Usage: Create an Operating System Installation Media
You might know that you can install Windows 10 with the help of a USB flash drive. But you might not know the detailed steps. You can then read the following paragraphs to know how to use a flash drive to create an operating system installation media and then install Windows.
Here is a tutorial on how to use a flash drive to create an operating system installation media.
Step 1: Create Windows 10 installation media on a normal running computer.
- Click here to download media creation tool program.
- Run the media creation tool and click Accept.
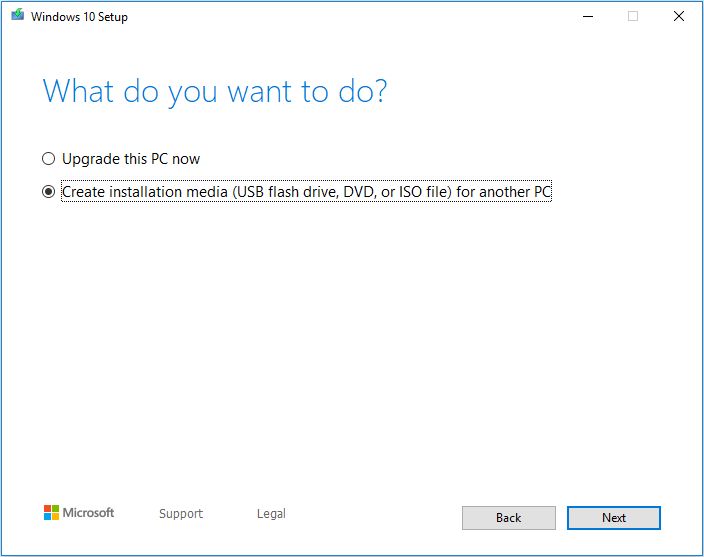
- Choose Create installation media for another PC.
- Click Next.
Step 2: Set specific parameters and choose media type.
- Select language, Windows edition and architecture. You can adopt the recommended option or make your own choice. Then, click Next.
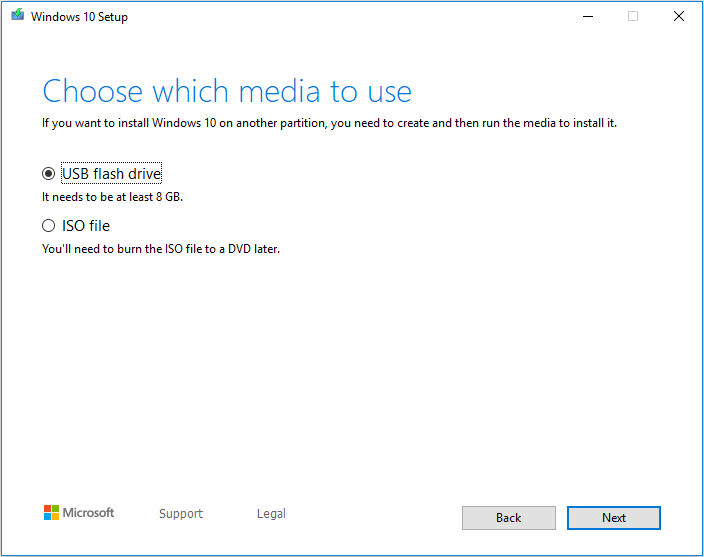
- Choose USB flash drive and click Next.
Step 3: Choose a USB flash drive and click Next again.
Then, please wait until the installation media is completed. Finally, you can plug the installation flash drive to another computer and perform installation process.
Here is a tutorial on how to use a flash drive to install Windows.
Step 1: Plug the installation flash drive into the computer and the computer will boot from it. If not, please set Firmware to make the computer boot from it.
Step 2: Install Windows.
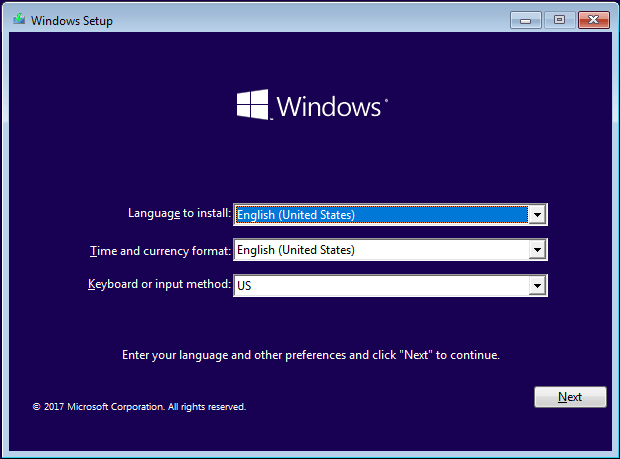
- Confirm language to install, time and currency format, as well as keyboard or input method.
- Click Next.
Step 3: Choose installation options.
- Click Install now.
- Read and do as required in Activate Windows Then click Next.
- Check I accept the license terms and click Next.
- Choose upgrade option or custom installation option after reading the differences.

Then, follow the wizard to complete the remaining installation process. You can click Install Windows 10 on a New Hard Drive to know more details.
Advanced Usage: Bootable Antivirus Disk
When your computer can’t boot after virus attack, you can also use a bootable antivirus flash drive to attempt killing the virus on your computer. Most antivirus software can make a bootable flash drive, and you can get the detailed steps on their websites. Then, you can boot the computer from the bootable antivirus flash drive to run antivirus scan.
Advanced Usage: Update Firmware
When existing bugs and some hardware incompatibility issues happen, you can update firmware to solve them. This is also a method to improve computer stability.
Step 1: Check current BIOS version.
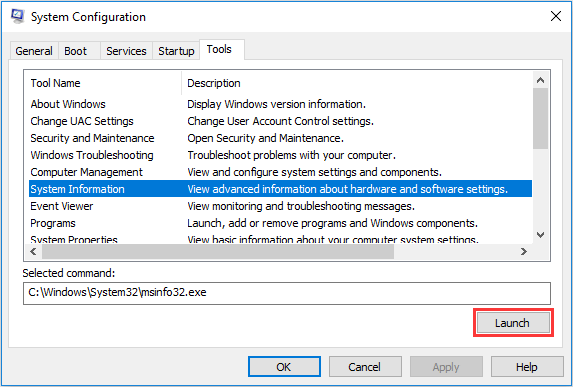
- Press “Windows + R” keys.
- Enter “msconfig” in Run box and click OK button to open System Configuration.
- Skip to Tools
- Highlight System Information and click Launch.
- Then, remember BIOS Version/Date
Step 2: Download correct new BIOS version into USB flash drive.
Step 3: Plug in the USB flash drive and enter BIOS to update firmware.
Read this article and you will know the various usages of a flash drive.Click to Tweet
Bottom Line
Is this article helpful? We need your feedback. If you ever have problems when recovering data with USB flash with or when installing Windows with flash drive, please leave a comment below to describe your problem. We will reply after reading your comment. And of course, you can also email [email protected] for help.
How to Use a Flash Drive FAQ
A flash drive is a small portable storage device which usually connects to a computer through USB (Universal Serial Bus) interface and stores data through flash memory.
It has advantages of compact design, relatively large storage capacity, low price, strong seismic performance, strong moisture and magnetic resistance, and reliable performance. In addition, it realizes plug and can play function and hot plug function.
About The Author

Position: Columnist
Linda has been an editor at MiniTool for seven years. She continuously learns about computers and puts her knowledge into practice. Moreover, she is particularly knowledgeable in disk management, data recovery, system installation, and PDF editing. Her articles typically reference multiple examples or are based on her own experience, providing users with the most suitable solutions.
User Comments :