When you are trying to install Windows or format drive partitions with Windows installation media, the error 0x8004242d may come up on your screen with a message saying “failed to format the selected partition”. The error can be caused by many reasons, and here are some of them:
- The SATA cable connected with your computer is loose.
- Certain file system error exists in the disk.
- The mass storage controller or mass storage driver is outdated.
- Your computer is incompatible with a mass storage controller or mass storage driver.
- The selected disk is a dynamic disk.
When you are stuck in the error 0x8004242d, the first thing you should do is to check if the SATA cable of your computer is connected properly. If not, you need to connect it carefully. If the error still exists after you do that, then you are supposed to try the following methods.
Please note that the error: 0x8004242d arises during the process of installation. As a result, you cannot boot your computer normally. Therefore, to successfully repair the error, you need to enter Windows RE first.
Method 1: Delete All Partitions
Usually, the error: 0x8004242d occurs due to certain corruption inside the Master Boot Record of the selected disk that prevents the Windows installation media from locating the needed partition correctly. In this case, deleting all partitions in the disk can solve the error easily. Here are two ways and you can choose one.
Via Diskpart
Diskpart.exe is a great built-in Windows tool that enables you to manage your disks. Here is how to delete all partitions with this tool.
Step 1: After entering the Windows PE, select Troubleshoot > Advanced options > Command Prompt.
Step 2: In the Command Prompt panel, type diskpart and then press Enter to run the Diskpart tool.
Step 3: Type the following commands one by one. Don’t forget to press Enter after each command.
- list disk
- select disk *(* is the number of the disk you choose to install Windows)
- list partition
- select partition N (N is the number of the partition you choose to delete)
- delete partition
Step 4: Repeat the last two commands until you successfully delete all the partitions on the disk.
Diskpart.exe only allows you to delete one partition at a time. As a result, it will take you some time to empty the whole disk. Therefore, to save time, you can use MiniTool Partition Wizard instead.
Via MiniTool Partition Wizard
MiniTool Partition Wizard is a comprehensive partition manager that can help you manage disks better. You can create and format partitions, copy disks, and do many other things with it. You can also delete all partitions at one time by using MiniTool Partition Wizard.
This program allows you to delete partitions with Windows PE-based media, so it can work even when your PC cannot boot. Just follow the steps below one by one.
MiniTool Partition Wizard DemoClick to Download100%Clean & Safe
Step 1: Download and launch MiniTool Partition Wizard on another working PC. Then launch it.
Step 2: Create a bootable USB disk with MiniTool Partition Wizard.
Step 3: Insert the bootable USB into the problematic computer and then boot the computer from it. MiniTool Partition Wizard will open automatically after you enter the MiniTool PE Loader screen.
Step 4: In the main interface of MiniTool Partition Wizard, right-click the disk you need to handle and choose the Delete All Partitions feature or you can choose the feature on the left action panel.
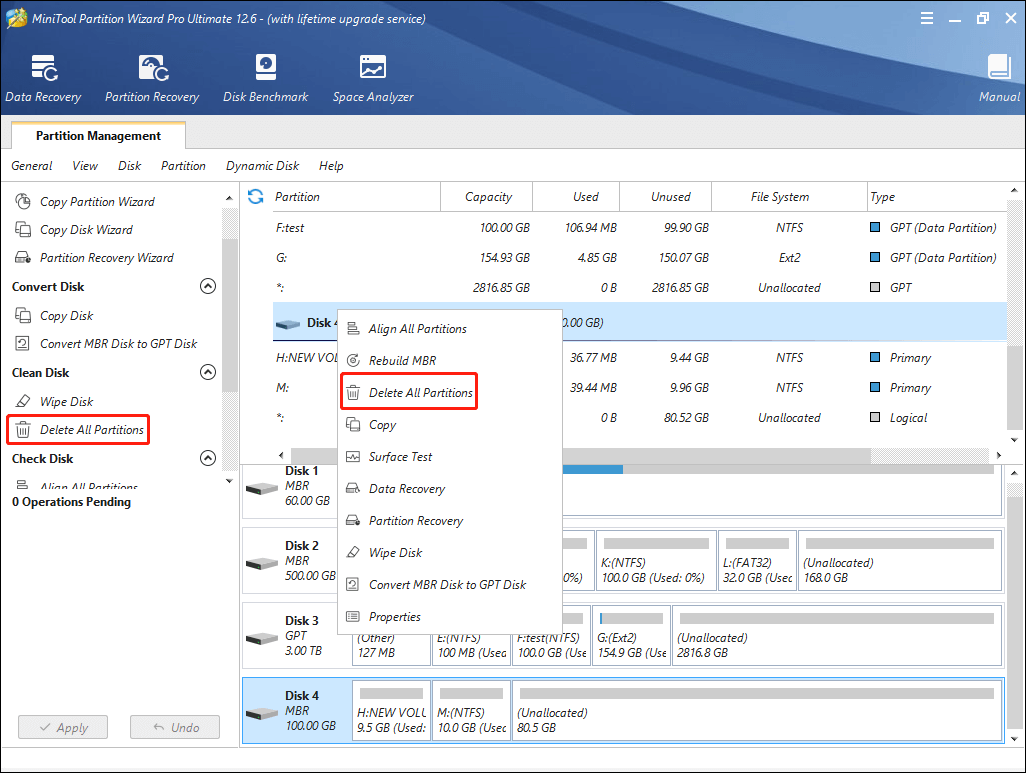
Step 5: Remember to click Apply to carry out the operation.
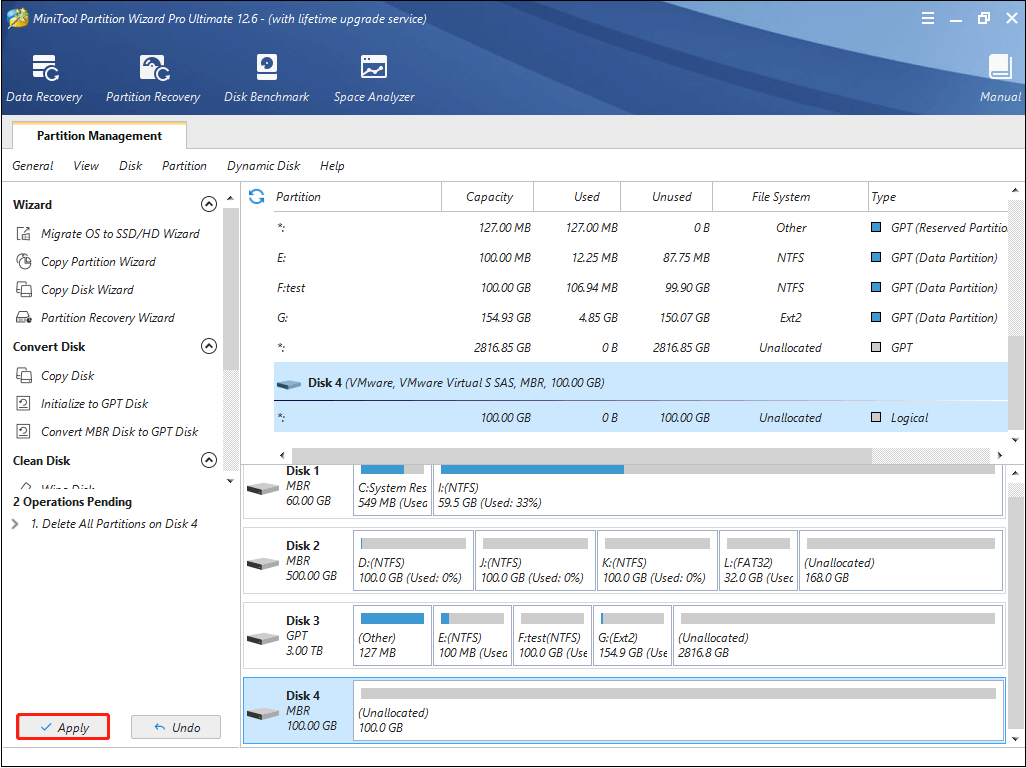
Once you delete all partitions, you can create new partitions and try to install Windows without the error: 0x8004242d.
Method 2: Convert Dynamic Disk to Basic
Since the Windows operating systems cannot be installed on a dynamic disk, it might be the reason for the error: 0x8004242d — the disk you select is a dynamic disk. As for this, you should convert the dynamic disk to a basic one.
Recommended article: What Are Basic & Dynamic Disks: Features, Differences, Conversion
Via Diskpart
You can convert the dynamic disk to a basic one with the Diskpart tool. To do so, you need to delete all the volumes first. Therefore, you are supposed to back up the important data on the disk.
Step 1: After entering the Windows PE, select Troubleshoot > Advanced options > Command Prompt.
Step 2: In the Command Prompt panel, type diskpart and press Enter to run the Diskpart utility.
Step 3: Type the following commands and press Enter after each command. And repeat the last two commands until you delete all the volumes on the dynamic disk.
- list disk
- select disk # (# is the number of the actual dynamic disk)
- detail disk
- select volume X (X is the number of the volume you want to delete)
- delete volume
Step 4: Type select disk # again and press Enter.
Step 5: Then type convert basic and press Enter to execute the operation.
Step 6: Exit the Command Prompt.
Via MiniTool Partition Wizard
MiniTool Partition Wizard allows you to convert dynamic disk to basic without data loss. It is supported in the Pro or higher editions. So, make sure you have upgraded to the suitable edition before the operation.
MiniTool Partition Wizard DemoClick to Download100%Clean & Safe
Step 1: Run MiniTool Partition Wizard and create a bootable USB disk on another computer.
Step 2: Boot the problematic computer with the bootable USB disk you have created.
Step 3: Select the dynamic disk you want to convert, and then choose Convert Dynamic Disk to Basic from the Dynamic Disk tab on the top. Alternatively, you can right-click the disk to choose Convert Dynamic Disk to Basic.
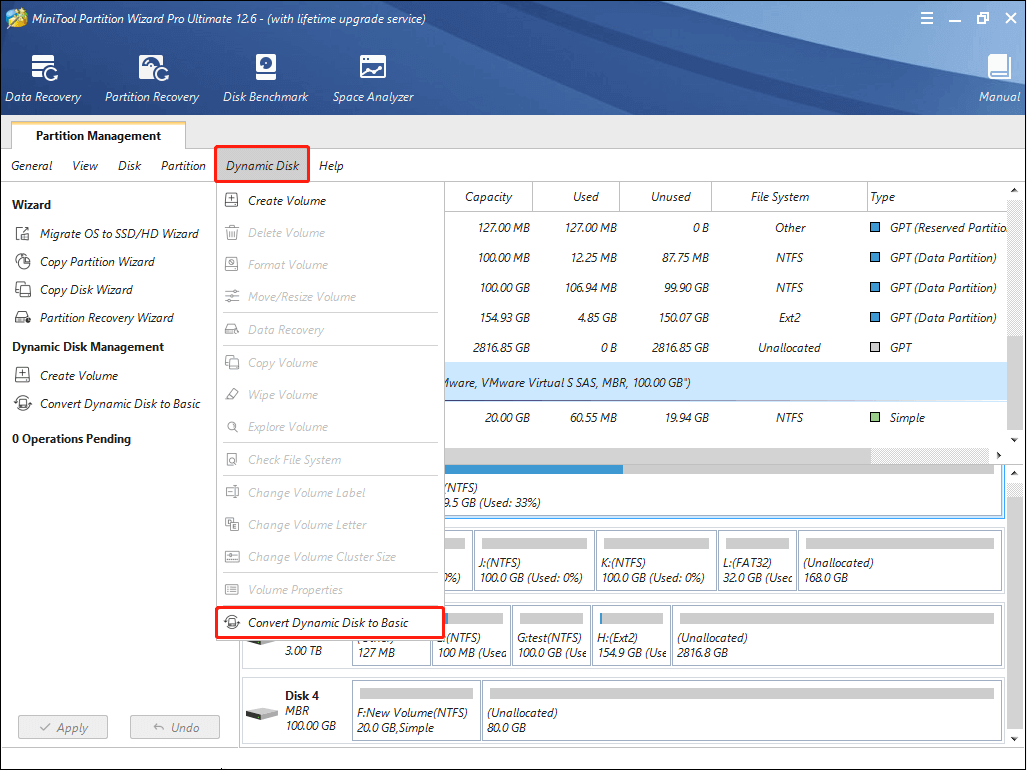
Step 4: Finally, don’t forget to click Apply to carry out the operation.
After the conversion, the original simple volumes on the disk will become primary partitions automatically. Then, you can try the installation again to check if the error disappears.
Method 3: Clean the Hard Disk
Cleaning the problematic hard disk may help you solve the error: 0x8004242d as well.
With Diskpart
You can clean the disk by running the Diskpart tool in Command Prompt.
Step 1: After entering the Windows PE, select Troubleshoot > Advanced options > Command Prompt.
Step 2: In the Command Prompt panel, type diskpart and press Enter to run the Diskpart utility.
Step 3: Type the following commands and press Enter after each of them.
- list disk
- select disk * (* represents the number of the target disk)
- clean all
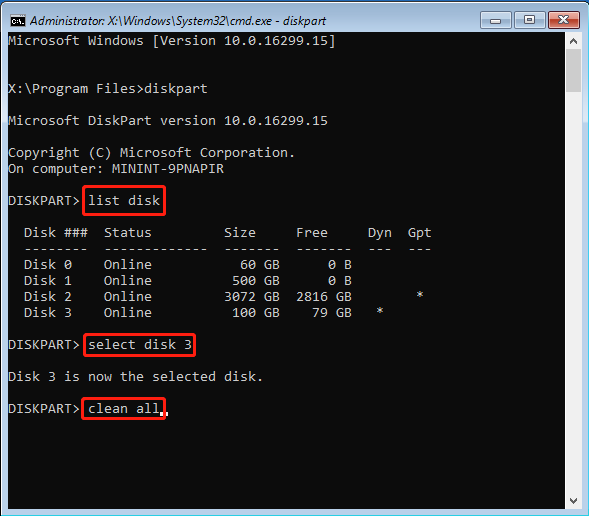
Step 4: It will take you some time. Wait until the clean finishes and then close the Command Prompt panel.
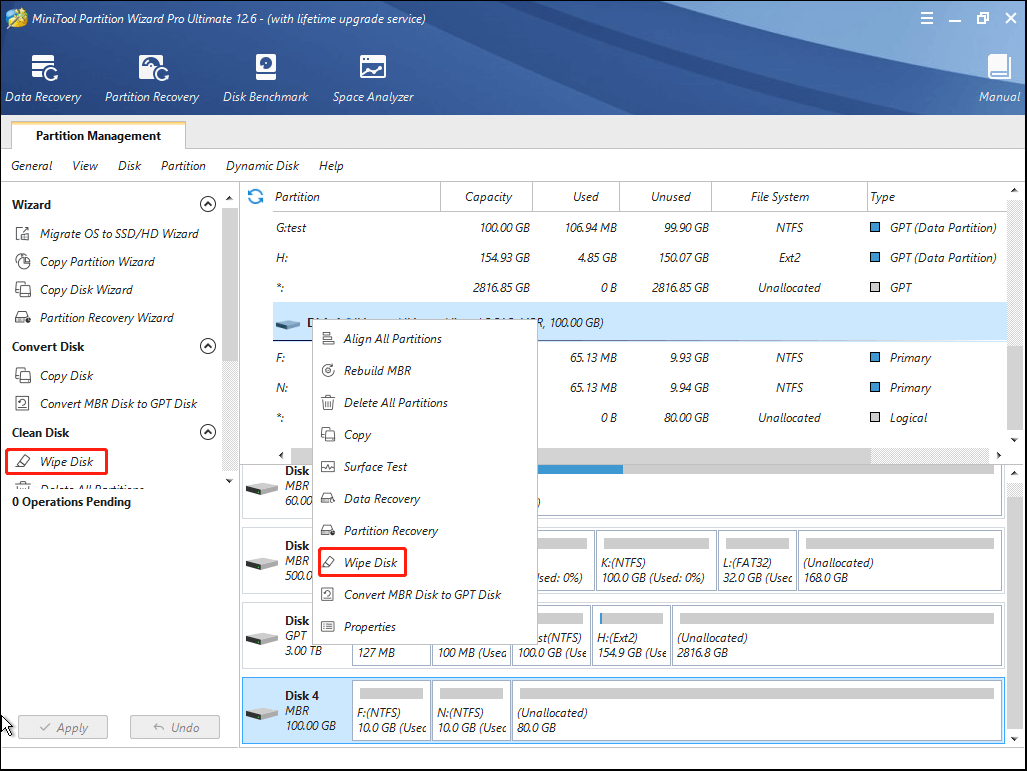
Wipe Disk with MiniTool Partition Wizard
The Wipe Disk feature provided by MiniTool Partition Wizard can clean your disk, too. It can be used as an alternative to Clean all with Diskpart.
MiniTool Partition Wizard DemoClick to Download100%Clean & Safe
Step 1: Run MiniTool Partition Wizard and create a bootable USB disk on another computer.
Step 2: Boot the problematic computer with the bootable USB disk you have created.
Step 3: Select the target disk you want to clean and then right-click it to choose Wipe Disk. Or you can choose Wipe Disk in the left action panel.
Step 4: There will be a pop-up window that contains five wiping methods. You are supposed to choose one from the list according to your needs and then click OK.
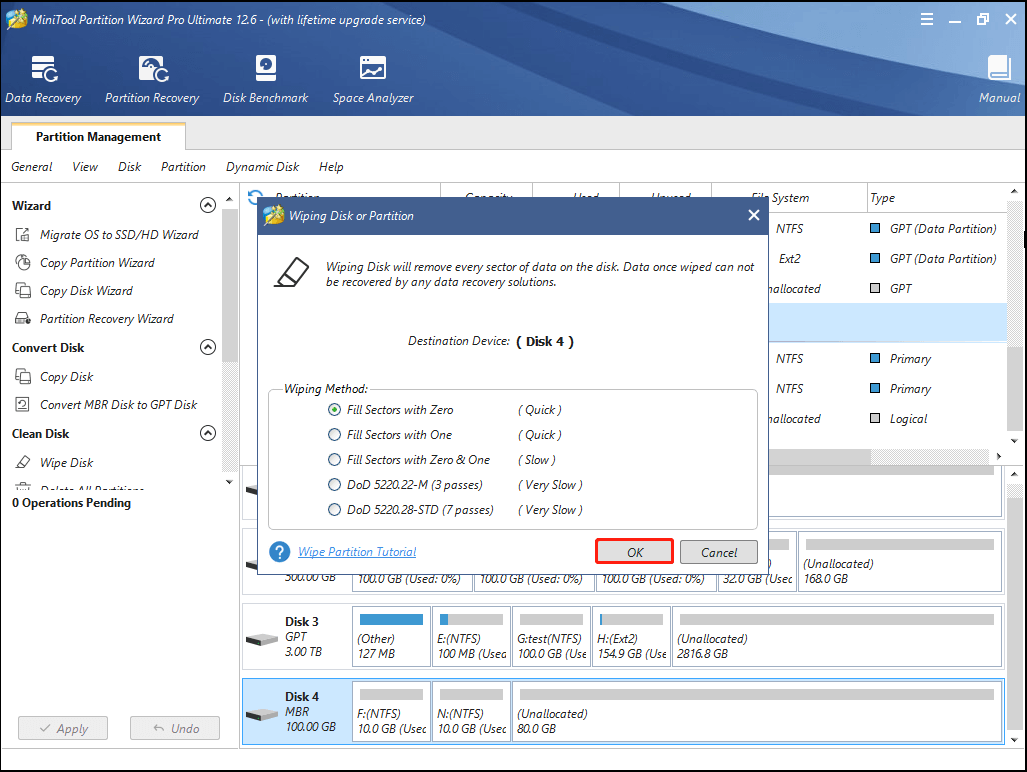
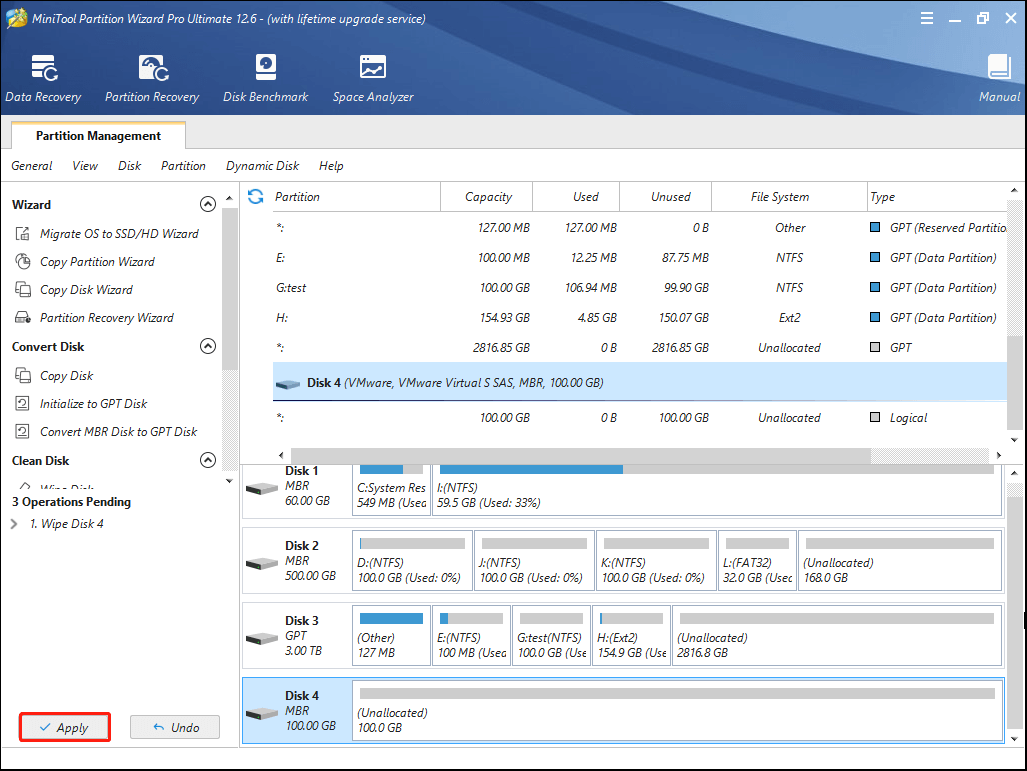
Step 5: Finally, be sure to click Apply to execute the operation.
Restart your computer and try to install Windows again. You might not see the error that reminds failed to format the selected partition anymore.
Method 4: Check for Bad Sectors
The bad sectors on the selected disk are also a possible reason that can lead to the error: 0x8004242d. If you still receive the problem, you are supposed to check if there are any bad sectors on the disk.
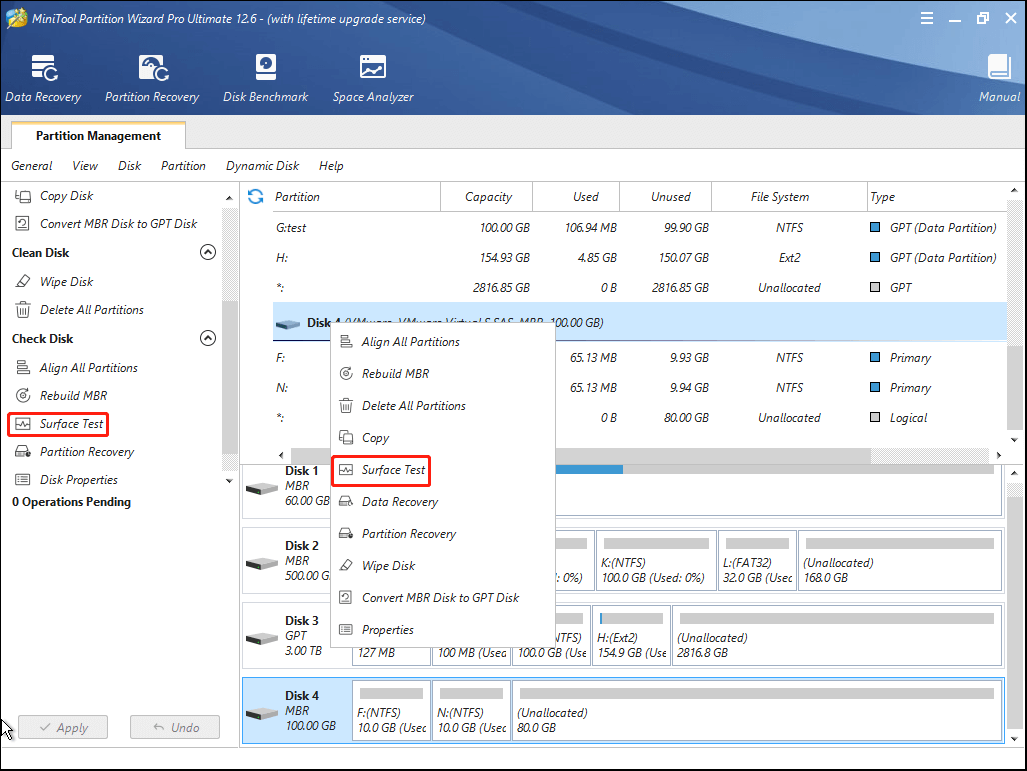
Run Surface Test with MiniTool Partition Wizard
To check bad sectors on your disk, you can choose to do a surface test with MiniTool Partition Wizard. It is very helpful to scan your disk and show you whether there are any bad sectors clearly.
Step 1: Run MiniTool Partition Wizard from the bootable USB disk.
Step 2: Right-click the target disk and then select Surface Test. You can also select the feature from the left action panel.
Step 3: Click Start Now in the pop-up window to begin the test.
Step 4: After the surface test is completed, you will see the bad sectors with red clearly on your disk if any exist.
Run CHKDSK
CHKDSK is a built-in Windows utility that can help you check and fix your disk errors.
Step 1: Enter the Command Prompt panel in Windows RE.
Step 2: Type chkdsk F: /r (F is the drive letter of the target disk) and press Enter.
During the process, CHKDSK can replace bad sectors with spare disk sectors and marks the bad sectors as unreadable. However, if there are too many bad sectors on the disk, you’d better replace the disk with another one to remove the error: 0x8004242d.
Method 5: Disable UEFI Boot Support
If your system supports both traditional BIOS and UEFI boot mode, then you may receive the failed to format the selected partition error because of the conflict between the two boot modes.
To fix the issue, you should disable the UEFI Boot Support by entering the BIOS Configuration Settings menu.
Step 1: Restart your computer and boot into BIOS.
Step 2: When you are in the BIOS settings, go to the Boot tab and select the UEFI/BIOS Boot Mode option.
Step 3: Choose the Legacy rather than UEFI.
Step 4: Press F10 on your keyboard to save the configuration change and exit.
After booting your computer successfully, you can try installing Windows one more time to check if the error persists.
Bottom Line
The error: 0x8004242d is an annoying issue when you are installing new Windows. These methods mentioned in this post are available for you to solve the error. In order to find the reason and fix the error efficiently, you are supposed to try the methods one by one.
If you have anything that you don’t understand about the error: 0x8004242d, please leave them in the below comments part. Besides, if you have problems while using MiniTool Partition Wizard, you can contact us via [email protected].
User Comments :